yahboom
HomeLearn
Solution
Blog
Online Store
About Us
EN/中文
ROS Robot Expansion Board📖
1.Expansion board STM32 driver
  • 0. Precautions
  • 1.1 Expansion Board Introduction_V3.0
  • 1.1 Expansion Board Introduction_V1.0
  • 1.2 STM32 Development environment
  • 1.3 Button to control the buzzer to whistle
  • 1.4 FreeRTOS application
  • 1.5 Serial communication
  • 1.6 SBUS model aircraft remote control
  • 1.7 CAN bus communication
  • 1.8 RGB colorful light bar
  • 1.9 Timer interrupt to control PWM servo
  • 1.10 Control serial port servos
  • 1.11 Nine-axis attitude sensor to obtain data
  • 1.12 Control the forward and reverse rotation of the motor
  • 1.13 The timer captures the encoder data
  • 1.14.1 Robot kinematics analysis theory
  • 1.14.2 Mecanum wheel kinematics analysis
  • 1.15 PID control robot movement
  • 1.16 OLED character display
2.Python basic control
  • 2.0 Bind PCB port devices
  • 2.1 Update the firmware of the expansion board
  • 2.2 Turn off the self-starting large program at startup
  • 2.3 Install the Rosmaster driver library
  • 2.4 Buzzer whistle
  • 2.5 Control PWM servo
  • 2.6 RGB colorful light bar special effects display
  • 2.7 Control the forward and reverse rotation of the motor
  • 2.8 Control the movement of the robot
  • 2.9 Control Serial Servo
3.ROS1 Basic Course
  • 1.ROS introduction
  • 2.ROS installation
  • 3.ROS common command tools
  • 4.ROS workspace
  • 5.ROS function package
  • 6.ROS node
  • 7.ROS topic publisher
  • 8.ROS topic subscribers
  • 9.ROS service client
  • 10.ROS service server
  • 11.ROS action client
  • 12.ROS action server
  • 13.ROS custom message reception
  • 14.ROS-launch file
  • 15.ROS-TF transformation
  • 16.ROS parameter service
  • 17.ROS-rviz use
  • 18.ROS-rqt tool usage
  • 19.Topic message recording and playback
  • 20.urdf model introduction
  • 21.gazebo introduction
  • 22.ROS distributed communication
4.ROS1 robot control
  • 0. Bind PCB port devices
  • 1. Package Use the tutorial
  • 2. Package Description
  • 3. Robot keyboard control
  • 4. Robot state estimation
  • 5. Robot imu calibration
  • 6. Robot URDF Model
5.ROS2 Basic Course
  • 1.Introduction to ROS2
  • 2.ROS2 install Humble
  • 3.ROS2 development environment
  • 4.ROS2 workspace
  • 5.ROS2 function package
  • 6.ROS2 node
  • 7.ROS2 topic communication
  • 8.ROS2 service communication
  • 9.ROS2 action communication
  • 10.ROS2 custom interface message
  • 11.ROS2 parameter service case
  • 12.ROS2 meta-function package
  • 13.ROS2 distributed communication
  • 14.ROS2 DDS
  • 15.ROS2 time related API
  • 16.ROS2 common command tools
  • 17.ROS2 rviz2 use
  • 18.ROS2 rqt toolbox
  • 19.ROS2 Launch startup file configuration
  • 20.ROS2 recording and playback tool
  • 21.ROS2 URDF model
  • 22.ROS2 Gazebo simulation platform
  • 23.ROS2 TF2 coordinate transformation
6.ROS2 robot control
  • 0. Bind PCB port devices
  • 1. Package Use the tutorial
  • 2. Robot information release
  • 3. Robot keyboard control
  • 4. Robot state estimation
  • 5. Robot calibration
  • 6. URDF model
7.RDK X3 course
  • 1. Update the firmware of the expansion board
  • 2. Turn off the self-starting large program at startup
  • 3. Install the Rosmaster driver library
  • 4. Buzzer whistle
  • 5. Control PWM servo
  • 6. RGB colorful light bar special effects
  • 7. Control motor forward reverse
  • 8. Control robot movement
  • 9. Control Serial Servo
Download
  • Rules_File
  • Hardware Info
  • Code
  • 3D Model File
  • RDK Code
  • ROS2_Basic_VM
Download ZIP

Welcome to ROS Robot Expansion Board repository

1.6 SBUS model aircraft remote control

6. SBUS model aircraft remote control

6. SBUS model aircraft remote control 6.1. Purpose of the experiment 6.2. Configuration pin information 6.3. Analysis of the experimental flow chart 6.4. core code explanation 6.5. Hardware connection 6.6. Experimental effect

6.1. Purpose of the experiment

Use the serial communication of STM32 to analyze the SBUS protocol data transmitted by the remote control transmitter of the model aircraft, and print the value of each channel.

6.2. Configuration pin information

  1. Import the ioc file from the Serial project and name it SBUS.

According to the schematic diagram, SBUS is connected to the RX pin of serial port 2, only receiving but not sending.

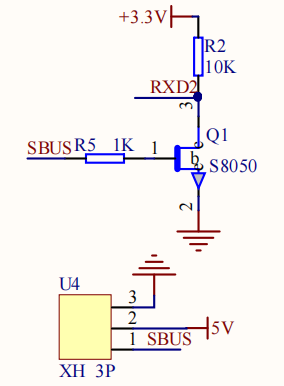
image-20220310095525343

image-20220310095551482

  1. Change the mode of serial port 2 to Asynchronous synchronous communication, the baud rate is 100000, the data width: 9 bits, the test: Even, the stop bit: 2 bits. Serial port 2 only uses the receive function, so Data Direction can choose Receive and Transmit or Receive Only.
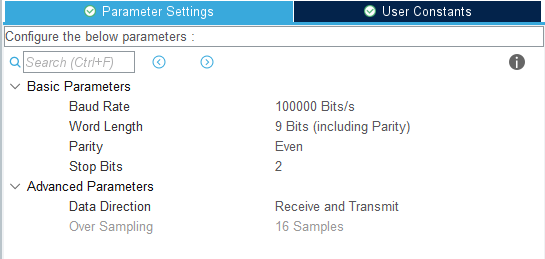
image-20220310101043637

  1. Open the serial port 2 interrupt settings.
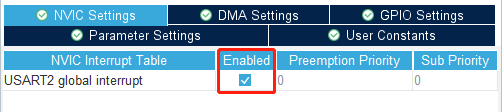
image-20220310101435783

6.3. Analysis of the experimental flow chart
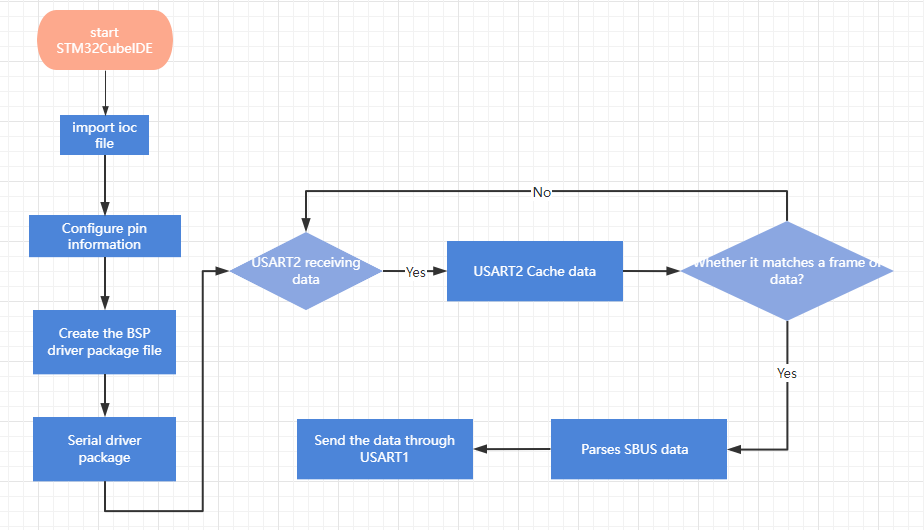
image-20220519100439298

6.4. core code explanation

  1. Add the following in bsp_uart.c:

USART1_Init(): Initialize the serial port related content, open serial port 1 and serial port 2 to receive 1 data.
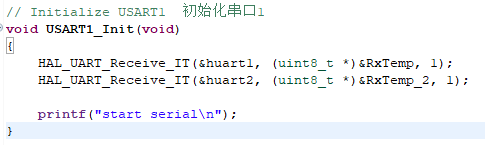
image-20220310104552288

  1. In the serial port interrupt callback, judge whether serial port 2 data is received, and at the same time distinguish whether serial port 1 or serial port 2 has received the data.
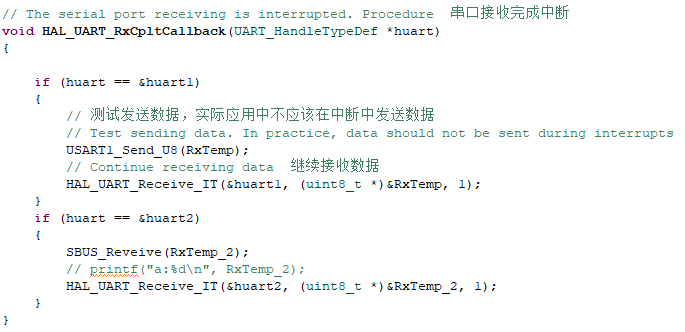
image-20220310104804430

  1. Create new bsp_sbus.h and bsp_sbus.c files to manage sbus data analysis content. Create the following in bsp_sbus.h:
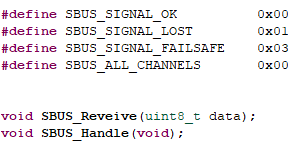
image-20220310105646989

Among them, SBUS_ALL_CHANNELS controls the number of channels parsed. By default, only eight channels are displayed. If full channel display is required, modify it to 1.

  1. SBUS_Reveive(data) receives the data of the serial port as a buffer. If it conforms to the communication protocol of SBUS, it will update a frame of data to the sbus_data array.
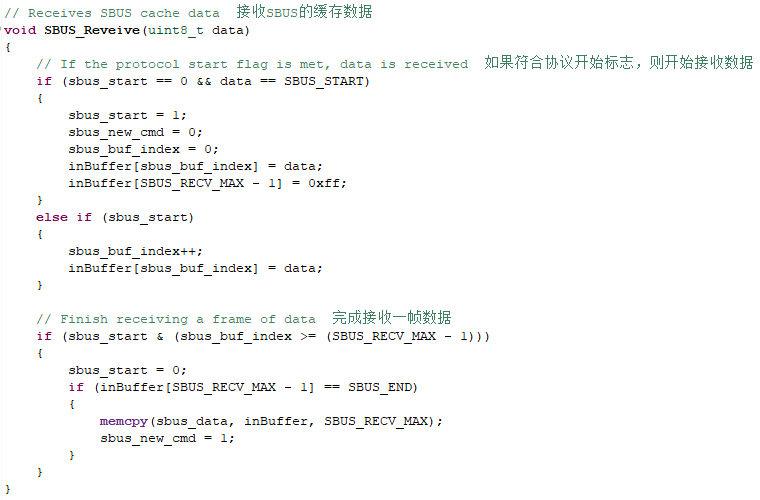
image-20220310105941366

  1. Analyze the data in sbus_data according to the SBUS communication protocol.
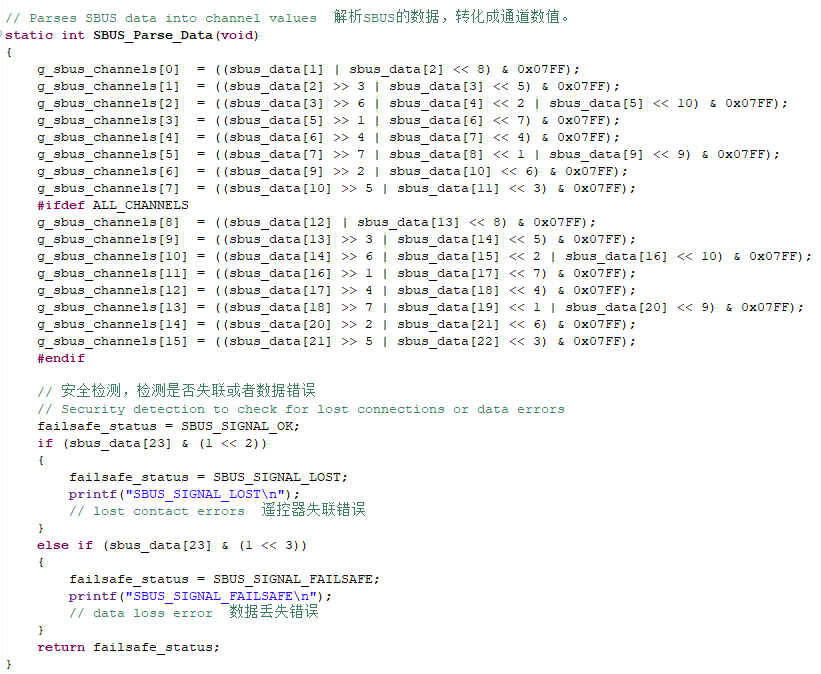
image-20220310111108240

  1. The SBUS_Handle() function is called cyclically in Bsp_Loop(), and the parsed data of each channel is printed out through serial port 1.
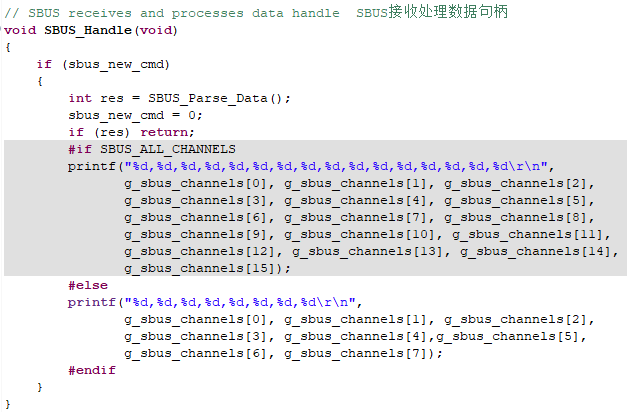
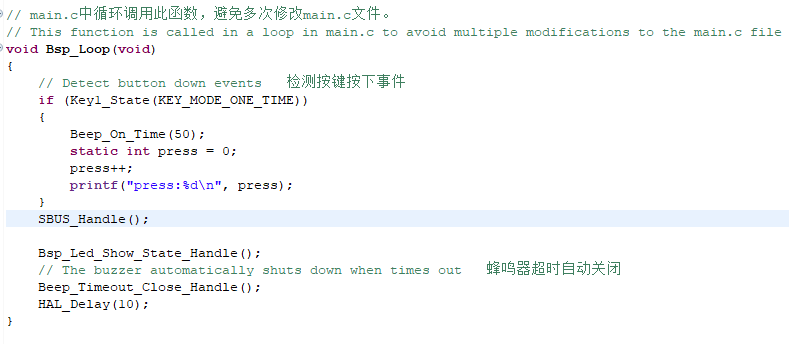
image-20220310111200456

image-20220310111729911

6.5. Hardware connection

Because SBUS communication needs to connect the SBUS receiver to the SBUS interface on the expansion board, S is connected to the signal, V is connected to the positive pole of the power supply, and G is connected to the ground. Therefore, you need to prepare your own model aircraft remote control and SBUS receiver, pair them in advance and turn on the power switch.
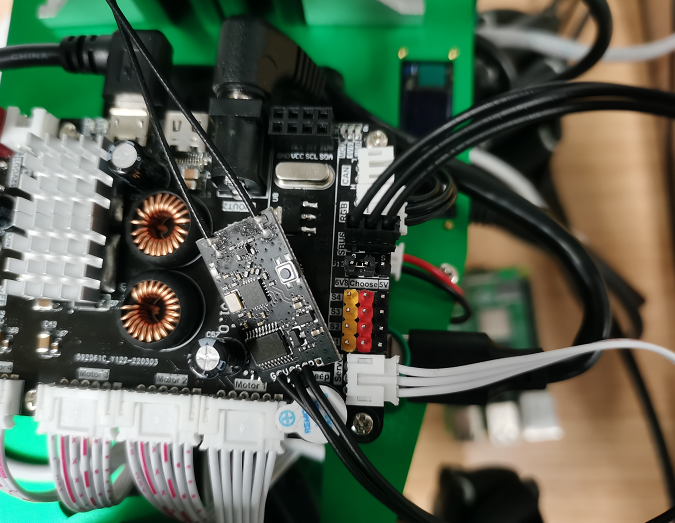
image-20220325154212344

6.6. Experimental effect

After programming the program, the LED light flashes every 200 milliseconds. After connecting the expansion board to the computer through the micro-USB data cable, open the serial port assistant (the specific parameters are shown in the figure below), and you can see that the model aircraft remote control has been printed on the serial port assistant. The data of each channel of the controller, when we manually toggle the joystick or button of the model aircraft remote controller, the data will change accordingly.
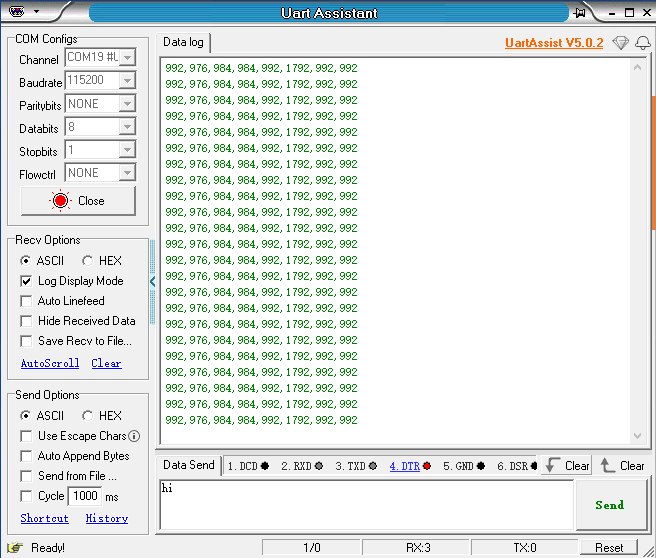
image-20220519101157207

Serial communication
CAN bus communication

COMPANY

  • About us
  • Team Style
  • Blog

LEARNING & EXPLORATION

  • Tutorials
  • Edge AI hardware
  • Educational robots
  • Embedded intelligent hardware

WHERE TO BUY

  • Yahboom Online Store
  • Amazon
  • Alibaba
  • AliExpress
  • Mercado

TECHNOLOGY SUPPORT

  • Email: support@yahboom.com

BE A DISTRIBUTOR

  • Email: sales@yahboom.com
QR Code

Copyright © 2017-2026 Yahboom. All Rights Reserved.

EN/中文