yahboom
HomeLearn
Solution
Blog
Online Store
About Us
EN/中文
Roboduino V2📖
0.Instruction manual
  • Instruction manual
1.Get started quickly
  • 01.Assembly of the Car
  • 02.Remote Control Car
  • 03.Common Problem Analysis
  • 04. Lithium Battery Pack and Charger Usage Guidelines
  • 05. Important Notes (Read Before Starting)
2.Environment Construction
  • 01.Serial port driver installation
  • 02.Arduino IDE Installation
  • 03.Arduino IDE usage
  • 04.Using third-party libraries
  • 05.Program compilation and upload
3.Basic car course
  • 01.RGB Control
  • 02.Serial Print
  • 03.KEY Read
  • 04.Buzzer control
  • 05.Logo Breath
  • 06.Servos Control
  • 07.Motor Control
  • 08.Ultrasonic Ranging
  • 09.Track Print
  • 10.Infrared Remote Print
  • 11.WIFI Camera
4.Advanced car course
  • 01.RGB Breath
  • 02.Play Music
  • 03.KEY Control RGB
  • 04.KEY Control Buzzer
  • 05.Serial Parse Data
  • 06.Parse Data Control Motor
  • 07.Parse Data Control RGB
  • 08.Parse Data Control Buzzer
  • 09.Parse Data Control Servo
5.Car motion control
  • 00.Mecanum wheel motion principle
  • 01.Car Vertical Movement
  • 02.Car Diagonal Movement
  • 03.Car Sideways Movement
  • 04.Car Rotational Movement
  • 05.Car Patrol
6.Comprehensive gameplay of car
  • 01.Car tracking
  • 02.Car Obstacle Avoid
  • 03.Car Follow Hand
  • 04.Car tracking Avoid
  • 05.Car Infrared Remote
  • 06.WiFi Control Car
  • 07.IR WiFi Control Car
7.AI vision course
  • 1. Cat(dog) detection
  • 2. Color recognition
  • 3. QR code instructions
  • 4. Person Recognition
  • 5. Face Detection
  • 6. Color Follows
  • 7. Face following
8.Expand peripherals
  • 01.Digital Tube Display
  • 02.Color Recognition
Download
  • Code
  • Library
  • Hardware manual
  • Software
  • 3D Model
  • Instruction Manual
Download ZIP

Welcome to Roboduino V2 repository

04.Buzzer control

Buzzer control

Buzzer controlDevice connectionHardware connectionSoftware connectionBuzzer controlControl PrincipleControl PinCode AnalysisExperimental results

Control the passive buzzer on the Robduino expansion board to sound.

Device connection

Hardware connection

Use Type-B data cable to connect Arduino Uno and computer.

Software connection

Open the "Arduino IDE" software and select the model and serial port number corresponding to the development board.

Buzzer control

The location selected by the red box is the location of the buzzer module:
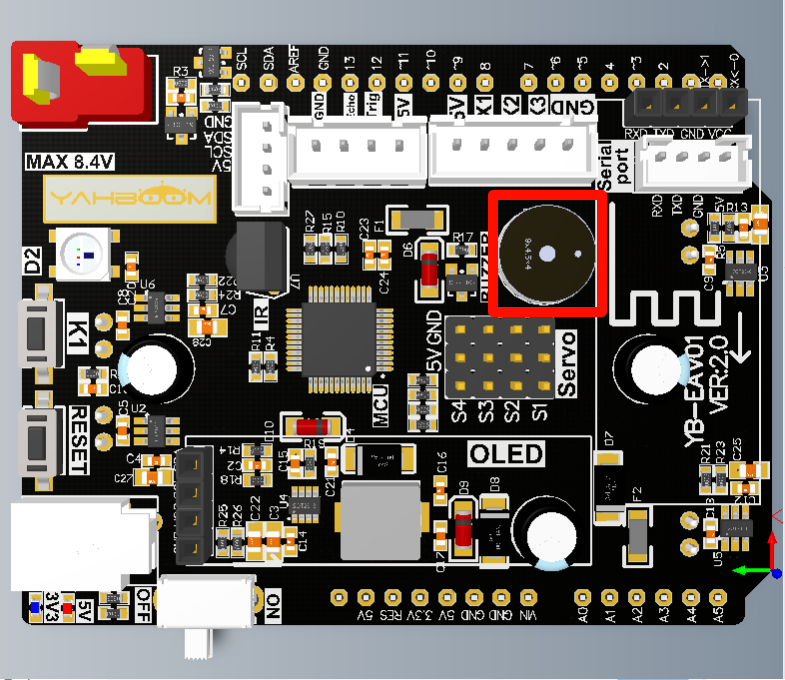
image-20240605183101826

Control Principle

Buzzers are divided into two types: active buzzers and passive buzzers. Active buzzers: require external working voltage to emit fixed frequency sound; Passive buzzers: require external circuit to provide driving signal, and control the pitch and loudness of the sound by changing the frequency and amplitude of the signal.

Arduino's tone library can be used to control the digital pin on the Arduino board to output a square wave signal of a specified frequency, thereby driving the buzzer connected to the pin to play the specified tone.

Control Pin

Peripheral ModuleArduino Uno
Buzzer10

Code Analysis

Here is only a brief introduction to the code content. For detailed code, it is recommended to refer to the corresponding code file, which is provided in the download area!

  • Define BUZZER control pins

x
// 定义蜂鸣器控制引脚 Define BUZZER control pins
#define BUZZER_PIN 10
  • Initialization Code

x
void setup() {
  pinMode(BUZZER_PIN, OUTPUT);  // 设置蜂鸣器引脚输出模式 Set the buzzer pin output mode
}
  • Looping code

xxxxxxxxxx
void loop() {
  tone(BUZZER_PIN, 1000);  // 播放频率为1000HZ的音调 Play a 1000 Hz tone
  delay(100);
  noTone(BUZZER_PIN);  // 停止发声 Stop play
  delay(5000);
}

Experimental results

After compiling the program successfully, upload the code to the Arduino Uno development board.

After the program is started, the buzzer will beep every 5 seconds!

xxxxxxxxxx
The burning program cannot use other programs to occupy the serial port or external serial communication module (for example: WiFi camera module), otherwise the program cannot be burned or an error message will be prompted!
KEY Read
Logo Breath

COMPANY

  • About us
  • Team Style
  • Blog

LEARNING & EXPLORATION

  • Tutorials
  • Edge AI hardware
  • Educational robots
  • Embedded intelligent hardware

WHERE TO BUY

  • Yahboom Online Store
  • Amazon
  • Alibaba
  • AliExpress
  • Mercado

TECHNOLOGY SUPPORT

  • Email: support@yahboom.com

BE A DISTRIBUTOR

  • Email: sales@yahboom.com
QR Code

Copyright © 2017-2026 Yahboom. All Rights Reserved.

EN/中文