Welcome to Roboduino V2 repository
05.Logo Breath
Logo Breath
Logo BreathDevice connectionHardware connectionSoftware connectionControl Logo (LED)Control principleControl pinCode analysisExperimental results
Control the breathing light effect of the Logo (LED) on the Robduino expansion board.
xxxxxxxxxxThere is an LED module on the board below the Logo. Controlling the LED effect is actually controlling the Logo effect!
Device connection
Hardware connection
Use a Type-B data cable to connect the Arduino Uno and the computer.
Software connection
Open the "Arduino IDE" software and select the model and serial port number corresponding to the development board.
Control Logo (LED)
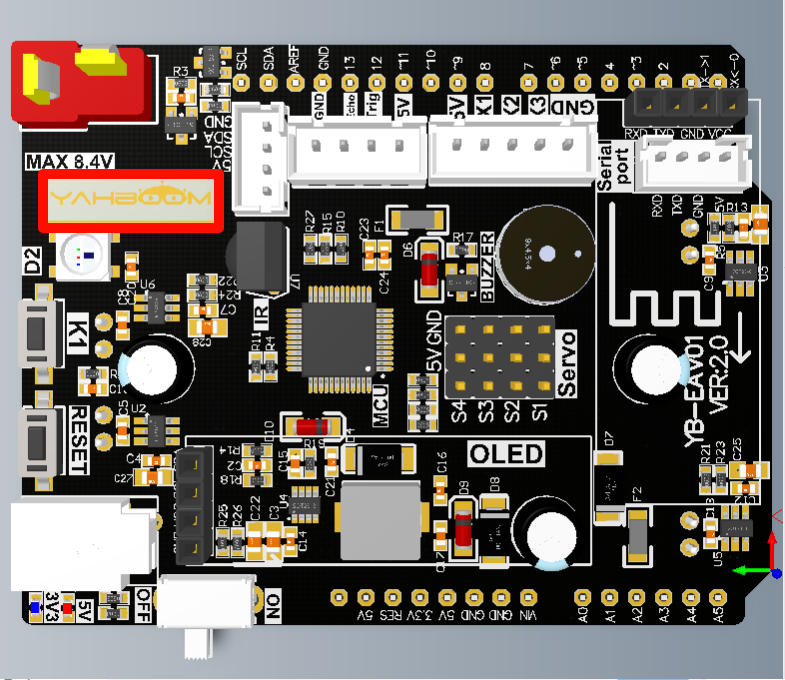
The Logo (LED) is directly driven by the underlying driver chip on the Robduino expansion board. The underlying driver chip and the Arduino Uno board use I2C communication, and the I2C address is 0x40.
The position selected by the red box is the location of the Logo (LED) module:
Control principle
By changing the duty cycle of the PWM signal that controls the Logo (LED) pin, the brightness of the LED display can be controlled.
Control pin
| Peripheral module | Bottom-layer driver chip (using I2C communication with Arduino Uno board) |
|---|---|
| Logo (LED) | LED7 (7) |
Code analysis
Here we only briefly introduce the code content. For detailed code, please refer to the corresponding code file, which is provided in the download area!
Contains
WireandAdafruit_PWMServoDriverlibraries
xxxxxxxxxx#include <Wire.h> // 包含Wire(I2C)通讯库 Include Wire library#include <Adafruit_PWMServoDriver.h> // 包含Adafruit PWMServoDriver库 Include Adafruit PWMServoDriver library
Define LED control pin, I2C address and PWM frequency
xxxxxxxxxx// 定义底层驱动芯片参数 Bottom-layer driver chip related parameters#define Bottom_Layer_Driver_ADDR 0x40 // 定义底层芯片I2C设备地址 Define the IIC address of the Bottom-layer driver chip#define LED_PIN 7 // 控制LOGO对应的LED引脚 Control LED pins#define PWM_FREQUENCY 50 // 定义PWM频率 Define PWM frequency
Create an instance of the Adafruit_PWMServoDriver class
x// 创建Adafruit_PWMServoDriver类的实例 Create an instance of the Adafruit_PWMServoDriver classAdafruit_PWMServoDriver pwm = Adafruit_PWMServoDriver(Bottom_Layer_Driver_ADDR);
Set breathing light effect
xxxxxxxxxx/*** @brief 设置Logo呼吸效果 Set the Logo breathing effect* @param delayTime: 延时时间 Delay time* @param increment: 亮度递增数字 Brightness variation* @retval 无 None*/void setLogoBreath(unsigned int delayTime, unsigned int increment) {for (int Brightness = 0; Brightness <= 4095; Brightness += increment) {pwm.setPWM(LED_PIN, 0, Brightness);delay(delayTime);}for (int Brightness = 4095; Brightness >= 0; Brightness -= increment) {pwm.setPWM(LED_PIN, 0, Brightness);delay(delayTime);}}
Initialization Code
xxxxxxxxxxvoid setup() {Wire.begin(); // 初始化I2C通讯 Initialize I2C communicationdelay(1000); // 如果控制异常,可以适当增加延时 If the function is abnormal, you can increase the delaypwm.begin(); // PWM初始化 Initialize the Pulse Width Modulation (PWM) librarypwm.setPWMFreq(PWM_FREQUENCY); // 设置PWM频率 Set the PWM frequency}
Looping code
xxxxxxxxxxvoid loop() {setLogoBreath(10, 25); // 设置Logo呼吸效果 Set the Logo breathing effect}
Experimental results
After compiling the program successfully, upload the code to the Arduino Uno development board.
After the program is started, the Logo (LED) will always show a breathing light effect.
xxxxxxxxxxThe burning program cannot use other programs to occupy the serial port or an external serial communication module (for example: WiFi camera module), otherwise the program cannot be burned or an error message will be prompted!