Welcome to Roboduino V2 repository
02.Color Recognition
Color Recognition
Color RecognitionDevice connectionHardware connectionSoftware connectionColor recognition moduleDigital tube installationCode analysisExperimental results
Use Arduino Uno to drive the color recognition module to identify the three color values of the object.
Device connection
Hardware connection
Use Type-B data cable to connect Arduino Uno and computer.
Software connection
Open the "Arduino IDE" software and select the model and serial port number corresponding to the development board.
Color recognition module
The driver chip used by the color recognition module is ZC-CLS381.
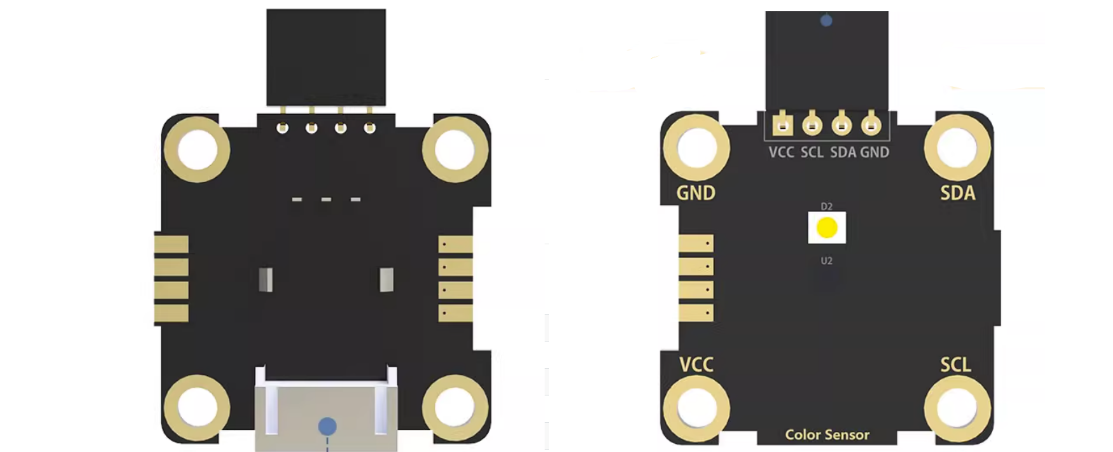
| Function pin | Function |
|---|---|
| VCC | Power supply interface: can be connected to 3.3V, 5V |
| SDA | I2C data transmission interface |
| SCL | I2C timing transmission interface |
| GND | Ground interface |
Digital tube installation
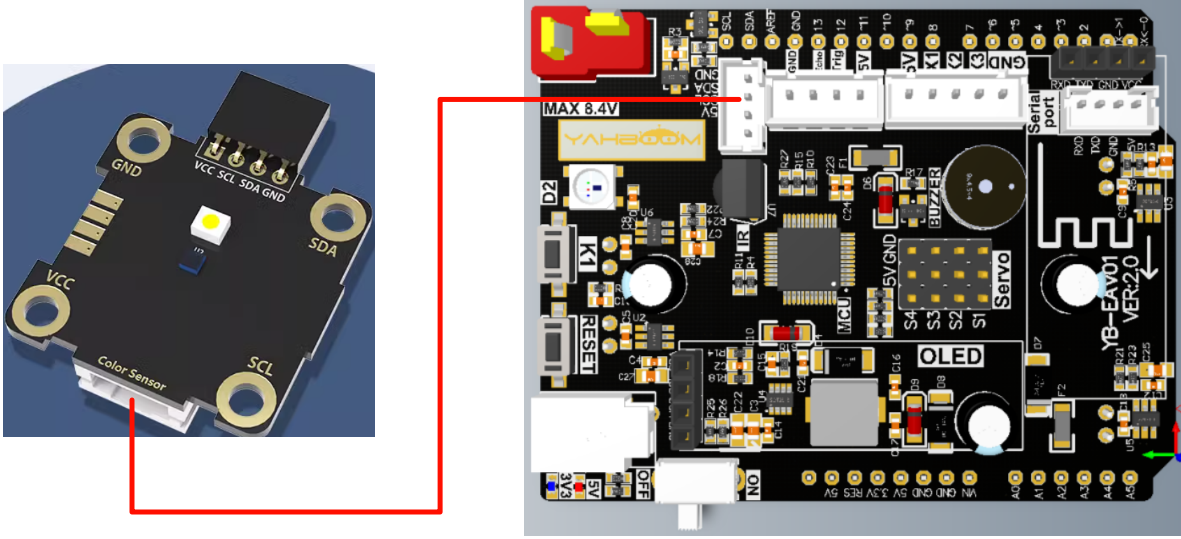
We use it with a car here. You can directly use the PH2.0 interface cable that comes with the color recognition module to connect the car expansion board.
Code analysis
Here is only a brief introduction to the code content. For detailed code, please refer to the corresponding code file, which is provided in the download area!
Include
Wirelibrary
x#include <Wire.h> // 包含用于I2C通信的库 Include Wire library
Define I2C Device Address
x#define I2C_ADDR 0x53 // 定义I2C设备地址 Define I2C Device Address// 定义RGB三色值变量 Defines an RGB three-color value variableunsigned int Red = 0;unsigned int Green = 0;unsigned int Blue = 0;unsigned int val_red = 0;unsigned int val_green = 0;unsigned int val_blue = 0;
Configure the color recognition module
x/*** @brief 配置颜色识别模块 Configure the color recognition module* @param None* @retval None*/void setColorRecognition(void) {Wire.beginTransmission(I2C_ADDR); //发送开始信号 Send the start signalWire.write(0x00);Wire.write(0x06);Wire.endTransmission(); // 发送结束信号 End of transmission signalWire.beginTransmission(I2C_ADDR); //发送开始信号 Send the start signalWire.write(0x04);Wire.write(0x41);Wire.endTransmission(); // 发送结束信号 End of transmission signalWire.beginTransmission(I2C_ADDR); //发送开始信号 Send the start signalWire.write(0x05);Wire.write(0x01);Wire.endTransmission(); // 发送结束信号 End of transmission signal}
Gets RGB tri-color values
x/*** @brief 获取颜色识别模块三色值 Gets RGB tri-color values* @param None* @retval None*/void getColorValue() {int index = 0;char ColorData[6] = { 0 };// 获取红色数据 Get red dataWire.beginTransmission(I2C_ADDR); //发送开始信号 Send the start signalWire.write(0x10);Wire.endTransmission(); // 发送结束信号 End of transmission signalWire.beginTransmission(I2C_ADDR); //发送开始信号 Send the start signalWire.requestFrom(I2C_ADDR, 2); // request 1 bytes from slave device #2while (Wire.available()) // slave may send less than requested{char ff = Wire.read(); // receive a byte as characterColorData[index] = ff;index++;}Wire.endTransmission(); // 发送结束信号 End of transmission signal// 获取绿色数据 Get green dataWire.beginTransmission(I2C_ADDR); //发送开始信号 Send the start signalWire.write(0x0D);Wire.endTransmission(); // 发送结束信号 End of transmission signalWire.beginTransmission(I2C_ADDR); //发送开始信号 Send the start signalWire.requestFrom(I2C_ADDR, 2); // request 1 bytes from slave device #2while (Wire.available()) // slave may send less than requested{char ff = Wire.read(); // receive a byte as characterColorData[index] = ff;index++;}Wire.endTransmission(); // 发送结束信号 End of transmission signal// 获取蓝色数据 Get blue dataWire.beginTransmission(I2C_ADDR); //发送开始信号 Send the start signalWire.write(0x13);Wire.endTransmission(); // 发送结束信号 End of transmission signalWire.beginTransmission(I2C_ADDR); //发送开始信号 Send the start signalWire.requestFrom(I2C_ADDR, 2); // request 1 bytes from slave device #2while (Wire.available()) // slave may send less than requested{char ff = Wire.read(); // receive a byte as characterColorData[index] = ff;index++;}Wire.endTransmission(); // 发送结束信号 End of transmission signalRed = ((unsigned int)(ColorData[1] & 0xff) << 8 | (ColorData[0] & 0xff));Green = ((unsigned int)(ColorData[3] & 0xff) << 8 | (ColorData[2] & 0xff));Blue = ((unsigned int)(ColorData[5] & 0xff) << 8 | (ColorData[4] & 0xff));// 打印未处理的颜色数据 Print unprocessed color data// Serial.println(Red);// Serial.println(Green);// Serial.println(Blue);// 颜色校准:分别使用不同颜色的色块进行校准,将下面参数修改成红、绿、蓝对应的数值// Color calibration: Use color blocks of different colors for calibration, and modify the following parameters to the corresponding values of red, green and blueif (Red > 4000) Red = 4000;if (Green > 7000) Green = 7000;if (Blue > 4500) Blue = 4500;val_red = map(Red, 0, 4000, 0, 255);val_green = map(Green, 0, 7000, 0, 255);val_blue = map(Blue, 0, 4500, 0, 255);Serial.println("RGB three color values:");Serial.print("R:");Serial.println(val_red);Serial.print("G:");Serial.println(val_green);Serial.print("B:");Serial.println(val_blue);}
Initialization Code
xvoid setup() {Wire.begin(); // 初始化I2C通讯 Initializing I2C communicationWire.setClock(100000); // 设置I2C通信的时钟频率为100kHz Set the clock frequency for I2C communication to 100kHzSerial.begin(115200); // 初始化串口通讯并设置通讯波特率115200 Initialize the serial communication and set the baud rate to 115200setColorRecognition(); // 配置颜色识别模块 Configure the color recognition module}
Looping code
xxxxxxxxxxvoid loop() {getColorValue(); // 获取颜色识别模块三色值 Gets RGB tri-color valuesdelay(500); // Delay 500 ms}
Experimental results
After compiling the program successfully, upload the code to the Arduino Uno development board.
After the program is started, the color recognition module prints the three-color values of the current recognized object every 500 milliseconds. The object needs to be close to the color recognition module to be recognized more accurately.
xxxxxxxxxxThe burning program cannot use other programs to occupy the serial port or external serial communication module (for example: WiFi camera module), otherwise the program cannot be burned or an error message will be prompted!