Welcome to Roboduino V2 repository
10.Infrared Remote Print
Infrared Remote Print
Infrared Remote PrintDevice connectionHardware connectionSoftware connectionInfrared remote controlControl principleNEC protocolControl pinCode analysisExperimental results
Receive and parse infrared remote control button data through the infrared receiver on the Robduino expansion board.
Device connection
Hardware connection
Use Type-B data cable to connect Arduino Uno and computer.
Software connection
Open the "Arduino IDE" software and select the model and serial port number corresponding to the development board.
Infrared remote control
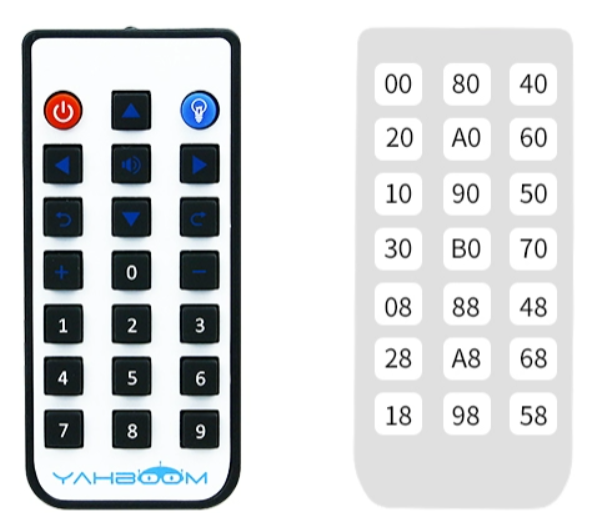
Use the infrared remote control with the infrared receiver to parse the data to achieve the purpose of remote control.
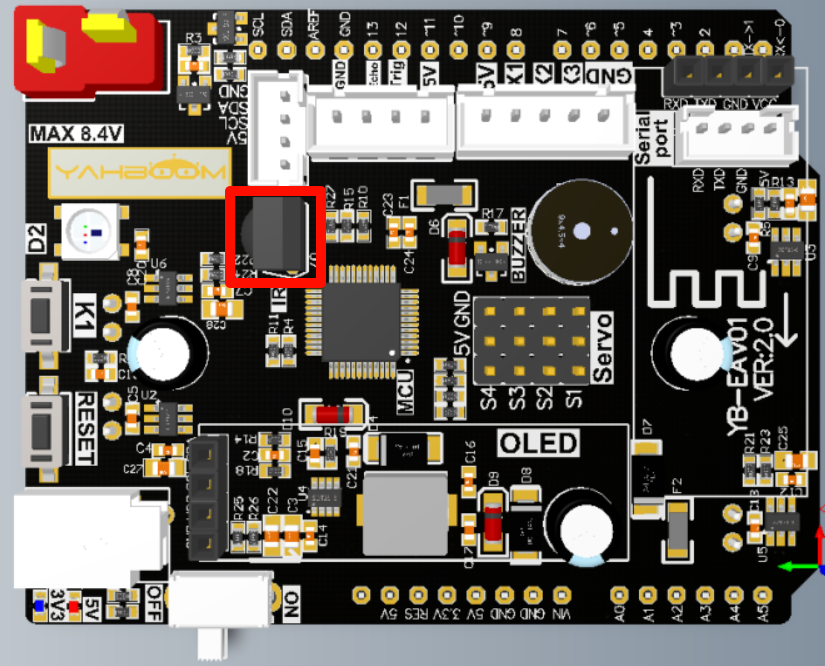
The position selected by the red box is the location of the infrared receiver:
Control principle
The data is judged to be 0 or 1 according to the high level duration of the infrared receiver's output pin, so as to realize the data reading of the infrared remote control key value.
NEC protocol
The matching remote control uses the NEC protocol with a carrier frequency of 38KHz.
| Format | Function |
|---|---|
| Boot code | Identifies the start of the command |
| Address code (user code) | Identifies the device address of the remote control |
| Address inverse code | Enhances data transmission reliability |
| Data code | Specific remote control command |
| Data inverse code | Enhances data transmission reliability |

Infrared remote control
0: 560us 38KHz carrier + 560us no carrier interval
1: 560us 38KHz carrier + 1680us no carrier interval
Infrared receiver
0: 560us low level + 560us high level
1: 560us low level + 1680us high level
When the infrared receiver receives the infrared carrier signal, the infrared receiver output pin outputs a low level
When the infrared receiver does not receive the infrared carrier signal, the infrared receiver output pin outputs a high level
Control pin
| Peripheral module | Arduino Uno |
|---|---|
| Infrared receiver | A3 |
Note: The infrared light emitted by the infrared probe is invisible to the human eye; in order to avoid infrared light interfering with the sensor, we need to use this module indoors.
Code analysis
Here is only a brief introduction to the code content. For detailed code, please refer to the corresponding code file, which is provided in the download area!
Include
IRremotelibrary
x#include <IRremote.hpp> // 包含IRremote库 Include IRremote library
Define infrared receiver pins and infrared remote control key data
x// 定义红外接收引脚 Define IR receiver pins#define IR_RECEIVE_PIN A3// 定义红外键值对应的红外数据 Define the value corresponding to the infrared remote control keyconst uint8_t Power = 0x00;const uint8_t RGB = 0x40;const uint8_t Buzzer = 0xA0;const uint8_t CarForward = 0x80;const uint8_t CarBackward = 0x90;const uint8_t CarLeft = 0x20;const uint8_t CarRight = 0x60;const uint8_t CarLeftSpin = 0x10;const uint8_t CarRightSpin = 0x50;const uint8_t Add = 0x30;const uint8_t Sub = 0x70;const uint8_t Number_0 = 0xB0;const uint8_t Number_1 = 0x08;const uint8_t Number_2 = 0x88;const uint8_t Number_3 = 0x48;const uint8_t Number_4 = 0x28;const uint8_t Number_5 = 0xA8;const uint8_t Number_6 = 0x68;const uint8_t Number_7 = 0x18;const uint8_t Number_8 = 0x98;const uint8_t Number_9 = 0x58;
Get infrared key value data
x/*** @brief 获取红外键值数据 Get infrared key value data* @param 无 None* @retval 红外键值数据 Infrared key value*/uint8_t getIRValue() {if (IrReceiver.decode()) {uint8_t IR_Value = bitreverseOneByte(IrReceiver.decodedIRData.command);// Serial.println(IR_Value, HEX);IrReceiver.resume();return IR_Value;}return 0xFF;}
Initialization Code
xxxxxxxxxxvoid setup() {Serial.begin(115200); // 初始化串口波特率115200 Initialize serial communication at 115200 bpsIrReceiver.begin(IR_RECEIVE_PIN, ENABLE_LED_FEEDBACK); // 初始化红外接收器 Initialize the infrared receiver}
Looping code
xxxxxxxxxxvoid loop() {// 通过串口打印红外键值 Print the received key value through the serial portswitch (getIRValue()) {case Power: Serial.println("Power"); break;case RGB: Serial.println("RGB"); break;case Buzzer: Serial.println("Buzzer"); break;case CarForward: Serial.println("CarForward"); break;case CarBackward: Serial.println("CarBackward"); break;case CarLeft: Serial.println("CarLeft"); break;case CarRight: Serial.println("CarRight"); break;case CarLeftSpin: Serial.println("CarLeftSpin"); break;case CarRightSpin: Serial.println("CarRightSpin"); break;case Add: Serial.println("Add"); break;case Sub: Serial.println("Sub"); break;case Number_0: Serial.println("Number_0"); break;case Number_1: Serial.println("Number_1"); break;case Number_2: Serial.println("Number_2"); break;case Number_3: Serial.println("Number_3"); break;case Number_4: Serial.println("Number_4"); break;case Number_5: Serial.println("Number_5"); break;case Number_6: Serial.println("Number_6"); break;case Number_7: Serial.println("Number_7"); break;case Number_8: Serial.println("Number_8"); break;case Number_9: Serial.println("Number_9"); break;default: break;}}
Experimental results
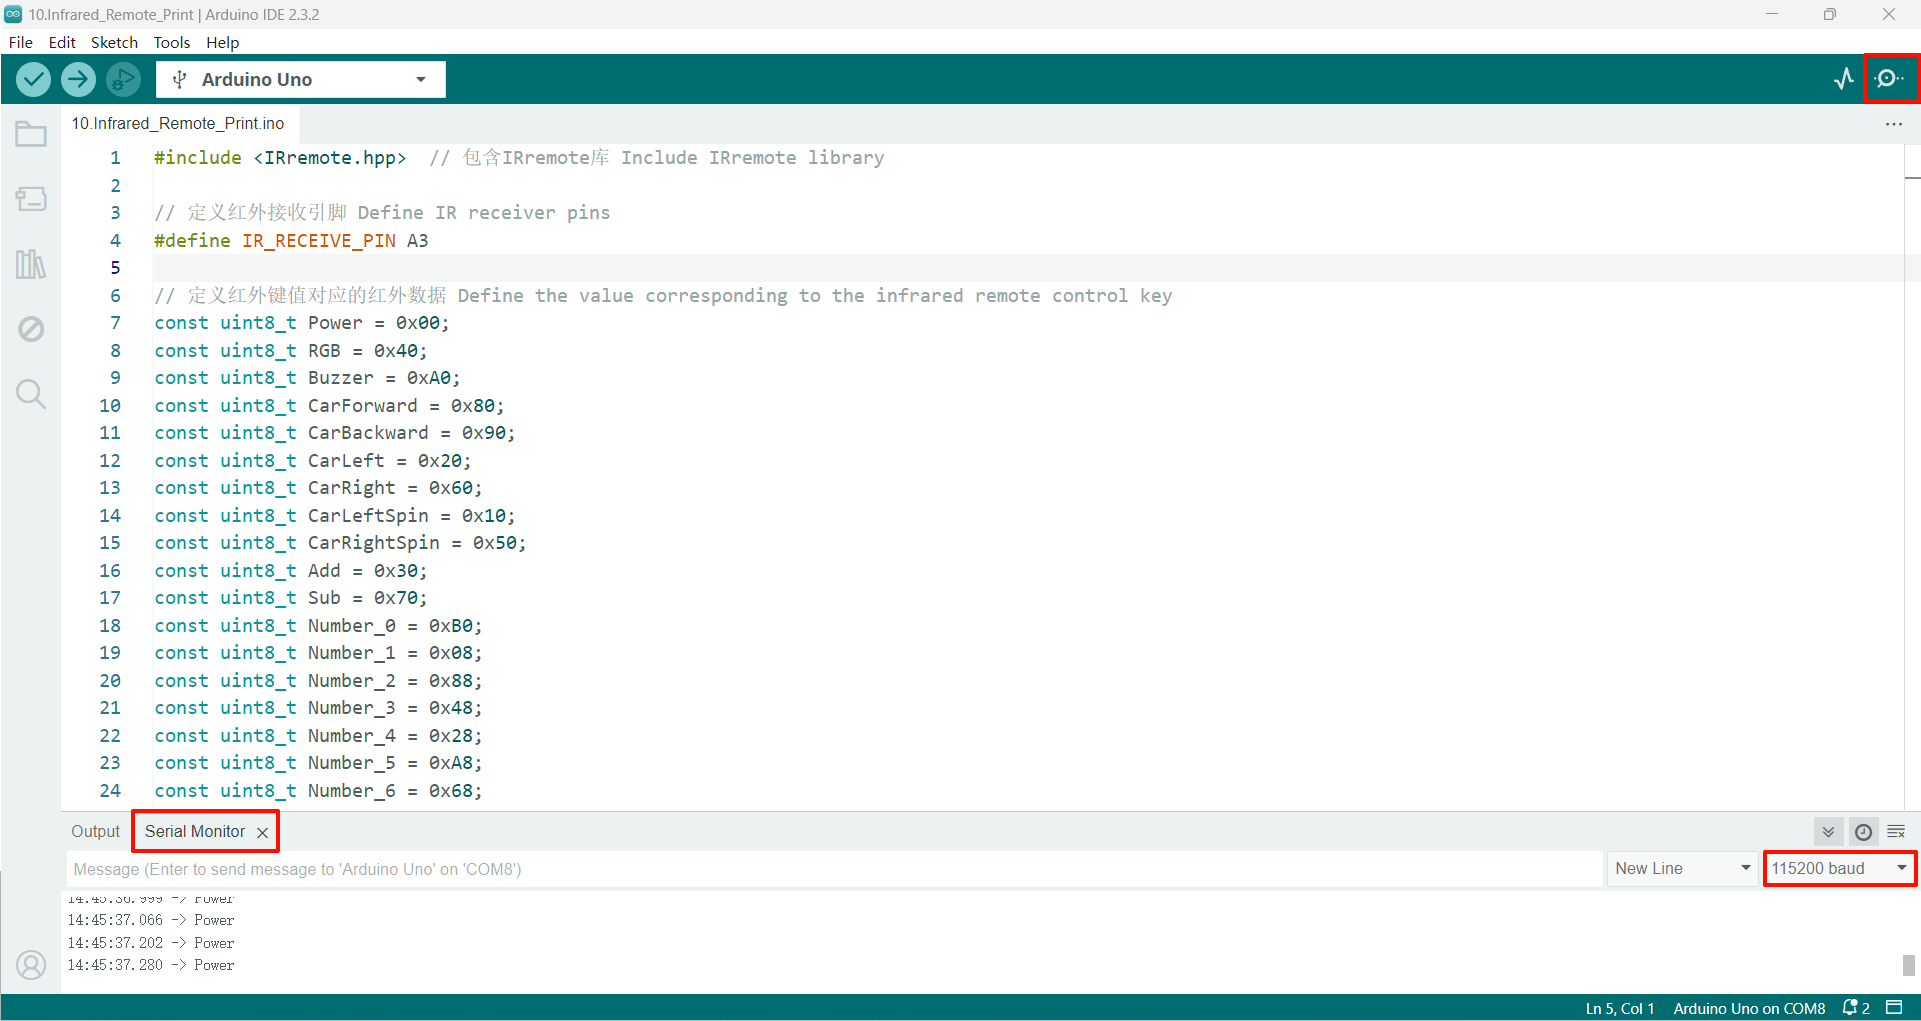
After compiling the program successfully, upload the code to the Arduino Uno development board.
After the program is started, the serial port will print the key value function pressed by our infrared remote control in real time.
If there is no display content, you can check whether the serial port baud rate is consistent with the code setting, and then press the RESET button on the development board.
xxxxxxxxxxThe burning program cannot use other programs to occupy the serial port or an external serial port communication module (for example: WiFi camera module), otherwise the program cannot be burned or an error message will be prompted!