Welcome to MicroROS Robot repository
9. Finger control
9. Finger control
1、synopsis
MediaPipe is a data stream processing machine learning application development framework developed and open-source by Google. It is a graph based data processing pipeline that enables the construction of various forms of data sources, such as video, frequency, sensor data, and any time series data. MediaPipe is cross platform and can run on embedded platforms (such as Raspberry Pi), mobile devices (iOS and Android), workstations, and servers, while supporting mobile GPU acceleration. MediaPipe provides cross platform, customizable ML solutions for real-time and streaming media. The core framework of MediaPipe is implemented in C++and provides support for languages such as Java and Objective C. The main concepts of MediaPipe include Packets, Streams, Calculators, Graphs, and Subgraphs.
The characteristics of MediaPipe:
- End to end acceleration: Built in fast ML inference and processing that can accelerate even on regular hardware。
- Build once, deploy anytime, anywhere: Unified solution suitable for Android, iOS, desktop/cloud, web, and IoT。
- Instant solution: A cutting-edge ML solution that showcases all features of the framework。
- Free and open source: Framework and solution under Apache 2.0, fully scalable and customizable.
2、Paintbrushes
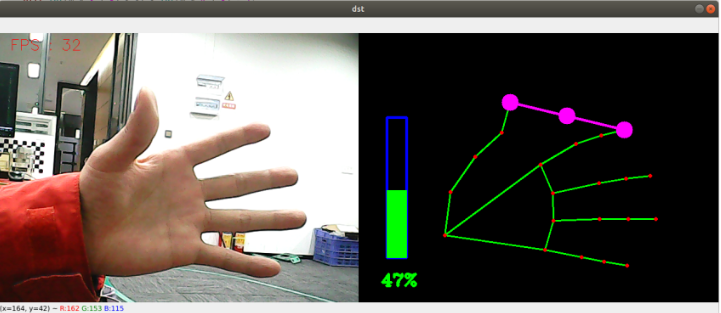
Click [f key] to switch the recognition effect, and the effect of the image can be controlled by the distance between the thumb and the index finger (Zhang/close).
3.1、activate
- First set the proxy IP for the ROS-wifi image transfer module. For specific steps, please refer to the basic use 1. The use of ROS-wifi image transfer module in micros car tutorial
- The Linux system connects to the ROS-wifi image transfer module, starts docket, and enters the following command to connect the ROS-wifi image transfer module
#Use the provided system for direct inputsh start_Camera_computer.shxxxxxxxxxx#Systems that are not data:docker run -it --rm -v /dev:/dev -v /dev/shm:/dev/shm --privileged --net=host microros/micro-ros-agent:humble udp4 --port 9999 -v4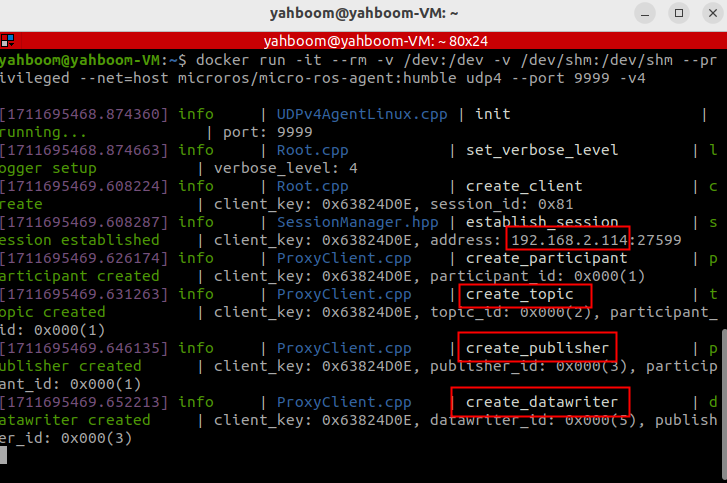 If the preceding information is displayed, the proxy connection is successful
- Open a new terminal and execute the following command
xxxxxxxxxxros2 run yahboom_esp32_mediapipe 10_HandCtrl
- Notes
- "If the camera angle is not centered, the Linux system needs to connect to the car agent. Please refer to the specific steps for development preparation before proceeding with tutorial 0. which provides essential information for a quick start (must-read). This tutorial will not provide further elaboration."
- After connecting the car's agent, enter the following command
xxxxxxxxxxros2 run yahboom_esp32_mediapipe control_servo
After the steering engine is in the center, press "ctrl+C" to end the program.
- If the camera picture is upside down, see 3. Camera picture correction (must-read) tutorial, this tutorial is no longer explained
3.2、Code parsing
xxxxxxxxxx~/yahboomcar_ws/src/yahboom_esp32_mediapipe/yahboom_esp32_mediapipe/10_HandCtrl.py
xvolPer = value = index = 0effect = ["color", "thresh", "blur", "hue", "enhance"]volBar = 400class handDetector: def __init__(self, mode=False, maxHands=2, detectorCon=0.5, trackCon=0.5): self.tipIds = [4, 8, 12, 16, 20] self.mpHand = mp.solutions.hands self.mpDraw = mp.solutions.drawing_utils self.hands = self.mpHand.Hands( static_image_mode=mode, max_num_hands=maxHands, min_detection_confidence=detectorCon, min_tracking_confidence=trackCon ) self.lmDrawSpec = mp.solutions.drawing_utils.DrawingSpec(color=(0, 0, 255), thickness=-1, circle_radius=15) self.drawSpec = mp.solutions.drawing_utils.DrawingSpec(color=(0, 255, 0), thickness=10, circle_radius=10)
def get_dist(self, point1, point2): x1, y1 = point1 x2, y2 = point2 return abs(math.sqrt(math.pow(abs(y1 - y2), 2) + math.pow(abs(x1 - x2), 2)))
def calc_angle(self, pt1, pt2, pt3): point1 = self.lmList[pt1][1], self.lmList[pt1][2] point2 = self.lmList[pt2][1], self.lmList[pt2][2] point3 = self.lmList[pt3][1], self.lmList[pt3][2] a = self.get_dist(point1, point2) b = self.get_dist(point2, point3) c = self.get_dist(point1, point3) try: radian = math.acos((math.pow(a, 2) + math.pow(b, 2) - math.pow(c, 2)) / (2 * a * b)) angle = radian / math.pi * 180 except: angle = 0 return abs(angle)
def findHands(self, frame, draw=True): img = np.zeros(frame.shape, np.uint8) img_RGB = cv.cvtColor(frame, cv.COLOR_BGR2RGB) self.results = self.hands.process(img_RGB) if self.results.multi_hand_landmarks: for handLms in self.results.multi_hand_landmarks: if draw: self.mpDraw.draw_landmarks(img, handLms, self.mpHand.HAND_CONNECTIONS) return img
def findPosition(self, frame, draw=True): self.lmList = [] if self.results.multi_hand_landmarks: for id, lm in enumerate(self.results.multi_hand_landmarks[0].landmark): # print(id,lm) h, w, c = frame.shape cx, cy = int(lm.x * w), int(lm.y * h) # print(id, lm.x, lm.y, lm.z) self.lmList.append([id, cx, cy]) if draw: cv.circle(frame, (cx, cy), 15, (0, 0, 255), cv.FILLED) return self.lmList
def frame_combine(slef,frame, src): if len(frame.shape) == 3: frameH, frameW = frame.shape[:2] srcH, srcW = src.shape[:2] dst = np.zeros((max(frameH, srcH), frameW + srcW, 3), np.uint8) dst[:, :frameW] = frame[:, :] dst[:, frameW:] = src[:, :] else: src = cv.cvtColor(src, cv.COLOR_BGR2GRAY) frameH, frameW = frame.shape[:2] imgH, imgW = src.shape[:2] dst = np.zeros((frameH, frameW + imgW), np.uint8) dst[:, :frameW] = frame[:, :] dst[:, frameW:] = src[:, :] return dst
class MY_Picture(Node): def __init__(self, name): super().__init__(name) self.bridge = CvBridge() self.sub_img = self.create_subscription( CompressedImage, '/espRos/esp32camera', self.handleTopic, 1)
self.hand_detector = handDetector() self.volPer = self.value = self.index = 0 self.effect = ["color", "thresh", "blur", "hue", "enhance"] self.volBar = 400
def handleTopic(self, msg): start = time.time() frame = self.bridge.compressed_imgmsg_to_cv2(msg) frame = cv.resize(frame, (640, 480))
action = cv.waitKey(1) & 0xFF
img = self.hand_detector.findHands(frame) lmList = self.hand_detector.findPosition(frame, draw=False) if len(lmList) != 0: angle = self.hand_detector.calc_angle(4, 0, 8) x1, y1 = lmList[4][1], lmList[4][2] x2, y2 = lmList[8][1], lmList[8][2] cx, cy = (x1 + x2) // 2, (y1 + y2) // 2 cv.circle(img, (x1, y1), 15, (255, 0, 255), cv.FILLED) cv.circle(img, (x2, y2), 15, (255, 0, 255), cv.FILLED) cv.line(img, (x1, y1), (x2, y2), (255, 0, 255), 3) cv.circle(img, (cx, cy), 15, (255, 0, 255), cv.FILLED) if angle <= 10: cv.circle(img, (cx, cy), 15, (0, 255, 0), cv.FILLED) self.volBar = np.interp(angle, [0, 70], [400, 150]) self.volPer = np.interp(angle, [0, 70], [0, 100]) self.value = np.interp(angle, [0, 70], [0, 255]) # print("angle: {},self.value: {}".format(angle, self.value)) if self.effect[self.index]=="thresh": gray = cv.cvtColor(frame, cv.COLOR_BGR2GRAY) frame = cv.threshold(gray, self.value, 255, cv.THRESH_BINARY)[1] elif self.effect[self.index]=="blur": frame = cv.GaussianBlur(frame, (21, 21), np.interp(self.value, [0, 255], [0, 11])) elif self.effect[self.index]=="hue": frame = cv.cvtColor(frame, cv.COLOR_BGR2HSV) frame[:, :, 0] += int(self.value) frame = cv.cvtColor(frame, cv.COLOR_HSV2BGR) elif self.effect[self.index]=="enhance": enh_val = self.value / 40 clahe = cv.createCLAHE(clipLimit=enh_val, tileGridSize=(8, 8)) lab = cv.cvtColor(frame, cv.COLOR_BGR2LAB) lab[:, :, 0] = clahe.apply(lab[:, :, 0]) frame = cv.cvtColor(lab, cv.COLOR_LAB2BGR) if action == ord('f'): self.index += 1 if self.index >= len(self.effect): self.index = 0 end = time.time() fps = 1 / (end - start) text = "FPS : " + str(int(fps)) cv.putText(frame, text, (20, 30), cv.FONT_HERSHEY_SIMPLEX, 0.9, (0, 0, 255), 1) cv.rectangle(img, (50, 150), (85, 400), (255, 0, 0), 3) cv.rectangle(img, (50, int(self.volBar)), (85, 400), (0, 255, 0), cv.FILLED) cv.putText(img, f'{int(self.volPer)}%', (40, 450), cv.FONT_HERSHEY_COMPLEX, 1, (0, 255, 0), 3) dst = self.hand_detector.frame_combine(frame, img) cv.imshow('dst', dst)
def main(): print("start it") rclpy.init() esp_img = MY_Picture("My_Picture") try: rclpy.spin(esp_img) except KeyboardInterrupt: pass finally: esp_img.destroy_node() rclpy.shutdown()The main process of the program: subscribe to the image from esp32, through MediaPipe to do the relevant recognition, and then through opencv to display the processed image.