yahboom
HomeLearn
Solution
Blog
Online Store
About Us
EN/中文
PALMSLAM📖
1. Product Introduction
  • 0.Get started
  • 1. Learning route
  • 2. Frequently Questions
  • 3. Control panel introduction
  • 4. Introduction to LiDAR
  • 5. Robot charging and battery considerations
  • 6.Unboxing and reviewing
2. Assembly video
  • Installation Video
3. Basic configuration
  • 0. Get started quickly
  • 1. Write the firmware
  • 2. Virtual machine installation and startup system
  • 3. Expansion board configuration parameters
  • 4. How to choose the alarm level and radar model
  • 5. Connection Agent
4. LiDAR course
  • 0. Enter the same docker terminal
  • 1. Robot information release
  • 2. Robot URDF model
  • 3. Basic distance measurement function
  • 4. SLAM Gmapping
  • 5. SLAM Cartographer
  • 6. APP mapping
5. Linux operating system
  • 1.Introduction to Linux system
  • 2.Ubuntu file system
  • 3.Ubuntu common commands
  • 4.Ubuntu common editors
  • 5.Ubuntu software operation commands
  • 6.Virtual machine installation
  • 7.SSH remote control
  • 8.VNC remote control
  • 9.Transfer files remotely
  • 10.Driver library and communication
  • 11.Static IP and hotspot mode
  • 12.Bind device ID
  • 13.Capacity expansion and resource allocation
  • 14.Update system software sources
  • 15.Set root user password
  • 16.sudo free password
  • 17.Connect to WiFi network
  • 18.View system version
  • 19.Customized service management
  • 20.Back up system image
6. ROS2 Basic Course
  • 1.Introduction to ROS2
  • 2.ROS2 install Humble
  • 3.ROS2 development environment
  • 4.ROS2 workspace
  • 5.ROS2 function package
  • 6.ROS2 node
  • 7.ROS2 topic communication
  • 8.ROS2 service communication
  • 9.ROS2 action communication
  • 10.ROS2 custom interface message
  • 11.ROS2 parameter service case
  • 12.ROS2 meta-function package
  • 13.ROS2 distributed communication
  • 14.ROS2 DDS
  • 15.ROS2 time related API
  • 16.ROS2 common command tools
  • 17.ROS2 rviz2 use
  • 18.ROS2 rqt toolbox
  • 19.ROS2 Launch startup file configuration
  • 20.ROS2 recording and playback tool
  • 21.ROS2 URDF model
  • 22.ROS2 Gazebo simulation platform
  • 23.ROS2 TF2 coordinate transformation
Download
  • System_File
  • VM_File
  • Code
  • Software_Tool
  • Hareware_Info
  • 3D_Model_File
  • Instruction_Manual
  • ROS2_Basic_VM
Download ZIP

Welcome to PALMSLAM repository

6.ROS2 node

6. ROS2 Nodes

1. Node Introduction

Regardless of the communication method used, the construction of communication objects relies on nodes. In ROS2, each node generally corresponds to a single functional module (for example, a radar driver node might be responsible for publishing radar messages, while a camera driver node might be responsible for publishing image messages). A complete robotic system may consist of many nodes working together. In ROS2, a single executable file (C++ program or Python program) can contain one or more nodes.

2. Node Creation Process

  1. Create a Program File
  2. Import Related ROS Libraries
  3. Write Node Functions
  4. Write the Configuration File
  5. Compile and Run

3. Hello World Node Example

This section uses the Python package as an example.

3.1. Creating the Python Package

Replace -workspace with your actual workspace path.

xxxxxxxxxx
cd workspace/src
ros2 pkg create pkg_helloworld_py --build-type `ment_python` --dependencies `rclpy` --node-name `helloworld`

3.2. Writing Code

Executing the above command will create pkg_helloworld_py and a helloworld.py file for writing the node:
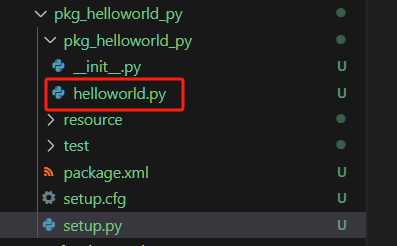
image-20231023163116372

Delete the original helloworld.py Write the following code:

xxxxxxxxxx
​
import rclpy                                     # ROS2 Python interface library
from rclpy.node import Node                      # ROS2 node class
import time
​
"""
Create a HelloWorld node and log "Hello World" during initialization.
"""
class HelloWorldNode(Node):
    def __init__(self, name):
        super().__init__(name)                     # Initialize the ROS2 node parent class
        while rclpy.ok():                          # Check if the ROS2 system is running properly
            self.get_logger().info("Hello World")  # Output ROS2 logs
            time.sleep(0.5)                        # Sleep control loop time
​
def main(args=None):                               # Main entry point for the ROS2 node
    rclpy.init(args=args)                          # Initialize the ROS2 Python interface
    node = HelloWorldNode("helloworld")            # Create and initialize the ROS2 node object
    rclpy.spin(node)                               # Loop and wait for ROS2 to exit.
    node.destroy_node()                            # Destroy the node object
    rclpy.shutdown()                               # Close the ROS2 Python interface
​

After writing the code, you need to set the package's compilation options to let the system know the entry point for the Python program. Open the package's setup.py file and add the following entry point configuration:
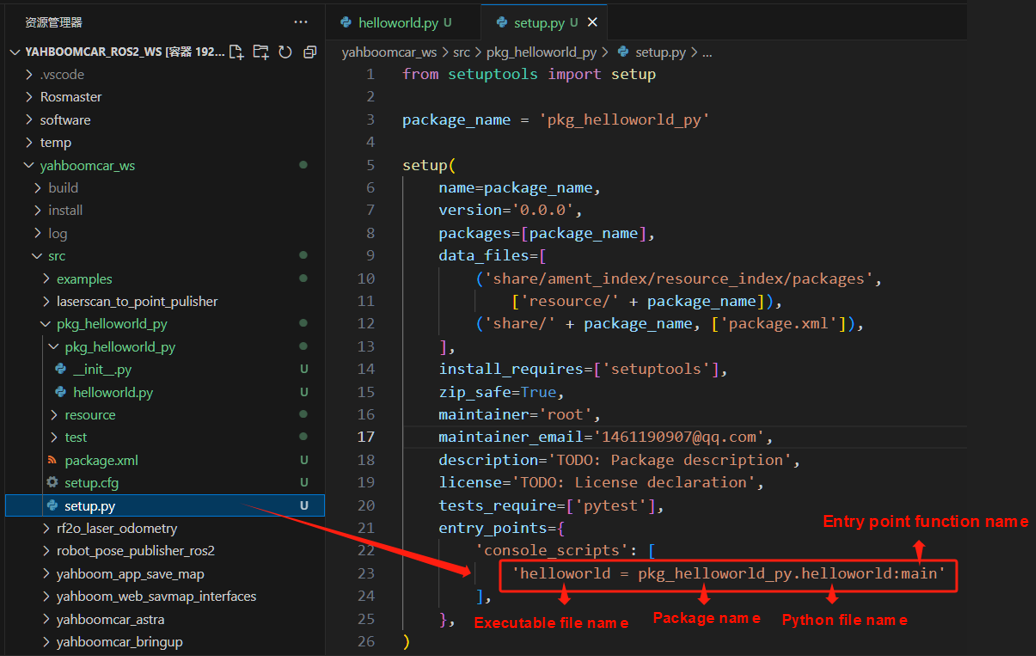
image-20231023172134879

3.3. Compiling the Package

  • Compiling the Package
xxxxxxxxxx
colcon build --packages-select pkg_helloworld_py
  • Refresh the environment variables in the workspace
xxxxxxxxxx
source install/setup.bash

3.4. Running the Node

xxxxxxxxxx
ros2 run pkg_helloworld_py helloworld

After running successfully, you can see the "Hello World" string being printed in a loop in the terminal:
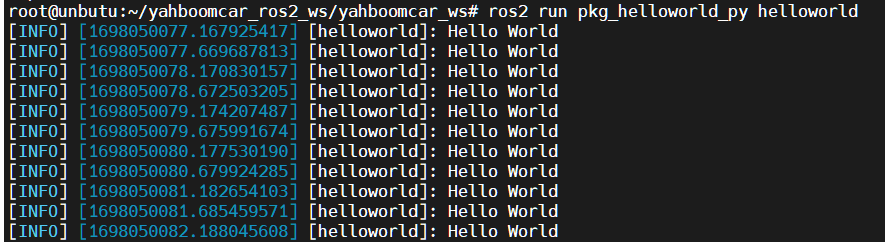
image-20231023163749024

ROS2 function package
ROS2 topic communication

COMPANY

  • About us
  • Team Style
  • Blog

LEARNING & EXPLORATION

  • Tutorials
  • Edge AI hardware
  • Educational robots
  • Embedded intelligent hardware

WHERE TO BUY

  • Yahboom Online Store
  • Amazon
  • Alibaba
  • AliExpress
  • Mercado

TECHNOLOGY SUPPORT

  • Email: support@yahboom.com

BE A DISTRIBUTOR

  • Email: sales@yahboom.com
QR Code

Copyright © 2017-2026 Yahboom. All Rights Reserved.

EN/中文