yahboom
HomeLearn
Solution
Blog
Online Store
About Us
EN/中文
JetCobot📖
1.Introduction to the Jetcobot
  • 0.Unboxing
  • 1 Version Configuration Instructions
  • 2. Power adapter usage specifications
  • 3. Common Problems and Solutions
  • 4. First-time use instructions
  • 5. Get started
  • 6. Open and close the virtual desktop
2.Assembly and assembly tutorial
  • Installation Video
3.Linux operating system
  • 1.Introduction to Linux system
  • 2.Ubuntu file system
  • 3.Ubuntu common commands
  • 4.Ubuntu common editors
  • 5.Ubuntu software operation commands
  • 6.Virtual machine installation
  • 7.SSH remote control
  • 8.VNC remote control
  • 9.Transfer files remotely
  • 10.Driver library and communication
  • 11.Static IP and hotspot mode
  • 12.Bind device ID
  • 13.Capacity expansion and resource allocation
  • 14.Update system software sources
  • 15.Set root user password
  • 16.sudo free password
  • 17.Connect to WiFi network
  • 18.View system version
  • 19.Customized service management
  • 20.Back up system image
4.Jupyter Lab Basic Course
  • 1. Read the document before operation
  • 2. JupyterLab environment construction tutorial
  • 3. JupyterLab Basic Usage Tutorial
  • 4. JupyterWidgets Configuration Tutorial
  • 5. Getting Started Tutorial for JupyterWidgets Controls
5.Basic courses of main control board
  • 1. Introduction to the main control board
  • 2. Burn the system image
  • 3. Re-read the burned image
  • 4. System startup
  • 5. System and desktop introduction
  • 6. System expansion
  • 7. Network Configuration
  • 8. SSH remote login and file transfer
  • 9. VNC Remote Login
  • 10. System backup
  • 11. Increased swap space
  • 12. Use of Jtop
6.GPIO hardware control course
  • 1.GPIO library API usage
  • 2. Hardware library configuration
  • 3. Pin reading function
  • 4. Pin level output control
  • 5. Control LED
  • 6. External device serial communication
  • 7.I2C communication
7.Jetson-inference vision course
  • 1. Install Jetcam (optional)
  • 2. Install TensorFlow (optional)
  • 3. Jetson-inference environment construction (optional)
  • 4. Hello AI World
  • 5. Image Classification Reasoning
  • 6. Object Detection Reasoning
  • 7. Semantic Segmentation
8.Opencv basic course
  • 1. Introduction to Open Source CV
  • 2. Image reading and display
  • 3. Image writing
  • 4. Image quality
  • 5. Pixel Operation
  • 6. Image zoom
  • 7. Picture cut
  • 8. Picture pan
  • 9. Picture mirroring
  • 10. Affine transformation
  • 11. Picture rotation
  • 12. Perspective transformation
  • 13. Grayscale processing
  • 14. Binary image
  • 15. Edge green detection
  • 16. Line segment drawing
  • 17. Rectangular circle drawing
  • 18. Text and picture drawing
9.ROS Basic Course
  • 1.ROS introduction
  • 2.ROS installation
  • 3.ROS common command tools
  • 4.ROS workspace
  • 5.ROS function package
  • 6.ROS node
  • 7.ROS topic publisher
  • 8.ROS topic subscribers
  • 9.ROS service client
  • 10.ROS service server
  • 11.ROS action client
  • 12.ROS action server
  • 13.ROS custom message reception
  • 14.ROS-launch file
  • 15.ROS-TF transformation
  • 16.ROS parameter service
  • 17.ROS-rviz use
  • 18.ROS-rqt tool usage
  • 19.Topic message recording and playback
  • 20.urdf model introduction
  • 21.gazebo introduction
  • 22.ROS distributed communication
10.ROS+OpenCV course
  • 1.QR code
  • 2.Human pose estimation
  • 3.Target Detection
  • 4.AR vision
  • 5.AR QR code
  • 6.ROS+Opencv basics
  • 7.Face recognition
  • 8.harris corner detection
  • 9.Target tracking algorithm
  • 10.Contour moment
  • 11.Polygon outline
  • 12.Discrete fourier transform algorithm
  • 13.Edge detection algorithm
  • 14.Face detection algorithm
  • 15.Optical flow detection algorithm
  • 16.Contour detection
  • 17.General contour detection
  • 18.Feature point tracking
  • 19.HLS color filtering
  • 20.Hough circle detection
  • 21.Hough linear detection
  • 22.HSV color filtering
  • 23.LK optical flow algorithm
  • 24.Detection algorithm
  • 25.Phase dependent displacement detection
  • 26.Image pyramid sampling algorithm
  • 27.RGB color filtering
  • 28.Clear background detection algorithm
  • 29.Simplified optical flow algorithm
  • 30.Simple filter
  • 31.Threshold image processing
  • 32.Watershed segmentation algorithm
11.Robotic arm control course
  • 1.Send data
  • 2.Read data
  • 3.Control robotic arm joint angle
  • 4.Control coordinates of robotic arm end
  • 5.Control robotic arm posture
  • 6.Handle control robotic arm
  • 7.Calibrate robotic arm joint
  • 8.Calibrate robotic arm gripper
12.AI visual basic ourse
  • 1.Camera driver
  • 2.Block color calibration
  • 3.Color recognition
  • 4.Face detection
  • 5.Gesture recognition
  • 6.Model training
  • 7.Garbage recognition
13.Mediapipe course
  • 1.Hand detection
  • 2.Posture detection
  • 3.Overall detection
  • 4.Face detection
  • 5.Face recognition
  • 6.Face effects
  • 7.3D object recognition
  • 8.Brush
  • 9.Finger control
  • 10.Gesture recognition
14.AI visual tracking course
  • 1.PID algorithm basics
  • 2.Color block positioning
  • 3.Color block tracking
  • 4.Face positioning
  • 5.Face tracking
  • 6.Fingertip trajectory recognition
  • 7.Mediapipe gesture control robotic arm action group
  • 8.Mediapipe arm posture control robotic arm
  • 9.Mediapipe palm arm target positioning
  • 10.Mediapipe palm recognition and tracking control robotic arm
  • 11.Apriltag tag code recognition
  • 12.Apriltag tag code tracking
  • 13.KCF object tracking
15.AI visual grabbing course
  • 1.Gesture recognition stacking blocks
  • 2.Color recognition grab blocks
  • 3.Apriltag recognition grabbing blocks
  • 4.Catch game
  • 5.Color sorting
  • 6.Color stacking
  • 7.apriltag sorting
  • 8.apriltag stacking
  • 9.Garbage sorting
  • 10.Garbage stacking
  • 11.Color interaction
16.URDF Model course
  • 1.URDF model of the robotic arm
  • 2.URDF model controls the real robotic arm
17.Kinesiology advanced course
  • 1.Movelt configuration
  • 2.MoveIt control the real machine
  • 3.Moves randomly
  • 4.Movelt kinematic design
  • 5.Movelt cartesian path
  • 6.Movelt collision detection
  • 7.Movelt scene design
18.Jetson Orin SUPER -Introduction to the Jetcobotnew
  • 1. Version Configuration Instructionsnew
  • 2. Power adapter usage specificationsnew
  • 3. Common Problems and Solutionsnew
  • 4. First-time use instructionsnew
  • 5. Get startednew
  • 6. Open and close the virtual desktopnew
19.Jetson Orin SUPER -Assembly and assembly tutorial
  • Installation Videonew
20.Jetson Orin SUPER -Linux operating systemnew
  • 1.Introduction to Linux systemnew
  • 2.Ubuntu file systemnew
  • 3.Ubuntu common commandsnew
  • 4.Ubuntu common editorsnew
  • 5.Ubuntu software operation commandsnew
  • 6.Virtual machine installationnew
  • 7.SSH remote controlnew
  • 8.VNC remote controlnew
  • 9.Transfer files remotelynew
  • 10.Driver library and communicationnew
  • 11.Static IP and hotspot modenew
  • 12.Bind device IDnew
  • 13.Capacity expansion and resource allocationnew
  • 14.Update system software sourcesnew
  • 15.Set root user passwordnew
  • 16.sudo free passwordnew
  • 17.Connect to WiFi networknew
  • 18.View system versionnew
  • 19.Customized service managementnew
  • 20.Back up system imagenew
21.Jetson Orin SUPER -Jupyter Lab Basic Course
  • 1. Read the document before operationnew
  • 2. JupyterLab environment construction tutorialnew
  • 3. JupyterLab Basic Usage Tutorialnew
  • 4. JupyterWidgets Configuration Tutorialnew
  • 5. Getting Started Tutorial for JupyterWidgets Controlsnew
22.Jetson Orin SUPER -Basic motherboard usage course
  • 1. Motherboard Introductionnew
  • 2. Restore the factory image systemnew
  • 3. System startupnew
  • 4. System and desktop introductionnew
  • 5.VNC Remote Controlnew
  • 6. System expansionnew
  • 7. Network Configurationnew
  • 8.SSH remote loginnew
  • 9. Remote file transfernew
  • 10. Chinese input methodnew
  • 11. Use of Jtop toolnew
  • 12. Swap space expansionnew
  • 13.Backup SSD systemnew
  • 14.Jetpack old system upgraded to SUPER system
23.Jetson Orin SUPER -GPIO hardware control course
  • 1.GPIO library API usagenew
  • 2.Hardware library configurationnew
  • 3.Pin reading functionnew
  • 4.Pin level output controlnew
  • 5.Control LEDnew
  • 6.External device serial communicationnew
  • 7.I2C communicationnew
24.Jetson Orin SUPER -YOLO11 development
  • 01.YOLO environment constructionnew
  • 02.CLI usenew
  • 03.Object detection
  • 04.Instance segmentationnew
  • 05.Pose estimationnew
  • 06.Image classificationnew
  • 07.Oriented object detectionnew
  • 08.Model conversionnew
  • 09.Dataset annotationnew
  • 10.Model training conversionnew
  • 11.Model predictionnew
25.Jetson Orin SUPER -OpenCV course
  • 1. Introduction to Open Source CVnew
  • 2. Image reading and displaynew
  • 3. Image writingnew
  • 4. Image qualitynew
  • 5. Pixel Operationnew
  • 6. Image zoomnew
  • 7. Picture cutnew
  • 8. Picture pannew
  • 9. Picture mirroringnew
  • 10. Affine transformationnew
  • 11. Picture rotationnew
  • 12. Perspective transformationnew
  • 13. Grayscale processingnew
  • 14. Binary imagenew
  • 15. Edge green detectionnew
  • 16. Line segment drawingnew
  • 17. Rectangular circle drawingnew
  • 18. Text and picture drawingnew
26.Jetson Orin SUPER -ROS2 basic course
  • 1. Introduction to ROS2new
  • 2.ROS2 install Humblenew
  • 3.ROS2 development environmentnew
  • 4.ROS2 workspacenew
  • 5.ROS2 function packagenew
  • 6.ROS2 nodenew
  • 7.ROS2 topic communicationnew
  • 8.ROS2 service communicationnew
  • 9.ROS2 action communicationnew
  • 10.ROS2 custom interface messagenew
  • 11.ROS2 parameter service casenew
  • 12.ROS2 meta-function packagenew
  • 13.ROS2 distributed communicationnew
  • 14.ROS2 DDSnew
  • 15.ROS2 time related APInew
  • 16.ROS2 common command toolsnew
  • 17.ROS2 rviz2 usenew
  • 18.ROS2 rqt toolboxnew
  • 19.ROS2 Launch startup file configurationnew
  • 20.ROS2 recording and playback toolnew
  • 21.ROS2 URDF modelnew
  • 22.ROS2 Gazebo simulation platformnew
  • 23.ROS2 TF2 coordinate transformationnew
27.Jetson Orin SUPER -Advanced vision course
  • 1.QR codenew
  • 2.Human pose estimationnew
  • 3.Target Detectionnew
  • 4.AR visionnew
  • 5.ROS+Opencv Basicsnew
28.Jetson Orin SUPER -Robotic Arm Control Course
  • 1. Sending Datanew
  • 2. Read datanew
  • 3. Control the joint angle of the robotic armnew
  • 4. Control the coordinates of the end of the robot armnew
  • 5. Control the posture of the robotic armnew
  • 6.Handle remote control robotic armnew
  • 7. Calibrate the robot arm jointsnew
  • 8. Calibrate the robot grippernew
29.Jetson Orin SUPER -AI Vision Basic Course
  • 1. Camera drivernew
  • 2. Color threshold adjustment and color block calibrationnew
  • 3. Color recognitionnew
  • 4. Face Detectionnew
  • 5. Gesture Recognitionnew
  • 6. Garbage Identificationnew
30.Jetson Orin SUPER -Mediapipe Development Course
  • 1. Hand detectionnew
  • 2. Posture detectionnew
  • 3. Overall detectionnew
  • 4.FaceMeshnew
  • 5. Face Detectionnew
  • 6. Face effectsnew
  • 7. 3D Object Recognitionnew
  • 8. Brushnew
  • 9. Finger controlnew
  • 10. Gesture Recognitionnew
31.Jetson Orin SUPER -AI visual tracking course
  • 1.PID algorithm basicsnew
  • 2. Color block positioning experimentnew
  • 3. Color block tracking experimentnew
  • 4. Face location experimentnew
  • 5. Face tracking experimentnew
  • 6. Fingertip trajectory recognitionnew
  • 7.Mediapipe gesture control robotic arm action groupnew
  • 8.Mediapipe arm posture control robotic armnew
  • 9. Mediapipe palm arm target positioningnew
  • 10. Mediapipe identifies and tracks your palm to control the robotic armnew
  • 11. Apriltag label code recognitionnew
  • 12. Apriltag label code trackingnew
  • 13.KCF Object Trackingnew
32.Jetson Orin SUPER -AI Visual Capture Course
  • 1. Gesture recognition stacking blocksnew
  • 2. Color recognition grab blocksnew
  • 3. Apriltag recognition and grabbing building blocksnew
  • 4.Catch gamenew
  • 5. Color sortingnew
  • 6. Color stackingnew
  • 7. Apriltag sortingnew
  • 8. Apriltag stackingnew
  • 9. Garbage sortingnew
  • 10. Garbage dumpnew
  • 11.Color interactionnew
33.Jetson Orin SUPER -Robotic Arm URDF Model Course
  • 1. Robotic arm URDF modelnew
  • 2. URDF model controls the real robot armnew
34.Jetson Orin SUPER -Moveit advanced kinematics course
  • 1.Movelt Configurationnew
  • 2. Use of MoveItnew
  • 3. MoveIt drives the real machinenew
  • 4. MoveIt Random Movenew
  • 5.Movelt positive kinematics designnew
  • 6.Movelt inverse kinematics designnew
  • 7.Movelt Cartesian pathnew
  • 8.Movelt scene designnew
  • 9.Movelt Collision Detectionnew
35.FAQnew
  • 1.Using your own Jetson board, JetCobot cannot start normally
Download
  • Instruction_Manual
  • SystemFile_for_NANO4GB
  • SystemFile_For_OrinNANO
  • SystemFile_For_OrinNX
  • VM_File
  • Code
  • 3D Model File
  • Jetson_Boot_USB.tar.gz
  • ROS2_Basic_VM
Download ZIP

Welcome to JetCobot repository

3. JupyterLab Basic Usage Tutorial

JupyterLab Basic Usage Tutorial

JupyterLab Basic Usage Tutorial1. Supported browsers2. Start JupyterLab3. Interface Introduction4. Program running5. Common shortcut keysVI. Plugin installation

1. Supported browsers

The latest versions of the following browsers are known to work properly:

  • Firefox
  • Chrome
  • Safari

Older browser versions may also work, but there is no guarantee.

2. Start JupyterLab

Use the following command to start JupyterLab, it will automatically open in your browser.

jupyter lab

3. Interface Introduction

The JupyterLab interface consists of a main workspace, which contains document and activity tabs, a collapsible left sidebar, and a menu bar. The left sidebar contains the file browser, a list of running kernels and terminals, the command palette, the notebook cell tool inspector, and the tab list.
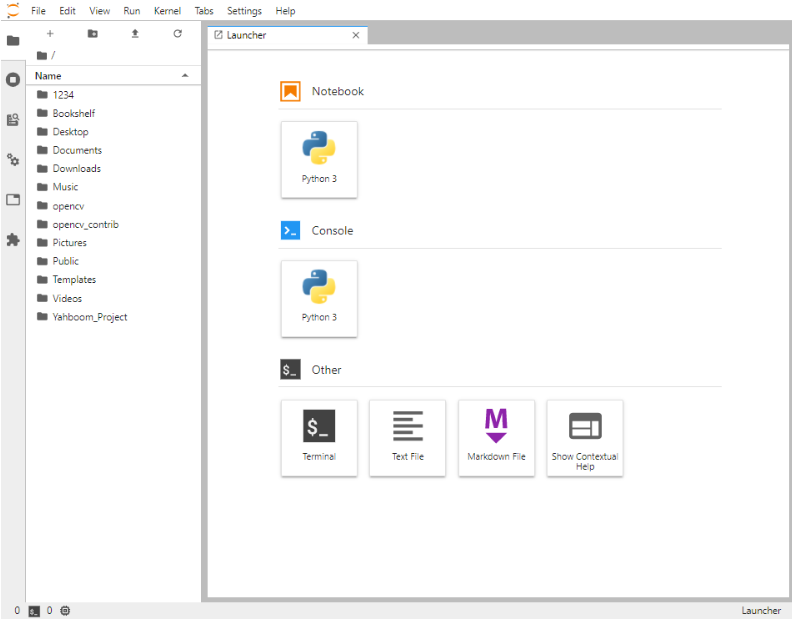
image.png

The menu bar at the top of JupyterLab has top-level menus that expose the actions available in JupyterLab through their keyboard shortcuts. The default menus are:

  • File: Actions related to files and directories
  • Edit: Actions related to editing documents and other activities
  • View: Actions that change the appearance of JupyterLab
  • Run: Actions for running code in different activities, such as notebooks and code consoles
  • Kernel: Actions for managing kernels, which are independent processes that run code
  • Tabs: List of open documents and activities in the dock
  • Settings: General settings and advanced settings editor
  • Help: List of JupyterLab and kernel help links

JupyterLab extensions can also create new top-level menus in the menu bar.

4. Program running

  • First select the code block to be run, then click ▶ in the figure to run the code block directly, ⬛ means stop the currently executing code block
  • There is a [ ] on the left side of the code block. When it is blank, it means no operation; when it is a number, it means it has been run; when it is '*', it means it is running.
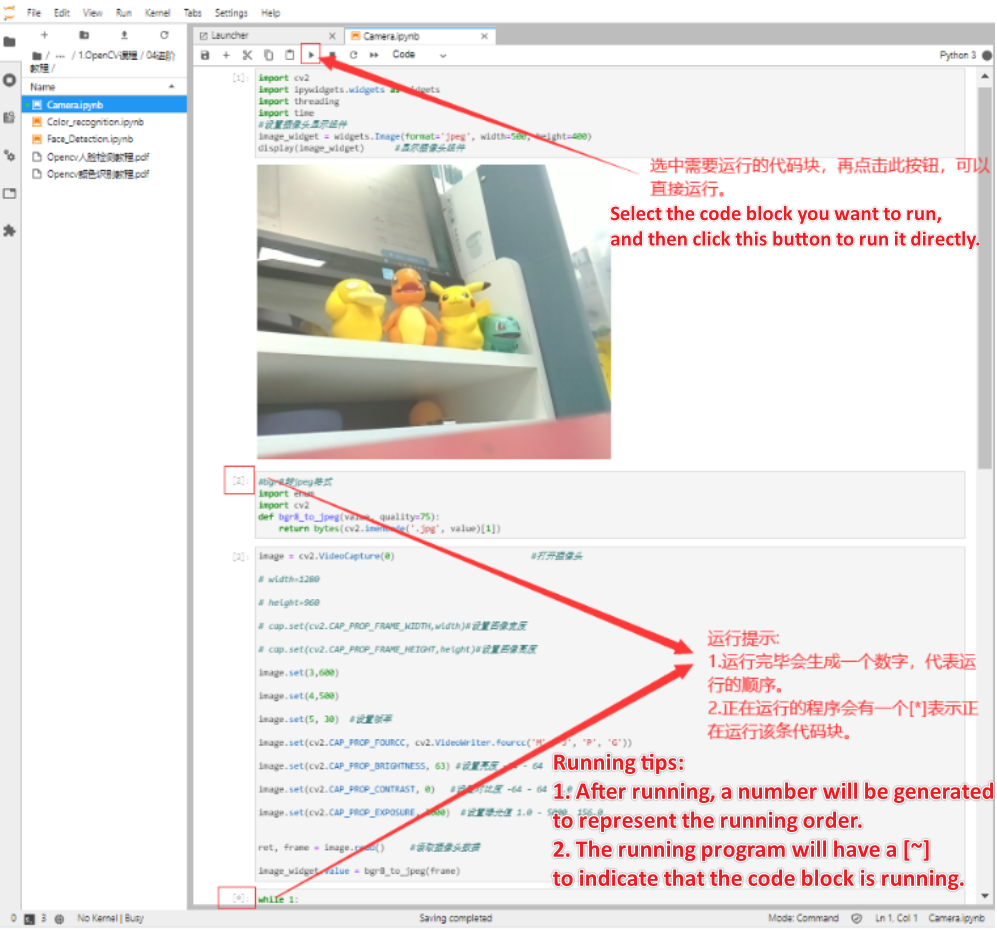
image.png

  • Note: After running the program, you need to clean up the running results, otherwise other programs may not display normal effects or cannot be executed. You can restart the kernel and clear all outputs through this step.
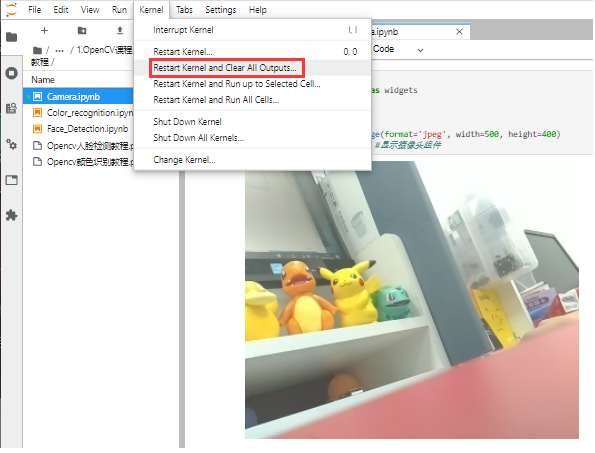
image.png

5. Common shortcut keys

1. Edit mode

  • Esc: Enter command line mode
  • Tab: Code completion or indentation
  • Shift+Tab: Prompt. View object and function descriptions.
  • Ctrl+[, Ctrl+]: Control left and right indents
  • Ctrl+D: Delete the entire line
  • Ctrl+Enter: Run the selected cell and enter command mode
  • Shift+Enter: Run the selected cell and then select the cell below

2. Command mode

  • Enter: Enter edit mode
  • b: Insert a cell below the current cell
  • a: Insert a cell above the current cell
  • y: Turn the cell into code
  • m: Turn the cell into a label
  • d+d: Press d twice to delete the code block
  • z: Undo deletion
  • s: Save
  • Ctrl+Enter: Run the selected cell
  • Shift+Enter: Run and select the cell below, if there is no cell below, add a new one

VI. Plugin installation

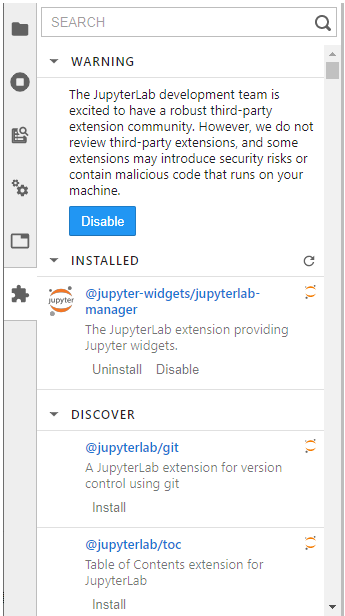
  1. Open the plugin manager in JupyterLab, find Enable and turn it on.
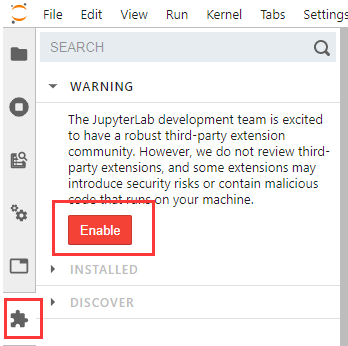
image.png

image.png

After successful opening, some plug-ins will be displayed and provided for installation.

If you need to install a plug-in, you can search for keywords under Search, and then install the corresponding plug-in. Generally, after the installation is complete, you will be prompted to re-Build JupyterLab. This process will be relatively long, and there will be no prompt after success. It is recommended to wait for about 2-3 minutes before re-entering jupyterlab. If there is no prompt Build JupyterLab, it means that the build is successful.

After the plug-in is successfully installed, the installed plug-in and plug-in description will be displayed in INSTALLED.

The examples on the Jupyter Lab official website are richer, and the usage methods and related explanations are also more accurate. Interested friends can enter and study on their own. Students who are not good at English need to bring their own translation software. The author uses Google Translate, which comes with Google Chrome. Official website: Jupyter Lab

https://jupyterlab.readthedocs.io/en/latest/user/interface.html

JupyterLab environment construction tutorial
JupyterWidgets Configuration Tutorial

COMPANY

  • About us
  • Team Style
  • Blog

LEARNING & EXPLORATION

  • Tutorials
  • Edge AI hardware
  • Educational robots
  • Embedded intelligent hardware

WHERE TO BUY

  • Yahboom Online Store
  • Amazon
  • Alibaba
  • AliExpress
  • Mercado

TECHNOLOGY SUPPORT

  • Email: support@yahboom.com

BE A DISTRIBUTOR

  • Email: sales@yahboom.com
QR Code

Copyright © 2017-2026 Yahboom. All Rights Reserved.

EN/中文