yahboom
HomeLearn
Solution
Blog
Online Store
About Us
EN/中文
JetCobot📖
1.Introduction to the Jetcobot
  • 0.Unboxing
  • 1 Version Configuration Instructions
  • 2. Power adapter usage specifications
  • 3. Common Problems and Solutions
  • 4. First-time use instructions
  • 5. Get started
  • 6. Open and close the virtual desktop
2.Assembly and assembly tutorial
  • Installation Video
3.Linux operating system
  • 1.Introduction to Linux system
  • 2.Ubuntu file system
  • 3.Ubuntu common commands
  • 4.Ubuntu common editors
  • 5.Ubuntu software operation commands
  • 6.Virtual machine installation
  • 7.SSH remote control
  • 8.VNC remote control
  • 9.Transfer files remotely
  • 10.Driver library and communication
  • 11.Static IP and hotspot mode
  • 12.Bind device ID
  • 13.Capacity expansion and resource allocation
  • 14.Update system software sources
  • 15.Set root user password
  • 16.sudo free password
  • 17.Connect to WiFi network
  • 18.View system version
  • 19.Customized service management
  • 20.Back up system image
4.Jupyter Lab Basic Course
  • 1. Read the document before operation
  • 2. JupyterLab environment construction tutorial
  • 3. JupyterLab Basic Usage Tutorial
  • 4. JupyterWidgets Configuration Tutorial
  • 5. Getting Started Tutorial for JupyterWidgets Controls
5.Basic courses of main control board
  • 1. Introduction to the main control board
  • 2. Burn the system image
  • 3. Re-read the burned image
  • 4. System startup
  • 5. System and desktop introduction
  • 6. System expansion
  • 7. Network Configuration
  • 8. SSH remote login and file transfer
  • 9. VNC Remote Login
  • 10. System backup
  • 11. Increased swap space
  • 12. Use of Jtop
6.GPIO hardware control course
  • 1.GPIO library API usage
  • 2. Hardware library configuration
  • 3. Pin reading function
  • 4. Pin level output control
  • 5. Control LED
  • 6. External device serial communication
  • 7.I2C communication
7.Jetson-inference vision course
  • 1. Install Jetcam (optional)
  • 2. Install TensorFlow (optional)
  • 3. Jetson-inference environment construction (optional)
  • 4. Hello AI World
  • 5. Image Classification Reasoning
  • 6. Object Detection Reasoning
  • 7. Semantic Segmentation
8.Opencv basic course
  • 1. Introduction to Open Source CV
  • 2. Image reading and display
  • 3. Image writing
  • 4. Image quality
  • 5. Pixel Operation
  • 6. Image zoom
  • 7. Picture cut
  • 8. Picture pan
  • 9. Picture mirroring
  • 10. Affine transformation
  • 11. Picture rotation
  • 12. Perspective transformation
  • 13. Grayscale processing
  • 14. Binary image
  • 15. Edge green detection
  • 16. Line segment drawing
  • 17. Rectangular circle drawing
  • 18. Text and picture drawing
9.ROS Basic Course
  • 1.ROS introduction
  • 2.ROS installation
  • 3.ROS common command tools
  • 4.ROS workspace
  • 5.ROS function package
  • 6.ROS node
  • 7.ROS topic publisher
  • 8.ROS topic subscribers
  • 9.ROS service client
  • 10.ROS service server
  • 11.ROS action client
  • 12.ROS action server
  • 13.ROS custom message reception
  • 14.ROS-launch file
  • 15.ROS-TF transformation
  • 16.ROS parameter service
  • 17.ROS-rviz use
  • 18.ROS-rqt tool usage
  • 19.Topic message recording and playback
  • 20.urdf model introduction
  • 21.gazebo introduction
  • 22.ROS distributed communication
10.ROS+OpenCV course
  • 1.QR code
  • 2.Human pose estimation
  • 3.Target Detection
  • 4.AR vision
  • 5.AR QR code
  • 6.ROS+Opencv basics
  • 7.Face recognition
  • 8.harris corner detection
  • 9.Target tracking algorithm
  • 10.Contour moment
  • 11.Polygon outline
  • 12.Discrete fourier transform algorithm
  • 13.Edge detection algorithm
  • 14.Face detection algorithm
  • 15.Optical flow detection algorithm
  • 16.Contour detection
  • 17.General contour detection
  • 18.Feature point tracking
  • 19.HLS color filtering
  • 20.Hough circle detection
  • 21.Hough linear detection
  • 22.HSV color filtering
  • 23.LK optical flow algorithm
  • 24.Detection algorithm
  • 25.Phase dependent displacement detection
  • 26.Image pyramid sampling algorithm
  • 27.RGB color filtering
  • 28.Clear background detection algorithm
  • 29.Simplified optical flow algorithm
  • 30.Simple filter
  • 31.Threshold image processing
  • 32.Watershed segmentation algorithm
11.Robotic arm control course
  • 1.Send data
  • 2.Read data
  • 3.Control robotic arm joint angle
  • 4.Control coordinates of robotic arm end
  • 5.Control robotic arm posture
  • 6.Handle control robotic arm
  • 7.Calibrate robotic arm joint
  • 8.Calibrate robotic arm gripper
12.AI visual basic ourse
  • 1.Camera driver
  • 2.Block color calibration
  • 3.Color recognition
  • 4.Face detection
  • 5.Gesture recognition
  • 6.Model training
  • 7.Garbage recognition
13.Mediapipe course
  • 1.Hand detection
  • 2.Posture detection
  • 3.Overall detection
  • 4.Face detection
  • 5.Face recognition
  • 6.Face effects
  • 7.3D object recognition
  • 8.Brush
  • 9.Finger control
  • 10.Gesture recognition
14.AI visual tracking course
  • 1.PID algorithm basics
  • 2.Color block positioning
  • 3.Color block tracking
  • 4.Face positioning
  • 5.Face tracking
  • 6.Fingertip trajectory recognition
  • 7.Mediapipe gesture control robotic arm action group
  • 8.Mediapipe arm posture control robotic arm
  • 9.Mediapipe palm arm target positioning
  • 10.Mediapipe palm recognition and tracking control robotic arm
  • 11.Apriltag tag code recognition
  • 12.Apriltag tag code tracking
  • 13.KCF object tracking
15.AI visual grabbing course
  • 1.Gesture recognition stacking blocks
  • 2.Color recognition grab blocks
  • 3.Apriltag recognition grabbing blocks
  • 4.Catch game
  • 5.Color sorting
  • 6.Color stacking
  • 7.apriltag sorting
  • 8.apriltag stacking
  • 9.Garbage sorting
  • 10.Garbage stacking
  • 11.Color interaction
16.URDF Model course
  • 1.URDF model of the robotic arm
  • 2.URDF model controls the real robotic arm
17.Kinesiology advanced course
  • 1.Movelt configuration
  • 2.MoveIt control the real machine
  • 3.Moves randomly
  • 4.Movelt kinematic design
  • 5.Movelt cartesian path
  • 6.Movelt collision detection
  • 7.Movelt scene design
18.Jetson Orin SUPER -Introduction to the Jetcobotnew
  • 1. Version Configuration Instructionsnew
  • 2. Power adapter usage specificationsnew
  • 3. Common Problems and Solutionsnew
  • 4. First-time use instructionsnew
  • 5. Get startednew
  • 6. Open and close the virtual desktopnew
19.Jetson Orin SUPER -Assembly and assembly tutorial
  • Installation Videonew
20.Jetson Orin SUPER -Linux operating systemnew
  • 1.Introduction to Linux systemnew
  • 2.Ubuntu file systemnew
  • 3.Ubuntu common commandsnew
  • 4.Ubuntu common editorsnew
  • 5.Ubuntu software operation commandsnew
  • 6.Virtual machine installationnew
  • 7.SSH remote controlnew
  • 8.VNC remote controlnew
  • 9.Transfer files remotelynew
  • 10.Driver library and communicationnew
  • 11.Static IP and hotspot modenew
  • 12.Bind device IDnew
  • 13.Capacity expansion and resource allocationnew
  • 14.Update system software sourcesnew
  • 15.Set root user passwordnew
  • 16.sudo free passwordnew
  • 17.Connect to WiFi networknew
  • 18.View system versionnew
  • 19.Customized service managementnew
  • 20.Back up system imagenew
21.Jetson Orin SUPER -Jupyter Lab Basic Course
  • 1. Read the document before operationnew
  • 2. JupyterLab environment construction tutorialnew
  • 3. JupyterLab Basic Usage Tutorialnew
  • 4. JupyterWidgets Configuration Tutorialnew
  • 5. Getting Started Tutorial for JupyterWidgets Controlsnew
22.Jetson Orin SUPER -Basic motherboard usage course
  • 1. Motherboard Introductionnew
  • 2. Restore the factory image systemnew
  • 3. System startupnew
  • 4. System and desktop introductionnew
  • 5.VNC Remote Controlnew
  • 6. System expansionnew
  • 7. Network Configurationnew
  • 8.SSH remote loginnew
  • 9. Remote file transfernew
  • 10. Chinese input methodnew
  • 11. Use of Jtop toolnew
  • 12. Swap space expansionnew
  • 13.Backup SSD systemnew
  • 14.Jetpack old system upgraded to SUPER system
23.Jetson Orin SUPER -GPIO hardware control course
  • 1.GPIO library API usagenew
  • 2.Hardware library configurationnew
  • 3.Pin reading functionnew
  • 4.Pin level output controlnew
  • 5.Control LEDnew
  • 6.External device serial communicationnew
  • 7.I2C communicationnew
24.Jetson Orin SUPER -YOLO11 development
  • 01.YOLO environment constructionnew
  • 02.CLI usenew
  • 03.Object detection
  • 04.Instance segmentationnew
  • 05.Pose estimationnew
  • 06.Image classificationnew
  • 07.Oriented object detectionnew
  • 08.Model conversionnew
  • 09.Dataset annotationnew
  • 10.Model training conversionnew
  • 11.Model predictionnew
25.Jetson Orin SUPER -OpenCV course
  • 1. Introduction to Open Source CVnew
  • 2. Image reading and displaynew
  • 3. Image writingnew
  • 4. Image qualitynew
  • 5. Pixel Operationnew
  • 6. Image zoomnew
  • 7. Picture cutnew
  • 8. Picture pannew
  • 9. Picture mirroringnew
  • 10. Affine transformationnew
  • 11. Picture rotationnew
  • 12. Perspective transformationnew
  • 13. Grayscale processingnew
  • 14. Binary imagenew
  • 15. Edge green detectionnew
  • 16. Line segment drawingnew
  • 17. Rectangular circle drawingnew
  • 18. Text and picture drawingnew
26.Jetson Orin SUPER -ROS2 basic course
  • 1. Introduction to ROS2new
  • 2.ROS2 install Humblenew
  • 3.ROS2 development environmentnew
  • 4.ROS2 workspacenew
  • 5.ROS2 function packagenew
  • 6.ROS2 nodenew
  • 7.ROS2 topic communicationnew
  • 8.ROS2 service communicationnew
  • 9.ROS2 action communicationnew
  • 10.ROS2 custom interface messagenew
  • 11.ROS2 parameter service casenew
  • 12.ROS2 meta-function packagenew
  • 13.ROS2 distributed communicationnew
  • 14.ROS2 DDSnew
  • 15.ROS2 time related APInew
  • 16.ROS2 common command toolsnew
  • 17.ROS2 rviz2 usenew
  • 18.ROS2 rqt toolboxnew
  • 19.ROS2 Launch startup file configurationnew
  • 20.ROS2 recording and playback toolnew
  • 21.ROS2 URDF modelnew
  • 22.ROS2 Gazebo simulation platformnew
  • 23.ROS2 TF2 coordinate transformationnew
27.Jetson Orin SUPER -Advanced vision course
  • 1.QR codenew
  • 2.Human pose estimationnew
  • 3.Target Detectionnew
  • 4.AR visionnew
  • 5.ROS+Opencv Basicsnew
28.Jetson Orin SUPER -Robotic Arm Control Course
  • 1. Sending Datanew
  • 2. Read datanew
  • 3. Control the joint angle of the robotic armnew
  • 4. Control the coordinates of the end of the robot armnew
  • 5. Control the posture of the robotic armnew
  • 6.Handle remote control robotic armnew
  • 7. Calibrate the robot arm jointsnew
  • 8. Calibrate the robot grippernew
29.Jetson Orin SUPER -AI Vision Basic Course
  • 1. Camera drivernew
  • 2. Color threshold adjustment and color block calibrationnew
  • 3. Color recognitionnew
  • 4. Face Detectionnew
  • 5. Gesture Recognitionnew
  • 6. Garbage Identificationnew
30.Jetson Orin SUPER -Mediapipe Development Course
  • 1. Hand detectionnew
  • 2. Posture detectionnew
  • 3. Overall detectionnew
  • 4.FaceMeshnew
  • 5. Face Detectionnew
  • 6. Face effectsnew
  • 7. 3D Object Recognitionnew
  • 8. Brushnew
  • 9. Finger controlnew
  • 10. Gesture Recognitionnew
31.Jetson Orin SUPER -AI visual tracking course
  • 1.PID algorithm basicsnew
  • 2. Color block positioning experimentnew
  • 3. Color block tracking experimentnew
  • 4. Face location experimentnew
  • 5. Face tracking experimentnew
  • 6. Fingertip trajectory recognitionnew
  • 7.Mediapipe gesture control robotic arm action groupnew
  • 8.Mediapipe arm posture control robotic armnew
  • 9. Mediapipe palm arm target positioningnew
  • 10. Mediapipe identifies and tracks your palm to control the robotic armnew
  • 11. Apriltag label code recognitionnew
  • 12. Apriltag label code trackingnew
  • 13.KCF Object Trackingnew
32.Jetson Orin SUPER -AI Visual Capture Course
  • 1. Gesture recognition stacking blocksnew
  • 2. Color recognition grab blocksnew
  • 3. Apriltag recognition and grabbing building blocksnew
  • 4.Catch gamenew
  • 5. Color sortingnew
  • 6. Color stackingnew
  • 7. Apriltag sortingnew
  • 8. Apriltag stackingnew
  • 9. Garbage sortingnew
  • 10. Garbage dumpnew
  • 11.Color interactionnew
33.Jetson Orin SUPER -Robotic Arm URDF Model Course
  • 1. Robotic arm URDF modelnew
  • 2. URDF model controls the real robot armnew
34.Jetson Orin SUPER -Moveit advanced kinematics course
  • 1.Movelt Configurationnew
  • 2. Use of MoveItnew
  • 3. MoveIt drives the real machinenew
  • 4. MoveIt Random Movenew
  • 5.Movelt positive kinematics designnew
  • 6.Movelt inverse kinematics designnew
  • 7.Movelt Cartesian pathnew
  • 8.Movelt scene designnew
  • 9.Movelt Collision Detectionnew
35.FAQnew
  • 1.Using your own Jetson board, JetCobot cannot start normally
Download
  • Instruction_Manual
  • SystemFile_for_NANO4GB
  • SystemFile_For_OrinNANO
  • SystemFile_For_OrinNX
  • VM_File
  • Code
  • 3D Model File
  • Jetson_Boot_USB.tar.gz
  • ROS2_Basic_VM
Download ZIP

Welcome to JetCobot repository

14.Jetpack old system upgraded to SUPER system

Jetpack old system upgraded to SUPER system

Jetpack old system upgraded to SUPER system1、ReadMe2、Write SUPER boot file2.1、Connect hardware2.2、Connect VM software2.3、Write SUPER boot file3、Write Yahboom robot system file into SSD3.1、Format SSD3.1.1、Download DiskGenius3.1.2、Use DiskGeniusDelete partitionCreate a new partition3.2、Write Yahboom robot car system file3.2.1、Install Win32DiskImager3.2.2、Use Win32DiskImager4、SSD expansion4.1、Install GParted4.2、Use GParted4.3. Adjust partitions

1、ReadMe

If you purchased a Jetson ORIN NANO/Jetson ORIN NX board, and you want to turn it into a Jetson ORIN NANO SUPER or Jetson ORIN NX SUPER. Please read this tutorials carefully.

2、Write SUPER boot file

The purpose of this tutorial is to write SUPER boot to the Jetson Orin series board (for use with Jetpack 6.2 system).

The process of writing the boot file does not require the install SSD.

2.1、Connect hardware

1.Use a jumper cap to short-circuit the FC REC and GND pins under the core board. You don't need to remove the core board, the picture is just for a clearer observation

This diagram takes Jetson Orin Nano official version as an example, and users of other versions can refer to it for use (the hardware interface and functional layout are consistent)

2.The Jetson Orin board needs to be connected to a DC power adapter, DP data cable, and network cable. And connect it to the computer via a Type C data cable

Note: You don't need to connect the DP data cable and network cable when writing the boot, but they will be needed when using the motherboard later.
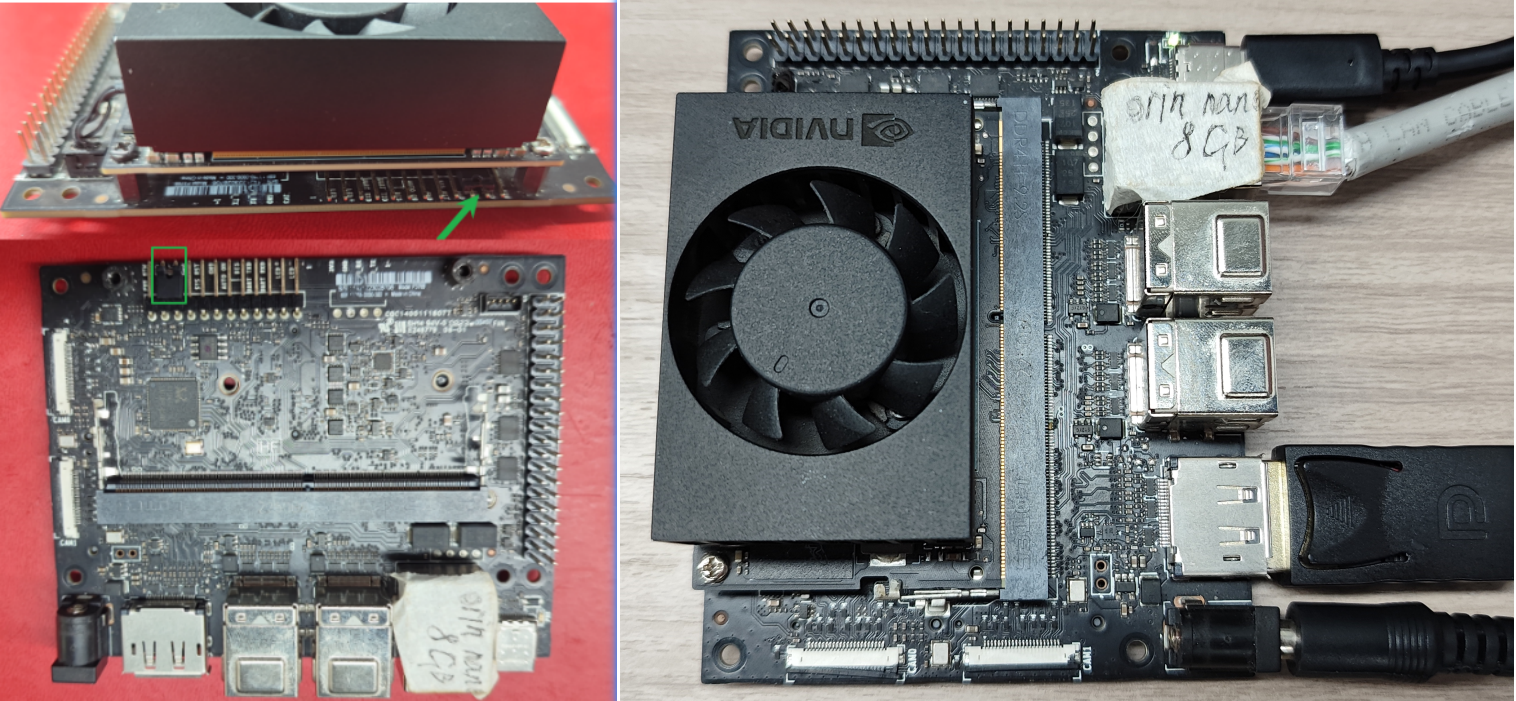
image-20250121195352195

2.2、Connect VM software

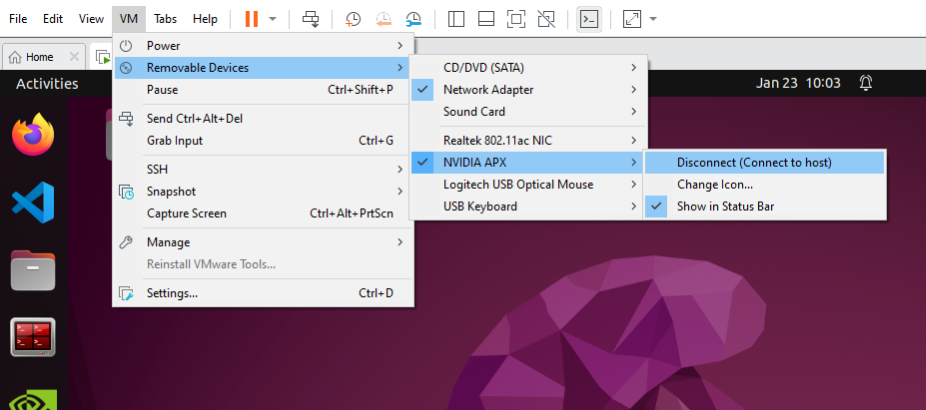
Users need to use the virtual machine file provided by Yahboom to write the SUPER boot file.

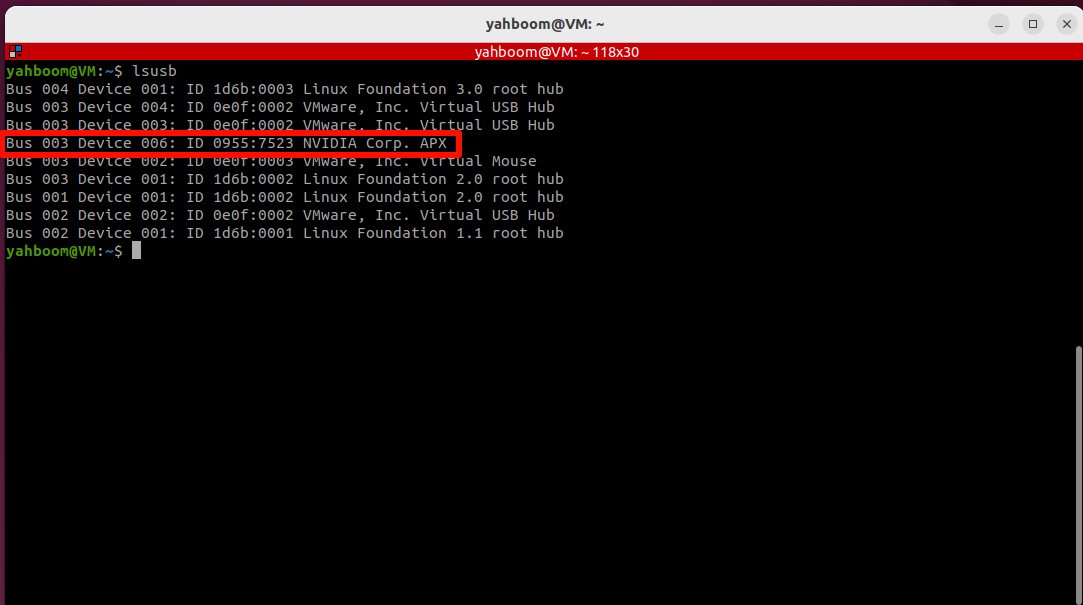
We need to connect the motherboard to the virtual machine so that it can be recognized by the Ubuntu system.

User name:yahboom
Password:yahboom

image-20250122104659911

image-20250122104757404

2.3、Write SUPER boot file

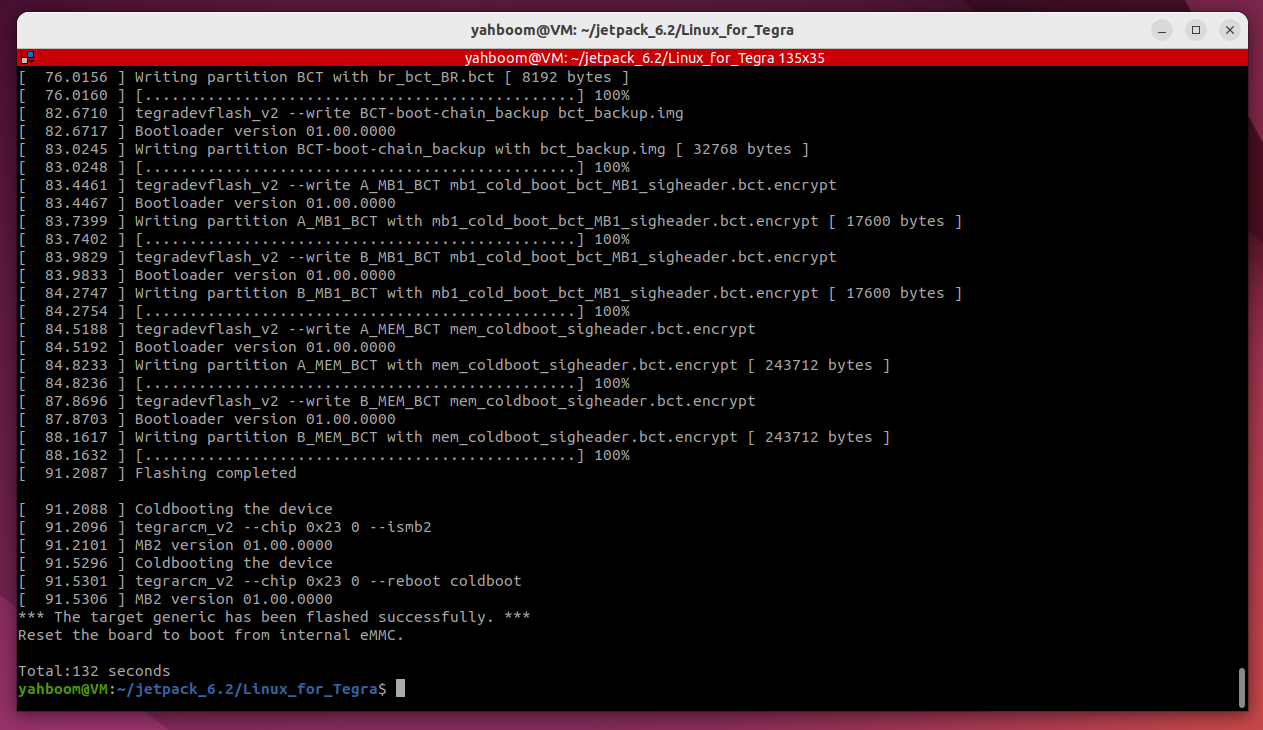
Open the terminal, enter the specified folder and run the script.

If writing fails, you can disconnect the motherboard power supply, reconnect the virtual machine to run the command, and try again

xxxxxxxxxx
cd ~/jetpack_6.2/Linux_for_Tegra && sudo ./yahboom_flash.sh.x
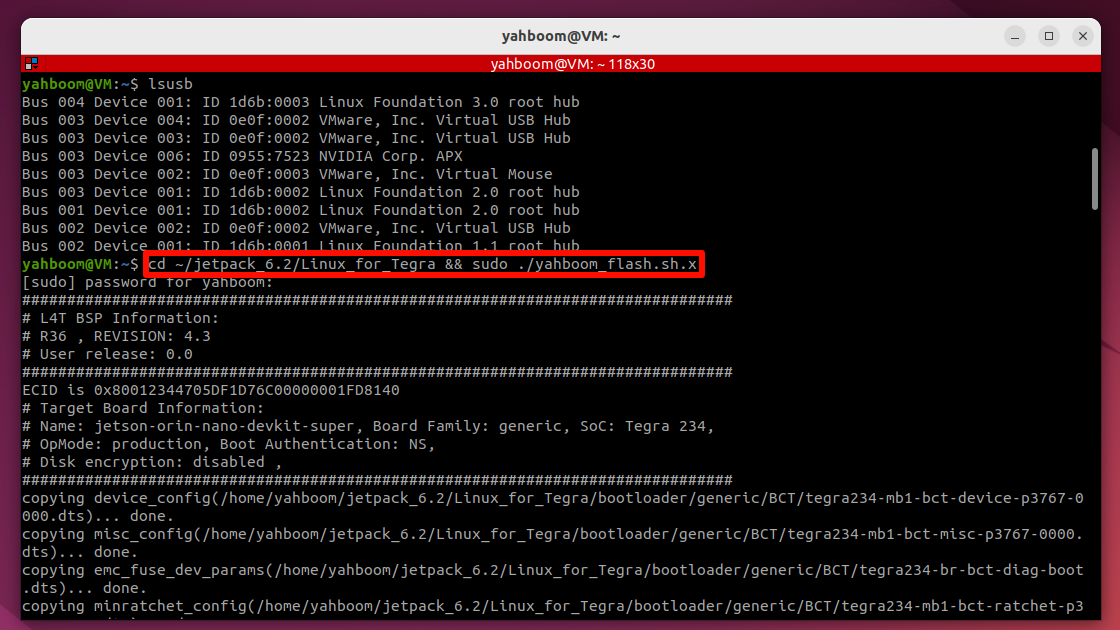
image-20250122104832985

image-20250122105606210

3、Write Yahboom robot system file into SSD

This tutorial allows you to write the system image file of the robot car SUPER (Jetpack6.2) provided by Yahboom to the SSD

Note: Users need to prepare the M.2 SSD Enclosure in advance, install the SSD into the M.2 SSD Enclosure, connect it to the computer, format it and write the new system image file.

3.1、Format SSD

Before writing the Yahboom robot car system image file, you need to format the solid-state drive into exFAT format.

3.1.1、Download DiskGenius

Download link:https://www.diskgenius.cn/

image-20250110201003552

Unzip the downloaded compressed file and open DiskGenius.exe to use.
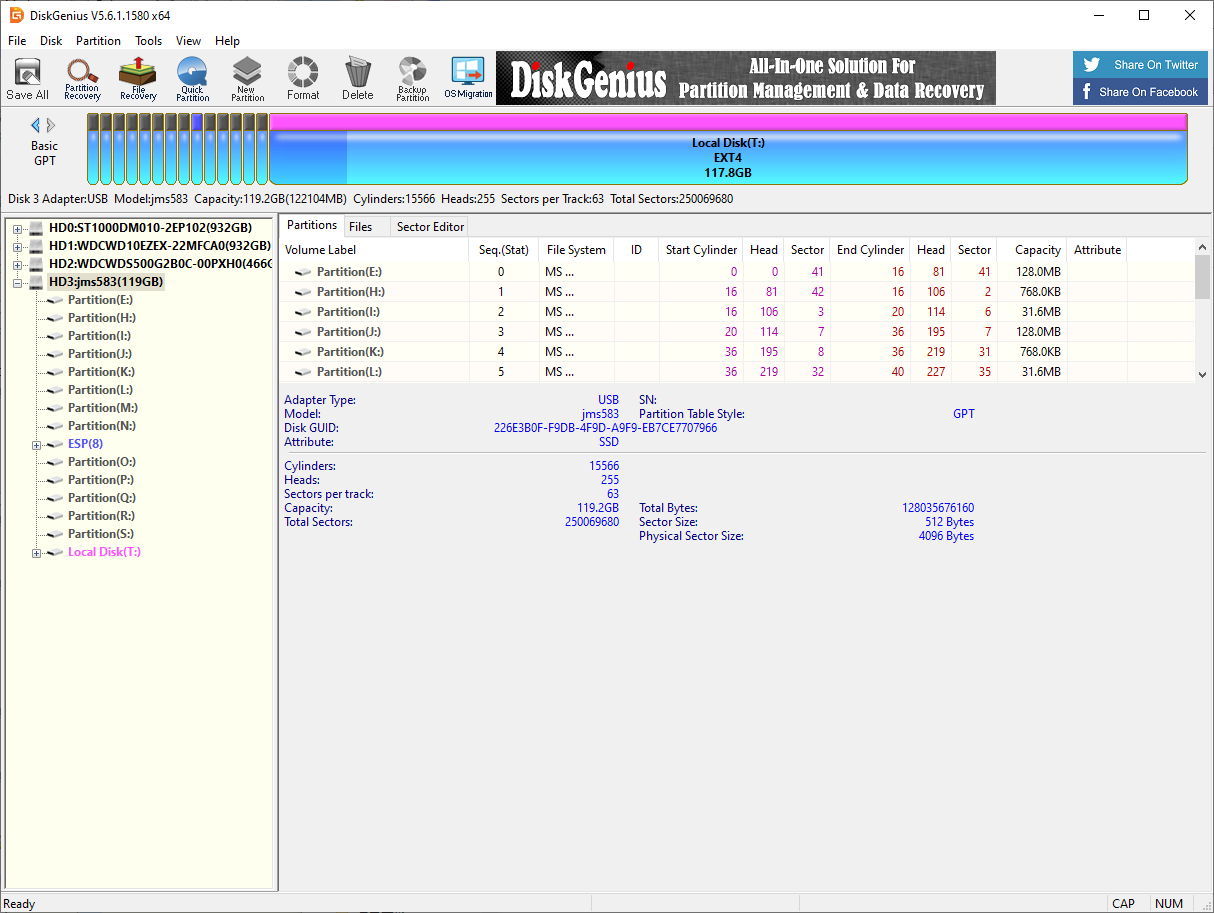
image-20250110201121200

3.1.2、Use DiskGenius

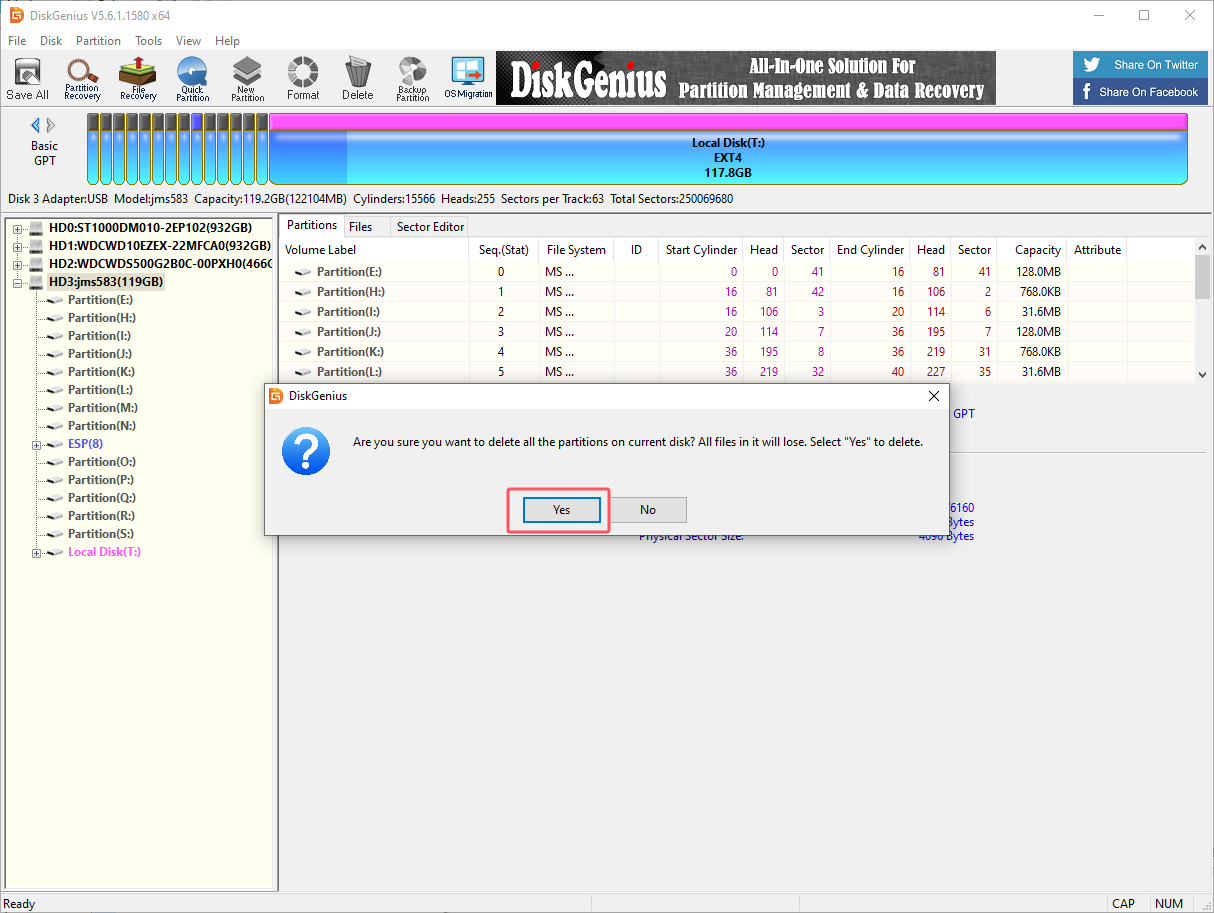
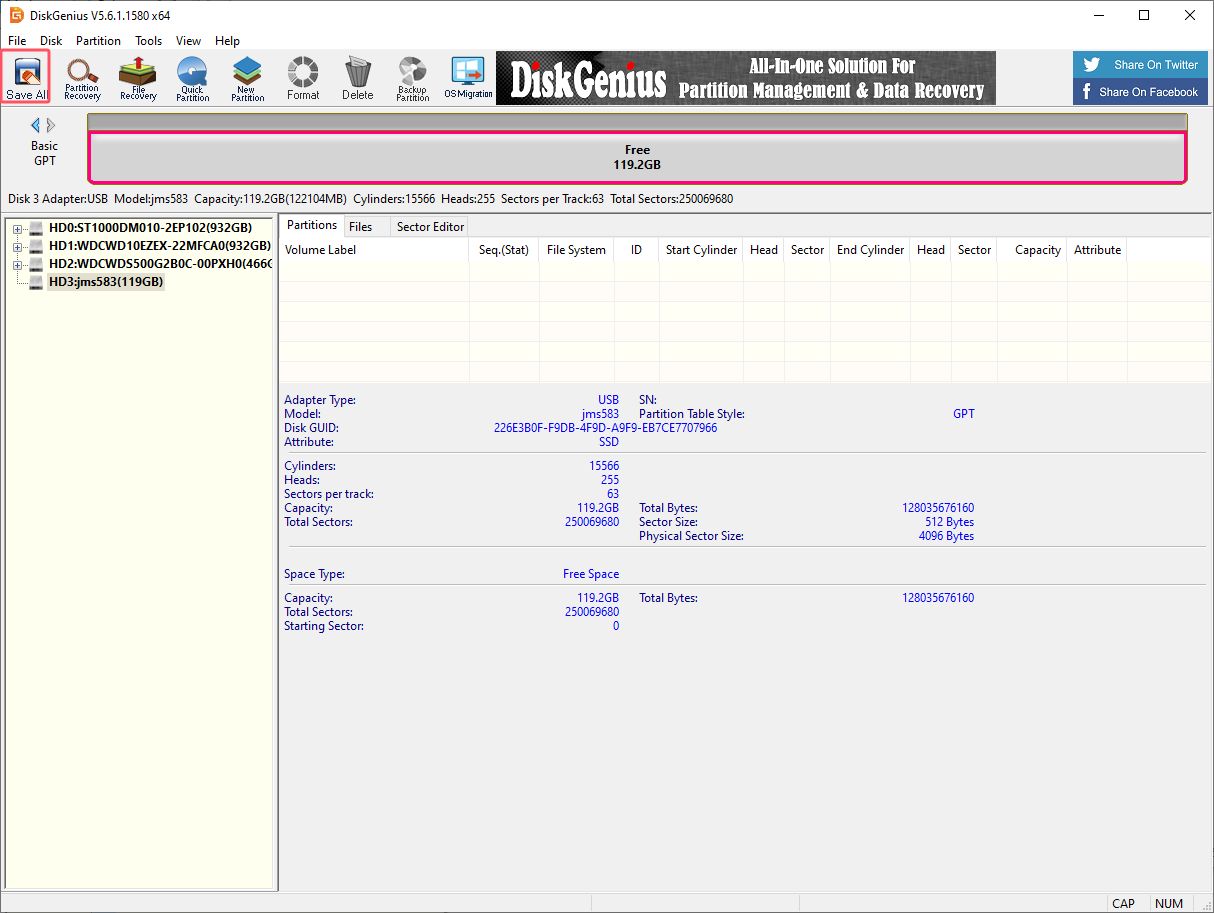
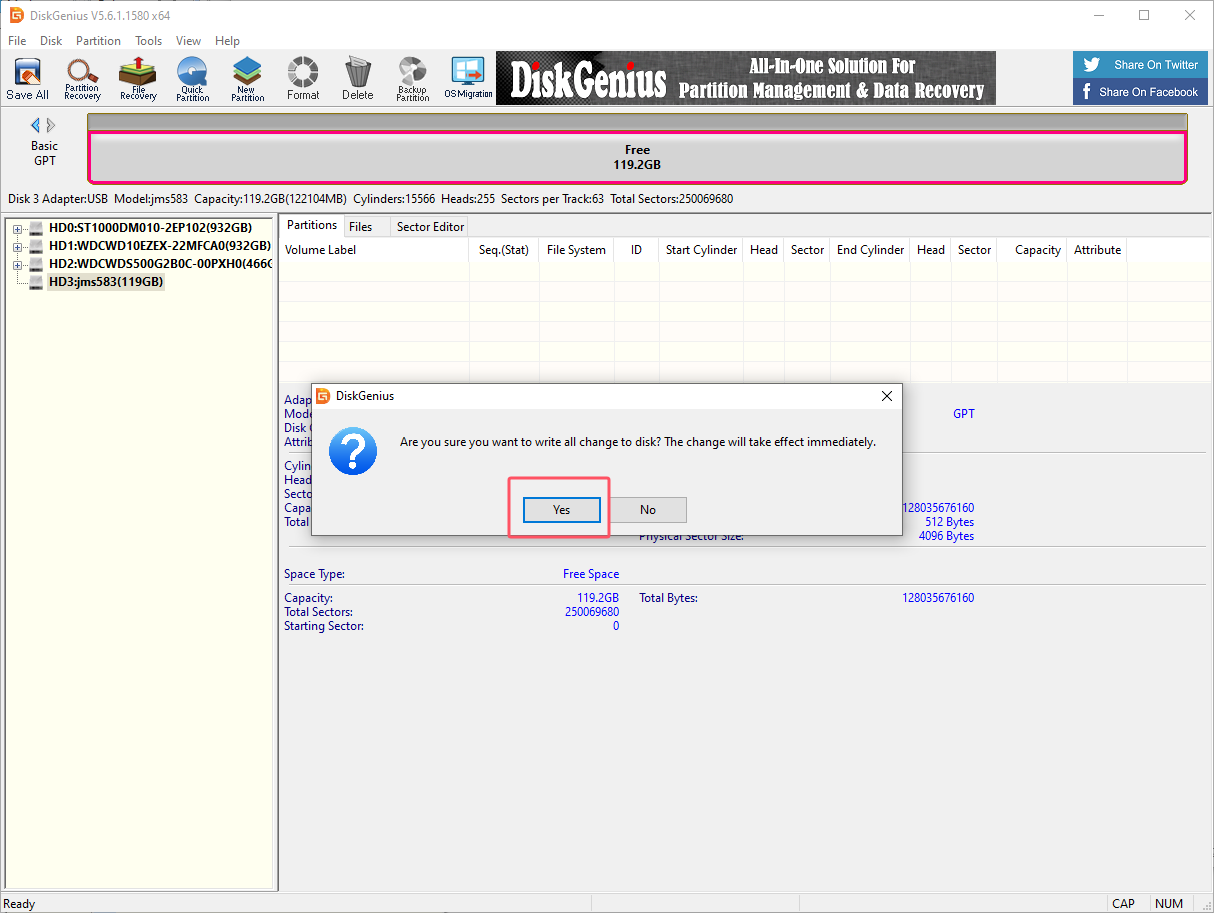
Delete partition

Deleting a partition will clear the disk data. Please confirm that the drive letter is the disk that needs to be formatted before confirming the operation.

You can judge based on the disk size and the newly added drive letter of the connected disk.
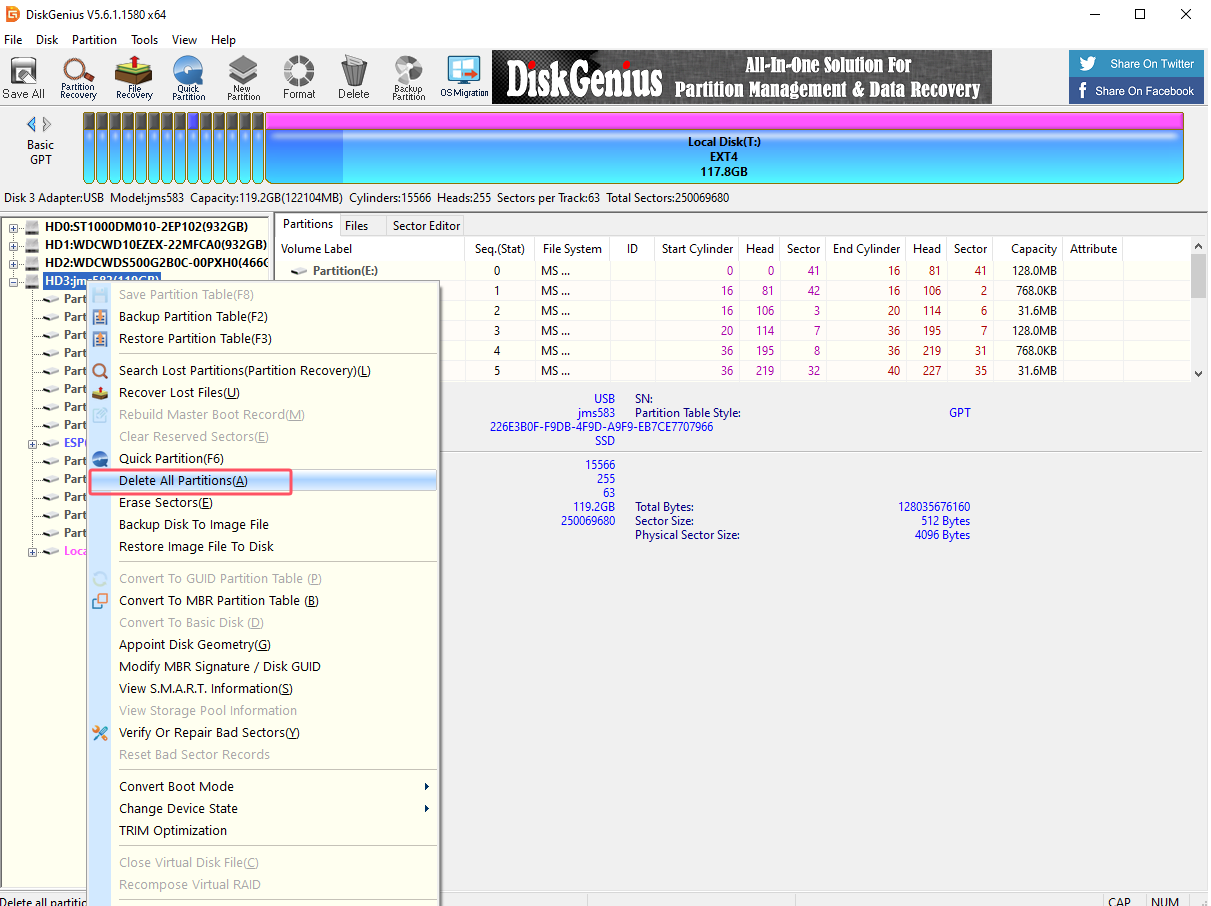
image-20250110201331658

image-20250110201403408

image-20250110201419269

image-20250110201432707

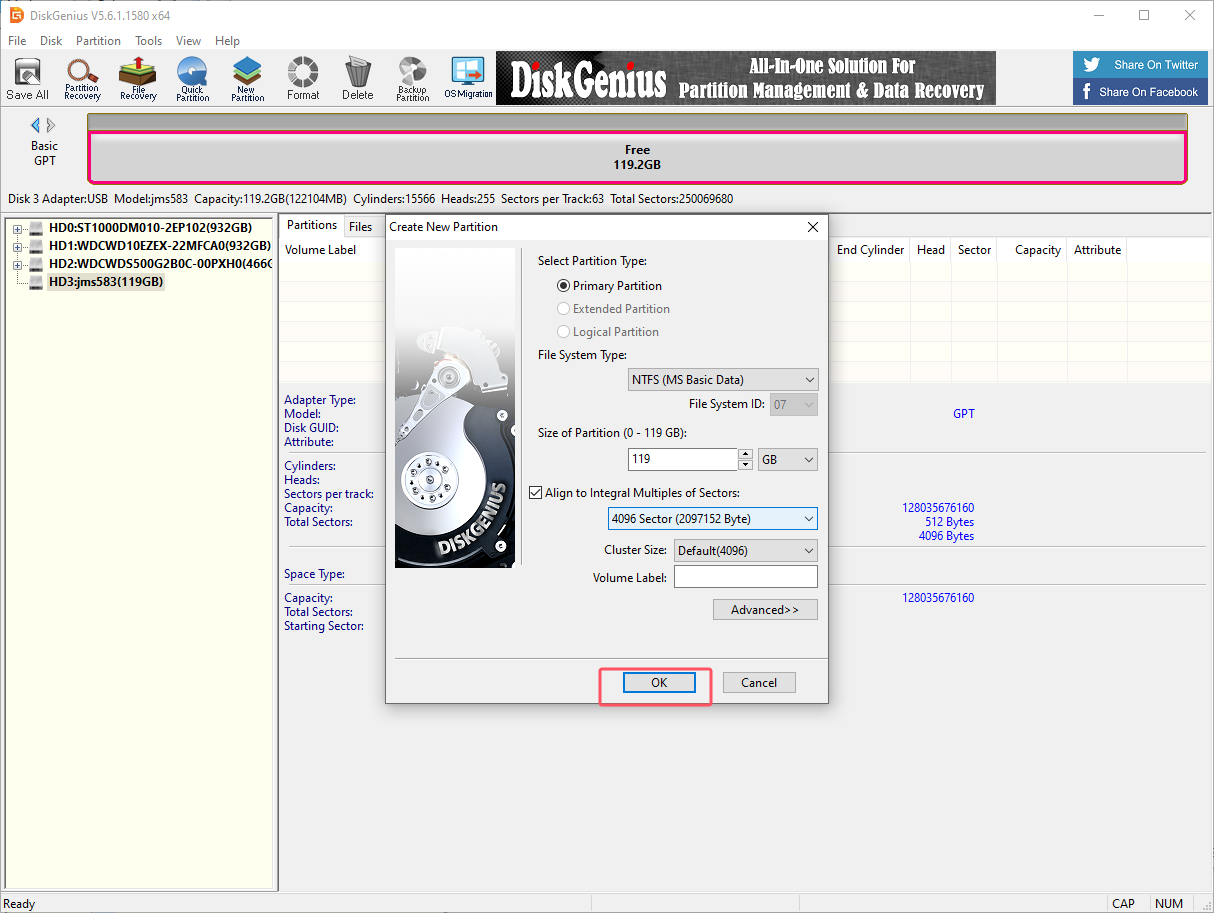
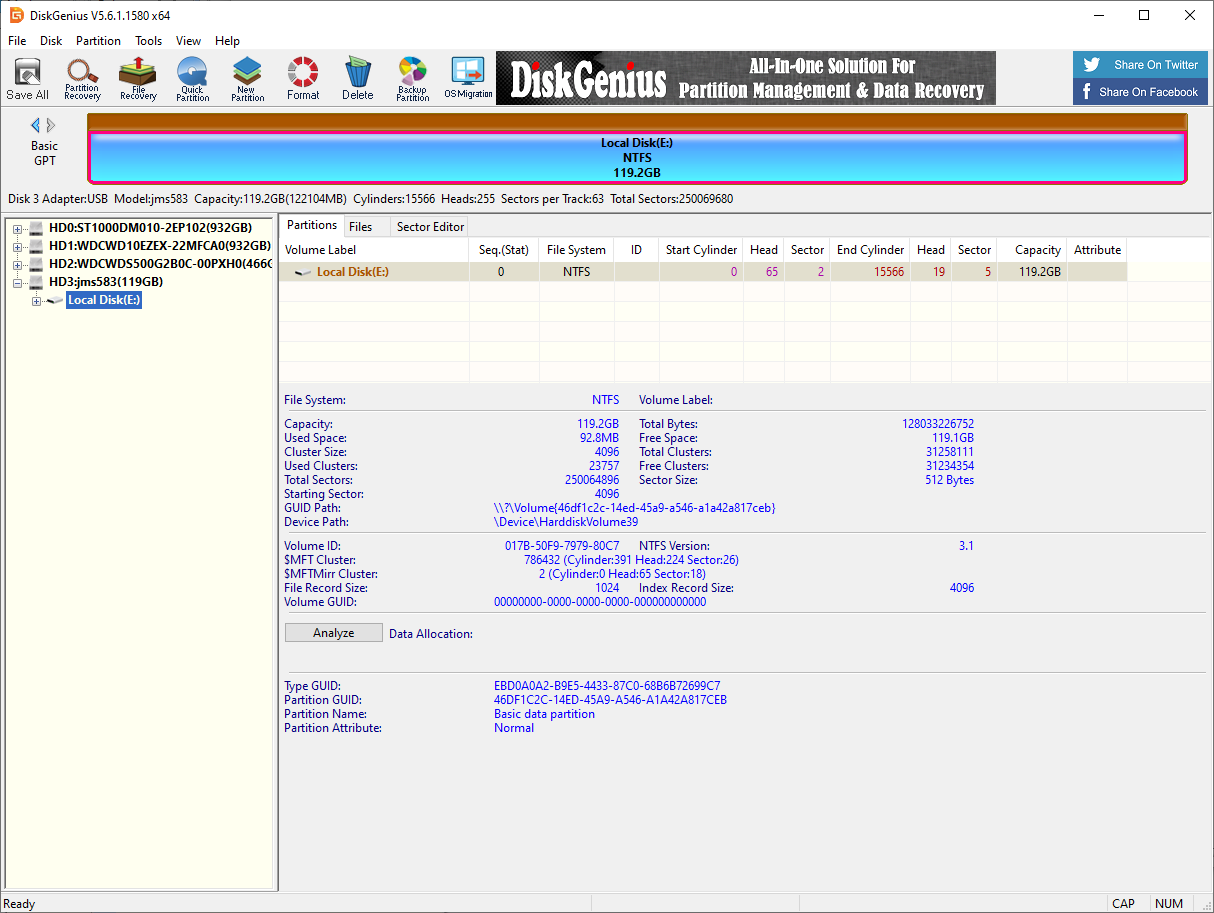
Create a new partition

Partition the SSD into exFAT format.

Select the drive letter corresponding to the SSD and click Quick Partition。
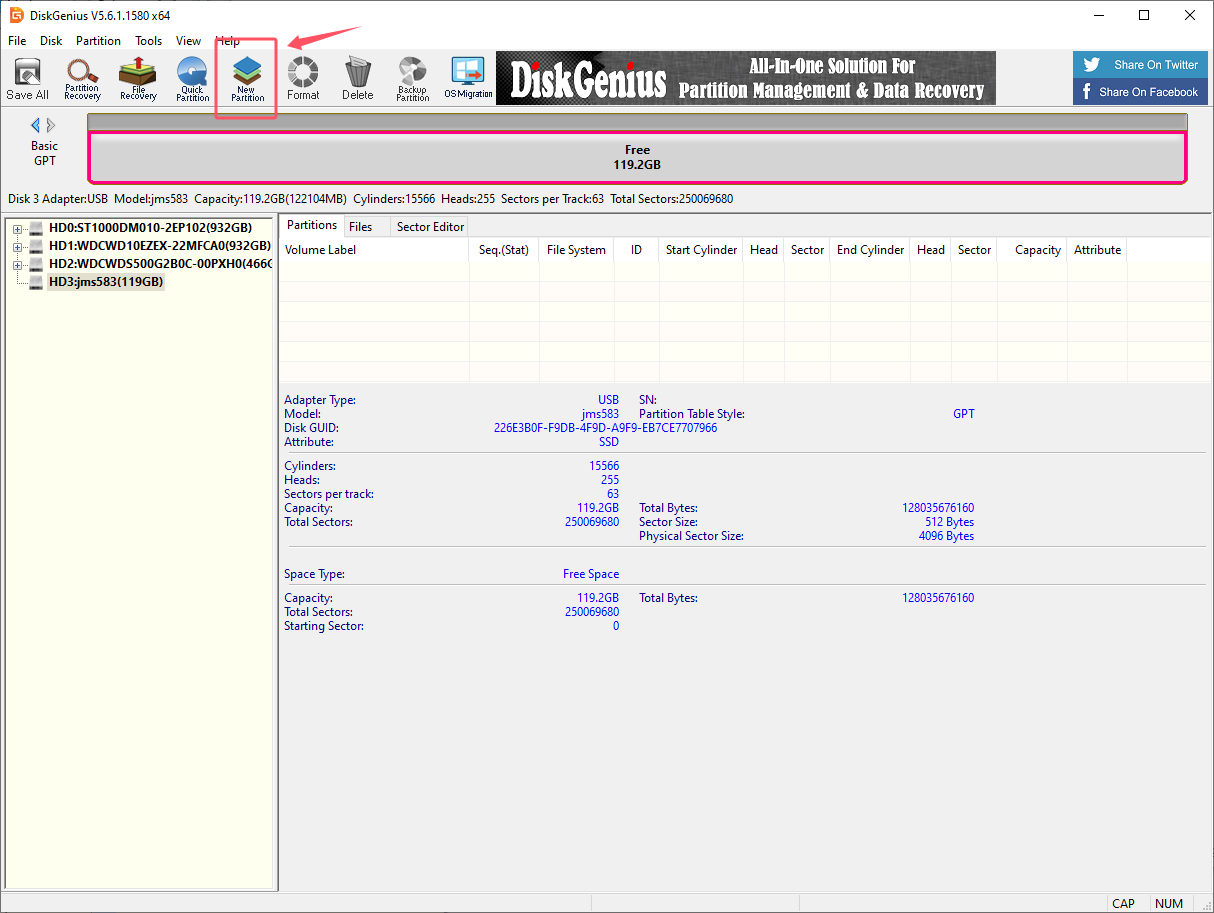
image-20250110201722505

Partition options: You can check as shown below
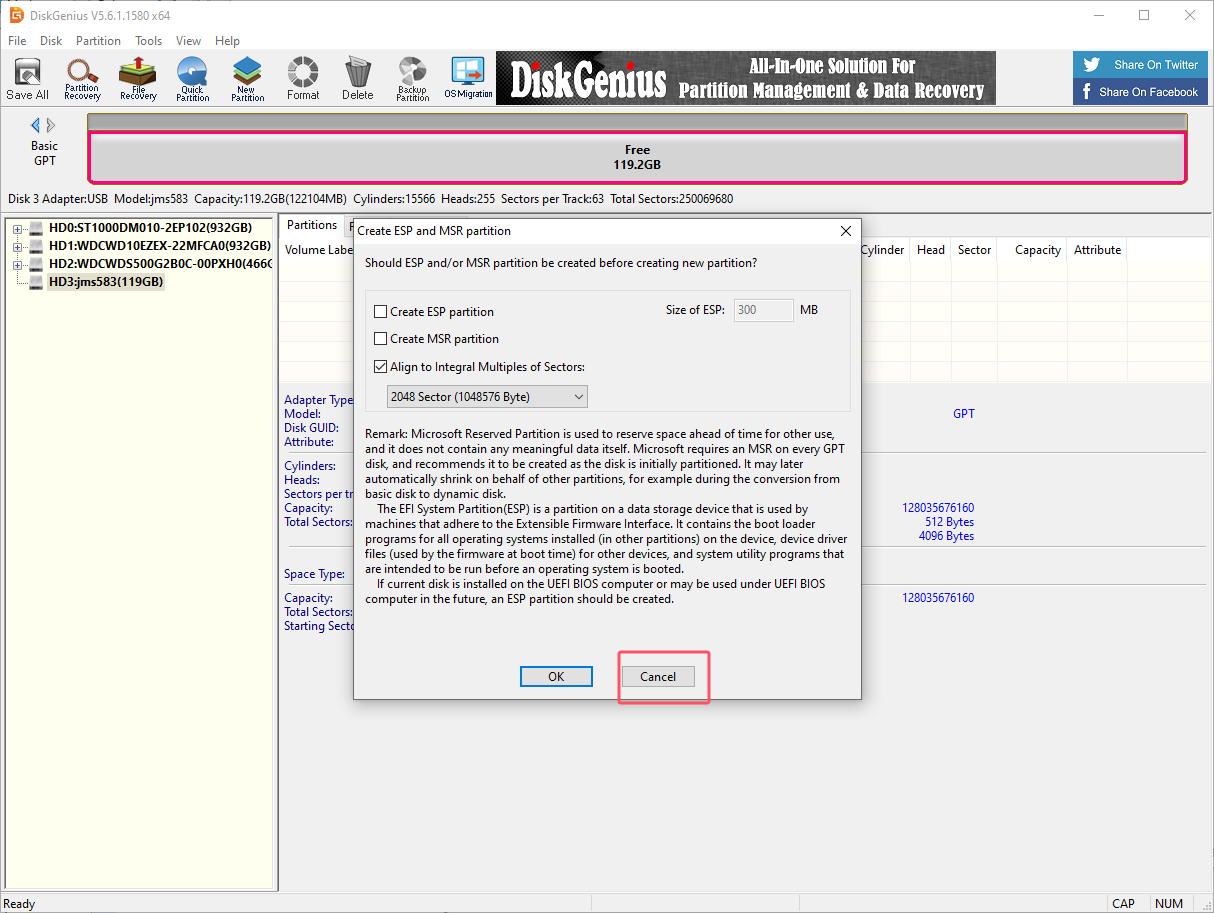
image-20250110201833715

image-20250110201833715

3.2、Write Yahboom robot car system file

You need to download the image system file in the tutorials in advance and decompress it to get the .img file. Download the system and decompress it locally.

3.2.1、Install Win32DiskImager

Download link:https://sourceforge.net/projects/win32diskimager/
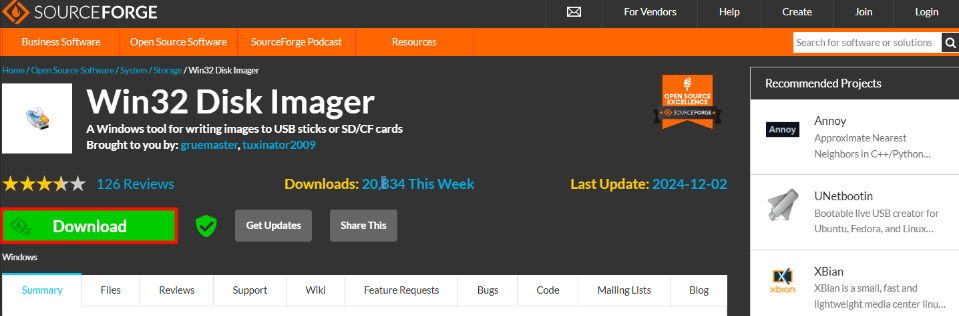
image-20250110222239328

Open the win32diskimager-1.0.0-install.exe installation package as an administrator and accept the agreement.
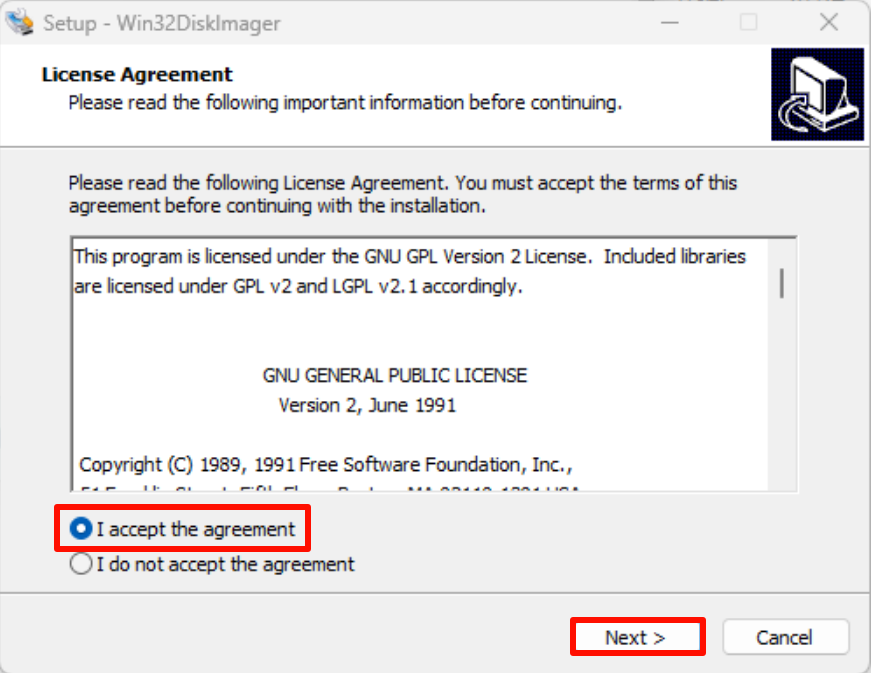
image-20250110222209318

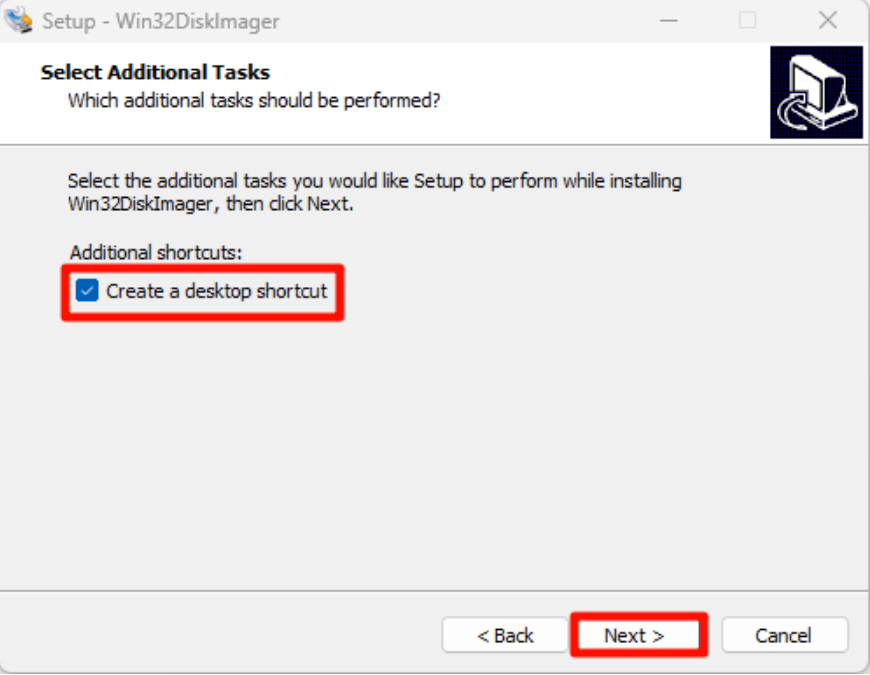
Installation location: Default location is recommended.
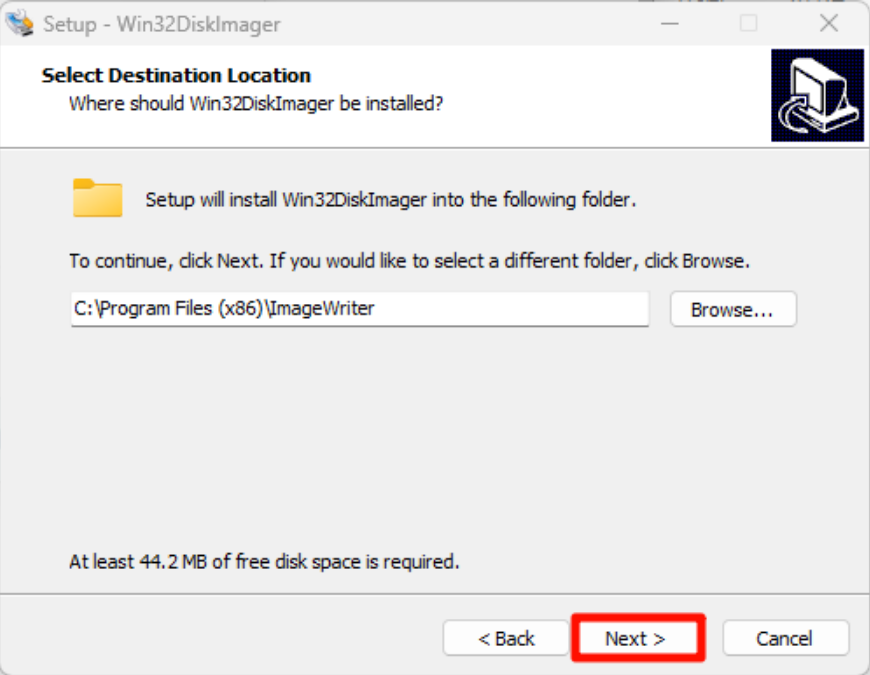
image-20250110222141639

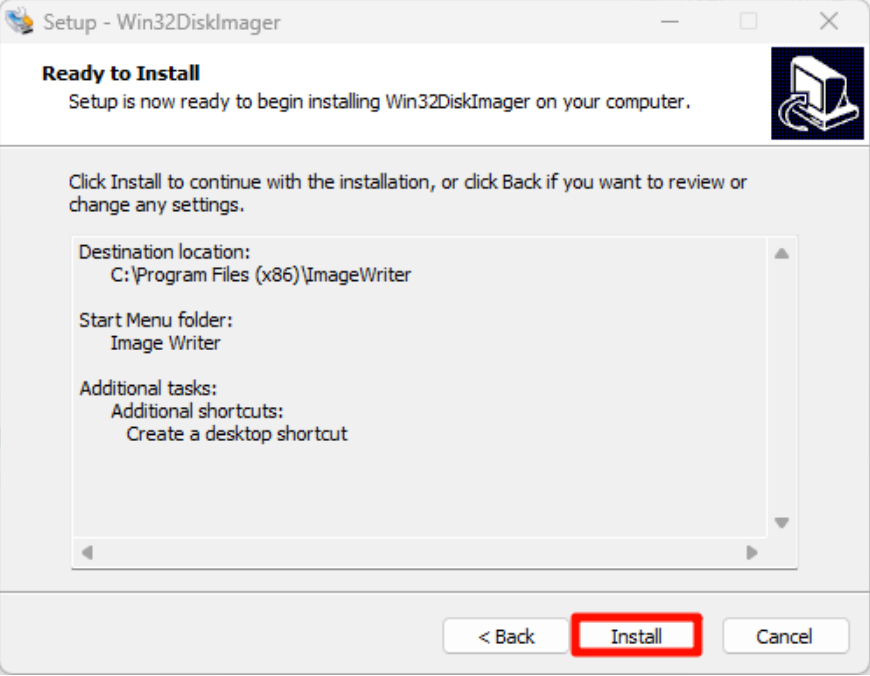
Click " Install"

image-20250110222109847

image-20250110222041855

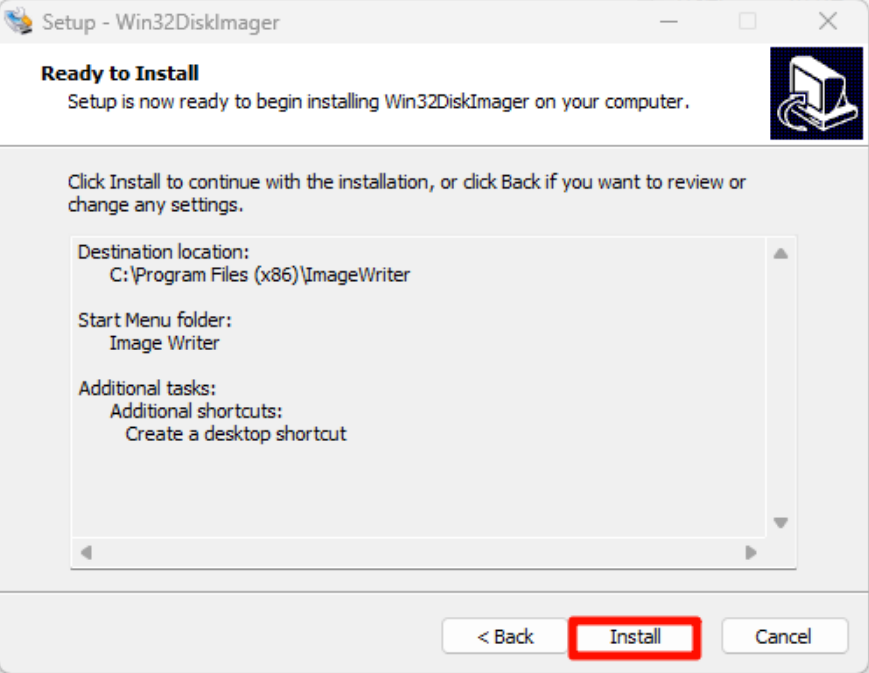
Click " Install"

image-20250110222017810

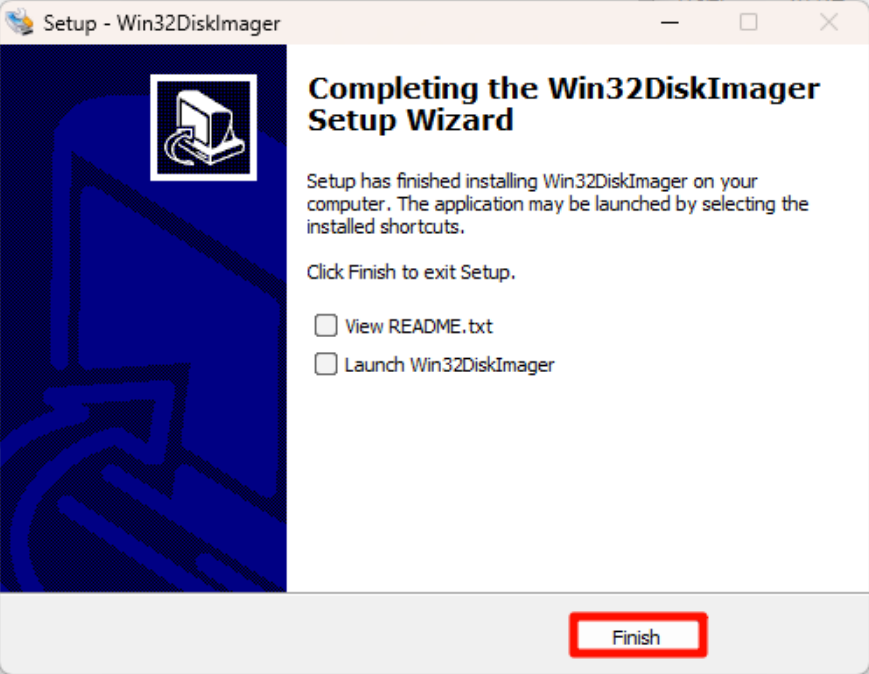
Complete the installation.

image-20250110221950093

3.2.2、Use Win32DiskImager

①: Select the factory image file (*.img) in the data

②: Select the drive letter corresponding to the SSD

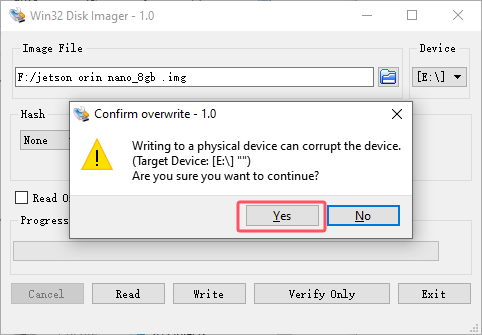
③: Write the Yahboom system image to the SSD
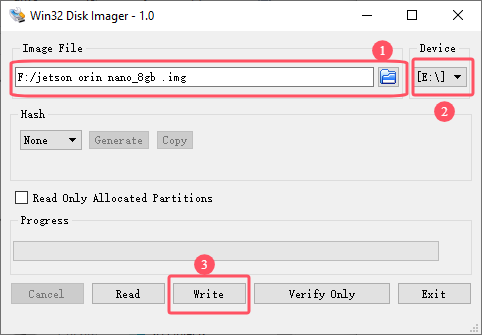
image-20250110202003280

Click "Yes"

image-20250110202018758

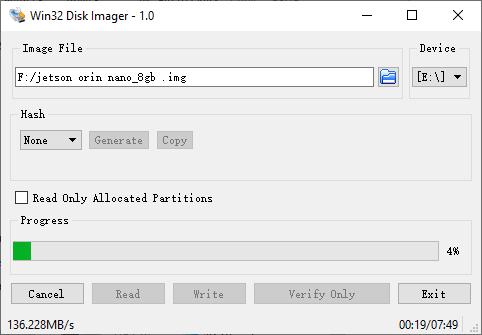
wait it

image-20250110202439181

image-20250110203047627

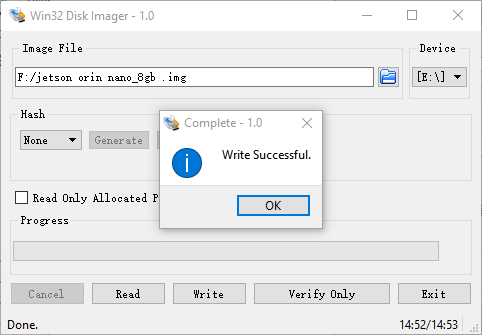
After the system is written, you can close this software.

And install the SSD to the Jetson Orin board.

4、SSD expansion

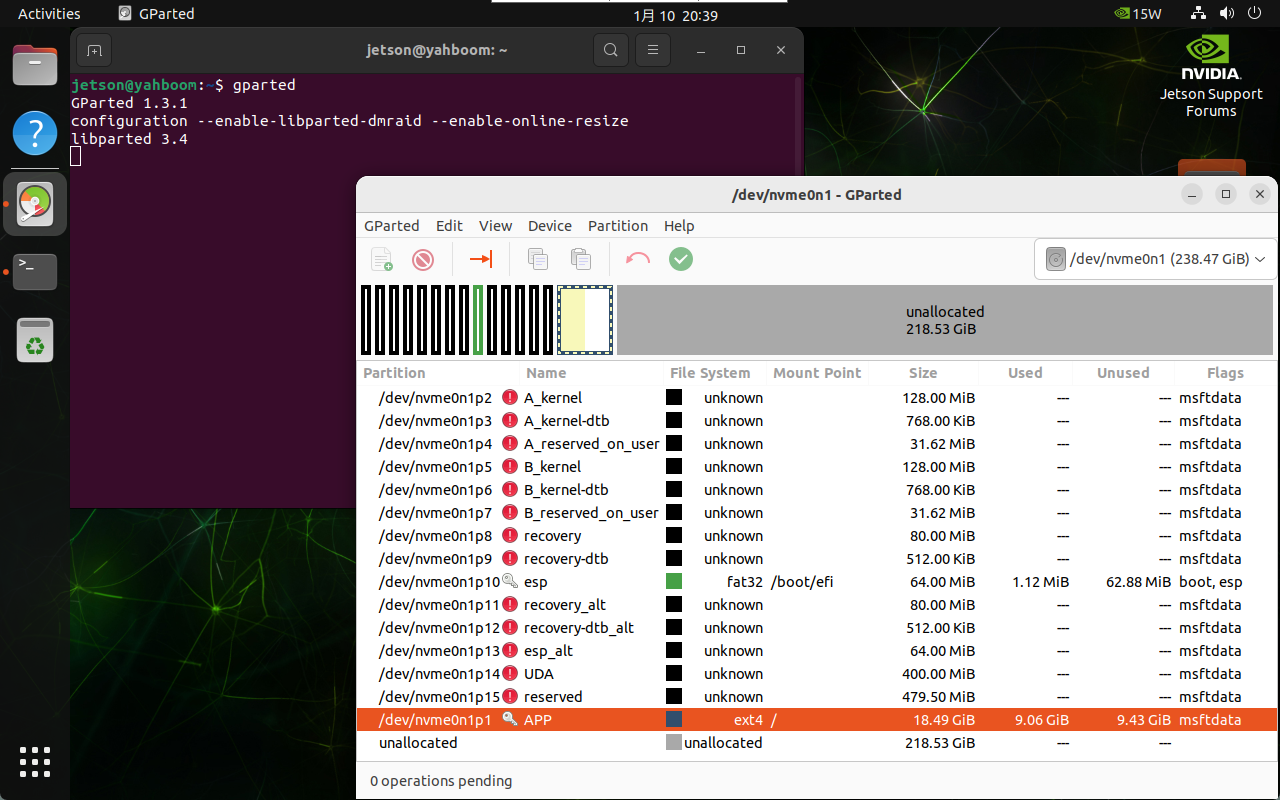
This tutorial can be used to allocate the unallocated space of the solid state drive.

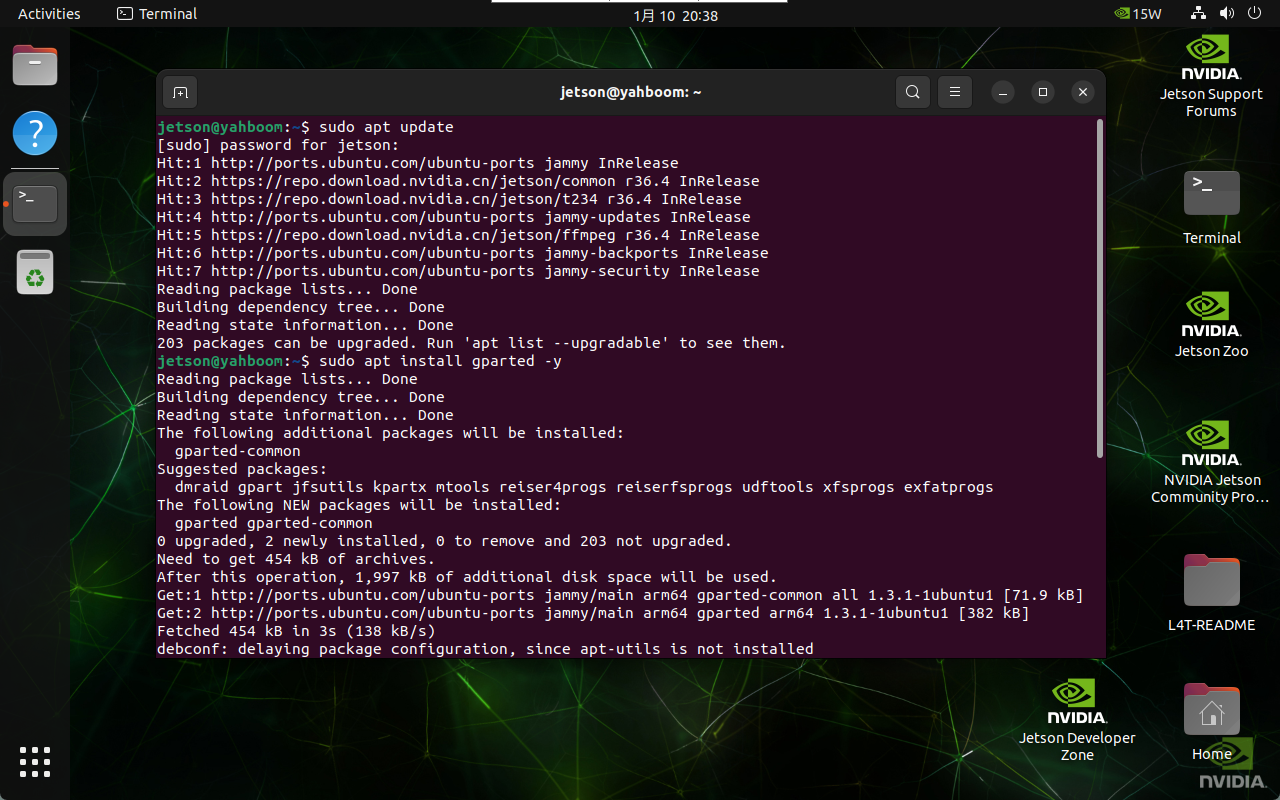
4.1、Install GParted

xxxxxxxxxx
sudo apt update
sudo apt install gparted -y

image-20250110203835949

4.2、Use GParted

Find the GParted application icon in the system application menu bar to open it or enter the following command in the terminal to start it.

xxxxxxxxxx
gparted

image-20250110203949546

4.3. Adjust partitions

Right-click the disk partition that needs to be expanded: generally select the largest partition on the disk
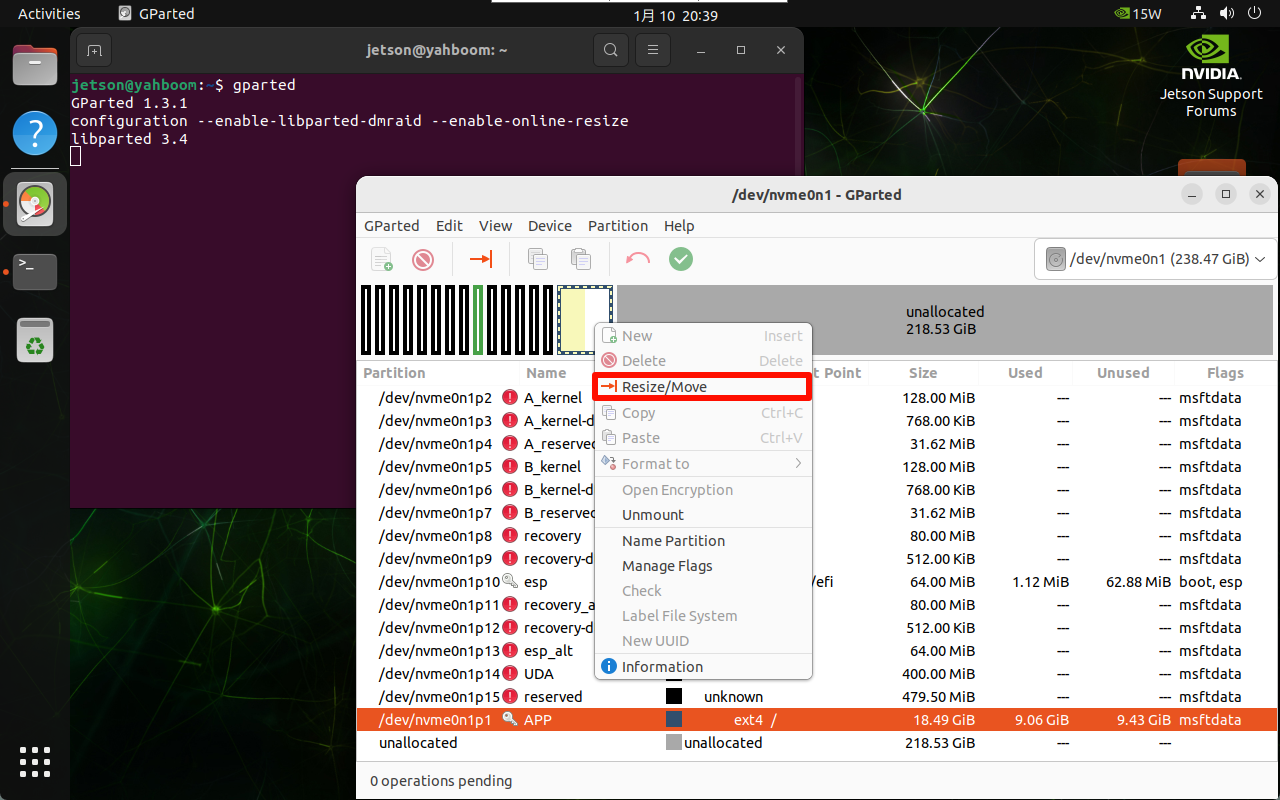
image-20250110203959602

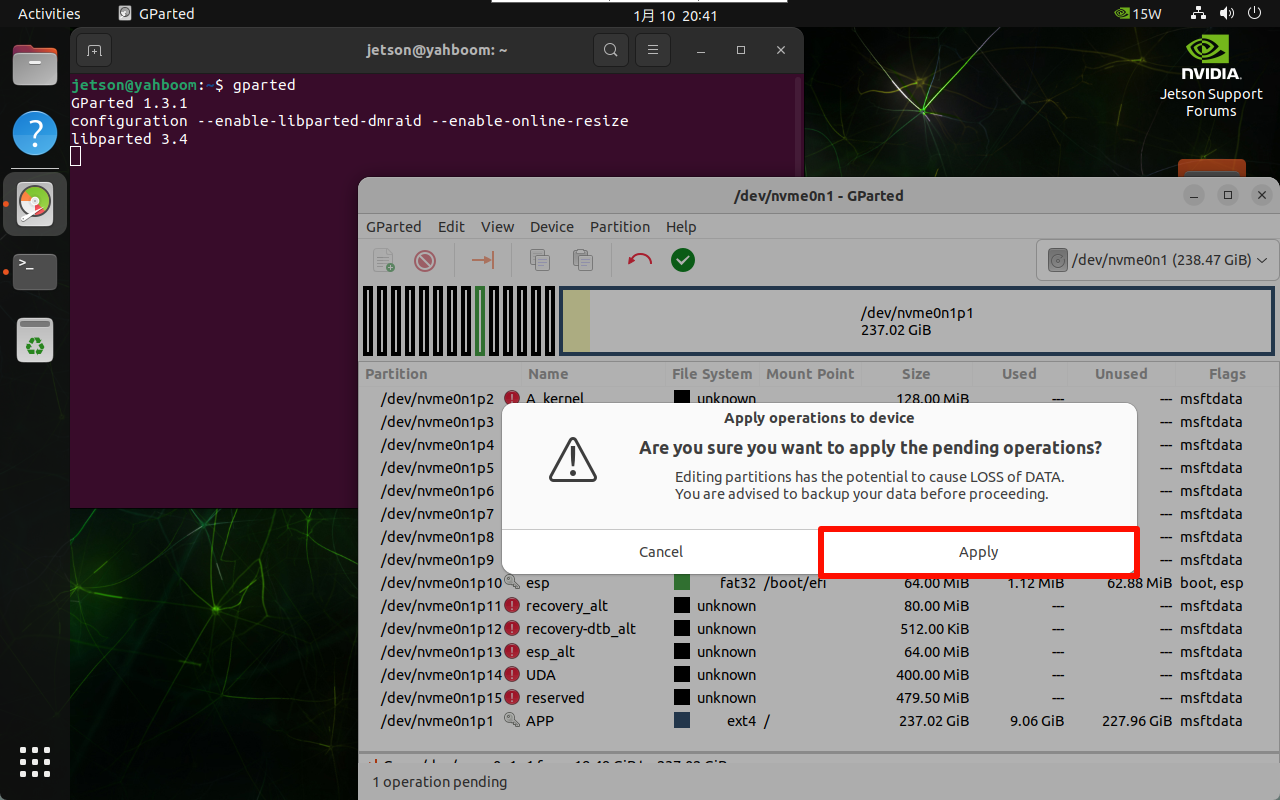
You can adjust the partition size by sliding the slider to the right to maximize the space.
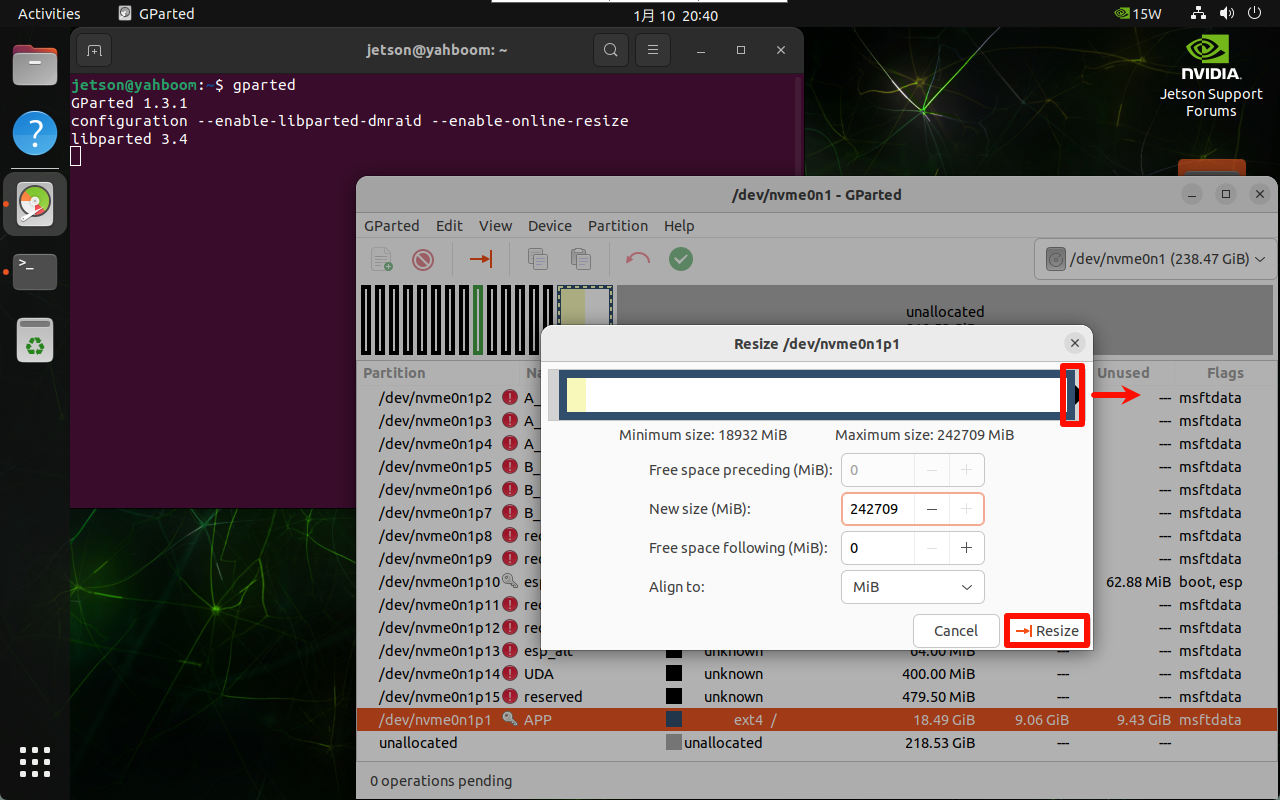
image-20250110204022401

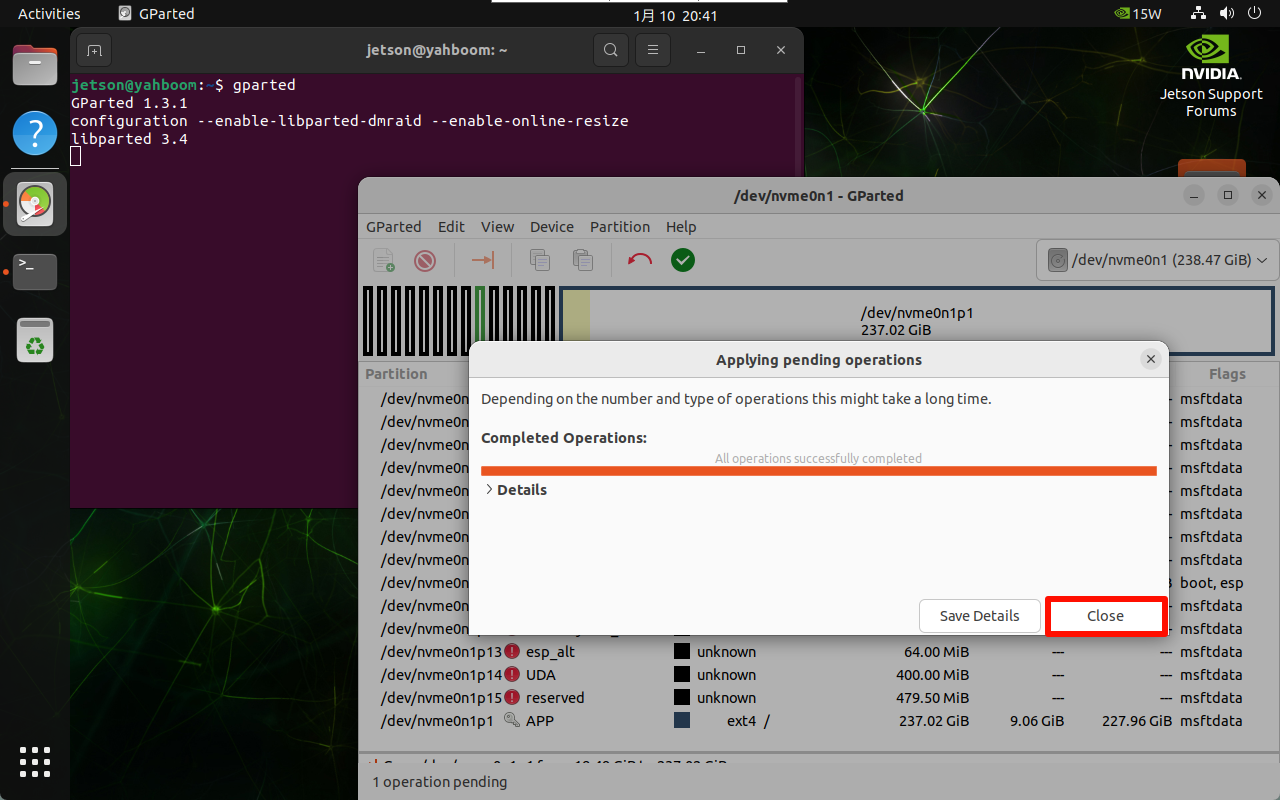
Confirm the partition adjustment operation.
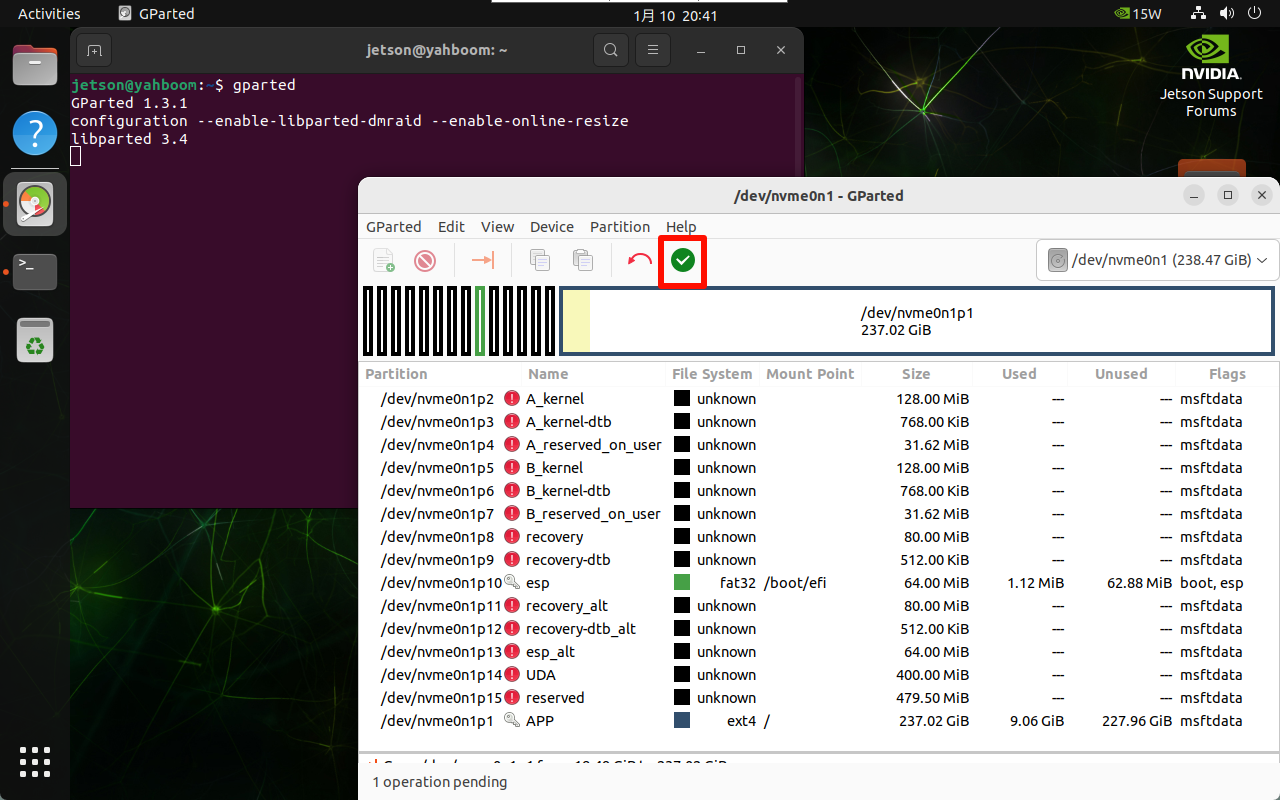
image-20250110204116310

image-20250110204133498

image-20250110204146422

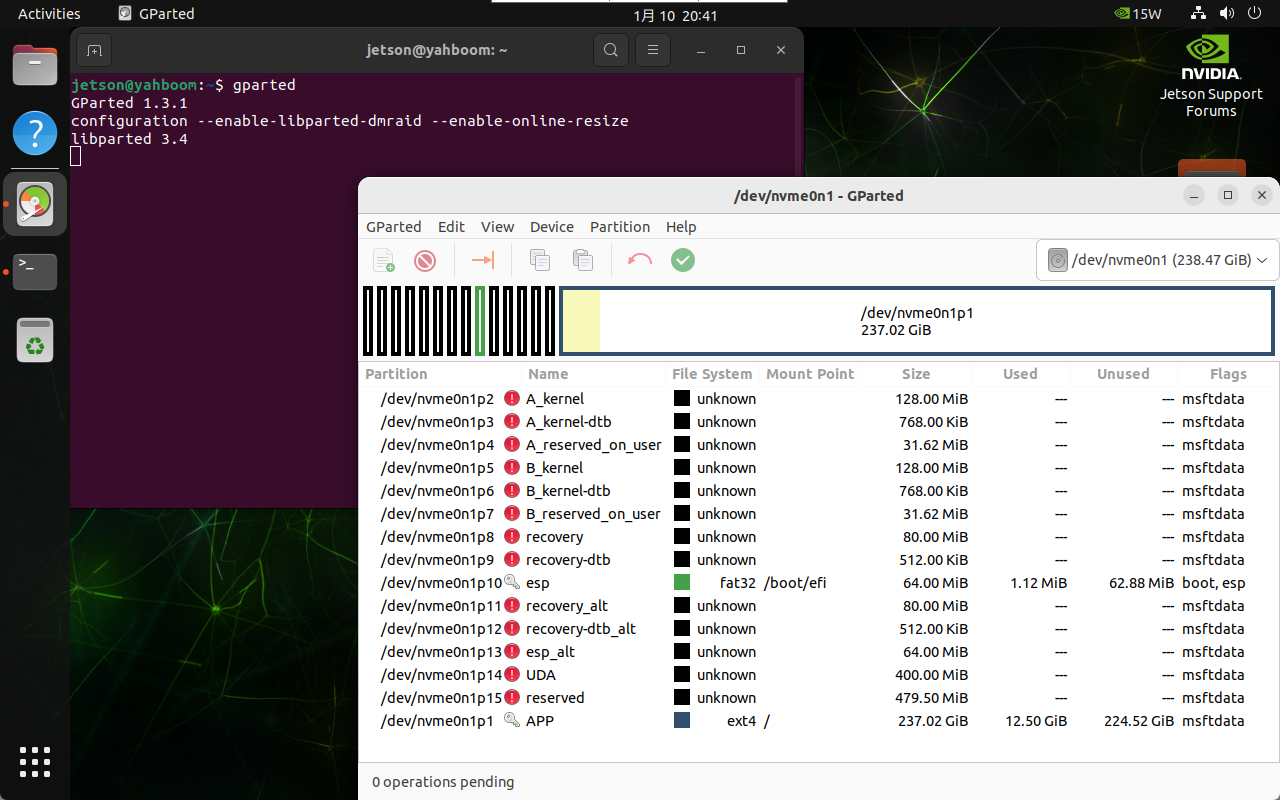
image-20250110204155043

After the partitioning is completed, close the GParted software.

Backup SSD system
GPIO library API usage

COMPANY

  • About us
  • Team Style
  • Blog

LEARNING & EXPLORATION

  • Tutorials
  • Edge AI hardware
  • Educational robots
  • Embedded intelligent hardware

WHERE TO BUY

  • Yahboom Online Store
  • Amazon
  • Alibaba
  • AliExpress
  • Mercado

TECHNOLOGY SUPPORT

  • Email: support@yahboom.com

BE A DISTRIBUTOR

  • Email: sales@yahboom.com
QR Code
QR Code

Copyright © 2017-2026 Yahboom. All Rights Reserved.

EN/中文