Welcome to MicroROS Robot Expansion Board repository
10. Customized transmission method
Customized transmission method
Customized transmission method1. Experimental purpose2. Hardware connection3. Core code analysis4. Compile and download the burning firmware5. Experimental results
1. Experimental purpose
Learn the ESP32-microROS component and use a custom transmission method (serial port transmission) to connect to the agent.
2. Hardware connection
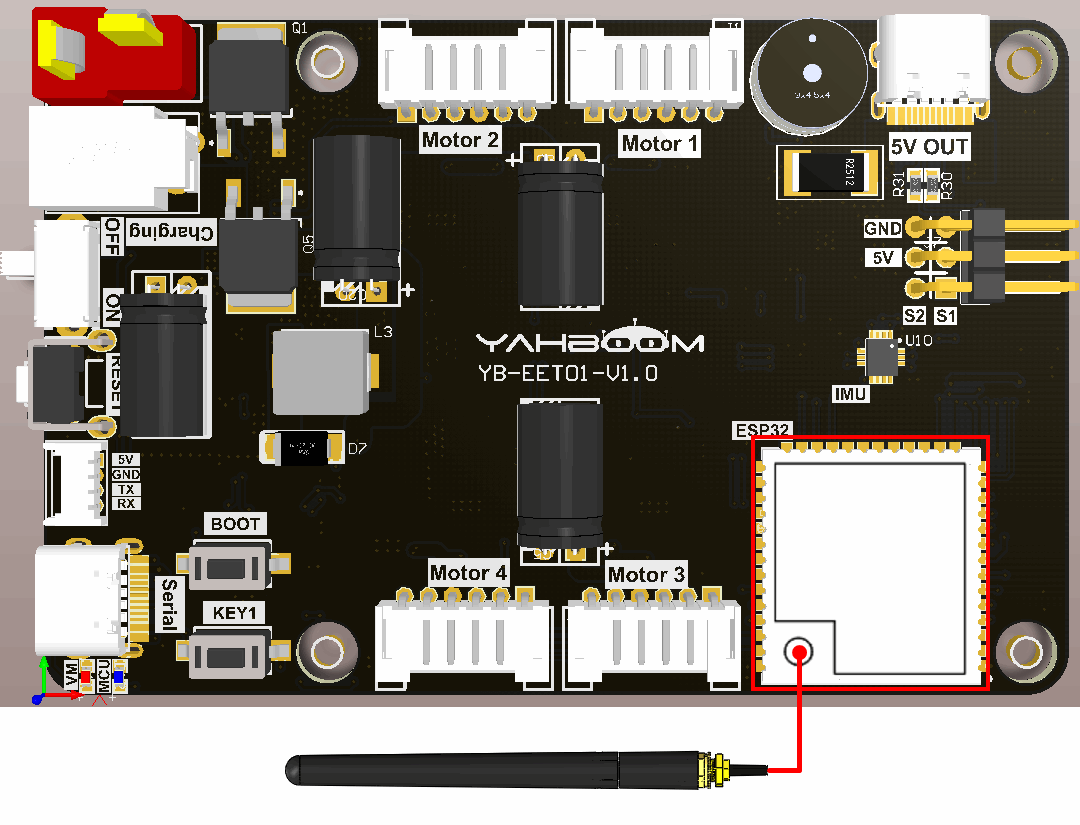
As shown in the figure below, the microROS control board integrates the ESP32-S3-WROOM core module, which has its own wireless WiFi function. The ESP32-S3 core module needs to be connected to an antenna, and a type-C data cable needs to be connected to the computer and the microROS control board as The functions of burning firmware and serial communication.
3. Core code analysis
The virtual machine path corresponding to the program source code is as follows:
~/esp/Samples/microros_samples/custom_transport
Since the custom transmission method needs to be recompiled to generate the libmicroros.a static library, this project does not import extra_components as the external component library. You need to reinstall the micro_ros_espidf_component component to the custom_components directory, and then import custom_components as the external component library.
The factory virtual machine system has already installed custom_components components.
The operation process of compiling and generating the custom version libmicroros.a static library is similar to the operation process of compiling the libmicroros.a static library in the extra_components directory. You just need to modify the "rmw_microxrcedds" parameter in the colcon.meta file and pay attention to replacing the compilation path.
xxxxxxxxxx"rmw_microxrcedds": {"cmake-args": ["-DRMW_UXRCE_XML_BUFFER_LENGTH=400","-DRMW_UXRCE_TRANSPORT=custom","-DRMW_UXRCE_MAX_NODES=1","-DRMW_UXRCE_MAX_PUBLISHERS=3","-DRMW_UXRCE_MAX_SUBSCRIPTIONS=3","-DRMW_UXRCE_MAX_SERVICES=1","-DRMW_UXRCE_MAX_CLIENTS=1","-DRMW_UXRCE_MAX_HISTORY=3"]},
Obtain relevant configuration parameters from the IDF configuration tool. By default, serial port 2 is used, the baud rate is 921600, the TX pin is GPIO43, the RX pin is GPIO44, the namespace is empty, and the domain ID is 20.
x#define ROS_NAMESPACE CONFIG_MICRO_ROS_NAMESPACE#define ROS_DOMAIN_ID CONFIG_MICRO_ROS_DOMAIN_ID#define ROS_UART_NUM CONFIG_MICRO_ROS_UART_NUM#define ROS_UART_BAUD CONFIG_MICRO_ROS_UART_BAUD#define UART_TXD CONFIG_MICRO_ROS_UART_TXD#define UART_RXD CONFIG_MICRO_ROS_UART_RXD#define UART_RTS CONFIG_MICRO_ROS_UART_RTS#define UART_CTS CONFIG_MICRO_ROS_UART_CTS
Initialize the configuration of microROS, in which ROS_DOMAIN_ID, ROS_AGENT_IP and ROS_AGENT_PORT are modified in the IDF configuration tool according to actual needs.
xxxxxxxxxxrcl_allocator_t allocator = rcl_get_default_allocator();rclc_support_t support;// 创建rcl初始化选项// Create init_options.rcl_init_options_t init_options = rcl_get_zero_initialized_init_options();RCCHECK(rcl_init_options_init(&init_options, allocator));// 修改ROS域ID// change ros domain idRCCHECK(rcl_init_options_set_domain_id(&init_options, ROS_DOMAIN_ID));// 初始化rmw选项// Initialize the rmw optionsrmw_init_options_t *rmw_options = rcl_init_options_get_rmw_init_options(&init_options);
Set the microROS custom transmission mode to serial port transmission mode.
xxxxxxxxxxRCCHECK(set_microros_serial_transports_with_options(rmw_options));
set_microros_serial_transports_with_options function as long as the function is to specify the transmission method
xxxxxxxxxxrmw_ret_t set_microros_serial_transports_with_options(rmw_init_options_t * rmw_options){rmw_ret_t ret = RMW_RET_OK;static size_t uart_port = ROS_UART_NUM;uart_driver_delete(UART_NUM_0);ret = rmw_uros_options_set_custom_transport(true,(void *) &uart_port,transport_serial_open,transport_serial_close,transport_serial_write,transport_serial_read,rmw_options);return ret;}
Open serial port
xxxxxxxxxxstatic bool transport_serial_open(struct uxrCustomTransport *transport){size_t *uart_port = (size_t *)transport->args;uart_config_t uart_config = {.baud_rate = serial_baudrate,.data_bits = UART_DATA_8_BITS,.parity = UART_PARITY_DISABLE,.stop_bits = UART_STOP_BITS_1,.flow_ctrl = UART_HW_FLOWCTRL_DISABLE,};if (uart_param_config(*uart_port, &uart_config) == ESP_FAIL){return false;}if (uart_set_pin(*uart_port, UART_TXD, UART_RXD, UART_RTS, UART_CTS) == ESP_FAIL){return false;}if (uart_driver_install(*uart_port, UART_BUFFER_SIZE * 2, 0, 0, NULL, 0) == ESP_FAIL){return false;}return true;}
Close serial port
xxxxxxxxxxstatic bool transport_serial_close(struct uxrCustomTransport *transport){size_t *uart_port = (size_t *)transport->args;return uart_driver_delete(*uart_port) == ESP_OK;}
Write data to serial port
xxxxxxxxxxstatic size_t transport_serial_write(struct uxrCustomTransport *transport, const uint8_t *buf, size_t len, uint8_t *err){size_t *uart_port = (size_t *)transport->args;const int txBytes = uart_write_bytes(*uart_port, (const char *)buf, len);return txBytes;}
Read data from serial port
xxxxxxxxxxstatic size_t transport_serial_read(struct uxrCustomTransport *transport, uint8_t *buf, size_t len, int timeout, uint8_t *err){size_t *uart_port = (size_t *)transport->args;const int rxBytes = uart_read_bytes(*uart_port, buf, len, timeout / portTICK_PERIOD_MS);return rxBytes;}
Try to connect to the proxy. If the connection is successful, go to the next step. If the connection to the proxy is unsuccessful, you will always be in the connected state.
xxxxxxxxxxwhile (1){state_agent = rclc_support_init_with_options(&support, 0, NULL, &init_options, &allocator);if (state_agent == ESP_OK){break;}vTaskDelay(pdMS_TO_TICKS(500));}
Create the node "custom_transport", in which ROS_NAMESPACE is empty by default and can be modified in the IDF configuration tool according to actual conditions.
xxxxxxxxxxrcl_node_t node;RCCHECK(rclc_node_init_default(&node, "custom_transport", ROS_NAMESPACE, &support));
Create the publisher "custom_publisher" and specify the ROS topic information as std_msgs/msg/Int32 type.
xxxxxxxxxxRCCHECK(rclc_publisher_init_default(&publisher,&node,ROSIDL_GET_MSG_TYPE_SUPPORT(std_msgs, msg, Int32),"custom_publisher"));
4. Compile and download the burning firmware
Use a Type-C data cable to connect the virtual machine/computer and the microROS control board. If the system pops up, choose to connect to the virtual machine.
Activate the ESP-IDF development environment. Note that every time you open a new terminal, you need to activate the ESP-IDF development environment before compiling the firmware.
xxxxxxxxxxsource ~/esp/esp-idf/export.sh
Enter the project directory
xxxxxxxxxxcd ~/esp/Samples/microros_samples/custom_transport
Open the ESP-IDF configuration tool.
xxxxxxxxxxidf.py menuconfig
Open micro-ROS example-app settings and keep the default configuration if there are no special requirements.
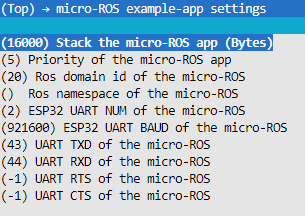
If there are any changes, please press S to save, and then press Q to exit the configuration tool.
Compile, burn, and open the serial port simulator.
xxxxxxxxxxidf.py build flash monitor
If you need to exit the serial port simulator, press Ctrl+].
5. Experimental results
After starting up, the serial port simulator will print a string of garbled characters. The reason is that the connection request sent by Microros using the serial port is not all characters, and the default baud rate is not suitable, so it looks like garbled characters.

At this time, press Ctrl+] to exit the simulator, and then enter the following content to open the serial port proxy.
xxxxxxxxxxdocker run -it --rm -v /dev:/dev -v /dev/shm:/dev/shm --privileged --net=host microros/micro-ros-agent:humble serial --dev /dev/ttyUSB0 -b 921600 -v4

If the connection is successful, information about the relevant nodes and topics will be printed.
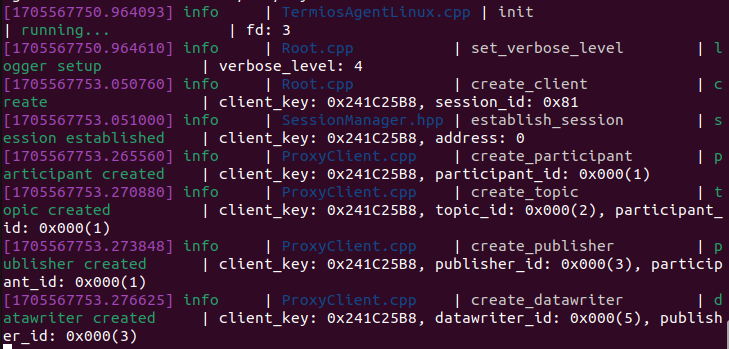
At this time, open another terminal to view the current node signal.
xxxxxxxxxxros2 node listros2 node info /custom_transport
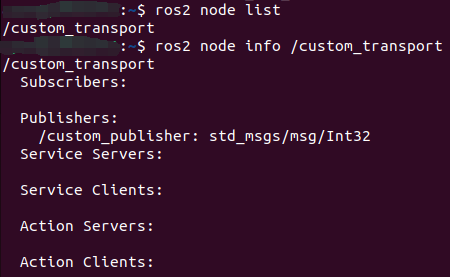
Subscribe to the data content of the /custom_transport topic
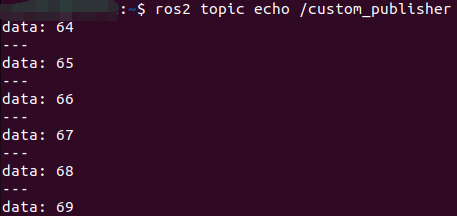
xxxxxxxxxxros2 topic echo /custom_publisher
Press Ctrl+C to exit the topic content.
Note: Since the microros serial port agent will occupy the serial port and cannot be burned, you need to press Ctrl+C to close the serial port agent before burning the program next time, and then burn the program.