yahboom
HomeLearn
Solution
Blog
Online Store
About Us
EN/中文
AI View Depth camera📖
01.Linux basic course
  • 1.Introduction to Linux system
  • 2.Ubuntu file system
  • 3.Ubuntu common commands
  • 4.Ubuntu common editors
  • 5.Ubuntu software operation commands
  • 6.Virtual machine installation
  • 7.SSH remote control
  • 8.VNC remote control
  • 9.Transfer files remotely
  • 10.Driver library and communication
  • 11.Static IP and hotspot mode
  • 12.Bind device ID
  • 13.Capacity expansion and resource allocation
  • 14.Update system software sources
  • 15.Set root user password
  • 16.sudo free password
  • 17.Connect to WiFi network
  • 18.View system version
  • 19.Customized service management
  • 20.Back up system image
02.ROS1-camera usage course
  • 1. Camera usage instructions
  • 2. Environment Construction
  • 3. Camera recording video
03.ROS1-OpenCV course
  • 1.Opencv Source CV Introduction
  • 2.Image reading and display
  • 3.Picture writing
  • 4.Picture Quality
  • 5.Pixel Operation
  • 6.Picture scaling
  • 7.Picture cutting
  • 8.Picture translation
  • 9.Picture mirroring
  • 10.Affine transformation
  • 11.Picture rotation
  • 12.Perspective transformation
  • 13.Grayscale processing
  • 14.Image binarization
  • 15.Edge detection
  • 16.Line segment drawing
  • 17.Rectangle and circle drawing
  • 18.Text and picture drawing
4.ROS1-basic course
  • 1.ROS introduction
  • 2.ROS installation
  • 3.ROS common command tools
  • 4.ROS workspace
  • 5.ROS function package
  • 6.ROS node
  • 7.ROS topic publisher
  • 8.ROS topic subscribers
  • 9.ROS service client
  • 10.ROS service server
  • 11.ROS action client
  • 12.ROS action server
  • 13.ROS custom message reception
  • 14.ROS-launch file
  • 15.ROS-TF transformation
  • 16.ROS parameter service
  • 17.ROS-rviz use
  • 18.ROS-rqt tool usage
  • 19.Topic message recording and playback
  • 20.urdf model introduction
  • 21.gazebo introduction
  • 22.ROS distributed communication
5.ROS1-Mediapipe course
  • 1.Hand detection
  • 2.Posture detection
  • 3.Overall detection
  • 4.Face detection
  • 5.Face recognition
  • 6.Face effects
  • 7.3D object recognition
  • 8.Brush
  • 9.Finger control
  • 10.Gesture recognition
6.ROS+Opencv application
  • 1.Camera calibration
  • 2.QR code
  • 3.Human body pose estimation
  • 4.Target detection
  • 5.ROS+Opencv basics
  • 6.Face recognition
  • 7.Harris corner detection
  • 8.Target tracking algorithm
  • 9.Contour moment
  • 10.Polygon outline
  • 11.Discrete Fourier transform algorithm
  • 12.Edge detection algorithm
  • 13.Face detection algorithm
  • 14.Optical flow detection algorithm
  • 15.Contour detection
  • 16.General contour detection
  • 17.Feature point tracking
  • 18.HLS color filtering
  • 19.Hough circle detection
  • 20.Hough line detection
  • 21.HSV color filtering
  • 22.LK optical flow algorithm
  • 23.Human body detection algorithm
  • 24.Phase-related displacement detection
  • 25.Image pyramid sampling algorithm
  • 26.RGB color filtering
  • 27.Clear background detection algorithm
  • 28.Simplified optical flow algorithm
  • 29.Simple filter
  • 30.Threshold image processing
  • 31.Watershed segmentation algorithm
  • 32.View point cloud data
  • 33.AR vision
  • 34.AR QR code tracking
  • 35.Color tracking
  • 36.Object tracking
07.ROS2-camera usage course
  • Instructions for using camera
08.ROS2-basic course
  • 1.Introduction to ROS2
  • 2.ROS2 install Humble
  • 3.ROS2 development environment
  • 4.ROS2 workspace
  • 5.ROS2 function package
  • 6.ROS2 node
  • 7.ROS2 topic communication
  • 8.ROS2 service communication
  • 9.ROS2 action communication
  • 10.ROS2 custom interface message
  • 11.ROS2 parameter service case
  • 12.ROS2 meta-function package
  • 13.ROS2 distributed communication
  • 14.ROS2 DDS
  • 15.ROS2 time related API
  • 16.ROS2 common command tools
  • 17.ROS2 rviz2 use
  • 18.ROS2 rqt toolbox
  • 19.ROS2 Launch startup file configuration
  • 20.ROS2 recording and playback tool
  • 21.ROS2 URDF model
  • 22.ROS2 Gazebo simulation platform
  • 23.ROS2 TF2 coordinate transformation
09.ROS2-OpenCV course
  • 1. ROS+opencv application
  • 2. QR code creation and recognition
  • 3. AR vision
10.ROS2-Mediapipe course
  • 1.Hand detection
  • 2.Posture detection
  • 3.Overall detection
  • 4.Face detection
  • 5.Personal insurance identification
11.ROS2-Depth camera course
  • 1. Use of depth camera
  • 2. Camera internal parameter calibration
  • 3. Color tracking
  • 4. KCF object tracking
  • 5. ORB_SLAM2 basics
  • 6. ORB_SLAM2 PCL mapping
  • 7. ORB_SLAM2 Octomap mapping
12.Bracket installation video
  • Bracket installation video
Download
  • VM_ROS1
  • VM_ROS2
  • Code-ROS1
  • Code-ROS2
  • 3D_File
  • ROS_Basic_VM
Download ZIP

Welcome to AI View Depth camera repository

5.Personal insurance identification

5.Personal insurance identification

1) Start

Input following command:

ros2 run yahboomcar_mediapipe 05_FaceEyeDetection
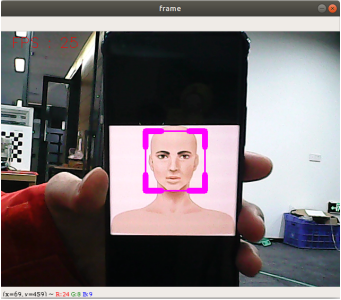
image-20231016103801561

2) Code

Code path: ~/orbbec_ws/src/yahboomcar_mediapipe/yahboomcar_mediapipe/05_FaceEyeDetection.py

​x
#!/usr/bin/env python2
# encoding: utf-8
#import ros lib
import rclpy
from rclpy.node import Node
from geometry_msgs.msg import Point
import mediapipe as mp
from cv_bridge import CvBridge
from sensor_msgs.msg import CompressedImage,Image
#import define msg
from yahboomcar_msgs.msg import PointArray
#import commom lib
import cv2 as cv
import numpy as np
import time
print("import done")


class FaceEyeDetection(Node):
    def __init__(self,name):
        super().__init__(name)
        self.bridge = CvBridge()
        self.eyeDetect = cv.CascadeClassifier( "/home/yahboom/orbbec_ws/src/yahboomcar_mediapipe/yahboomcar_mediapipe/file/haarcascade_eye.xml")
        self.faceDetect = cv.CascadeClassifier(
"/home/yahboom/orbbec_ws/src/yahboomcar_mediapipe/yahboomcar_mediapipe/file/haarcascade_eye.xml")
        self.pub_rgb = self.create_publisher(Image,"/FaceEyeDetection/image", 500)

    def cancel(self):
        self.pub_rgb.unregister()

    def face(self, frame):
        gray = cv.cvtColor(frame, cv.COLOR_BGR2GRAY)
        faces = self.faceDetect.detectMultiScale(gray, 1.3)
        for face in faces: frame = self.faceDraw(frame, face)
        return frame

    def eye(self, frame):
        gray = cv.cvtColor(frame, cv.COLOR_BGR2GRAY)
        eyes = self.eyeDetect.detectMultiScale(gray, 1.3)
        for eye in eyes:
            cv.circle(frame, (int(eye[0] + eye[2] / 2), int(eye[1] + eye[3] / 2)), (int(eye[3] / 2)), (0, 0, 255), 2)
        return frame

    def faceDraw(self, frame, bbox, l=30, t=10):
        x, y, w, h = bbox
        x1, y1 = x + w, y + h
        cv.rectangle(frame, (x, y), (x + w, y + h), (255, 0, 255), 2)
        # Top left x,y
        cv.line(frame, (x, y), (x + l, y), (255, 0, 255), t)
        cv.line(frame, (x, y), (x, y + l), (255, 0, 255), t)
        # Top right x1,y
        cv.line(frame, (x1, y), (x1 - l, y), (255, 0, 255), t)
        cv.line(frame, (x1, y), (x1, y + l), (255, 0, 255), t)
        # Bottom left x1,y1
        cv.line(frame, (x, y1), (x + l, y1), (255, 0, 255), t)
        cv.line(frame, (x, y1), (x, y1 - l), (255, 0, 255), t)
        # Bottom right x1,y1
        cv.line(frame, (x1, y1), (x1 - l, y1), (255, 0, 255), t)
        cv.line(frame, (x1, y1), (x1, y1 - l), (255, 0, 255), t)
        return frame

    def pub_img(self, frame):
        self.pub_rgb.publish(self.bridge.cv2_to_imgmsg(frame, "bgr8"))


def main():
    rclpy.init()
    capture = cv.VideoCapture(0)
    capture.set(6, cv.VideoWriter_fourcc(*'XVID'))
    capture.set(cv.CAP_PROP_FRAME_WIDTH, 640)
    capture.set(cv.CAP_PROP_FRAME_HEIGHT, 480)
    print("capture get FPS : ", capture.get(cv.CAP_PROP_FPS))
    pTime, cTime, content_index = 0, 0, 0
    dat_file = "./file/shape_predictor_68_face_landmarks.dat"
    face_eye_detection = FaceEyeDetection('face_eye_detection')
    content = ["face", "eye", "face_eye"]
    while capture.isOpened():
        ret, frame = capture.read()
        # frame = cv.flip(frame, 1)
        action = cv.waitKey(1) & 0xFF
        if action == ord("f") or action == ord("F"):
            content_index += 1
            if content_index >= len(content): content_index = 0
        if content[content_index] == "face": frame = face_eye_detection.face(frame)
        elif content[content_index] == "eye": frame = face_eye_detection.eye(frame)
        else: frame = face_eye_detection.eye(face_eye_detection.face(frame))
        if action == ord('q') or action == ord("Q"): break
        cTime = time.time()
        fps = 1 / (cTime - pTime)
        pTime = cTime
        text = "FPS : " + str(int(fps))
        cv.putText(frame, text, (20, 30), cv.FONT_HERSHEY_SIMPLEX, 0.9, (0, 0, 255), 1)
        cv.imshow('frame', frame)
        face_eye_detection.pub_img(frame)
    capture.release()
    cv.destroyAllWindows()


Face detection
Use of depth camera

COMPANY

  • About us
  • Team Style
  • Blog

LEARNING & EXPLORATION

  • Tutorials
  • Edge AI hardware
  • Educational robots
  • Embedded intelligent hardware

WHERE TO BUY

  • Yahboom Online Store
  • Amazon
  • Alibaba
  • AliExpress
  • Mercado

TECHNOLOGY SUPPORT

  • Email: support@yahboom.com

BE A DISTRIBUTOR

  • Email: sales@yahboom.com
QR Code

Copyright © 2017-2026 Yahboom. All Rights Reserved.

EN/中文