Welcome to MicroROS Self-balancing Robot Car repository
4.Multi-machine rapid relocation navigation
Multi-car Navigation2 fast relocation navigation
Note: The virtual machine needs to be in the same LAN as the car, and the ROS_DOMAIN_ID needs to be consistent. You can check [Must-read before use] to set the IP and ROS_DOMAIN_ID on the board.
1. Program function description
After the program is started, you can give the target points of the two cars in rviz. After receiving the command, the two cars will calculate the path based on their own posture and move to their destinations.
xxxxxxxxxxNote: Before running the program, the car needs to be restarted in a standing position to ensure that all sensors are reset
2. Basic settings for multi-machine functions
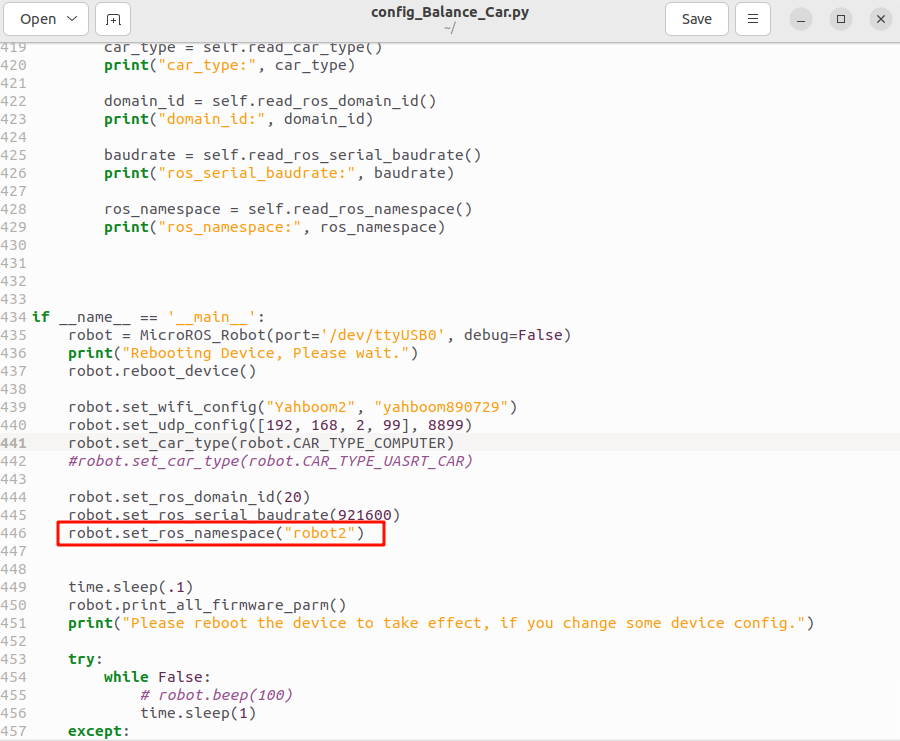
Take two cars as an example. It is recommended to use two computers with matching virtual machines, change the config_robot.py files respectively, set robot.set_ros_namespace() to robot1 and robot2 respectively; set robot.set_udp_config() to the IP addresses of the two virtual machines respectively, and the ROS_DOMAIN_ID of the two cars and the ROS_DOMAIN_ID of the virtual machine need to be set to the same. Then open the terminal in the /home/yahboom directory, enter sudo python3 config_Balance_Car.py to run this program (the rest of the programs other than running multiple cars need to be changed back and re-run this program).
3. Start and connect the agent
Take the matching virtual machine as an example. In the two virtual machines, enter the following command to start the agent of each car.
xxxxxxxxxxsudo docker run -it --rm -v /dev:/dev -v /dev/shm:/dev/shm --privileged --net=host microros/micro-ros-agent:humble udp4 --port 8899 -v4 
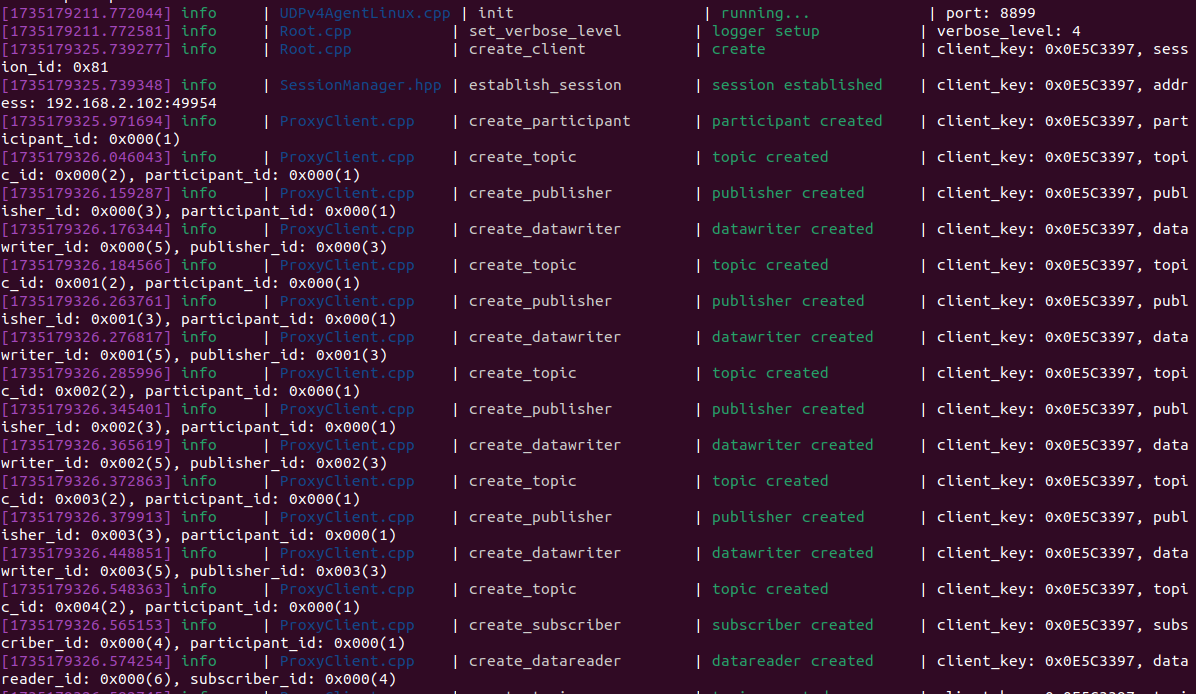
Then, turn on the switches of the two cars and wait for the two cars to connect to their respective agents. If the connection is successful, the terminal display is as shown in the figure below.
Check the currently started node. In the two virtual machines, randomly select one and open the terminal to enter,
xxxxxxxxxxros2 node list 
As shown in the figure above, the nodes of both cars have been started. Query the current topic information, input in the terminal,
xxxxxxxxxxros2 topic list 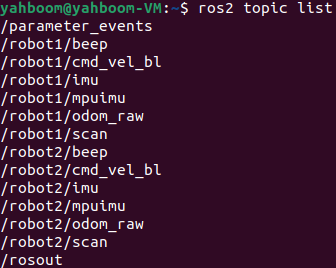
4. Load the map program
Select one of the two virtual machines at random, open the terminal and input,
xxxxxxxxxxros2 launch yahboomcar_multi map_server_launch.py ••map:=/home/yahboom/yahboomcar_ws/src/yahboomcar_nav/maps/yahboom_map.yamlParameter description
xxxxxxxxxx#Load map parameters: (target map can be replaced)maps:=/home/yahboom/yahboomcar_ws/src/yahboomcar_nav/maps/yahboom_map.yaml#.pgm file must also be in the same path as .yamlNote: Here, yahboom_map.yaml and yahboom_map.pbstream must be built at the same time, that is, the same map, refer to cartograph mapping algorithm to save the map
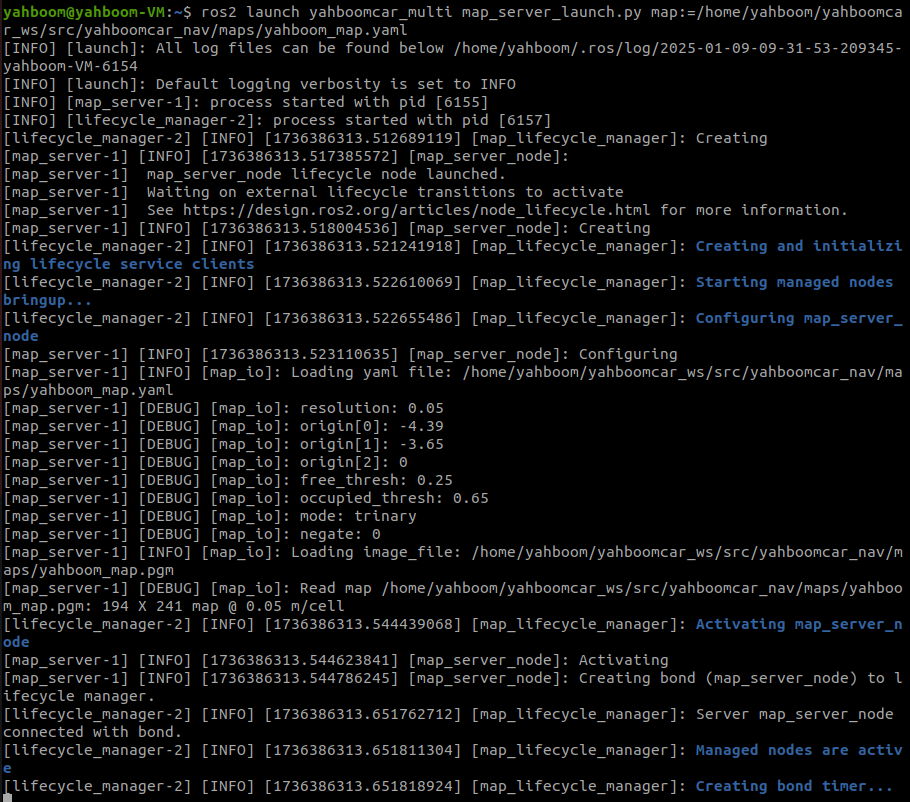
Note: Lifecycle error may occur here, which is caused by the map not being built.
Take the virtual machine as an example, the map loaded here is,
xxxxxxxxxx/home/yahboom/yahboomcar_ws/src/yahboomcar_nav/maps/yahboom_map.yamlIf you need to modify the default loading of other maps, copy the map's yaml file and pgm file to the
/home/yahboom/yahboomcar_ws/src/yahboomcar_nav/maps/ directory, and then modify the map_server_launch.py program, which is located in /home/yahboom/yahboomcar_ws/src/yahboomcar_multi/launch, and modify the following places,
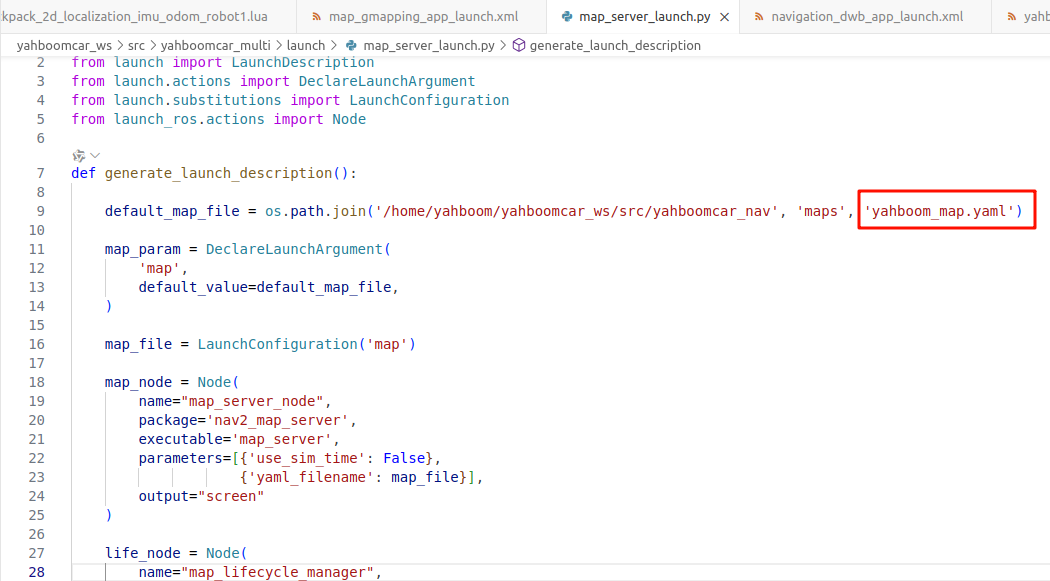
Replace the red box with the name of your own map, save and exit, then enter the following command to compile,
xxxxxxxxxxcd ~/yahboomcar_wscolcon buildThen enter the following command to re-source the environment variable,
xxxxxxxxxxsource ~/.bashrc5. Start the car's underlying data processing program
In the virtual machine terminal that starts robot1,
xxxxxxxxxxros2 launch yahboomcar_multi navigation_bringup_multi.launch.xml robot_name:=robot1In the virtual machine terminal that starts robot2,
xxxxxxxxxxros2 launch yahboomcar_multi navigation_bringup_multi.launch.xml robot_name:=robot2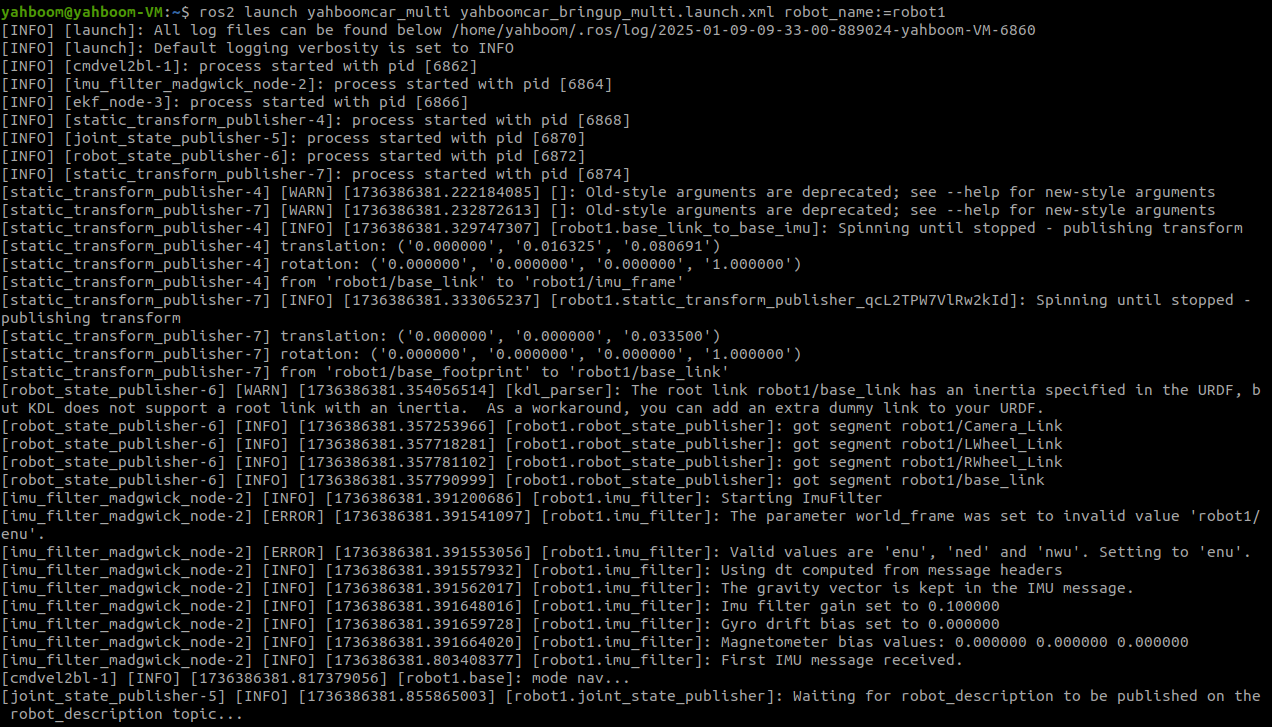
yahboomcar_bringup_multi.launch.xml source code path (taking the matching virtual machine as an example),
xxxxxxxxxx/home/yahboom/yahboomcar_ws/src/yahboomcar_multi/launch/yahboomcar_bringup_multi.launch.xml
xxxxxxxxxx<launch> <arg name="robot_name" default="robot1"/> <group> <push-ros-namespace namespace="$(var robot_name)"/> <!--base_node--> <node name="base" pkg="yahboomcar_bringup" exec="cmdvel2bl" output="screen"> <param name="mode" value="nav"/> <remap from="/cmd_vel" to="cmd_vel"/> <remap from="/cmd_vel_bl" to="cmd_vel_bl"/> </node> <!--imu_filter_node--> <node name="imu_filter" pkg="imu_filter_madgwick" exec="imu_filter_madgwick_node" output="screen"> <param name="fixed_frame" value="$(var robot_name)/base_link"/> <param name="use_mag" value="false"/> <param name="publish_tf" value="false"/> <param name="world_frame" value="$(var robot_name)/enu"/> <param name="orientation_stddev" value="0.00"/> <remap from="imu/data_raw" to="imu"/> </node> <!--ekf_node--> <node name="ekf_filter_node" pkg="robot_localization" exec="ekf_node"> <param from="$(find-pkg-share yahboomcar_multi)/param/ekf_$(var robot_name).yaml"/> <remap from="odometry/filtered" to="odom"/> <remap from="/odom_raw" to="odom_raw"/> </node> <node pkg="tf2_ros" exec="static_transform_publisher" name="base_link_to_base_imu" args="0 0.016325 0.080691 0 0 0 $(var robot_name)/base_link $(var robot_name)/imu_frame " /> </group> <include file="$(find-pkg-share yahboomcar_description)/launch/description_multi_$(var robot_name).launch.py"/> </launch>Here, a pair of
6. Start the fast relocation program and rviz of the car
Input in the virtual machine terminal that starts robot1, and you can choose any rviz to start.
xxxxxxxxxxros2 launch yahboomcar_multi robot1_localization_imu_odom.launch.py load_state_filename:=/home/yahboom/yahboomcar_ws/src/yahboomcar_nav/maps/yahboom_map.pbstream use_rviz:=true
Parameter Description
xxxxxxxxxx#Select whether to open rviz, true is open, false is not openuse_rviz:=true#Replaceable target map fileload_state_filename:=/home/yahboom/yahboomcar_ws/src/yahboomcar_nav/maps/testaa.pbstreamIn the terminal of the virtual machine that starts robot2, enter,
xxxxxxxxxxros2 launch yahboomcar_multi robot2_localization_imu_odom.launch.py load_state_filename:=/home/yahboom/yahboomcar_ws/src/yahboomcar_nav/maps/yahboom_map.pbstream use_rviz:=false
Parameter description
xxxxxxxxxx#Select whether to open rviz, true is open, false is not openuse_rviz:=false#Replaceable target map fileload_state_filename:=/home/yahboom/yahboomcar_ws/src/yahboomcar_nav/maps/testaa.pbstreamNote: The testaa.pbstream map of robot1 and robot2 must be the same map
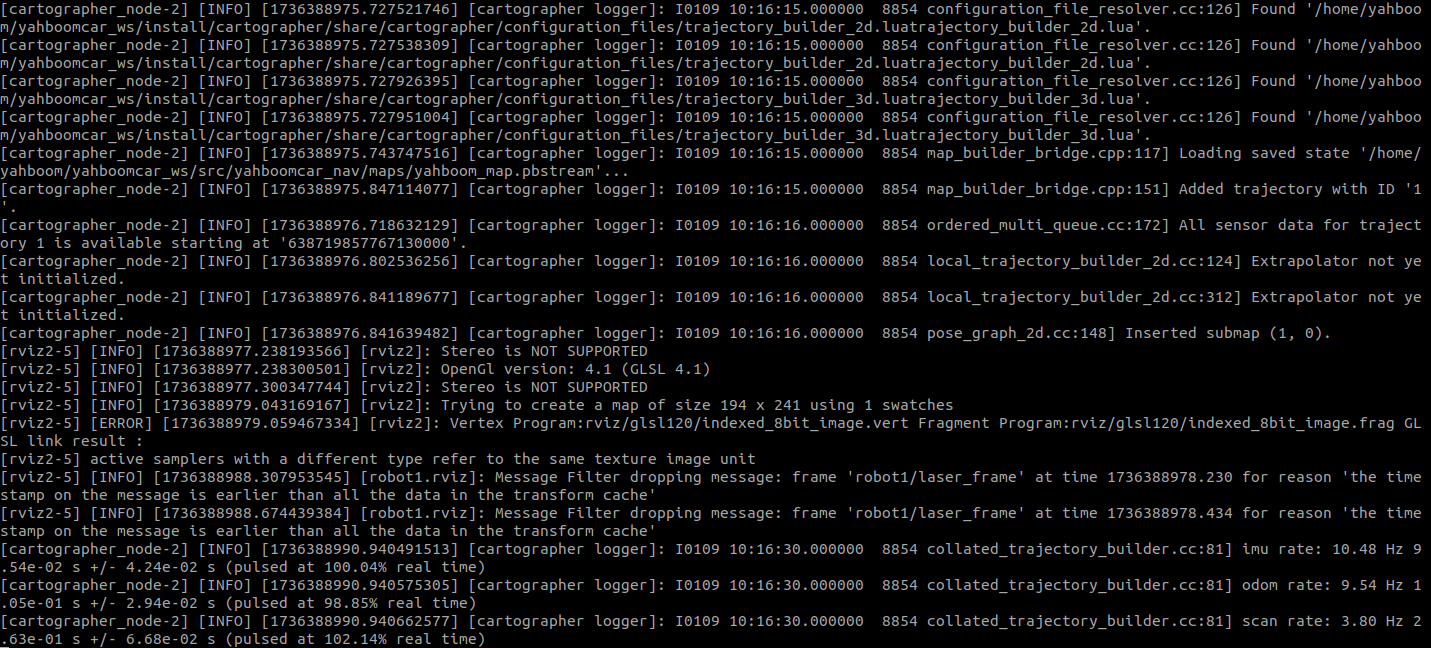
When it prints (pulsed at 101.80% real time)...etc., it proves that the startup is normal
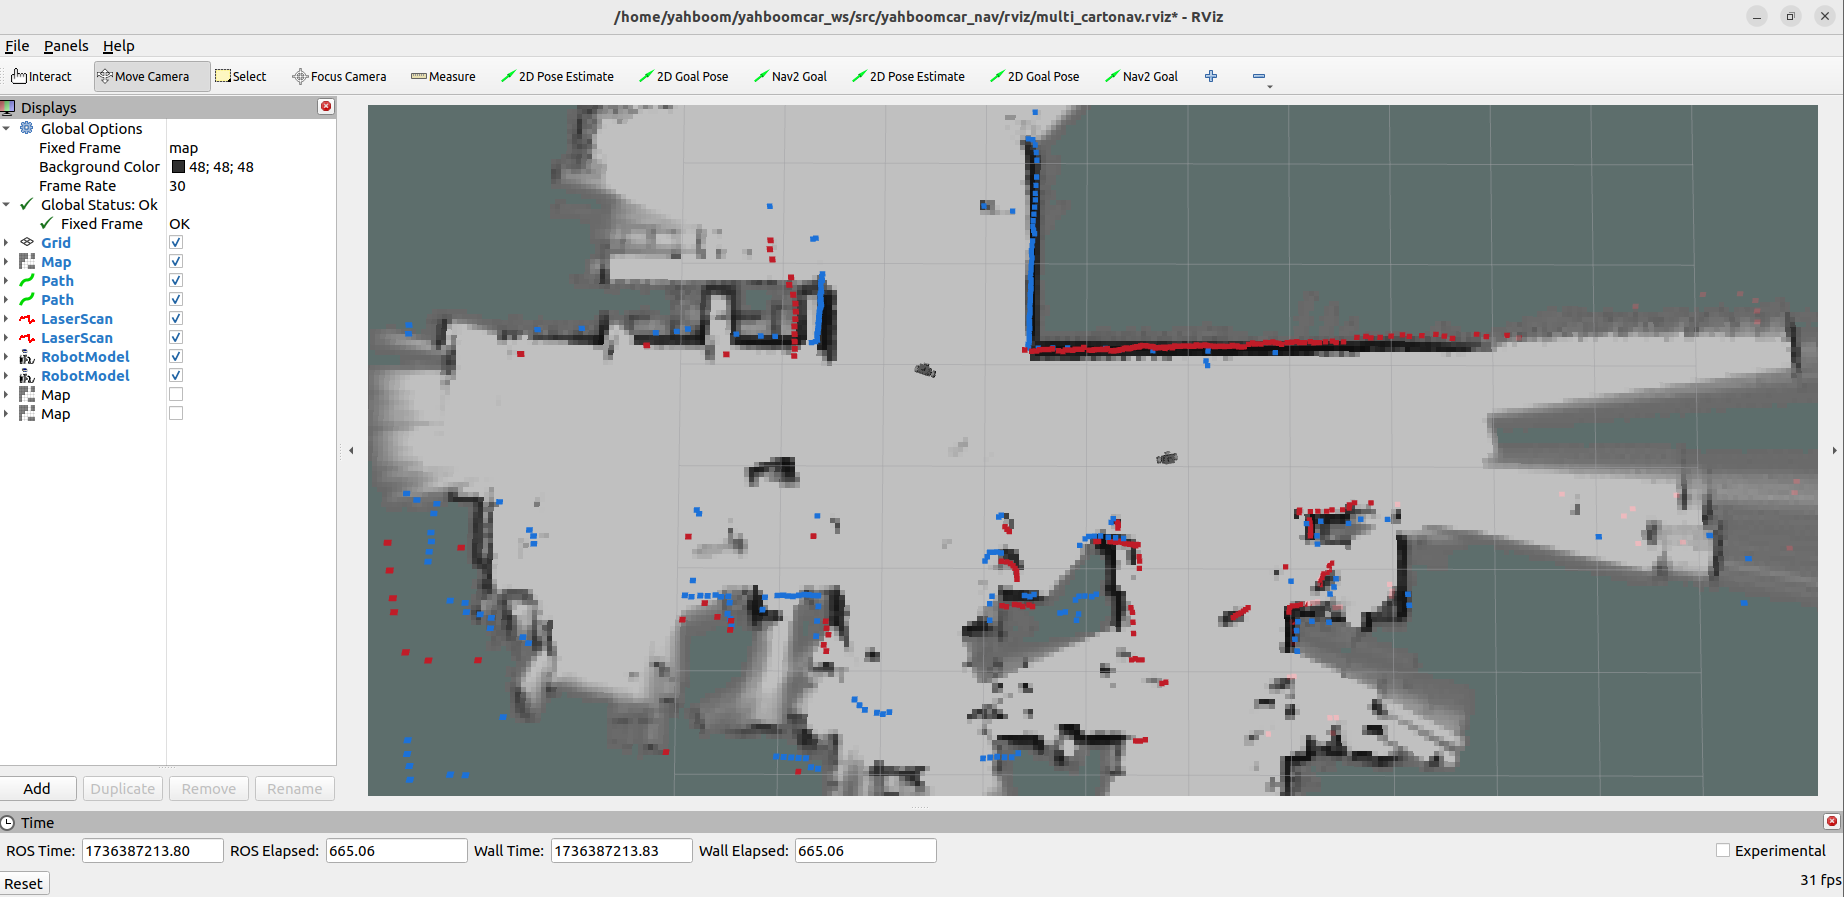
You can see that the map is loaded, but the positioning of the car is not accurate, then we click [2D Pose Estimate】, give the two cars an initial pose respectively. According to the approximate position of the car in the actual environment, click and drag with the mouse in rviz, and the car can be quickly positioned on the map.
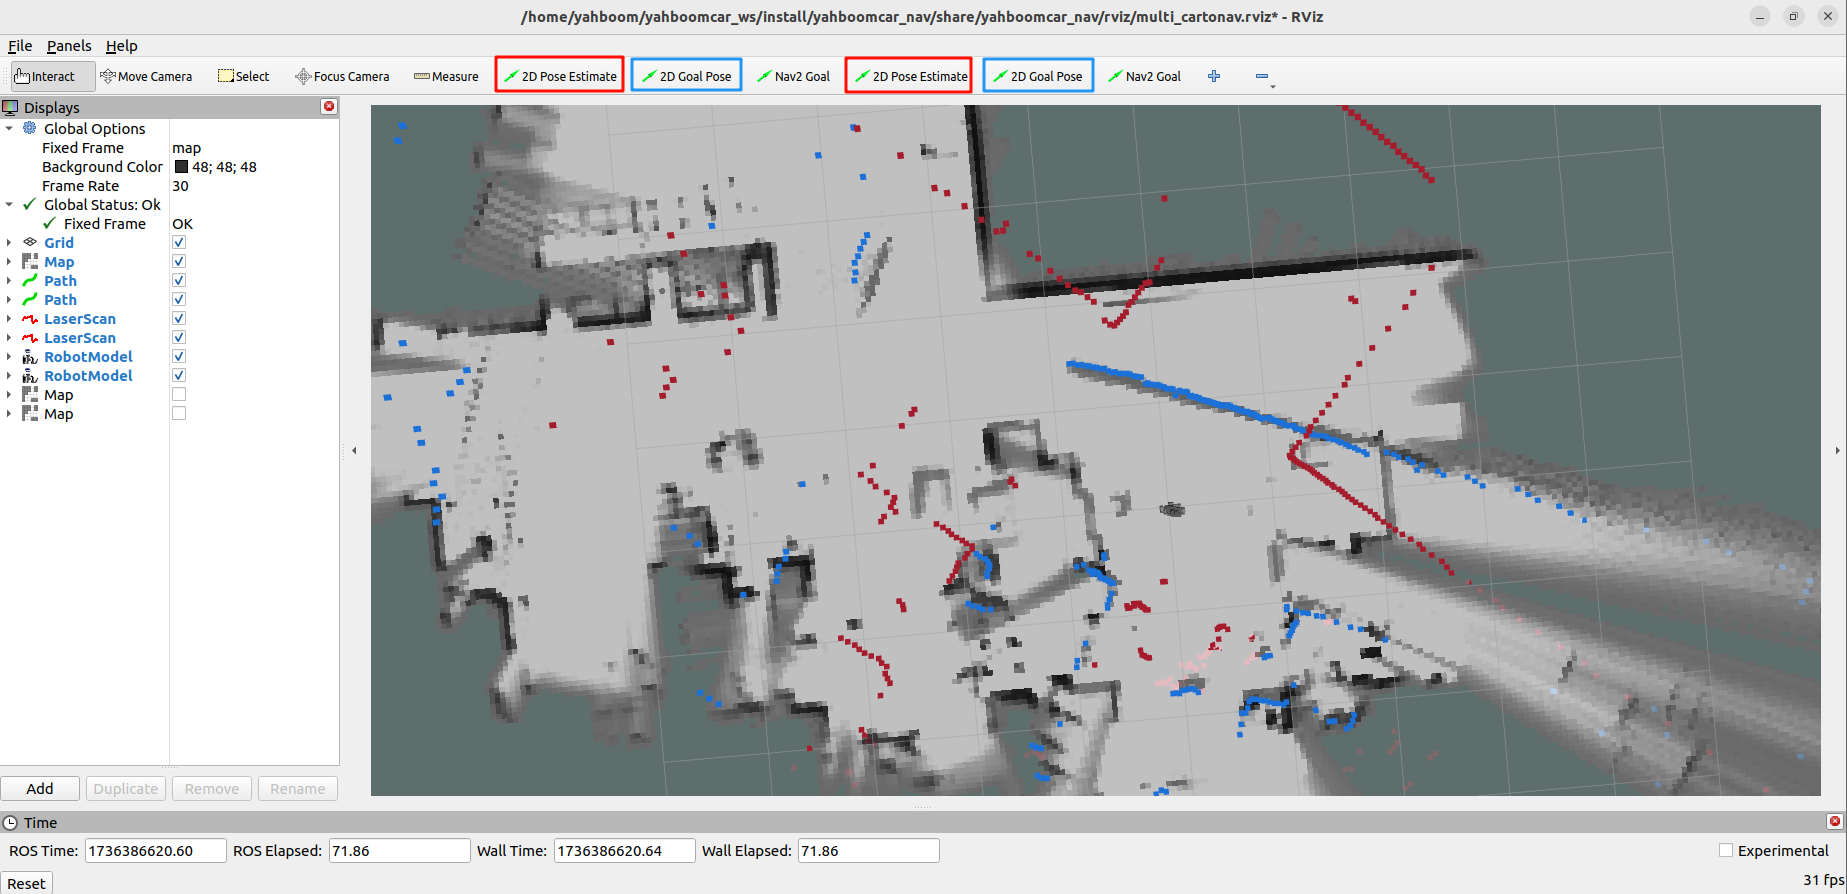
Red represents robot1 and blue represents robot2.
The functions of the symbols in Figures 1-4 above are as follows:
[1]: robot1 calibrates the initial pose
[2]: robot1 gives the target point
[3]: robot2 calibrates the initial pose
[4]: robot2 gives the target point
Note: If positioning is still not possible, it may be that the car is in an obstacle area. Please place it in a place with no obstacles around and start again. You can also keep the terminal open, restart the car directly, and wait for the automatic data recovery to re-position it. It may also be that there are too few map feature points when building the map, and the map construction must be more detailed.
As shown in the figure below, if the area scanned by the radar roughly coincides with the actual obstacle, it means that the posture is accurate.
Take the virtual machine as an example, the source code location: /home/yahboom/yahboomcar_ws/src/yahboomcar_multi/launch
robot1_localization_imu_odom.launch.py
xxxxxxxxxxfrom launch import LaunchDescriptionfrom launch.actions import DeclareLaunchArgument, GroupAction, LogInfo,Shutdownfrom launch.conditions import IfConditionfrom launch.substitutions import LaunchConfiguration, TextSubstitutionfrom launch_ros.actions import Node, PushRosNamespacefrom launch_ros.substitutions import FindPackageSharedef generate_launch_description():    robot_name = 'robot1'
    load_state_filename_arg = DeclareLaunchArgument(        'load_state_filename',        default_value='/home/yahboom/yahboomcar_ws/src/yahboomcar_nav/maps/yahboom_map.pbstream'    )
    use_rviz_arg = DeclareLaunchArgument(        'use_rviz',        default_value='true',    )
    rviz_node = Node(        package='rviz2',        executable='rviz2',        on_exit=Shutdown(),        arguments=['-d', FindPackageShare('yahboomcar_nav').find('yahboomcar_nav') + '/rviz/multi_cartonav.rviz'],        parameters=[{'use_sim_time': False}],        condition=IfCondition(LaunchConfiguration('use_rviz'))    )    base_link_to_laser_tf_node = Node(        package='tf2_ros',        executable='static_transform_publisher',        name='base_link_to_base_laser',        namespace = 'robot1',        arguments=['0', '0' , '0.138','0','0','0','robot1/base_link','robot1/laser_frame']    )    group = GroupAction([        PushRosNamespace(namespace=robot_name),
        Node(            package='cartographer_ros',            executable='cartographer_node',            parameters=[{'use_sim_time': False}],            arguments=[                '-configuration_directory', FindPackageShare('cartographer_ros').find('cartographer_ros') + '/configuration_files',                '-configuration_basename', f'ros1_backpack_2d_localization_imu_odom_{robot_name}.lua',                '-load_state_filename', LaunchConfiguration('load_state_filename')],            remappings=[                ('imu', 'imu/data'),                ('scan', 'scan')],            output='screen'        ),
        Node(            package='cartographer_ros',            executable='cartographer_occupancy_grid_node',            parameters=[                {'use_sim_time': False},                {'resolution': 0.05}],            remappings=[                ('map', 'map')]        ),
        Node(            package='tf2_ros',            executable='static_transform_publisher',            name='base_link_to_base_laser',            arguments=['0', '0' , '0.138','0','0','0','robot1/base_link','robot1/laser_frame']        ),
        rviz_node,
    ])
    return LaunchDescription([        # Launch arguments        load_state_filename_arg,        use_rviz_arg,        # Group for robot1        base_link_to_laser_tf_node,        group    ])
The following nodes are started here:
rviz_node: Start
rviz2to visualize the robot status.cartographer_node: Start
cartographer_nodefor SLAM positioning and mapping.cartographer_occupancy_grid_node: Start
cartographer_occupancy_grid_nodeto generate occupancy grid map.base_link_to_laser_tf_node: Publish the static transformation from chassis to radar.
7. Start the car navigation program
In the virtual machine terminal that starts robot1, enter,
xxxxxxxxxxros2 launch yahboomcar_multi robot1_navigation_dwb_launch.pyIn the virtual machine terminal that starts robot2, enter,
xxxxxxxxxxros2 launch yahboomcar_multi robot2_navigation_dwb_launch.py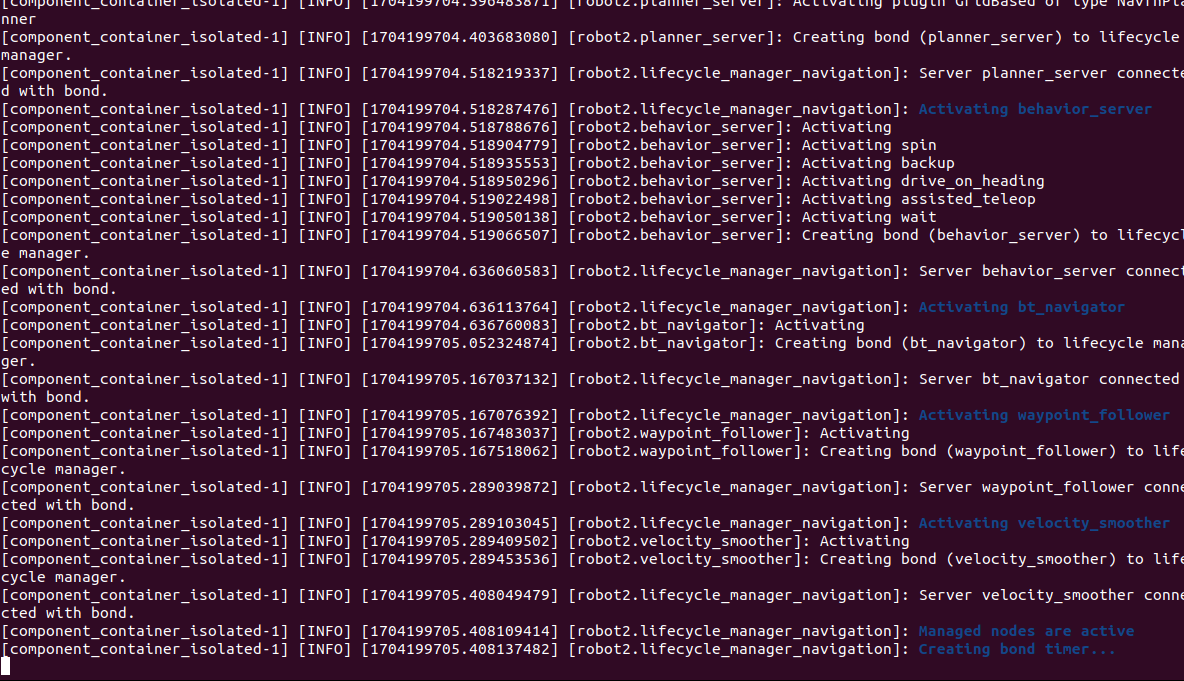
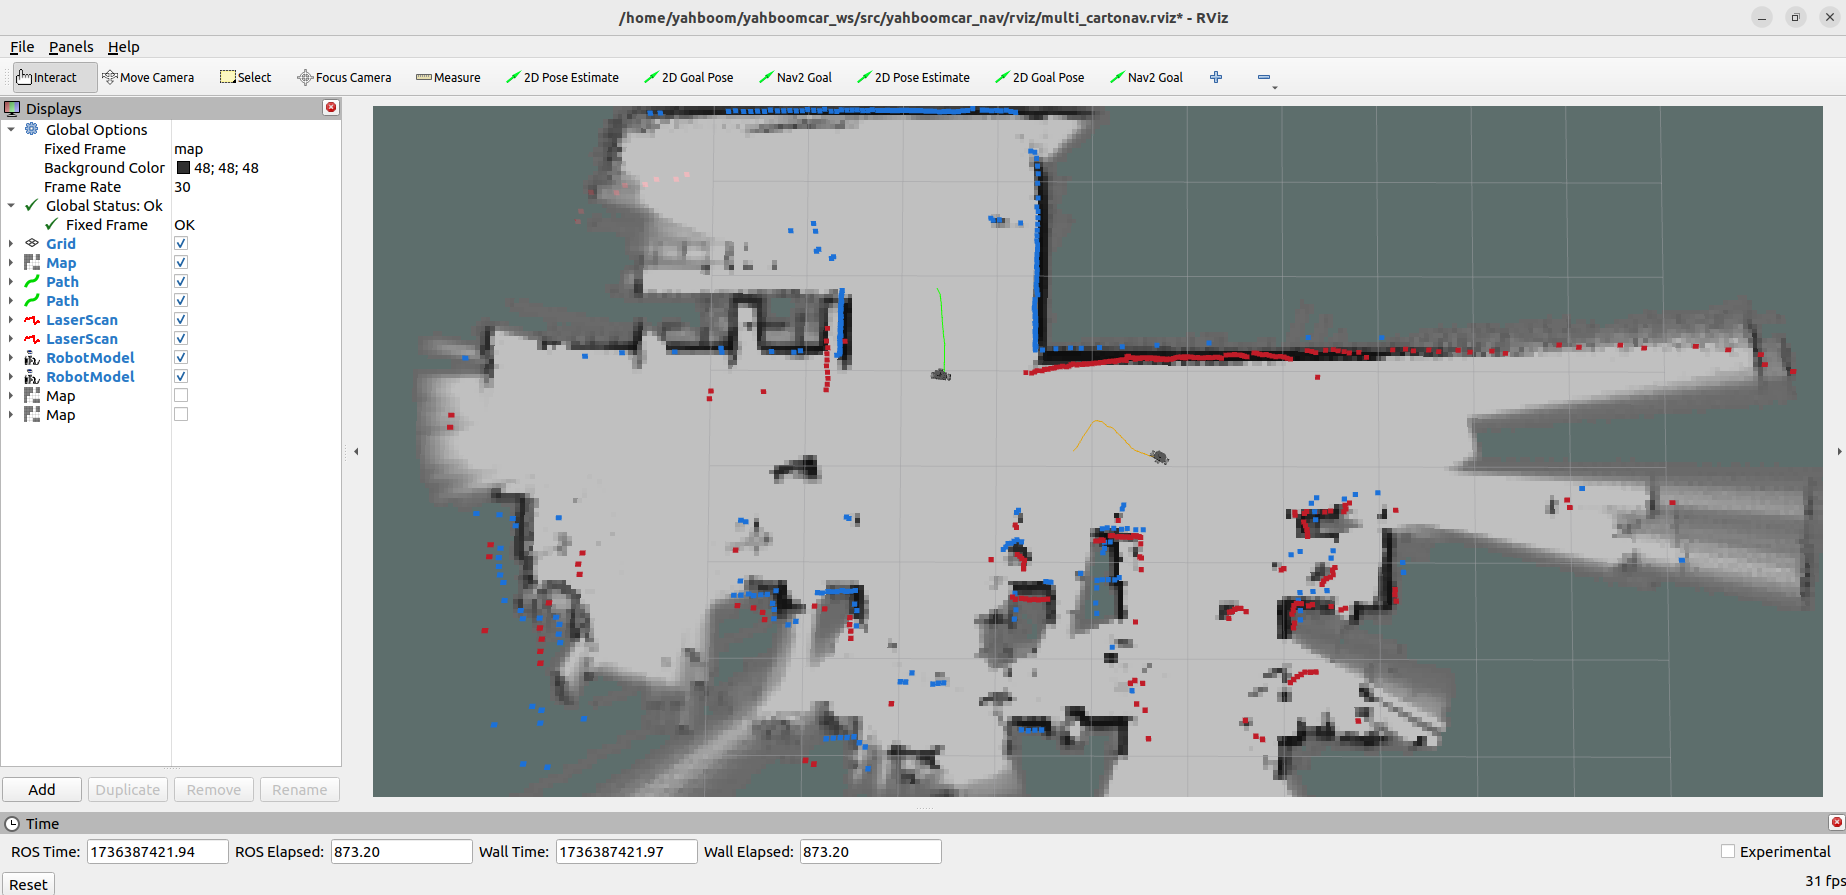
As shown in the figure above, the "Creating bond timer..." appears, indicating that the program is loaded. Then, the corresponding [2D Goal Pose] on riviz can be used to give the target points of the two cars. The cars will generate a path based on their respective postures and surrounding obstacles, and autonomously navigate to their respective destinations.

The yellow route is the route planned by robot1, and the green line is the route planned by robot2.
8. Multi-car navigation expansion
The tutorial takes two cars as an example. If you want to add other cars, you need to make the following modifications.
8.1. Add a URDF model of the car and add a urdf model loader
Note: The path is,
xxxxxxxxxx/home/yahboom/yahboomcar_ws/src/yahboomcar_description/launch/description_multi_robot1.launch.py/home/yahboom/yahboomcar_ws/src/yahboomcar_description/urdf/STM32-V2-V1_robot1.urdf
Add a car model
For reference, /home/yahboom/yahboomcar_ws/src/yahboomcar_description/urdf/STM32-V2-V1_robot1.urdf
Change the name and robot1 in the urdf file to other car names, such as robot3.
Added urdf model loader
For reference, /home/yahboom/yahboomcar_ws/src/yahboomcar_description/launch/description_multi_robot1.launch.py Change the name and robot1 in the launch file to other car names. The name needs to be consistent with the newly added urdf.
8.2, Added car ekf parameter table
Note: The path is,
xxxxxxxxxx/home/yahboom/yahboomcar_ws/src/yahboomcar_multi/param/ekf_robot1.yaml
You can refer to /home/yahboom/yahboomcar_ws/src/yahboomcar_multi/param/ekf_robot1.yaml, change the name and robot1 in the file to other car names, and the name needs to be consistent with the newly added urdf.
8.3, Added launch file for starting positioning
Note: The path is:
xxxxxxxxxx/home/yahboom/yahboomcar_ws/src/yahboomcar_multi/launch/robot1_localization_imu_odom.launch.py
Added launch file for positioning
Refer to /home/yahboom/yahboomcar_ws/src/yahboomcar_multi/launch/robot1_localization_imu_odom.launch.py, change the name and robot1 in the file to the name of other cars, and the name needs to be consistent with the newly added urdf.
8.4, Added car nav2 parameter table and launch file for starting nav2
Note: The path is:
xxxxxxxxxx/home/yahboom/yahboomcar_ws/src/yahboomcar_multi/param/robot1_nav_params.yaml/home/yahboom/yahboomcar_ws/src/yahboomcar_multi/launch/robot1_navigation_dwb_launch.py
Added car nav2 parameter table
Refer to /home/yahboom/yahboomcar_ws/src/yahboomcar_multi/param/robot1_nav_params.yaml, change the name and robot1 in the file to the name of other cars, and the name needs to be consistent with the newly added urdf.
Added launch file for nav2
Refer to /home/yahboom/yahboomcar_ws/src/yahboomcar_multi/launch/robot1_navigation_dwb_launch.py, change the name and robot1 in the file to the name of other cars, and the name needs to be consistent with the newly added urdf.
8.5, Added [2D Pose Estimate] and [2D Goal Pose] in the rviz toolbar
Note: The path is:
xxxxxxxxxx/home/yahboom/yahboomcar_ws/src/yahboomcar_nav/rviz
Modify the multi_nav.rviz file, the directory of the file is /home/yahboom/yahboomcar_ws/src/yahboomcar_nav/rviz/multi_nav.rviz, find the following part,
xxxxxxxxxx- Class: rviz_default_plugins/SetInitialPose Covariance x: 0.25 Covariance y: 0.25 Covariance yaw: 0.06853891909122467 Topic: Depth: 5 Durability Policy: Volatile History Policy: Keep Last Reliability Policy: Reliable Value: /robot1/initialpose- Class: rviz_default_plugins/SetGoal Topic: Depth: 5 Durability Policy: Volatile History Policy: Keep Last Reliability Policy: Reliable Value: /robot1/goal_pose...The above are two tools for robot1. You can copy one and put it behind. Change the robot1 that appears to the name of other cars. The name needs to be consistent with the newly added urdf.
After completing the above 5 steps, return to the yahboomcar_ws workspace, compile it using colcon build, and then run the test according to the tutorial. After successful operation, you can add the car model and radar data to display in rviz.