yahboom
HomeLearn
Solution
Blog
Online Store
About Us
EN/中文
MicroROS Self-balancing Robot Car📖
01.Introduction
  • 0.Unboxing and Reviewing
  • 1. Must read before use - learning route
  • 2. Introduction to LiDAR
  • 3. Balance car interface description
  • 4. Analysis of common problems
  • 5. Robot charging and battery precautions
02.Assembly tutorial
  • Robot assembly steps
03.Preparation
  • 0.Quick Start (Must Read)
  • 1.Write firmware
  • 2.How to install and use VM
  • 3.ESP32 communication board configuration parameters
  • 4.Connect to microROS agent
04.ROS-WiFi module configuration
  • 0.Serial port configuration WiFi instructions
  • 1.Use ROS-WiFi cam module(must read)
  • 2.Connect to ROS-WiFi cam module agent
  • 3.Camera image correction (optional)
05.Quick start control
  • 1.Keyboard remote control
  • 2.Handle remote control
06.ROS+OpenCV course
  • 1.OpenCV Getting started
  • 2.Geometric transformation
  • 3.Image processing and drawing text line segments
  • 4.Image beautification
07.Mediapipe course
  • 1. Hand detection
  • 2. Posture detection
  • 3. Overall inspection
  • 4. Face detection
  • 5. Face recognition
  • 6. Facial effects
  • 7. 3D object recognition
  • 8. Brush
  • 9. Finger control
  • 10. Gesture recognition
08.Robot basic course
  • 1.Robot information release
  • 2.Robot keyboard control
  • 3.Robot handle control
  • 4.Robot state estimation
  • 5.Line speed calibration
  • 6.Angular velocity calibration
  • 7.Robot URDF model
09.Lidar course
  • 1.Lidar avoid
  • 2.Lidar following
  • 3.Lidar guard
  • 5.Gmapping mapping
  • 6.Cartographer mapping
  • 7.Navigation2 navigation avoid
  • 8.Navigation2 fast relocation navigation
  • 9.ROS Robot APP mapping
  • 10.ROS Robot APP navigation
10.Robot visual interaction
  • 1.Color tracking
  • 2.Object recognition and tracking
  • 3.Face recognition tracking
  • 4.Autonomous driving line patrol
  • 5.QR code motion control
  • 6.Gesture control car movement
  • 7.Palm control car movement
  • 8.Gesture control car action group
  • 9.Palm recognition and tracking
  • 10.Human body posture recognition and tracking
11.Multi-machine course
  • 1.Multi-machine handle control
  • 2.Multi-machine keyboard control
  • 3.Multi-machine navigation
  • 4.Multi-machine rapid relocation navigation
12.STM32 balancing case
01.Environment construction and development
  • 13.Window Watchdog (WWDG)
  • 01.MDK-ARM installation
  • 02.STM32CubeIDE installation
  • 03.Common driver installation
  • 04.Download the program
  • 05.MDK-ARM project usage
  • 06.Program simulation
02.STM32 getting started course
  • 01.Project creation
  • 02.LED Control(GPIO)
  • 03.Buzzer control(GPIO)
  • 04.Button control(EXTI)
  • 05.Serial communication(USART)
  • 06.Voltage detection(ADC)
  • 07.Basic timer(TIM)
  • 08.Universal timer(TIM)
  • 09.Advanced Timer(TIM)
  • 10.I2C Communication(I2C)-OLED
  • 11.SPI communication(SPI)-2.4G handle
  • 12.Independent Watchdog (IWDG)
  • 14.DMA-USART
  • 15.DMA-I2C
03.STM32 expansion course
  • 01.Battery voltage detection (ADC)
  • 02.Ultrasonic module-measuring distance (TIM)
  • 03.Motor drive+encoder (TIM)
  • 04.OLED Data-Display(I2C)
  • 05.MPU6050-Data Read (I2C)
04.Robot car PID control course
  • 01.PID basic concept
  • 02.PID example analysis
  • 03.P, PI, PD controller theory
  • 04.Position PID
  • 05.Incremental PID
  • 06.Cascade PID
  • 07.Balance principle of car
  • 08.Car upright control (PD)
  • 09.Car speed ​​control (PI)
  • 10.Car steering control (PD)
  • 11.Got angle and angular velocity (DMP algorithm)
  • 12.Got angle and angular velocity (Kalman filter algorithm)
  • 13.Got angle and angular velocity(Complementary filter algorithm)
05.Robot car basic course
  • 01.Car parameter adjustment
  • 02.Ultrasonic obstacle avoidance
  • 03.Ultrasonic follow
  • 04.Bluetooth remote control
  • 05.Load balance
  • 06.Radar obstacle avoidance
  • 07.Radar guard
  • 08.Radar follow
  • 09.Radar patrol
  • 10.Radar wall following go in a straight line
  • 11.Radar tracking wall multiple walls
06.Robot car LQR control
  • Balance car LQR high-level control
07.Circuit design
  • 01.Overall circuit design
  • 02.STM32 minimum system
  • 03.Serial port circuit design
  • 04.Power circuit design
  • 05.MPU6050 Circuit Design
  • 06.Motor drive circuit design
08.Mathematical model
  • Balance car mathematical model
13.Linux basic course
  • 1.Introduction to Linux system
  • 2.Ubuntu file system
  • 3.Ubuntu common commands
  • 4.Ubuntu common editors
  • 5.Ubuntu software operation commands
  • 6.Virtual machine installation
  • 7.SSH remote control
  • 8.VNC remote control
  • 9.Transfer files remotely
  • 10.Driver library and communication
  • 11.Static IP and hotspot mode
  • 12.Bind device ID
  • 13.Capacity expansion and resource allocation
  • 14.Update system software sources
  • 15.Set root user password
  • 16.sudo free password
  • 17.Connect to WiFi network
  • 18.View system version
  • 19.Customized service management
  • 20.Back up system image
14.Docker course
  • 1. Overview and installation
  • 2. Common commands
  • 3. Docker images deeply understand and publish images
  • 4. Docker hardware interaction and data processing
  • 5. Enter the bot's docker container
15.ROS2 basic course
  • 1.Introduction to ROS2
  • 2.ROS2 install Humble
  • 3.ROS2 development environment
  • 4.ROS2 workspace
  • 5.ROS2 function package
  • 6.ROS2 node
  • 7.ROS2 topic communication
  • 8.ROS2 service communication
  • 9.ROS2 action communication
  • 10.ROS2 custom interface message
  • 11.ROS2 parameter service case
  • 12.ROS2 meta-function package
  • 13.ROS2 distributed communication
  • 14.ROS2 DDS
  • 15.ROS2 time related API
  • 16.ROS2 common command tools
  • 17.ROS2 rviz2 use
  • 18.ROS2 rqt toolbox
  • 19.ROS2 Launch startup file configuration
  • 20.ROS2 recording and playback tool
  • 21.ROS2 URDF model
  • 22.ROS2 Gazebo simulation platform
  • 23.ROS2 TF2 coordinate transformation
Download
  • RemoteCtrl_APP(Android)
  • Mapping_APP(iOS_Android)
  • Code
  • Hardware Information
  • software tools
  • 3D model file
  • Instruction manual
  • VM image file
  • ROS2_Basic_VM
Download ZIP

Welcome to MicroROS Self-balancing Robot Car repository

01.MDK-ARM installation

MDK-ARM Installation

MDK-ARM Installation1. Software Download1. Download URL2. Select product3. Fill in information4. Download the installation package2. Software installation1. Open the installation package2. Installation process-settings3. Software configuration1. Open the application2. Close the start interface3. Install the chip support package4. ARM Compiler1. Install the compiler2. Add compiler3. Verify the installation

Since MDK-ARM software is a paid software, we will only demonstrate how to install it, and will not introduce the software usage and activation in detail!

Software offline installation package path: Attachment → Software Tools

1. Software Download

1. Download URL

Keil official website: https://www.keil.com/
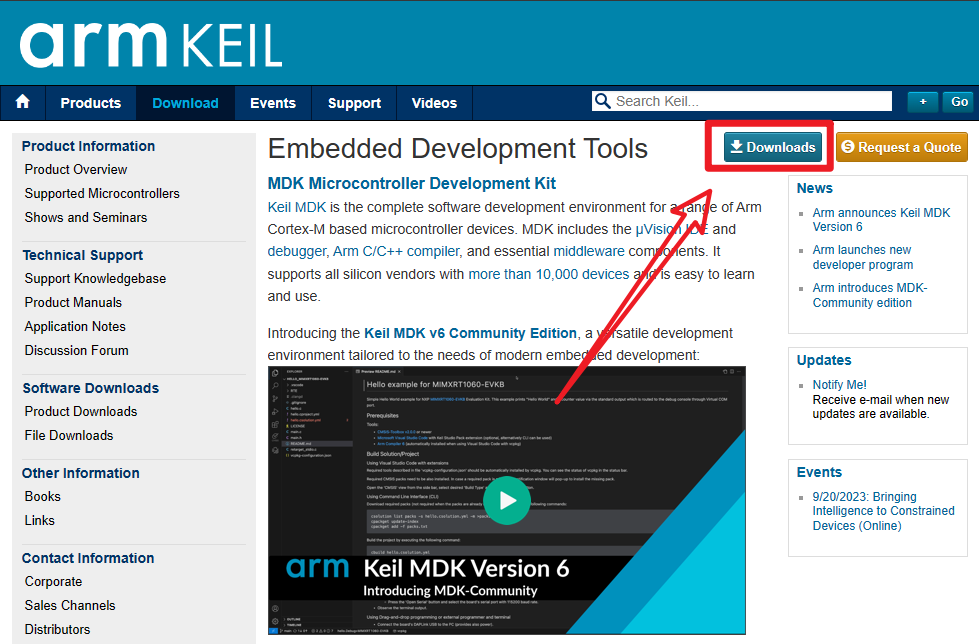
image-20230919192944289

2. Select product

Download Products: MDK-Arm
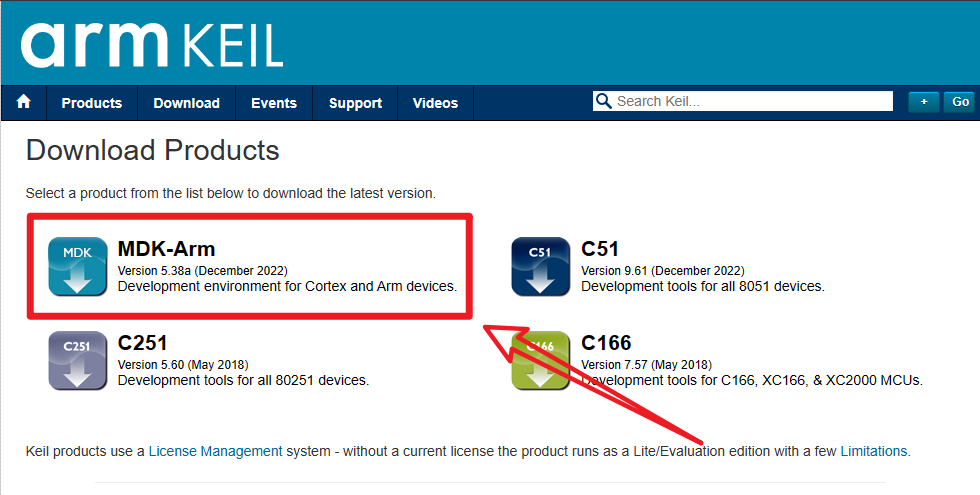
image-20230919193112470

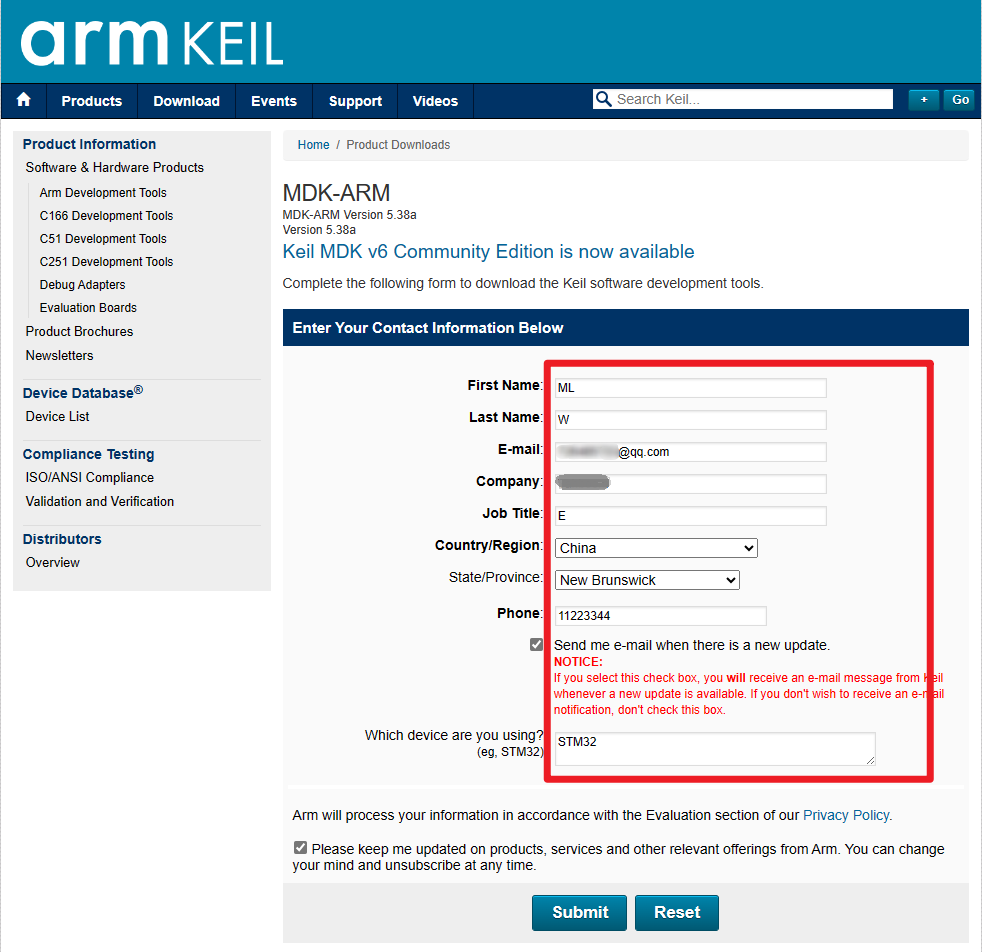
3. Fill in information

image-20230919194001381

xxxxxxxxxx
This content can be filled in at will

4. Download the installation package
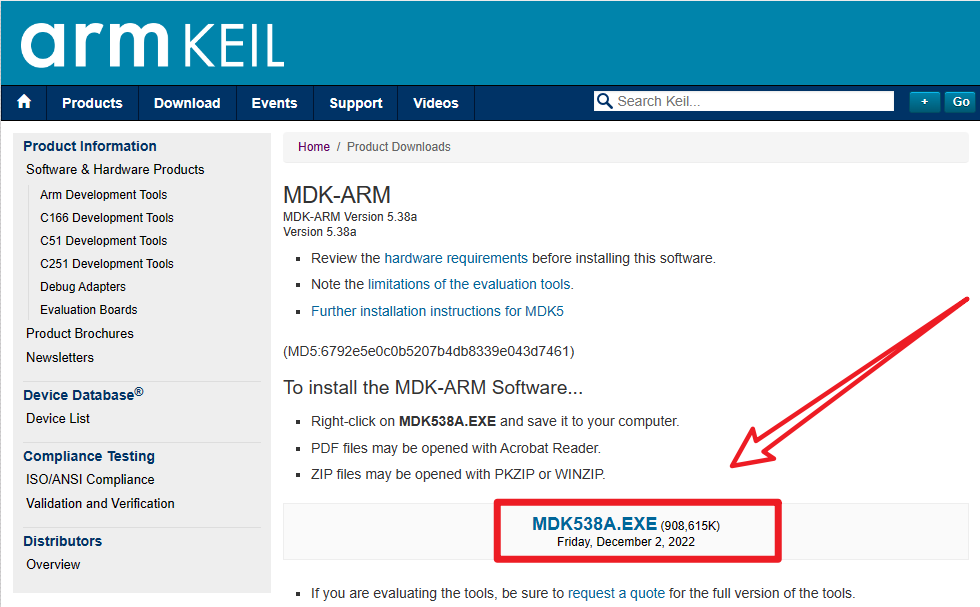
image-20230919193527804

2. Software installation

1. Open the installation package

  • Administrator

Open the MDK installation package as an administrator.

2. Installation process-settings

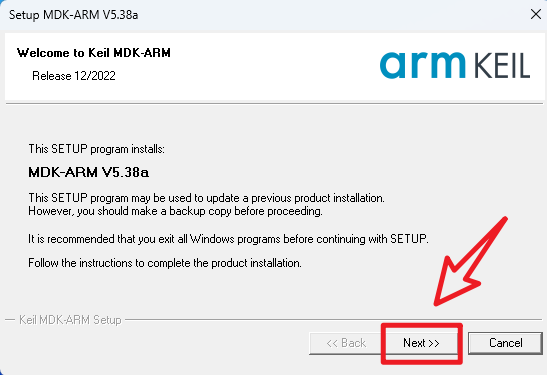
  • Next

image-20230919214029867

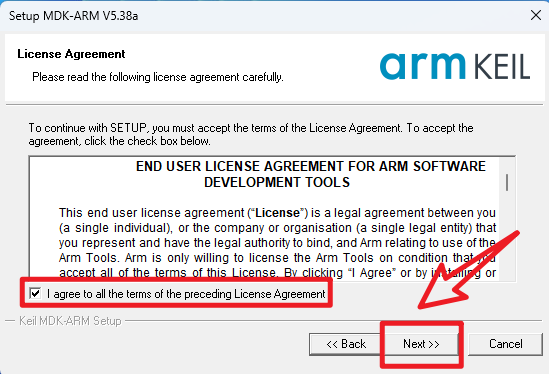
  • Check the agreement → Next

image-20230919214351598

  • Installation location → Next
xxxxxxxxxx
It is recommended to use the system default location
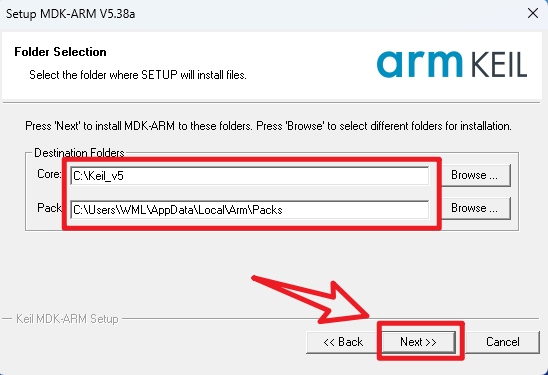
image-20230919214313891

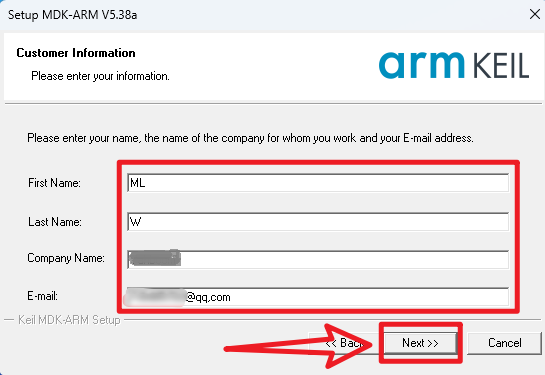
  • User information → Next
xxxxxxxxxx
You can fill in as you like

image-20230919214625085

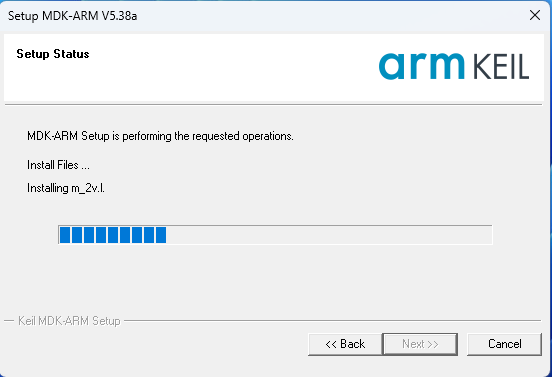
  • Waiting for installation

image-20230919214741781

xxxxxxxxxx
This process takes a long time
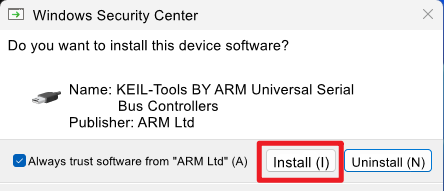
  • ULINKL driver installation

image-20230919215701566

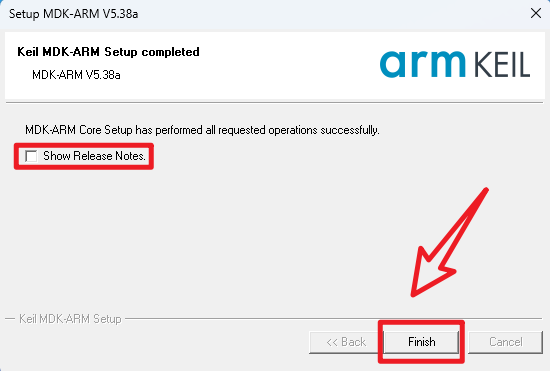
  • Installation completed

image-20230919220011595

3. Software configuration

Install the chip package required during development

xxxxxxxxxx
Tutorial demonstrates how to install the STM32F1xx series chip package

1. Open the application

Left mouse button: Double-click the desktop "Keil uVision5" icon
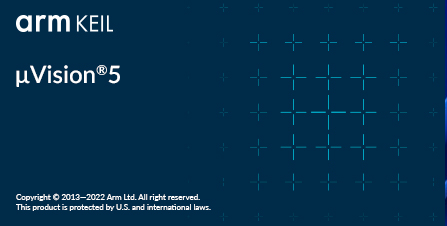
image-20230920204513610

2. Close the start interface

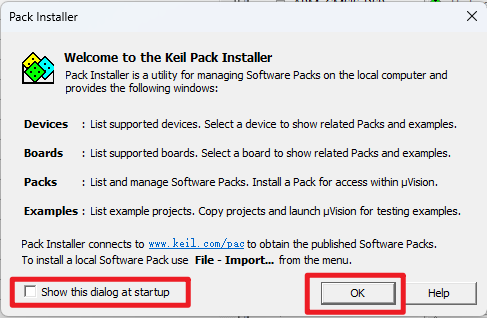
image-20230919220506716

image-20230919221149444

3. Install the chip support package

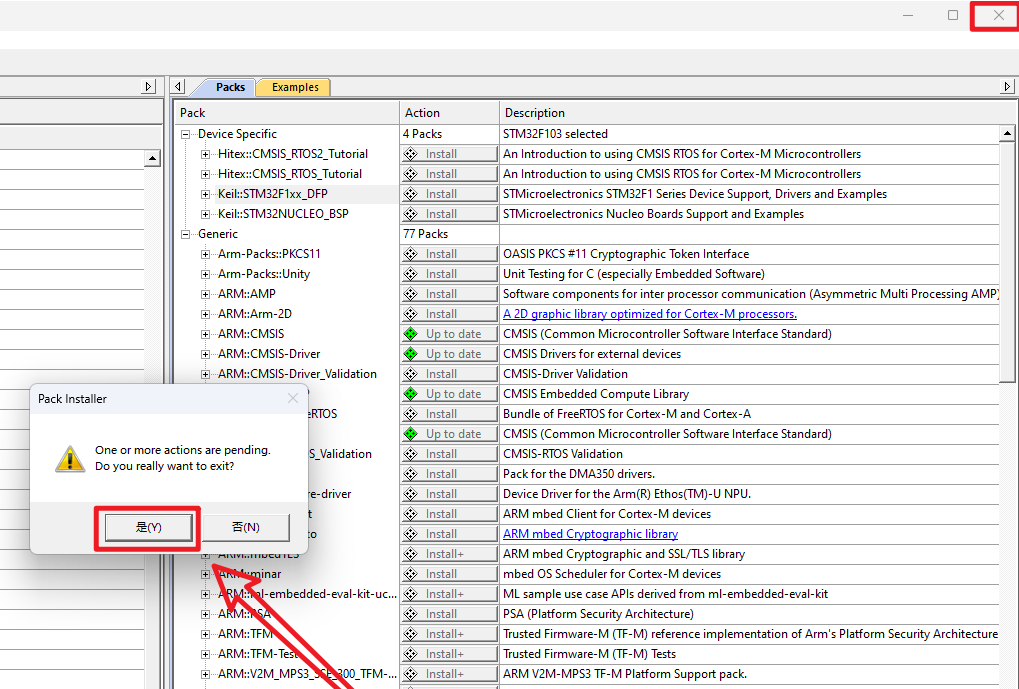
  • Pack Installer
xxxxxxxxxx
Keil software comes with it, loading is very slow, not recommended

Installing: The download and installation progress bar is in the lower right corner of the page
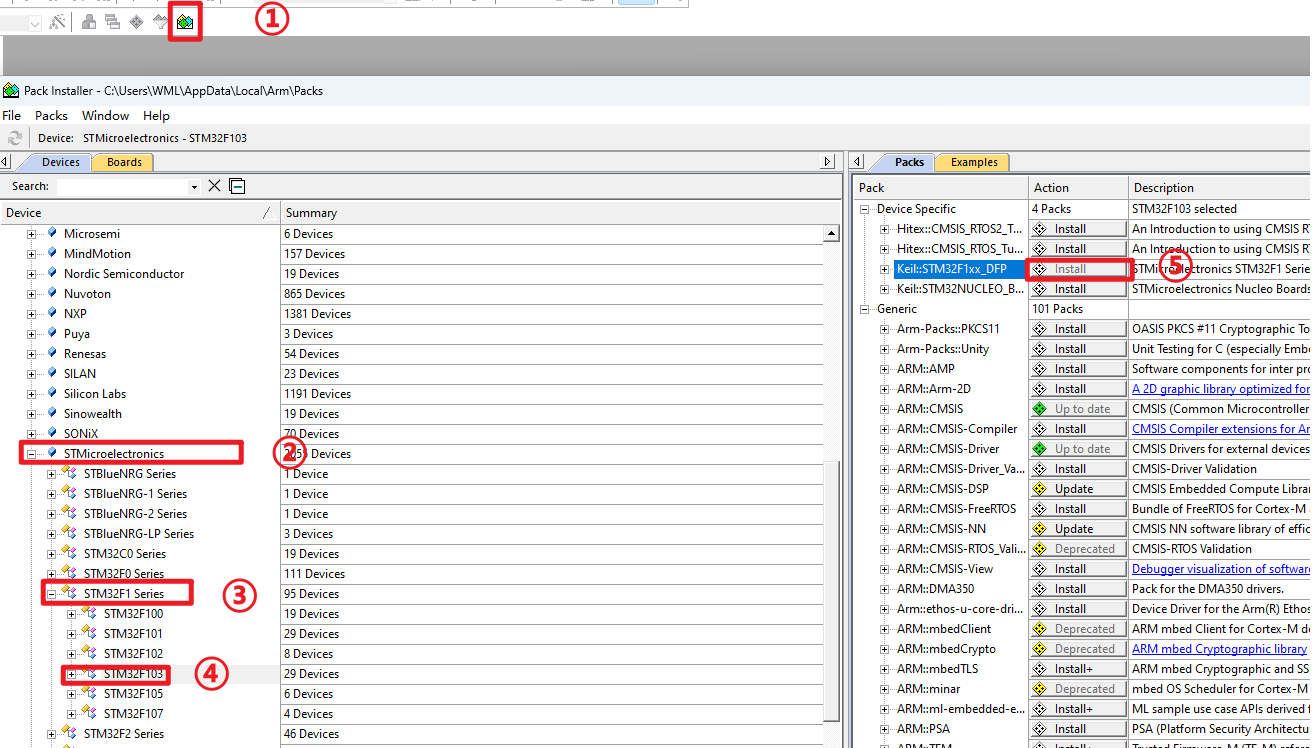
image-20230919222701697

Installation completed: After the installation is completed, the update option "Up to date" will appear
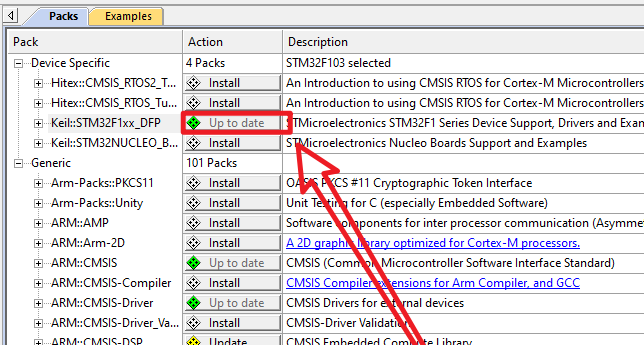
image-20230919223014547

  • Official website download chip package

Official website address: https://www.keil.arm.com/devices/

Search chip package: Search for STM32F103 and click on any chip
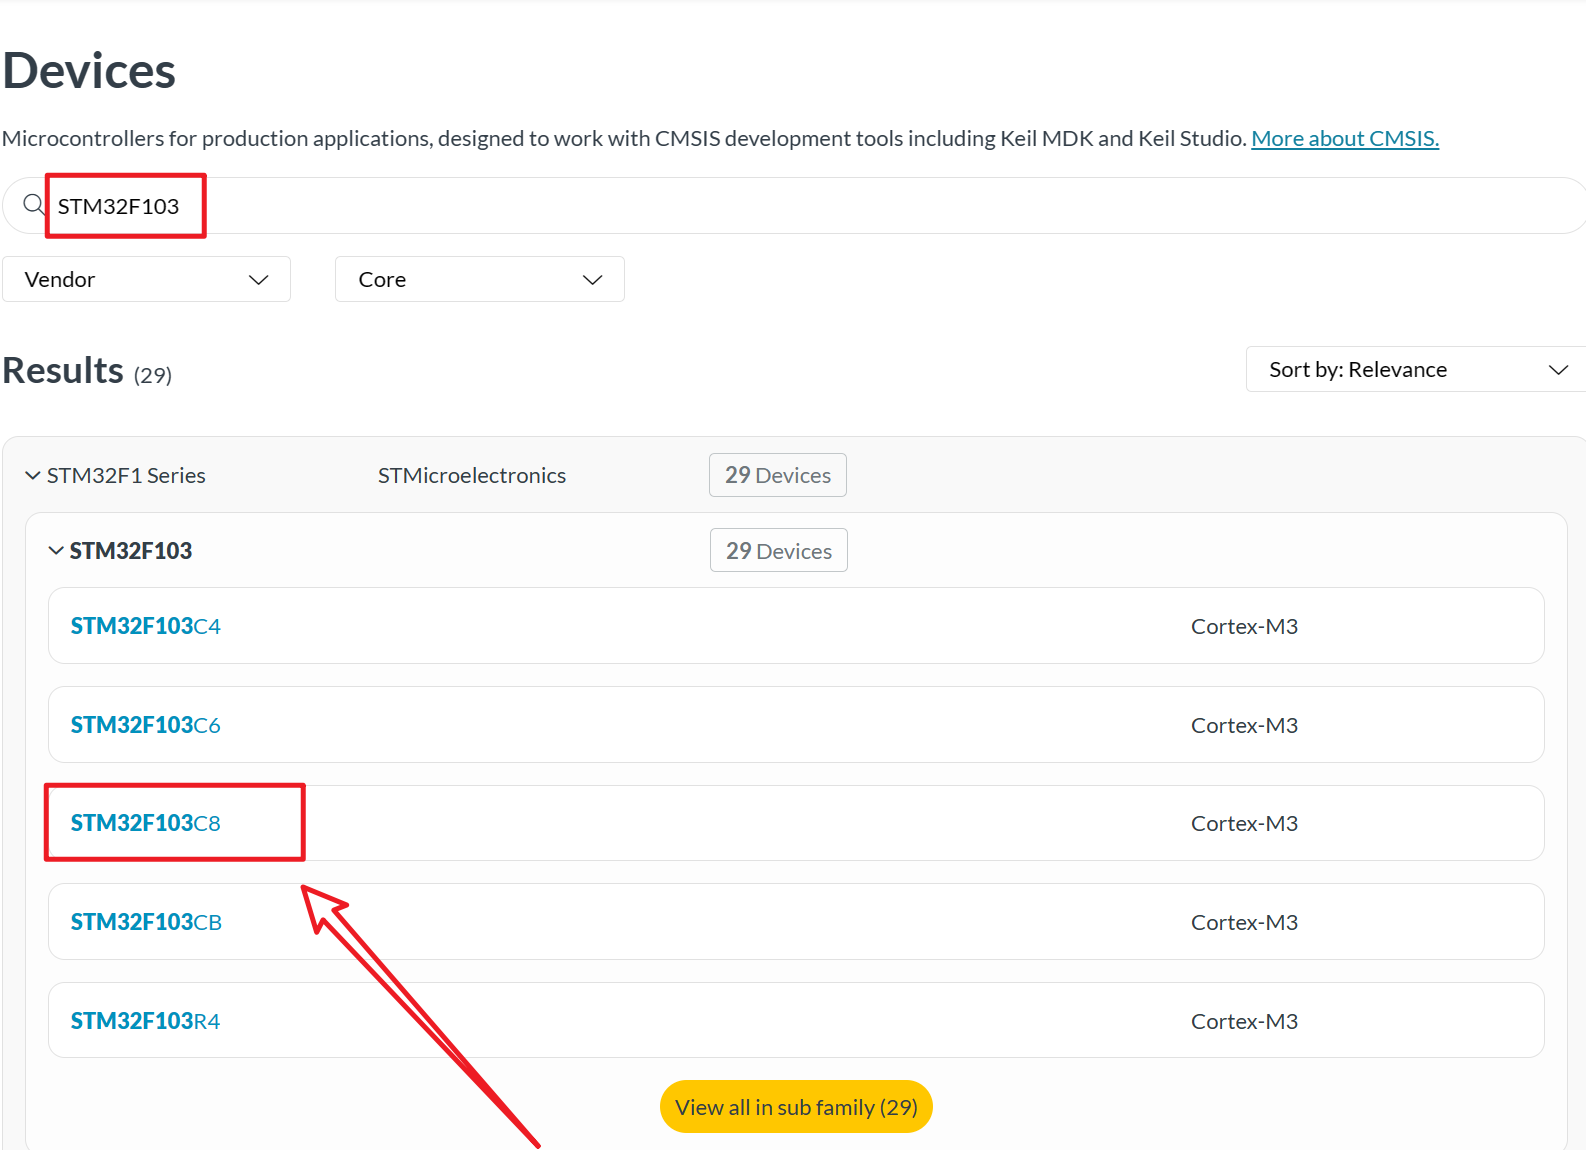
image-20230919223834601

Download chip package: Click "STM32F1xx_DFP"
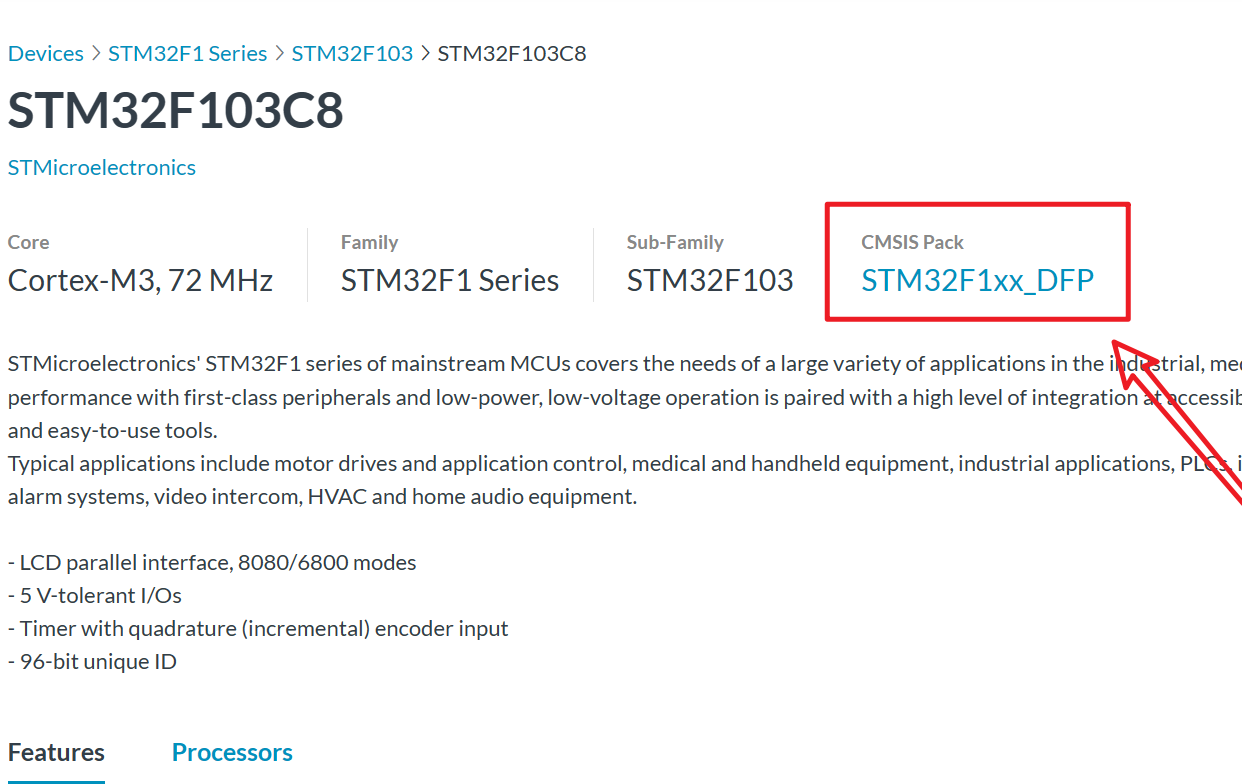
image-20230919224043372

Download the official recommended chip package
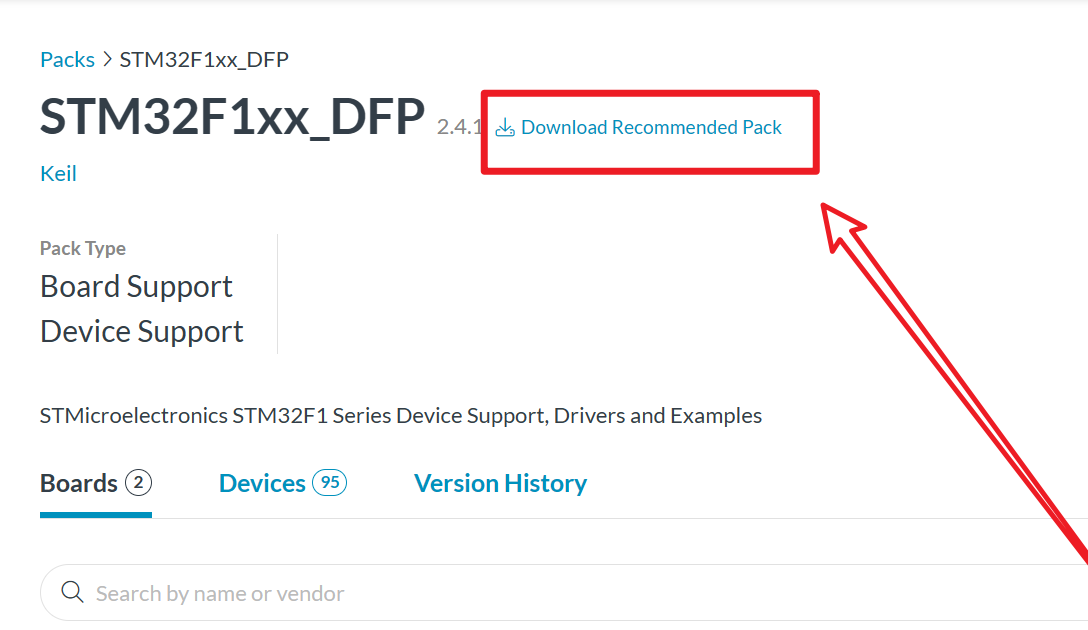
image-20230919224131229

Open chip support package: Keil.STM32F1xx_DFP.2.4.1
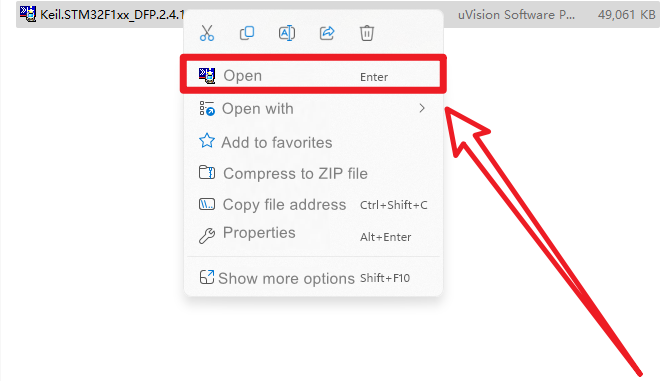
image-20230919224816940

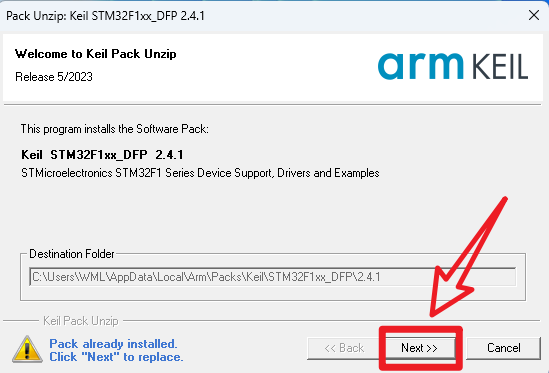
Install chip support package

image-20230919225107905

xxxxxxxxxx
Since I have installed the chip support package through the "Pack Installer" option, a replacement prompt will appear during installation

Installation completed
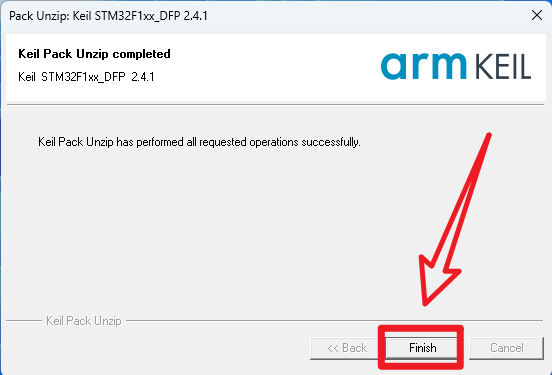
image-20230919225731058

4. ARM Compiler

Starting from MDK5.37, the AC5 (ARMCC) compiler is no longer installed by default and needs to be installed independently.

xxxxxxxxxx
You need to open a project before you can click this option. You can use the template project provided in the document [Attachment → Source Code Summary] to operate
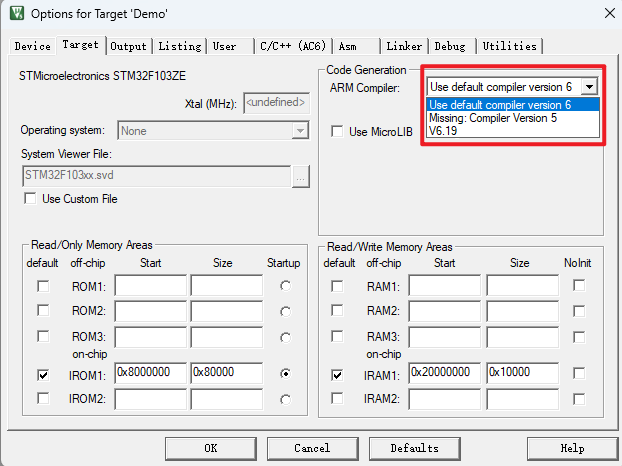
image-20231010095635507

1. Install the compiler

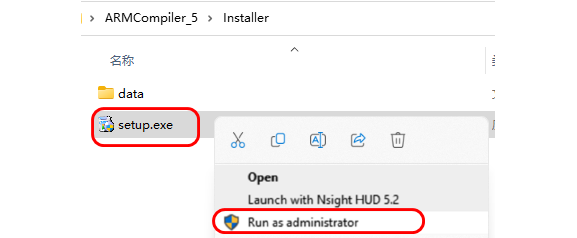
  • Unzip the compressed package

Unzip the ARMCompiler_5.zip file, the file location is under [Software-Project File] in this chapter

  • Open as Administrator

image-20231010100015606

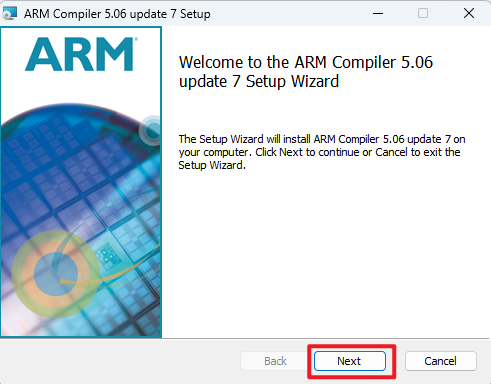
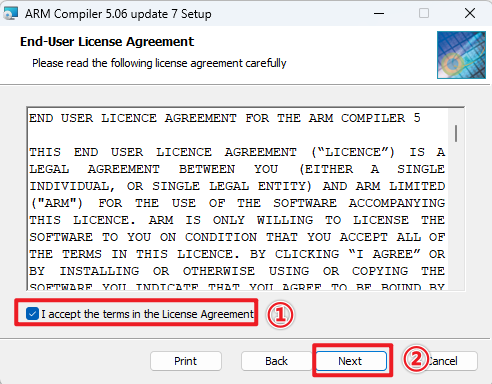
  • Next

image-20231010100109491

image-20231010100139145

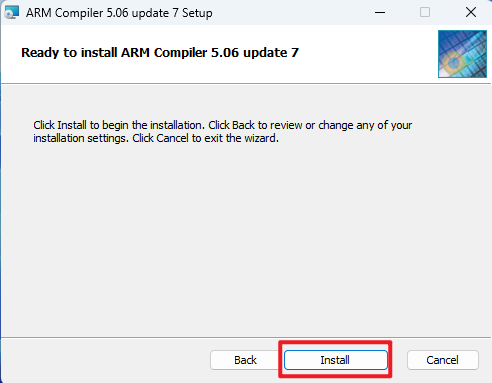
  • Modify the installation location

Installation location: Create a new ARMCC folder under the C:\Keil_v5\ARM folder and select this folder as the software installation location
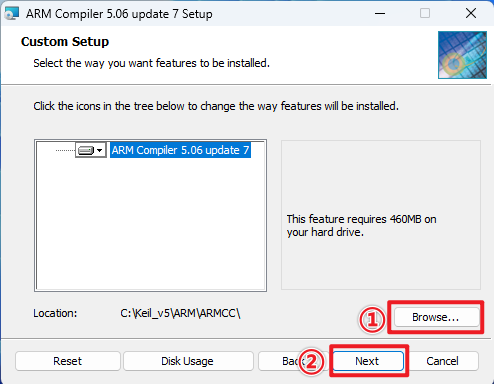
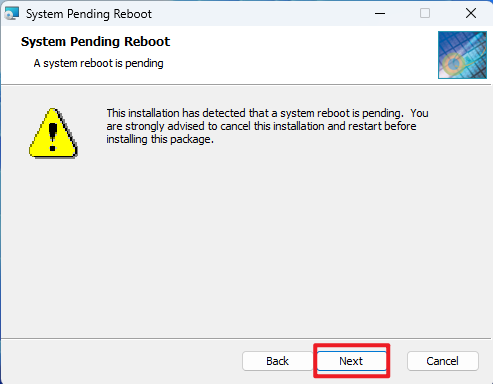
image-20231010100317400

image-20231010100544648

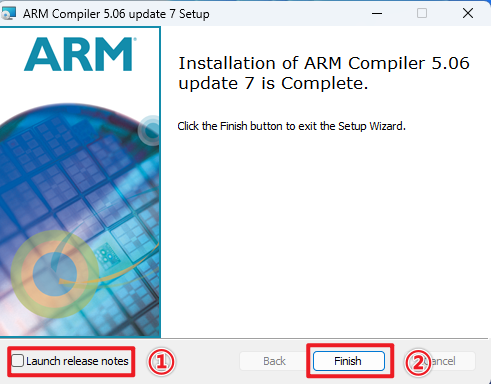
  • Installation completed

image-20231010100614287

image-20231010100744906

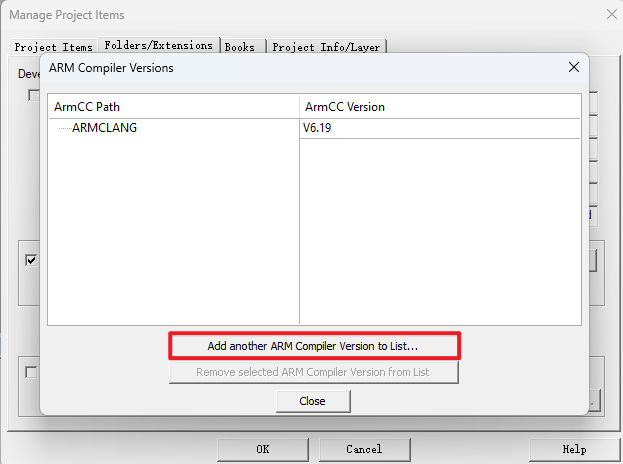
2. Add compiler

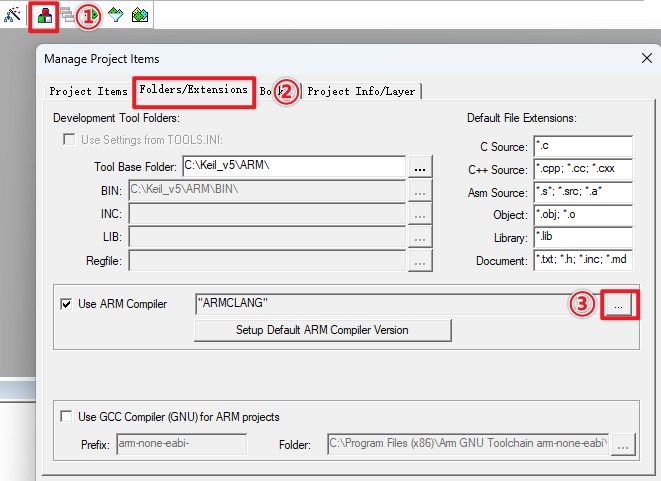
The following operations involve Keil5 software, and you need to open a project; otherwise, the relevant menu options cannot be selected

  • Project management

image-20231010100940204

image-20231010101007944

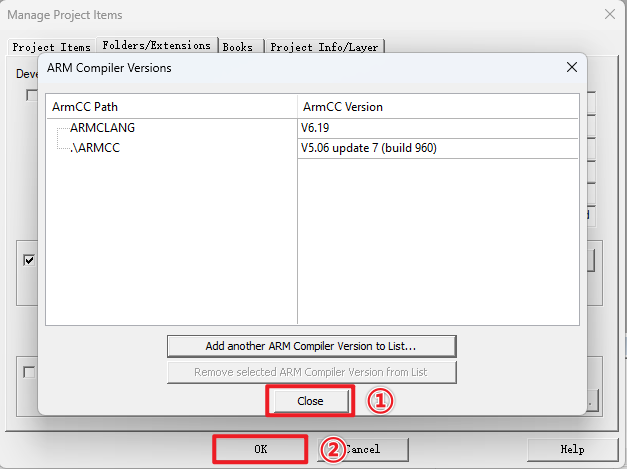
  • Compiler path

Select the location you just installed
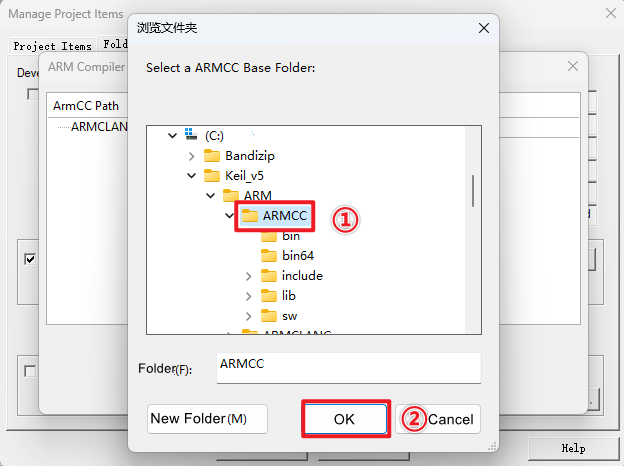
image-20231010101121730

image-20231010101158295

3. Verify the installation

If the following options appear, AC5 has been successfully installed!
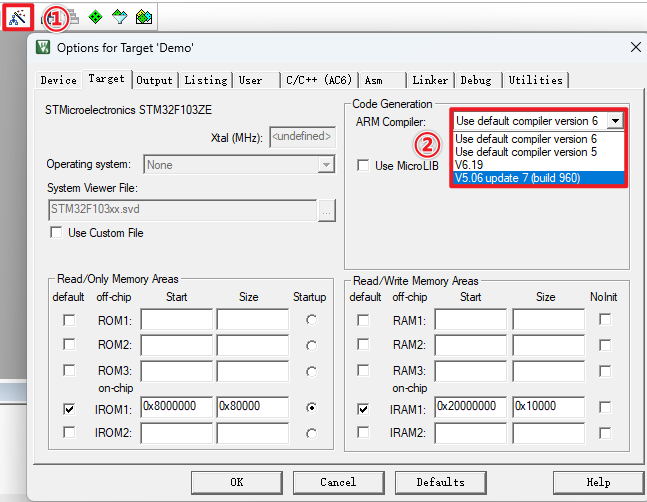
image-20231010101402666

Window Watchdog (WWDG)
STM32CubeIDE installation

COMPANY

  • About us
  • Team Style
  • Blog

LEARNING & EXPLORATION

  • Tutorials
  • Edge AI hardware
  • Educational robots
  • Embedded intelligent hardware

WHERE TO BUY

  • Yahboom Online Store
  • Amazon
  • Alibaba
  • AliExpress
  • Mercado

TECHNOLOGY SUPPORT

  • Email: support@yahboom.com

BE A DISTRIBUTOR

  • Email: sales@yahboom.com
QR Code

Copyright © 2017-2026 Yahboom. All Rights Reserved.

EN/中文