Welcome to Raspberry Pi 4B repository
4.Publisher
4 Publisher
4 Publisher 4.1 Publisher 4.2 Create workspace and topic package 4.2.1 Create a workspace 4.2.2 Compilation workspace 4.2.3 Update environment variables 4.2.4 Check environment variables 4.2.5 Create function package 4.2.6 Compile function package 4.3 create a publisher 4.3.1 Creation steps 4.3.2 C++ language implementation 4.3.3 Python language implementation
4.1 Publisher
Publisher, as the name suggests, plays the role of publishing news. The message here can be the sensor information transmitted by the lower computer to the upper computer, and then packaged and packaged by the upper computer and sent to the subscribers who have subscribed to the topic; it can also be the data of the upper computer after the operation is packaged and packaged and sent to the Subscribers to this topic.
4.2 Create workspace and topic package
4.2.1 Create a workspace
mkdir -p ~/catkin_ws/src cd ~/catkin_ws/src catkin_init_workspace 4.2.2 Compilation workspace
xxxxxxxxxxcd ~/catkin_ws/ catkin_make 4.2.3 Update environment variables
xxxxxxxxxxsource devel/setup.bash 4.2.4 Check environment variables
xxxxxxxxxxecho $ROS_PACKAGE_PATH 4.2.5 Create function package
xxxxxxxxxxcd ~/catkin_ws/src catkin_create_pkg learning_topic std_msgs rospy roscpp geometry_msgs turtlesim #Explanation: learning_topic is the name of the function package 4.2.6 Compile function package
xxxxxxxxxxcd ~/catkin_ws catkin_make source ~/catkin_ws/devel/setup.bash 4.3 create a publisher
4.3.1 Creation steps
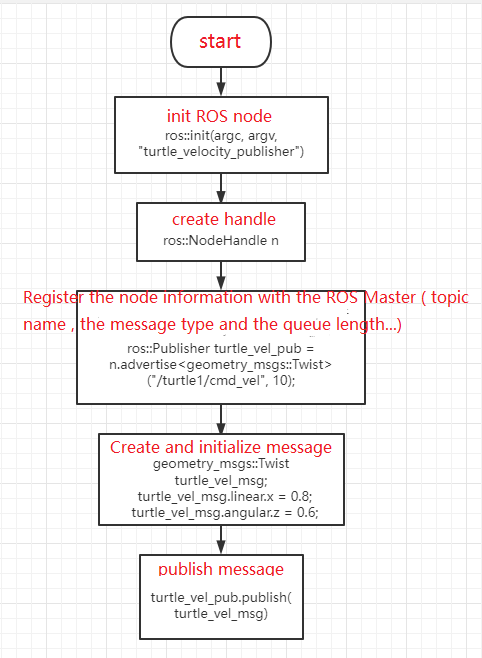
- initialize the ROS node
- create a handle
- Register node information with ROS Master, including the topic name published, the message type in the topic, and the queue length
- create and initialize message data
- Send messages cyclically according to a certain frequency
4.3.2 C++ language implementation
- In the src folder of the function package, create a c++ file(the file suffix is .cpp) and name it turtle_velocity_publisher.cpp
- copy and paste the program code below into the turtle_velocity_publisher.cpp file
x/* Create a speed publisher for a baby turtle */ int main(int argc, char ** argv){ ros::init(argc, argv, "turtle_velocity_publisher"); //ROS node initialization ros::NodeHandle n; //here is to create handle
//Create a Publisher, publish a topic named /turtle1/cmd_vel, the message type is geometry_msgs::Twist, and the queue length is 10 ros::Publisher turtle_vel_pub = n.advertise < geometry_msgs::Twist >("/turtle1/cmd_vel", 10); ros::Rate loop_rate(10); //Set the frequency of the loop
while (ros::ok()){ //Initialize the message to be published, the type must be consistent with Publisher geometry_msgs::Twist turtle_vel_msg; turtle_vel_msg.linear.x = 0.8; turtle_vel_msg.angular.z = 0.6; turtle_vel_pub.publish(turtle_vel_msg); // publish velocity message
//Print the published speed content ROS_INFO("Publsh turtle velocity command[%0.2f m/s, %0.2f rad/s]", turtle_vel_msg.linear.x, turtle_vel_msg.angular.z); loop_rate.sleep(); //Delay according to the loop frequency } return 0; } - the program flow chart, which can be viewed corresponding to the content of 1.3.1
- configure in CMakelist.txt, under the build area, add the following content
xxxxxxxxxxadd_executable(turtle_velocity_publisher src/turtle_velocity_publisher.cpp) target_link_libraries(turtle_velocity_publisher ${catkin_LIBRARIES}) - Compile the code in the workspace directory
xxxxxxxxxxcd ~/catkin_ws catkin_make source devel/setup.bash #Environment variables need to be configured, otherwise the system cannot find the running program - run the program
run roscore
xxxxxxxxxxroscoreRun the turtle node
xxxxxxxxxxrosrun turtlesim turtlesim_nodeRun the publisher to continuously send the speed to the little turtle
xxxxxxxxxxrosrun learning_topic turtle_velocity_publisher
- Screenshot of running effect
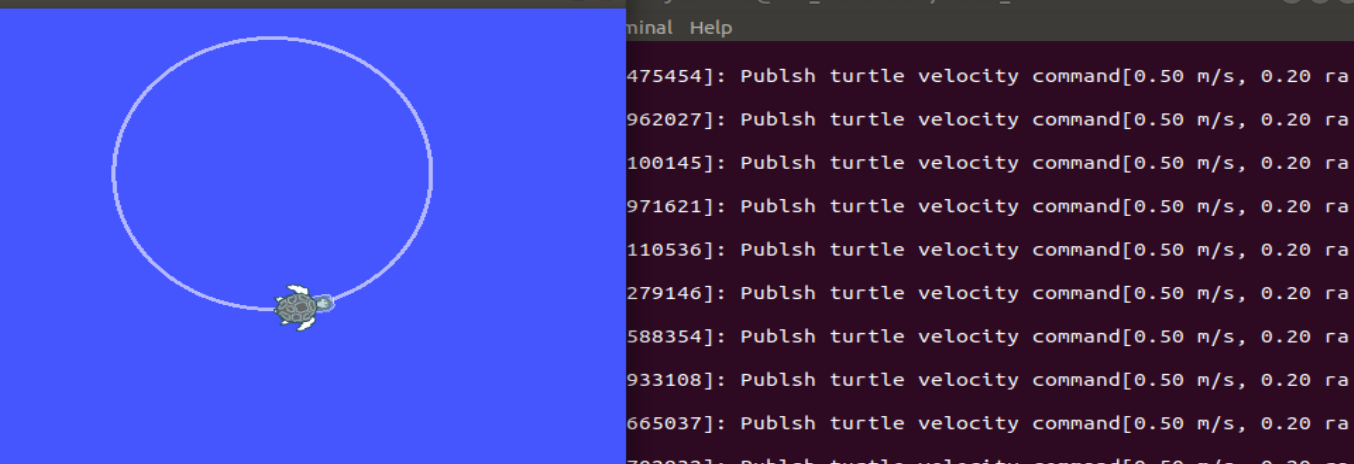
- program operation instructions
- Enter rostopic list in the terminal to view the topic list and you will find the topic /turtle1/cmd_vel
- We use rostopic info /turtle1/cmd_vel to find out
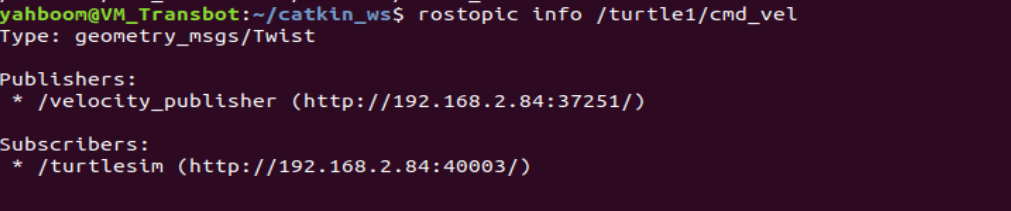
This shows that the little turtle is a subscription to the speed topic /turtle1/cmd_vel. Therefore, the publisher keeps sending speed data. After the little turtle receives it, it starts to move according to the speed.
4.3.3 Python language implementation
- In the function package directory, create a new folder scripts, and then create a new python file(file suffix .py) in the scripts folder, named turtle_velocity_publisher.py
- copy and paste the program code below into the turtle_velocity_publisher.py file
xxxxxxxxxx#!/usr/bin/env python # -*- coding: utf-8 -*- # This routine will publish turtle1/cmd_vel topic, message type geometry_msgs::Twist
import  rospy from  geometry_msgs.msg import Twist
def turtle_velocity_publisher():         rospy.init_node('turtle_velocity_publisher', anonymous = True) # ROS node initialization
    # Create a small turtle speed publisher, publish a topic named /turtle1/cmd_vel, the message type is geometry_msgs::Twist, and 8 represents the message queue length     turtle_vel_pub  =  rospy.Publisher('/turtle1/cmd_vel', Twist, queue_size = 8)
        rate = rospy.Rate(10) # set the frequency of the loop
    while  not  rospy.is_shutdown():         # Initialize a message of type geometry_msgs::Twist         turtle_vel_msg  =  Twist()         turtle_vel_msg.linear.x  =  0.8         turtle_vel_msg.angular.z  =  0.6
        # make an announcement         turtle_vel_pub.publish(turtle_vel_msg)         rospy.loginfo("linear is :%0.2f m/s, angular is :%0.2f rad/s",                 turtle_vel_msg.linear.x, turtle_vel_msg.angular.z)
                rate.sleep() # Delay according to the loop frequency
if __name__ == '__main__' : try : turtle_velocity_publisher() except rospy.ROSInterruptException : pass - program flow chart
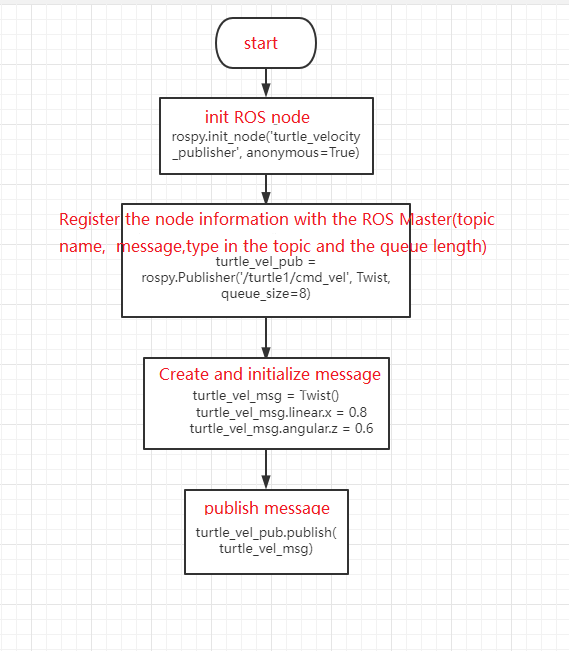
- run the program
run roscore
xxxxxxxxxxroscoreRun the turtle node
xxxxxxxxxxrosrun turtlesim turtlesim_nodeRun the publisher to continuously send the speed to the little turtle
xxxxxxxxxxrosrun learning_topic turtle_velocity_publisher.py
Note: Before running, you need to add executable permissions to turtle_velocity_publisher.py, open the terminal in the turtle_velocity_publisher.py folder,
xxxxxxxxxxsudo chmod a+x turtle_velocity_publisher.py
All pythons need to add execute file permissions, otherwise an error will be reported!
- Refer to 1.3.2 for operation effect and program description.