yahboom
HomeLearn
Solution
Blog
Online Store
About Us
EN/中文
Raspberry Pi 4B📖
1.Preparation before use
  • 1.1 Download image
  • 1.2 Write image into SD card
  • 1.3 Start up Raspberry Pi
  • 1.4 Linux common commands
  • 1.5 Precautions
2.Basic course
  • 2.1 Log into Raspberry Pi system
  • 2.2 Change password and root account
  • 2.3 Remote transfer file
  • 2.4 Backup image file
  • 2.5 Fixing Raspberry Pi IP
  • 2.6 Set screen keep on
  • 2.7 Get Pi temperature
  • 2.8 Connect WIFI
  • 2.9 Modify Pi time
  • 2.10 Set the boot self-starting program
3.Expand course
  • 3.1 Serial port communicates with external devices
  • 3.2 2.Serial port login Pi
  • 3.3 Configured as a router
  • 3.4 Install Jupyter Lab
  • 3.5 Install Jupyter Widgets
  • 3.6 More Detail for Widgets
  • 3.7 Install OpenCV
  • 3.8 Install Tensorflow
4.Programming course
C language
  • 1.Development environment
  • 2.Print Hello World
  • 3.Pin output level
  • 4.Read pin level
  • 5.PWM output
Python language
  • 1.Development environment
  • 2.Print basic usage
  • 3.Pin output level
  • 4.Read pin level
  • 5.PWM output
5.AI vision course
A.Getting started with OpenCV
  • 6.Picture Rotation
  • 1.Introduction of OpenCV
  • 2.OpenCV image read and display
  • 3.OpenCV image write
  • 4.OpenCV image quality
  • 5.OpenCV pixel operation
B.OpenCV Geometric transformat
  • 1.Picture Zoom
  • 2.Picture Cut
  • 3.Picture Shift
  • 4.Picture Mirroring
  • 5.Affine Map
  • 7.Perspective Transformation
C.OpenCV picture processing
  • 1.Grayscale processing
  • 2.Image Binarization
  • 3.Edge detection
  • 4.Drawing line segment
  • 5.Drawing rectangle circle
  • 6.Drawing text picture
D.OpenCV image beautification
  • 1.Histogram of color pictures
  • 2.Histogram equalization
  • 3.Image restoration
  • 4.Brightness enhancement
  • 5.Skin whitening
  • 6.Gaussian mean filtering
  • 7.Median filtering
F.AI Advanced Course (Ubuntu system)
  • 1. QR code
  • 2. Human posture estimation
  • 3. Target detection
  • 4. Mediapipe development
  • 5. yolov4-tiny
E.Install TensorFlow
  • Install TensorFlow
6.ROS1 coursenew
Basic Course
  • 1.ROS introduction
  • 2.Project file structure
  • 3.Common commands and tools
  • 4.Publisher
  • 5.Subscribers
  • 6.Customize topic messages and use
  • 7.Client
  • 8.Server
  • 9.Custom service messages and usage
  • 10.TF release and monitoring
Visual Image Processing
  • 1. AR vision
  • 2. AR QR code
  • 3. ROS+Opencv foundation
  • 4. ROS+Opencv application
  • 5. MediaPipe development
7.ROS2 coursenew
Docker Course
  • 1.Overview and installation
  • 2.Common commands
  • 3.Understand and publish images
  • 4.Hardware interaction data processing
  • 5.Enter docker container
  • 6.Update docker images
Basic Course
  • 1.Introduction to ROS2
  • 2.Commands and tools
  • 3.ROS2 Topic communications
  • 4.ROS2 service communications
  • 5.ROS2launch file starts
OpenCV Course
  • 1.OpenCV Basic Course
  • 2.ROS+opencv application
  • 3.QR code recognition
  • 4.AR Vision
  • 5.Mediapipe
8.Accessories installation
  • 1. Installation of heat sink
  • 2. Wiring of cooling fan
  • 3. Double fan armor case Installation
  • 4. Argon NEO aluminum case installation
  • 5. Argon ONE aluminum alloy case installation
  • 6. Metal shell with built-in fan installation
  • 7. Acrylic case with cooling fan installation
  • 8. White-red ABS protective case installation
Download
  • Tools
  • C_code
  • Python code
  • ROS System
Download ZIP

Welcome to Raspberry Pi 4B repository

1.Introduction to ROS2

Introduction to ROS2

1、ROS2 overview

ROS2 is the second generation of the Robot Operating System, an upgraded version of ROS1 that solves some of the problems with ROS1. The earliest version of ROS2, Arden, was in 2017, and with the iteration of the version, it has been continuously updated and optimized, and now there is a stable version. With ROS1, the choice of Linux version and ROS2 version is also related, and the corresponding versions of the two are as follows:

ROS2 versionUbuntu version
FoxyUbuntu20.04
GalacticUbuntu20.04
HumbleUbuntu22.04

Download the ROS2 version according to your Linux version, and this product course is based on the Foxy version.

2、ROS2 characteristics

2.1、ROS2 fully supports all three platforms

  • Ubuntu
  • Mac OS X
  • Windows 10

2.2、A distributed architecture is implemented

Cancel the master central node and realize distributed discovery, publish/subscribe, request/respond communication of nodes.

2.3、Supports real-time

2.4、Use a new version of the programming language

  • C++ 11
  • Python 3.5+

2.5、The new compilation system ament (Ross for Catkin) was used.

2.6、ROS1 can communicate via Rosbridge and ROS2

3、The difference between ROS2 and ROS1

3.1、platform

ROS1 currently only supports running on Linux, and is commonly built and used in Ubuntu. ROS2 can currently be built and used on Ubuntu, Windows and even embedded development boards, and the platform is more extensive.

3.2、program language

  • C++

    The core of ROS1 is C++03, while ROS2 makes extensive use of C++11.

  • Python

    The Python version used by ROS1 is Python 2, while the Python version used by ROS2 is at least 3.5 or above, and the Python version used by Foxy is 3.8.

3.3、Middleware

ROS1 needs to start roscore before starting, this master controls the communication between all nodes, while ROS2 does not, only an abstract middleware interface through which data is transmitted. Currently, all implementations of this interface are based on the DDS standard. This enables ROS 2 to provide a variety of high-quality QoS service strategies to improve communication across different networks.
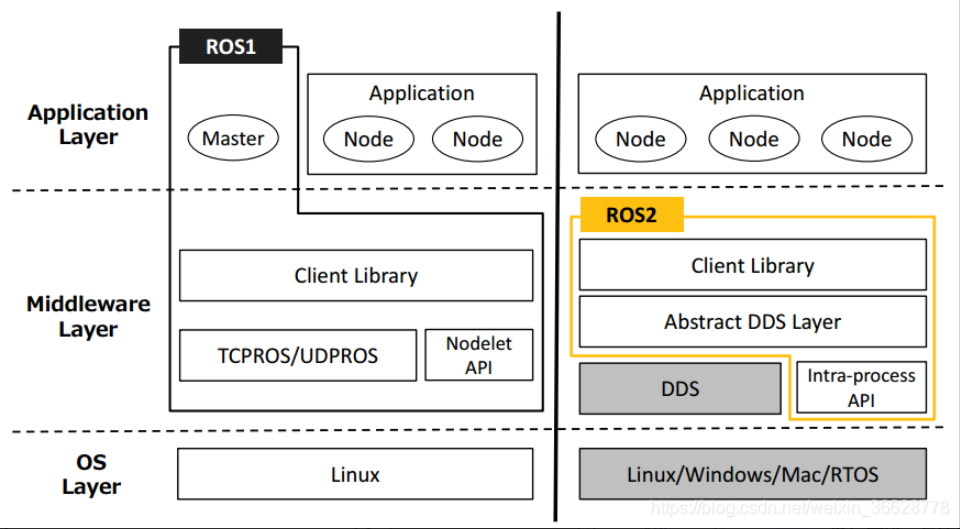
image-20230427150532854

3.4、Compile the command

ROS1's compile command is catkin_make, while ROS2's compile command uses the colcon build command.


Update docker images
Commands and tools

COMPANY

  • About us
  • Team Style
  • Blog

LEARNING & EXPLORATION

  • Tutorials
  • Edge AI hardware
  • Educational robots
  • Embedded intelligent hardware

WHERE TO BUY

  • Yahboom Online Store
  • Amazon
  • Alibaba
  • AliExpress
  • Mercado

TECHNOLOGY SUPPORT

  • Email: support@yahboom.com

BE A DISTRIBUTOR

  • Email: sales@yahboom.com
QR Code
QR Code

Copyright © 2017-2026 Yahboom. All Rights Reserved.

EN/中文