yahboom
HomeLearn
Solution
Blog
Online Store
About Us
EN/中文
Raspberry Pi 4B📖
1.Preparation before use
  • 1.1 Download image
  • 1.2 Write image into SD card
  • 1.3 Start up Raspberry Pi
  • 1.4 Linux common commands
  • 1.5 Precautions
2.Basic course
  • 2.1 Log into Raspberry Pi system
  • 2.2 Change password and root account
  • 2.3 Remote transfer file
  • 2.4 Backup image file
  • 2.5 Fixing Raspberry Pi IP
  • 2.6 Set screen keep on
  • 2.7 Get Pi temperature
  • 2.8 Connect WIFI
  • 2.9 Modify Pi time
  • 2.10 Set the boot self-starting program
3.Expand course
  • 3.1 Serial port communicates with external devices
  • 3.2 2.Serial port login Pi
  • 3.3 Configured as a router
  • 3.4 Install Jupyter Lab
  • 3.5 Install Jupyter Widgets
  • 3.6 More Detail for Widgets
  • 3.7 Install OpenCV
  • 3.8 Install Tensorflow
4.Programming course
C language
  • 1.Development environment
  • 2.Print Hello World
  • 3.Pin output level
  • 4.Read pin level
  • 5.PWM output
Python language
  • 1.Development environment
  • 2.Print basic usage
  • 3.Pin output level
  • 4.Read pin level
  • 5.PWM output
5.AI vision course
A.Getting started with OpenCV
  • 6.Picture Rotation
  • 1.Introduction of OpenCV
  • 2.OpenCV image read and display
  • 3.OpenCV image write
  • 4.OpenCV image quality
  • 5.OpenCV pixel operation
B.OpenCV Geometric transformat
  • 1.Picture Zoom
  • 2.Picture Cut
  • 3.Picture Shift
  • 4.Picture Mirroring
  • 5.Affine Map
  • 7.Perspective Transformation
C.OpenCV picture processing
  • 1.Grayscale processing
  • 2.Image Binarization
  • 3.Edge detection
  • 4.Drawing line segment
  • 5.Drawing rectangle circle
  • 6.Drawing text picture
D.OpenCV image beautification
  • 1.Histogram of color pictures
  • 2.Histogram equalization
  • 3.Image restoration
  • 4.Brightness enhancement
  • 5.Skin whitening
  • 6.Gaussian mean filtering
  • 7.Median filtering
F.AI Advanced Course (Ubuntu system)
  • 1. QR code
  • 2. Human posture estimation
  • 3. Target detection
  • 4. Mediapipe development
  • 5. yolov4-tiny
E.Install TensorFlow
  • Install TensorFlow
6.ROS1 coursenew
Basic Course
  • 1.ROS introduction
  • 2.Project file structure
  • 3.Common commands and tools
  • 4.Publisher
  • 5.Subscribers
  • 6.Customize topic messages and use
  • 7.Client
  • 8.Server
  • 9.Custom service messages and usage
  • 10.TF release and monitoring
Visual Image Processing
  • 1. AR vision
  • 2. AR QR code
  • 3. ROS+Opencv foundation
  • 4. ROS+Opencv application
  • 5. MediaPipe development
7.ROS2 coursenew
Docker Course
  • 1.Overview and installation
  • 2.Common commands
  • 3.Understand and publish images
  • 4.Hardware interaction data processing
  • 5.Enter docker container
  • 6.Update docker images
Basic Course
  • 1.Introduction to ROS2
  • 2.Commands and tools
  • 3.ROS2 Topic communications
  • 4.ROS2 service communications
  • 5.ROS2launch file starts
OpenCV Course
  • 1.OpenCV Basic Course
  • 2.ROS+opencv application
  • 3.QR code recognition
  • 4.AR Vision
  • 5.Mediapipe
8.Accessories installation
  • 1. Installation of heat sink
  • 2. Wiring of cooling fan
  • 3. Double fan armor case Installation
  • 4. Argon NEO aluminum case installation
  • 5. Argon ONE aluminum alloy case installation
  • 6. Metal shell with built-in fan installation
  • 7. Acrylic case with cooling fan installation
  • 8. White-red ABS protective case installation
Download
  • Tools
  • C_code
  • Python code
  • ROS System
Download ZIP

Welcome to Raspberry Pi 4B repository

5.Subscribers

5 Subscribers

5 Subscribers 5.1 Subscribers 5.2 Create a Subscriber 5.2.1 Creation steps 5.2.2 C++ language implementation 5.2.3 Python language implementation

5.1 Subscribers

The subscriber receives the data published by the publisher, and then enters its callback function and processes the received data in the callback function. Its core content is a callback function, and each subscriber subscribes to a topic that has a callback function.

5.2 Create a Subscriber

5.2.1 Creation steps

  1. initialize the ROS node
  2. create a handle
  3. subscribe to the topic you need
  4. wait for the topic message in a loop, and enter the callback function after receiving the message
  5. complete the message processing in the callback function.

5.2.2 C++ language implementation

  1. In the "Publisher" tutorial, create a new c++ file under the src folder of the created function package and name it turtle_pose_subscriber.cpp
  2. Copy and paste the program code below into the turtle_pose_subscriber.cpp file
​x
/*Create a small turtle's current pose information to receive*/ 
#include <ros/ros.h> 
#include "turtlesim/Pose.h" 
// After receiving the message, it will enter the message callback function, and the callback function will process the received data 
void  turtle_poseCallback(const  turtlesim::Pose::ConstPtr &  msg){ 
    // print received message 
    ROS_INFO("Turtle pose: x:%0.3f, y:%0.3f", msg -> x, msg -> y); 
} 

int  main(int argc, char ** argv){ 
    
    ros::init(argc, argv, "turtle_pose_subscriber"); // initialize the ROS node 

    ros::NodeHandle  n; //here is to create handle 

    // Create a subscriber, the subscribed topic is the topic of /turtle1/pose, and poseCallback is the callback function 
    ros::Subscriber  pose_sub  =  n.subscribe("/turtle1/pose", 10, turtle_poseCallback); 
   
    ros::spin(); // loop waiting for callback function 

    return  0; 
} 
  1. Program flow chart, which can be viewed corresponding to the content of 5.2.1
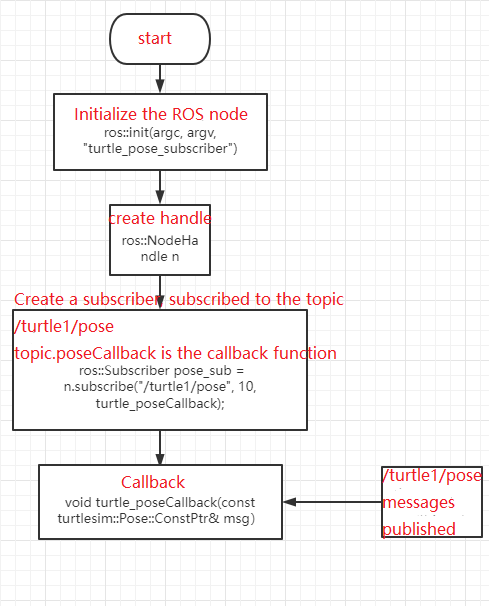
sub_c++

  1. configure in CMakelist.txt, under the build area, add the following content
xxxxxxxxxx
add_executable(turtle_pose_subscriber src/turtle_pose_subscriber.cpp) 
target_link_libraries(turtle_pose_subscriber ${catkin_LIBRARIES}) 
  1. Compile the code in the workspace directory
xxxxxxxxxx
cd ~/catkin_ws 
catkin_make 
source devel/setup.bash #Environment      variables need to be configured, otherwise the system cannot find the running program 
  1. run the program
  • run roscore
xxxxxxxxxx
roscore 
  • Run the turtle node
xxxxxxxxxx
rosrun turtlesim turtlesim_node 
  • Run the subscription to continuously receive the pose data sent by the turtle
xxxxxxxxxx
rosrun learning_topic turtle_pose_subscriber 
  1. run the screenshot

image-20220225102205852

  1. program operation instructions
  • After running the node of the turtle, the turtle will continuously send its own pose information, and the topic name sent is

/turtle1/pose

  • After turtle_pose_subscriber runs, it will receive the data messages sent by the turtle, and then print the information in the callback function.

5.2.3 Python language implementation

  1. In the function package directory, create a new folder scripts, and then create a new python file(file suffix .py) in the scripts folder, named turtle_pose_subscriber.py
  2. copy and paste the following program code into the turtle_pose_subscriber.py file
xxxxxxxxxx
#!/usr/bin/env python 
# -*- coding: utf-8 -*- 

import  rospy 
from  turtlesim.msg  import  Pose 

 def poseCallback(msg): 
    rospy.loginfo("Turtle pose: x:%0.3f, y:%0.3f", msg.x, msg.y) 

 def turtle_pose_subscriber(): 
    
    rospy.init_node('turtle_pose_subscriber', anonymous = True) # ROS node initialization 

    # Create a Subscriber, subscribe to the topic named /turtle1/pose, register the callback function poseCallback 
    rospy.Subscriber("/turtle1/pose", Pose, poseCallback) 

    
    rospy.spin() # loop waiting for the callback function 

if  __name__  ==  '__main__' : 
    turtle_pose_subscriber() 
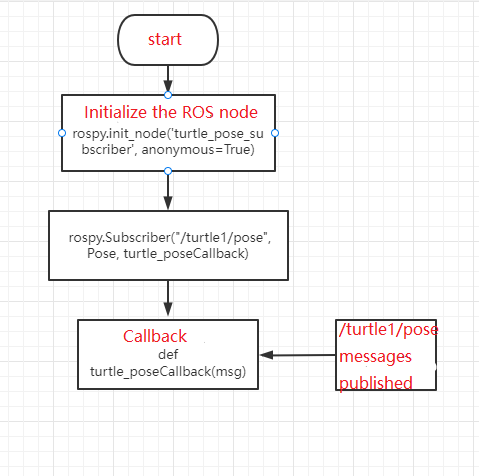
  1. program flow chart

image-20220225103401539

  1. run the program
  • run roscore

    xxxxxxxxxx
    roscore 
  • Run the turtle node

    xxxxxxxxxx
    rosrun turtlesim turtlesim_node 
  • Run the subscriber to continuously receive the pose data sent by the turtle

    xxxxxxxxxx
    rosrun learning_topic turtle_pose_subscriber.py 
  1. Refer to 5.2.2 for operation effect and program description.

Publisher
Customize topic messages and use

COMPANY

  • About us
  • Team Style
  • Blog

LEARNING & EXPLORATION

  • Tutorials
  • Edge AI hardware
  • Educational robots
  • Embedded intelligent hardware

WHERE TO BUY

  • Yahboom Online Store
  • Amazon
  • Alibaba
  • AliExpress
  • Mercado

TECHNOLOGY SUPPORT

  • Email: support@yahboom.com

BE A DISTRIBUTOR

  • Email: sales@yahboom.com
QR Code
QR Code

Copyright © 2017-2026 Yahboom. All Rights Reserved.

EN/中文