yahboom
HomeLearn
Solution
Blog
Online Store
About Us
EN/中文
Raspberry Pi 4B📖
1.Preparation before use
  • 1.1 Download image
  • 1.2 Write image into SD card
  • 1.3 Start up Raspberry Pi
  • 1.4 Linux common commands
  • 1.5 Precautions
2.Basic course
  • 2.1 Log into Raspberry Pi system
  • 2.2 Change password and root account
  • 2.3 Remote transfer file
  • 2.4 Backup image file
  • 2.5 Fixing Raspberry Pi IP
  • 2.6 Set screen keep on
  • 2.7 Get Pi temperature
  • 2.8 Connect WIFI
  • 2.9 Modify Pi time
  • 2.10 Set the boot self-starting program
3.Expand course
  • 3.1 Serial port communicates with external devices
  • 3.2 2.Serial port login Pi
  • 3.3 Configured as a router
  • 3.4 Install Jupyter Lab
  • 3.5 Install Jupyter Widgets
  • 3.6 More Detail for Widgets
  • 3.7 Install OpenCV
  • 3.8 Install Tensorflow
4.Programming course
C language
  • 1.Development environment
  • 2.Print Hello World
  • 3.Pin output level
  • 4.Read pin level
  • 5.PWM output
Python language
  • 1.Development environment
  • 2.Print basic usage
  • 3.Pin output level
  • 4.Read pin level
  • 5.PWM output
5.AI vision course
A.Getting started with OpenCV
  • 6.Picture Rotation
  • 1.Introduction of OpenCV
  • 2.OpenCV image read and display
  • 3.OpenCV image write
  • 4.OpenCV image quality
  • 5.OpenCV pixel operation
B.OpenCV Geometric transformat
  • 1.Picture Zoom
  • 2.Picture Cut
  • 3.Picture Shift
  • 4.Picture Mirroring
  • 5.Affine Map
  • 7.Perspective Transformation
C.OpenCV picture processing
  • 1.Grayscale processing
  • 2.Image Binarization
  • 3.Edge detection
  • 4.Drawing line segment
  • 5.Drawing rectangle circle
  • 6.Drawing text picture
D.OpenCV image beautification
  • 1.Histogram of color pictures
  • 2.Histogram equalization
  • 3.Image restoration
  • 4.Brightness enhancement
  • 5.Skin whitening
  • 6.Gaussian mean filtering
  • 7.Median filtering
F.AI Advanced Course (Ubuntu system)
  • 1. QR code
  • 2. Human posture estimation
  • 3. Target detection
  • 4. Mediapipe development
  • 5. yolov4-tiny
E.Install TensorFlow
  • Install TensorFlow
6.ROS1 coursenew
Basic Course
  • 1.ROS introduction
  • 2.Project file structure
  • 3.Common commands and tools
  • 4.Publisher
  • 5.Subscribers
  • 6.Customize topic messages and use
  • 7.Client
  • 8.Server
  • 9.Custom service messages and usage
  • 10.TF release and monitoring
Visual Image Processing
  • 1. AR vision
  • 2. AR QR code
  • 3. ROS+Opencv foundation
  • 4. ROS+Opencv application
  • 5. MediaPipe development
7.ROS2 coursenew
Docker Course
  • 1.Overview and installation
  • 2.Common commands
  • 3.Understand and publish images
  • 4.Hardware interaction data processing
  • 5.Enter docker container
  • 6.Update docker images
Basic Course
  • 1.Introduction to ROS2
  • 2.Commands and tools
  • 3.ROS2 Topic communications
  • 4.ROS2 service communications
  • 5.ROS2launch file starts
OpenCV Course
  • 1.OpenCV Basic Course
  • 2.ROS+opencv application
  • 3.QR code recognition
  • 4.AR Vision
  • 5.Mediapipe
8.Accessories installation
  • 1. Installation of heat sink
  • 2. Wiring of cooling fan
  • 3. Double fan armor case Installation
  • 4. Argon NEO aluminum case installation
  • 5. Argon ONE aluminum alloy case installation
  • 6. Metal shell with built-in fan installation
  • 7. Acrylic case with cooling fan installation
  • 8. White-red ABS protective case installation
Download
  • Tools
  • C_code
  • Python code
  • ROS System
Download ZIP

Welcome to Raspberry Pi 4B repository

5.Mediapipe

5.Mediapipe

Mediapipe

This tutorial takes usb no-drive camera as an example. All codes run in docker. When entering docker, you need to mount the camera. For details, please refer to docker tutorial [5、Enter the docker Container].

1、Introduction to Mediapipe

  • MediaPipe is a data stream processing machine learning application development framework developed by Google and open source.It is a graph based data processing pipeline that enables the construction of various forms of data sources, such as video, frequency, sensor data, and any time series data. MediaPipe is cross platform and can be run on embedded platforms (such as Raspberry Pi), mobile devices (iOS and Android), workstations, and servers, while supporting mobile GPU acceleration. MediaPipe provides cross platform, customizable ML solutions for real-time and streaming media. The core framework of MediaPipe is implemented in C++and provides support for languages such as Java and Objective C. The main concepts of MediaPipe include Packets, Streams, Calculators, Graphs, and Subgraphs.

    Characteristics of MediaPipe:

    • End-to-end acceleration: The built-in fast ML inference and processing can be accelerated even on ordinary hardware;
    • Build once, deploy anytime, anywhere: Unified solution suitable for Android, iOS, desktop/cloud, web, and IoT;
    • Instant Solution: A cutting-edge ML solution that showcases all functionalities of the framework;
    • Free open source: Framework and solution under Apache 2.0, fully scalable and customizable.

2、Use Cases

2.1、Program Running Example

Source code path reference (in docker)

/root/yahboomcar_ros2_ws/yahboomcar_ws/src/yahboomcar_mediapipe/yahboomcar_mediapipe

docker终端输入,

​x
#Hand detection
ros2 run yahboomcar_mediapipe 01_HandDetector
# attitude detection
ros2 run yahboomcar_mediapipe 02_PoseDetector
# Overall inspection
ros2 run yahboomcar_mediapipe 03_Holistic 
# Internal inspection
ros2 run yahboomcar_mediapipe 04_FaceMesh

# Facial recognition
ros2 run yahboomcar_mediapipe 05_FaceEyeDetection

Taking hand detection as an example, the screenshot of the operation is as follows
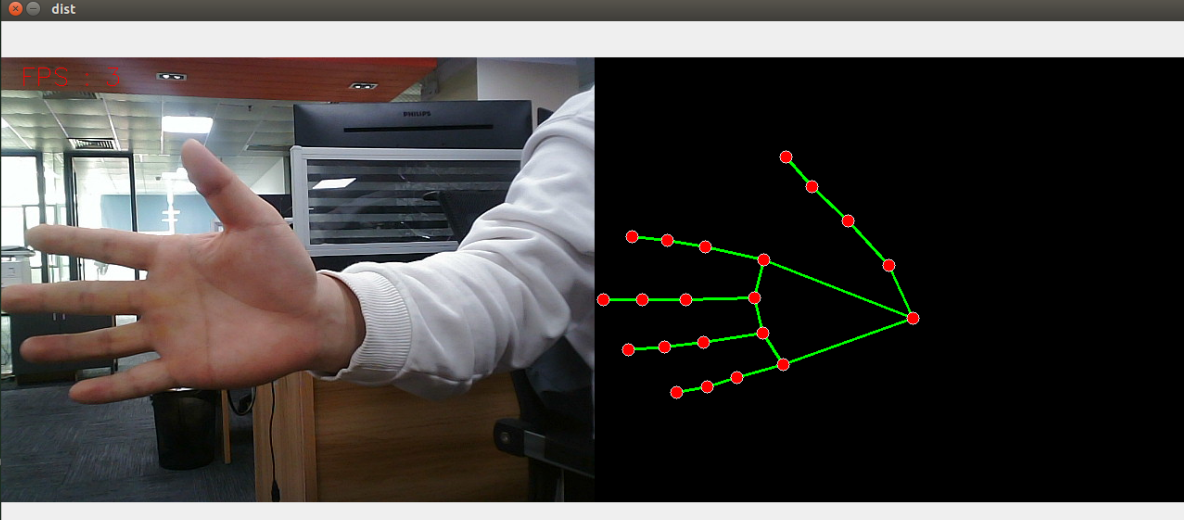
image-20230426142447158

In addition, you can also view point cloud data and input it through the Docker termina

xxxxxxxxxx
# Run point cloud publishing program
ros2 run yahboomcar_point pub_point

# Enable rviz to view point clouds
rviz2

Follow these steps to add a point cloud topic to rviz
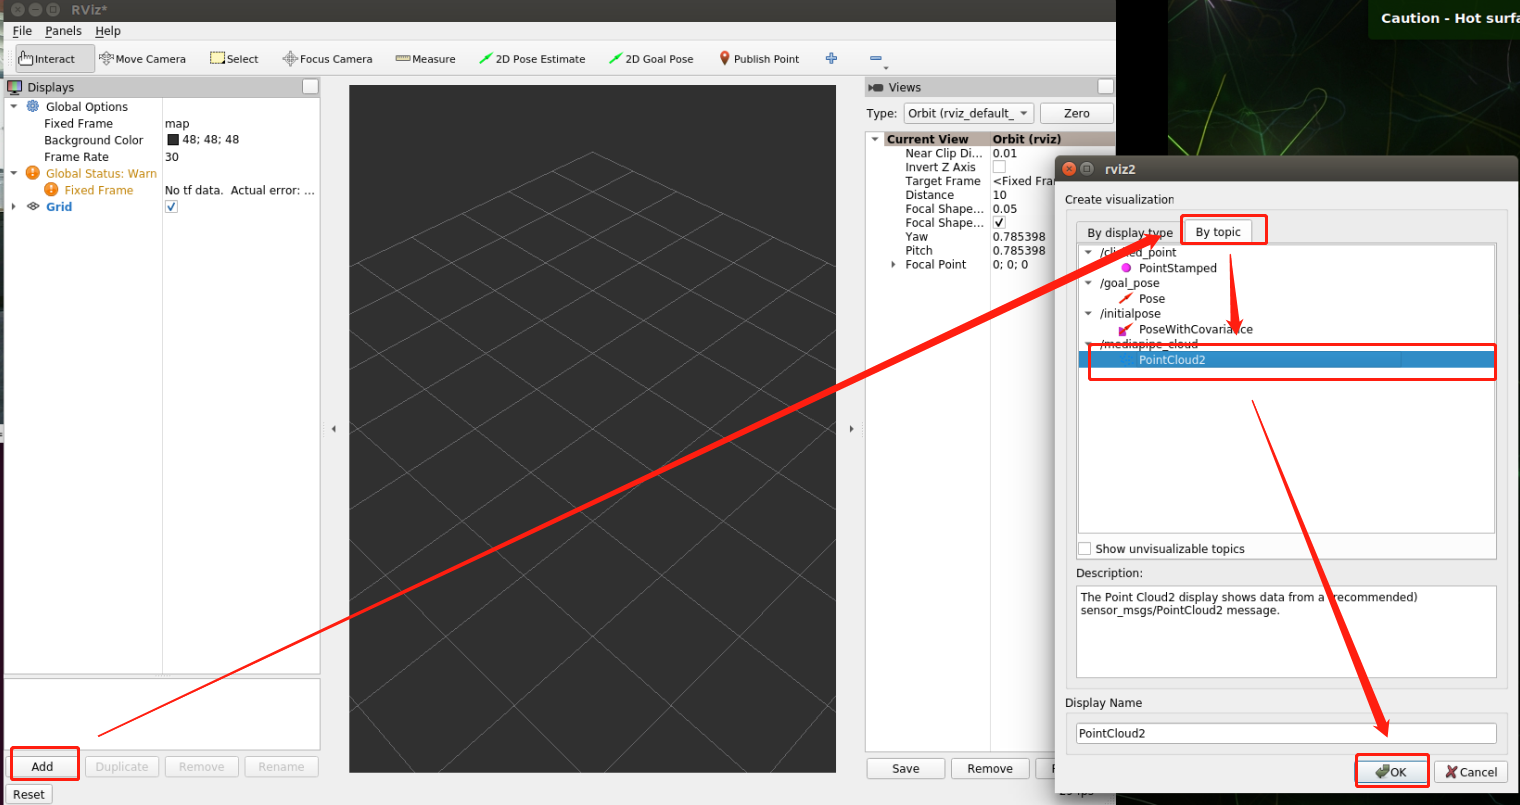
image-20230426143745998

image-20230426143910215

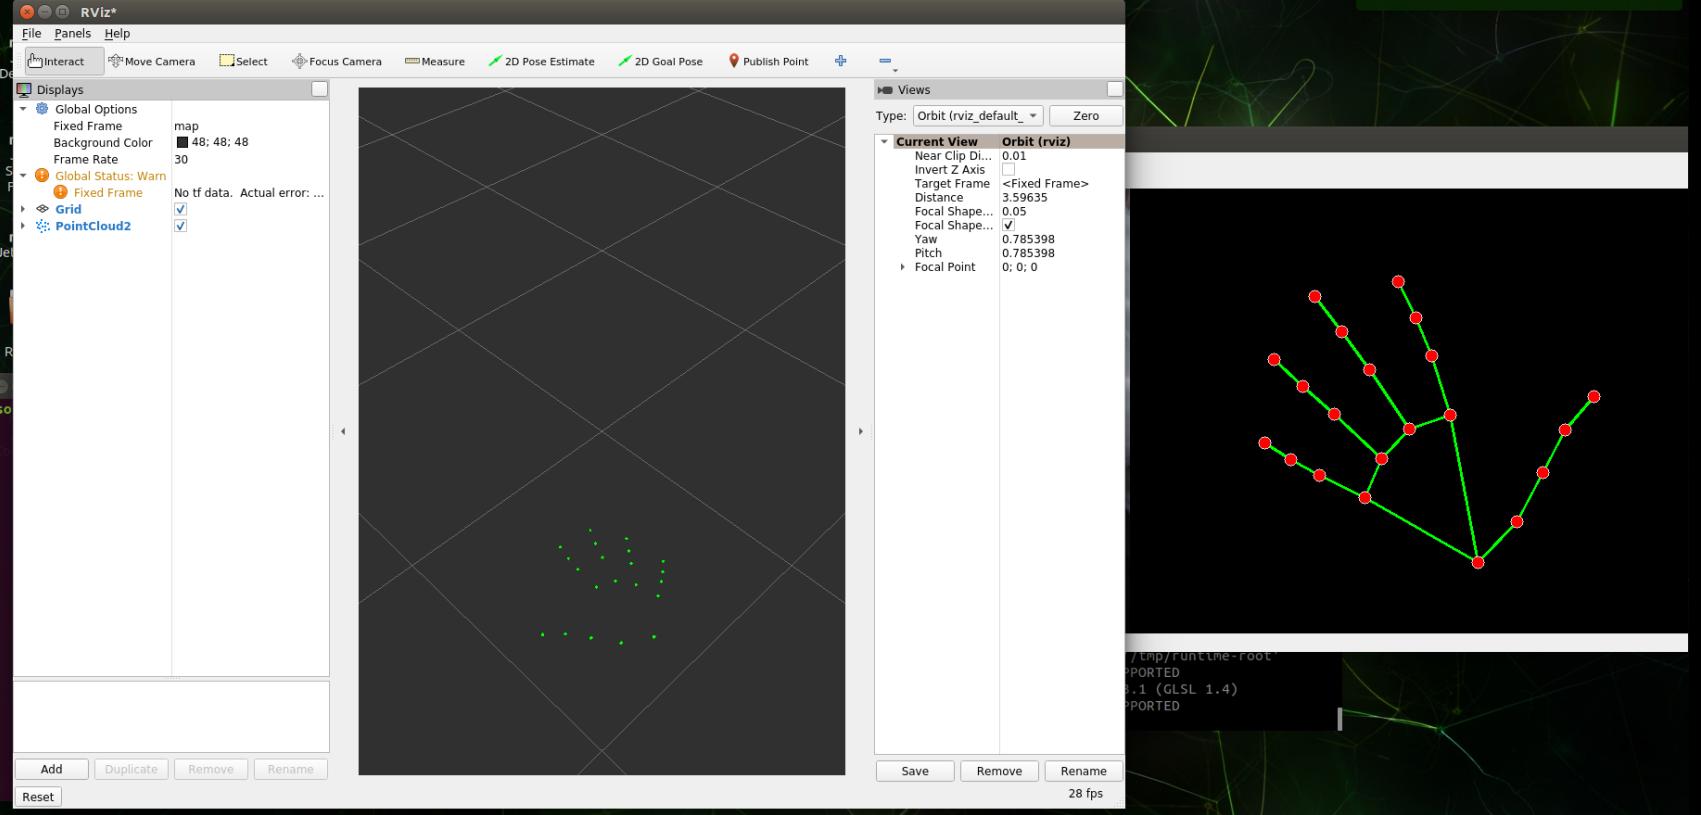
Above is running palm detection, which is 01_ Point cloud diagram of HandDetector program.

Point cloud viewing only supports demos from 01 to 04.


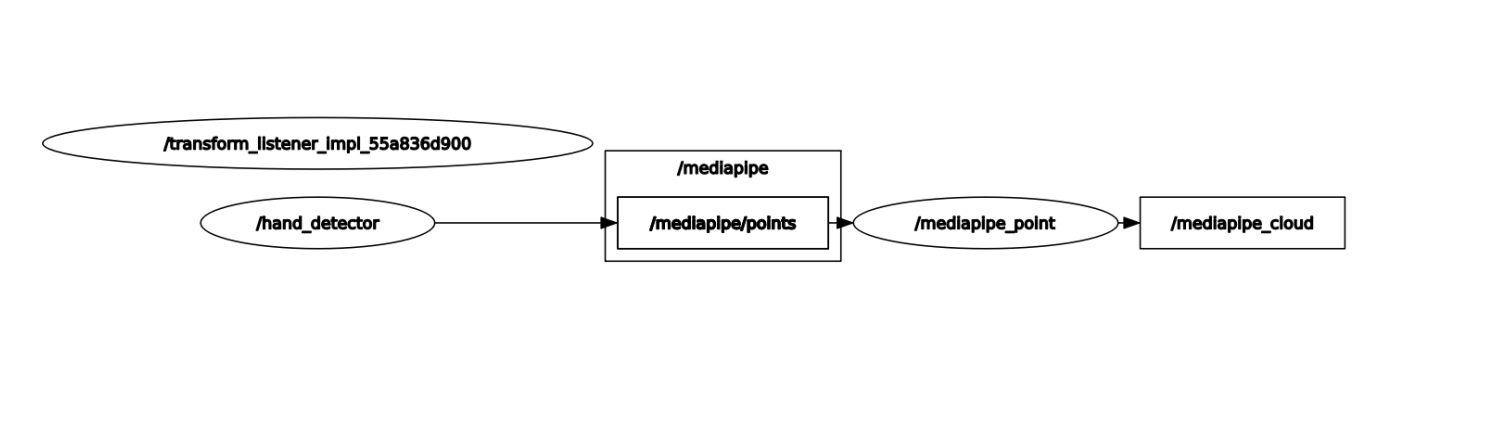
You can use rqt_ Graph View Node Topic Communication Graph

xxxxxxxxxx
ros2 run  rqt_graph rqt_graph

image-20230426144926684

2.2、Other fun gameplay

Docker terminal input

xxxxxxxxxx
cd /root/yahboomcar_ros2_ws/yahboomcar_ws/src/yahboomcar_mediapipe/yahboomcar_mediapipe

# Face effect
python3 06_FaceLandmarks.py 
# Face detection
python3 07_FaceDetection.py
# 3D object recognition
python3 08_Objectron.py 
# painting brush
python3 09_V
AR Vision
Installation of heat sink

COMPANY

  • About us
  • Team Style
  • Blog

LEARNING & EXPLORATION

  • Tutorials
  • Edge AI hardware
  • Educational robots
  • Embedded intelligent hardware

WHERE TO BUY

  • Yahboom Online Store
  • Amazon
  • Alibaba
  • AliExpress
  • Mercado

TECHNOLOGY SUPPORT

  • Email: support@yahboom.com

BE A DISTRIBUTOR

  • Email: sales@yahboom.com
QR Code
QR Code

Copyright © 2017-2026 Yahboom. All Rights Reserved.

EN/中文