Welcome to Raspberry Pi 4B repository
3.Understand and publish images
3.Understand and publish images
3.Understand and publish images3.1、image understanding3.2、UnionFS(Federated file systems)3.3、image layering3.3.1、hierarchical understanding3.3.2、Docker images should use layering benefits3.4、Make and publish images3.4.1、Make an image3.4.2、Publish the image3.4.2.1、Steps to publish the image to docker hub:3.4.2.2、Steps to publish the image to tar package:
3.1、image understanding
- An image is a lightweight, executable stand-alone software package that contains everything needed to run a piece of software. We package applications and configurations into a ready, deliverable, deployable runtime environment, including code, libraries, environment variables and configuration files required for runtime, and this large package runtime environment is the image image file.
- Docker container instances can only be generated through image files.
3.2、UnionFS(Federated file systems)
1.Union file system (UnionFS) is a hierarchical, lightweight, high-performance file system, it is the basis of docker images, and supports the modification of the file system as a commit to overlay layer by layer, while different directories can be mounted under the same virtual file system.
2.The image can be inherited through layering, and based on the basic image, various specific application images can be made.
Features of the Union file system: load multiple file systems at the same time, but from the outside, only one file system can be seen; Federated loading overlays the layers of file systems so that the final file system contains files and directories for all layers.
3.3、image layering
When downloading an image, pay attention to the downloaded log output, you can see that it is downloading layer by layer:
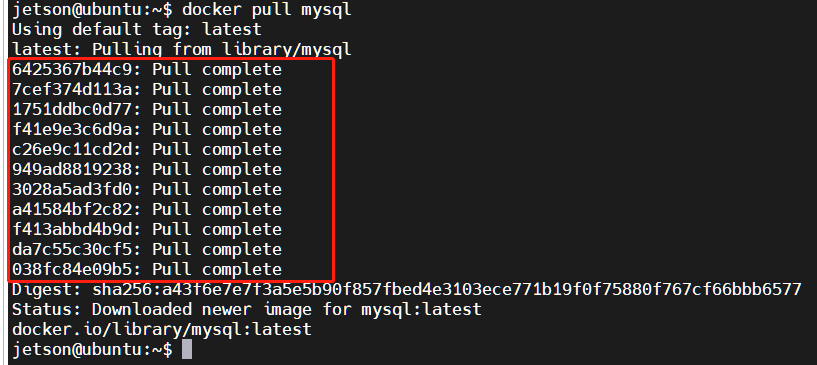
# The way to view image layering can be done with the command: docker image inspect image namejetson@ubuntu:~$ docker image inspect mysql:latest[{"Id": "sha256:5371f8c3b63eec64a33b35530be5212d6148e0940111b57b689b5ba1ffe808c8",........."RootFS": {"Type": "layers","Layers": ["sha256:d6d4fc6aef875958d6186f85f03d88e6bb6484ab2dd56b30a79163baceff2f6d","sha256:05c3b0b311a02bc56ca23105a76d16bc9b8c1d3e6eac808f4efb1a2e8350224b","sha256:7b80f7f05642477ebc7d93de9539af27caab7c41a768db250fe3fe2b5506ca2c","sha256:50e037faefab22cb1c75e60abb388b823e96a845650f3abd6d0a27e07a5a1d5e","sha256:66040abb3f7201d2cc64531349a8225412db1029447a9431d59d999c941d56f6","sha256:857162425652837a362aa5f1c3d4974cc83702728793de52ba48176d5367a89b","sha256:7eebed3016f6b6ab68aa8e6be35f0689a3c18d331b7b542984a0050b859eaf26","sha256:2fc4c142633d57d795edc0f3fd457f99a35fa611eab8b8c5d75c66e6eb729bc2","sha256:7fde2d12d484f0c14dabd9ca845da0bcdaf60bd773a58ca2d73687473950e7fe","sha256:9319848a00d38e15b754fa9dcd3b6e77ac8506850d32d8af493283131b9745a3","sha256:5ff94d41f068ea5b52244393771471edb6a9a10f7a4ebafda9ef6629874a899b"]},"Metadata": {"LastTagTime": "0001-01-01T00:00:00Z"}}]
3.3.1、hierarchical understanding
- All docker images start from a base image layer, and when modifications or additions are made, a new image layer will be created on top of the current image layer.
- For a simple example, if a new image is created based on Ubuntu 20.04, this is the first layer of the new image; If you add a Python package to the image, a second image layer is created on top of the base image layer; If you continue to add a security patch, a third mirror layer is created.
- Docker images are all read-only, and when the container starts, a new writable layer is loaded on top of the image! This layer is what we usually call the container layer, and what is under the container is called the image layer!
3.3.2、Docker images should use layering benefits
Resource sharing, for example, if there are multiple images built from the same base image, then the host only needs to keep a base image on disk, and only one base image needs to be loaded in memory, so that all containers can be served, and each layer of the image can be shared.
3.4、Make and publish images
3.4.1、Make an image
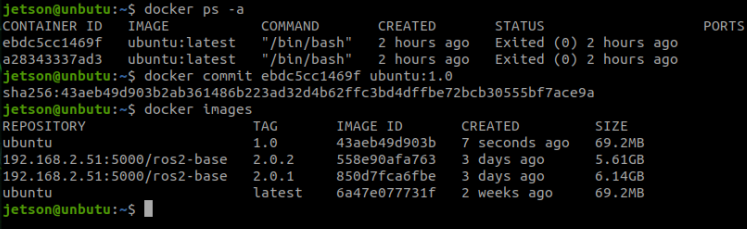
Method 1: Submit an image from the container:
x# commanddocker commit -m="description of commit" -a="author" container id Target image name to be created: [tag name] [You can also omit the -m -a parameter]# testjetson@ubuntu:~$ docker ps -aCONTAINER ID IMAGE COMMAND CREATED STATUS PORTS NAMESc54bf9efae47 ubuntu:latest "/bin/bash" 3 hours ago Up 24 minutes funny_huglejetson@ubuntu:~$ docker commit c54bf9efae47 ubuntu:1.0sha256:78ca7be949b6412f74ba12e8d16bd548aaa7c3fa25134326db3a67784f848f8fjetson@ubuntu:~$ docker images # Generated the ubuntu:1.0 imageREPOSITORY TAG IMAGE ID CREATED SIZEubuntu 1.0 78ca7be949b6 5 seconds ago 69.2MBubuntu latest bab8ce5c00ca 6 weeks ago 69.2MBhello-world latest 46331d942d63 13 months ago 9.14kB
Method 2: Make an image from a dockerfile:
xxxxxxxxxx# commanddocker build -f dockerfile file path -t new image name: TAG . # The docker build command has a . Represents the current directory# Testdocker build -f dockerfile-ros2 -t yahboomtechnology/ros-foxy:1.2 .For more information on writing dockerfiles, please refer to: :https://docs.docker.com/develop/develop-images/dockerfile_best-practices/
3.4.2、Publish the image
The docker repository is a centralized storage place for image files. The largest public repository is Docker Hub (https://hub.docker.com/), which houses a huge number of images for users to download.
3.4.2.1、Steps to publish the image to docker hub:
1、Address:https://hub.docker.com/ ,register an account first 2、Ensure that the account can log in normally

3、Use the tag command to modify the image name
The specification for publishing an image to docker hub is:
xxxxxxxxxxdocker push registration username/image name
For example, my registered username here is: pengan88, then you must first change the image name
xxxxxxxxxx# Command:docker tag [image ID] [The name of the image after modified]# testjetson@ubuntu:~$ docker imagesREPOSITORY TAG IMAGE ID CREATED SIZEubuntu 1.0 78ca7be949b6 5 seconds ago 69.2MBubuntu latest bab8ce5c00ca 6 weeks ago 69.2MBhello-world latest 46331d942d63 13 months ago 9.14kBjetson@ubuntu:~$ docker tag 78ca7be949b6 pengan88/ubuntu:1.0jetson@ubuntu:~$ docker imagesREPOSITORY TAG IMAGE ID CREATED SIZEpengan88/ubuntu 1.0 78ca7be949b6 23 minutes ago 69.2MBubuntu 1.0 78ca7be949b6 23 minutes ago 69.2MBubuntu latest bab8ce5c00ca 6 weeks ago 69.2MBhello-world latest 46331d942d63 13 months ago 9.14kB
4、Log in to Docker Hub to publish the image:
xxxxxxxxxxjetson@ubuntu:~$ docker login -u pengan88Password: # Enter the password of the account registered by Docker Hub hereWARNING! Your password will be stored unencrypted in /home/jetson/.docker/config.json.Configure a credential helper to remove this warning. Seehttps://docs.docker.com/engine/reference/commandline/login/#credentials-storeLogin Succeededjetson@ubuntu:~$ docker push pengan88/ubuntu:1.0The push refers to repository [docker.io/pengan88/ubuntu]ca774712d11b: Pushed874b048c963a: Mounted from library/ubuntu1.0: digest: sha256:6767d7949e1c2c2adffbc5d3c232499435b95080a25884657fae366ccb71394d size: 736
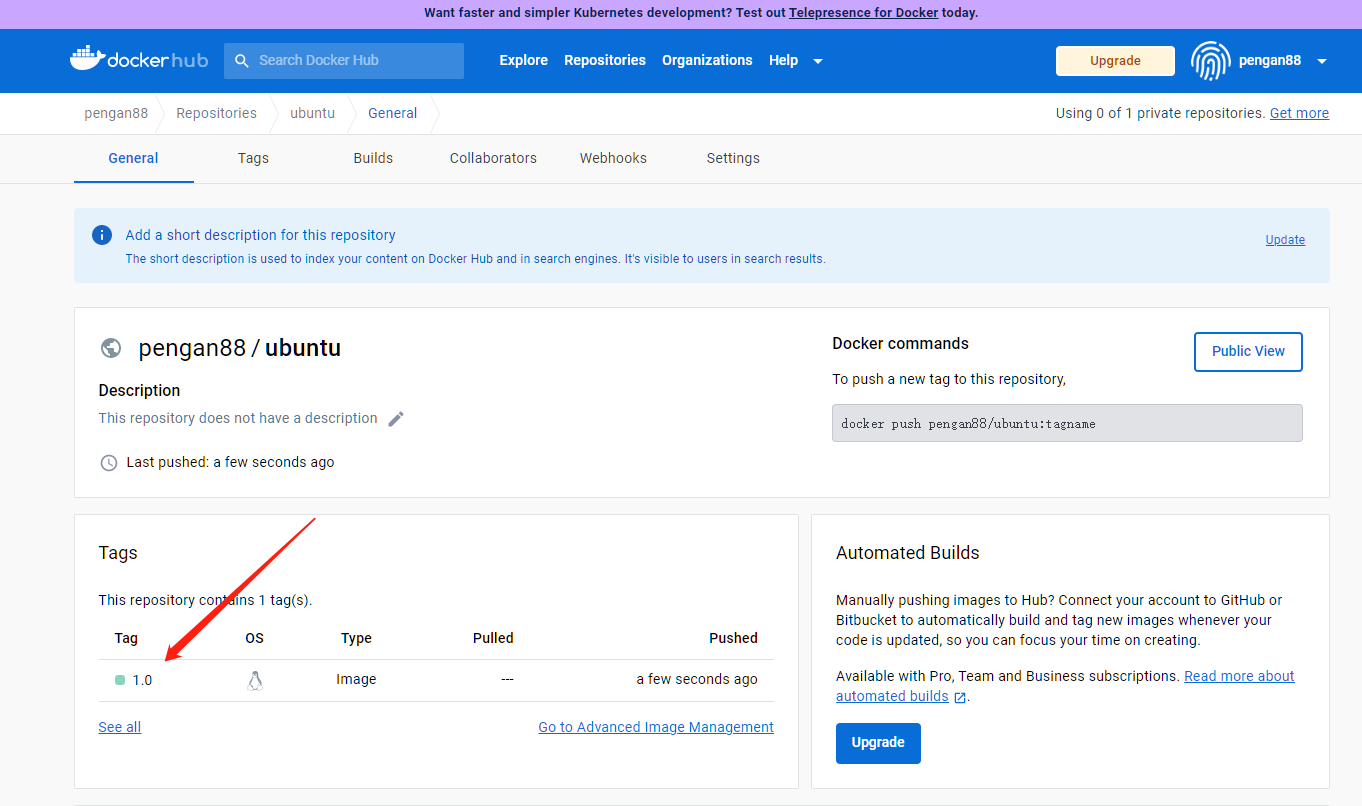
5、Visit Docker Hub to see that it has been successfully released
3.4.2.2、Steps to publish the image to tar package:
* The following command operate in the host machine, not in docker *
1、Method 1: docker export and docker import(Export compressed package from container)
Use (docker ps -a) to query the ID of the container and run the following command to generate a compressed package for the container
xxxxxxxxxxdocker export -o xxx.tar [container ID]#The tar package name can be your own#Such as: docker export -o ros2-base:1.0.1.tar [container ID]
The compressed package is generated and then imported into the image library using docker import
xxxxxxxxxxdocker import xxx.tar [image name]:[tag]#The image name and tag can be your own#Such as: docker import ros2-base:1.0.1.tar yahboomtechnology/ros2-base:1.0.1
2、Method 2: docker save and docker load(Export compressed package from image)
Use (docker images) to query the ID and tag of the image and run the following command to generate a compressed package for the image
xxxxxxxxxxdocker save -o xxx.tar [image name]:[tag]#The image name and tag can be your own#Such as: docker save -o ros2-base1.0.1.tar yahboomtechnology/ros2-base:1.0.1
After generating the compressed package, import it into the image library using docker load
xxxxxxxxxxdocker load -i xxx.tar# Here is the name of your tar package
3、The difference between the two methods
docker export is generated from containers,docker save generated from image. docker export smaller packages than docker save,The reason is that save can saves an entire hierarchical file system, export only save container-layer file systems.