yahboom
HomeLearn
Solution
Blog
Online Store
About Us
EN/中文
Wheeled Chassis Kit📖
0.Chassis installation course
  • Installation Video-1
  • Installation Video-2
  • Installation Video-3
1.4-channel motor drive module tutorials
Motor introduction and commissioning
  • 1. Motor introduction and usage
  • 2.PC host
IIC communication
  • For Arduino
  • For ESP32
  • For JetsonNANO
  • For MSPM0
  • For PICO2
  • For RDK X5
  • For RPi5
  • For STM32
USART communication
  • For Arduino
  • For ESP32
  • For JetsonNANO
  • For MSPM0
  • For PICO2
  • For RDK X5
  • For RPi5
  • For STM32
2.Kinematic analysis
  • Kinematic Analysis of Two-wheel Drive Vehicles
  • Kinematic Analysis of Four-wheel Drive Vehicles
3.MSPM0 chassis tutorials(MSPM0G3507/MSPM0G3519)
MSPM0 Basic Course
  • 1. Introduction to MSPM0
Development environment construction
  • 01.CCS Theia Development
  • 02.MDK Arm Development
  • 03.UniFlash Downloader
  • 04.DAP-LINK download program
  • 05.Program simulation and debugging
  • 06.Engineering transplantation
Keil basic case
  • 1. Turn on the LED light
  • 2. System delay
  • 3. Button control
  • 4. External interruption
  • 5. Serial communication
  • 6. Timer
  • 7. PWM breathing light
  • 8. ADC acquisition
  • 9. DMA transfer
  • 10. Get MPU6050 data (I2C)
  • 11. LCD Display (SPI)
CCS basic case
  • 1. Turn on the LED light
  • 2. System delay
  • 3. Button control
  • 4. External interruption
  • 5. Serial communication
  • 6. Timer
  • 7. PWM breathing light
  • 8. ADC acquisition
  • 9. DMA transfer
  • 10. Get MPU6050 data (I2C)
  • 11. LCD Display (SPI)
MSPM0 Robot Expansion Board Example
  • 1. Introduction to MSPM0 robot expansion board
  • 2. Customize buttons
  • 3. Drive the buzzer
MSPM0 Sensor extension information
  • 01.3-channel tracking
  • 02.4-channel tracking
  • 03.8-channel tracking
  • 04.CCD tracking
  • 05.Electric PTZ control
  • 06.2.4G handle control
  • 07.Servo ultrasonic avoid
  • 08.Bluetooth remote control
  • 09.K210-Automatic Driving
  • 10.K210-Color follow
  • 11.K210-Number recognition
  • 12.K210-Color reaction
  • 13.K210-Road signs
  • 14.K210-Machine code following
  • 15.K210-QR code recognition
  • 16.K230-Visual tracking
  • 17.K230-Color tracking
  • 18.K230-Color response
  • 19.K230-Road sign recognition
  • 20.K230-Machine code tracking
  • 21.K230-QR code recognition action
  • 22.K230-Autonomous avoid
  • 23.K230-License plate tracking
  • 24.K230-Face tracking
  • 25.K230-Gaze direction tracking
  • 26.K230-Palm tracking
  • 27.K230-Target tracking
  • 28.K230-Human body tracking
  • 29.K230-OCR character recognition action
4.STM32 chassis tutorials
  • 01.3-channel tracking
  • 02.4-channel tracking
  • 03.8-channel tracking
  • 04.CCD tracking
  • 05.Electric PTZ control
  • 06.2.4G handle control
  • 07.Servo ultrasonic avoid
  • 08.Bluetooth remote control
  • 09.K210-Automatic Driving
  • 10.K210-Color follow
  • 11.K210-Number recognition
  • 12.K210-Color Reaction
  • 13.K210-Road signs
  • 14.K210-Machine code following
  • 15.K210-QR code recognition
  • 16.K230-Visual tracking
  • 17.K230-Color tracking
  • 18.K230-Color response
  • 19.K230-Road sign recognition
  • 20.K230-Machine code tracking
  • 21.K230-QR code recognition action
  • 22.K230-Autonomous avoid
  • 23.K230-License plate tracking
  • 24.K230-Face tracking
  • 25.K230-Gaze direction tracking
  • 26.K230-Palm tracking
  • 27.K230-Target tracking
  • 28.K230-Human body tracking
  • 29.K230-OCR character recognition action
5.Expand course
  • 1.Autonomous driving car
  • 2.Vehicle-mounted balance ball motion control systemnew
Download
  • Code
  • 3D_Model_File
Download ZIP

Welcome to Wheeled Chassis Kit repository

2.PC host

Serial communication

1.1 Explanation

Please read 《0. Motor introduction and usage》first to understand the motor parameters, wiring method, and power supply voltage you are currently using. To avoid improper operation and damage to the driver board or motor.

Connect the driver board to the computer through the TYPE-C port on the driver board, and use the serial port assistant to send commands to the driver board for control and data reading.

Hardware wiring:
Motor4-channel motor drive board(Motor)
M2M-
V3V3
AH1A
BH1B
GGND
M1M+


1.2 Instructions

Open the serial port assistant software on the computer. Here we take Uart Assistant as an example.
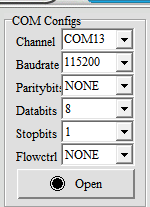
image-20250218145905154


Serial port configuration: Baud rate 115200, no parity check, no hardware flow control, 1 stop bit

After configuration, you can send commands in the send window below to control the driver board. All serial port commands and explanations are listed in the course《1.2 Control command》.

Next, we will demonstrate how to modify the default parameters to use 310 motor, 48mm diameter tire.
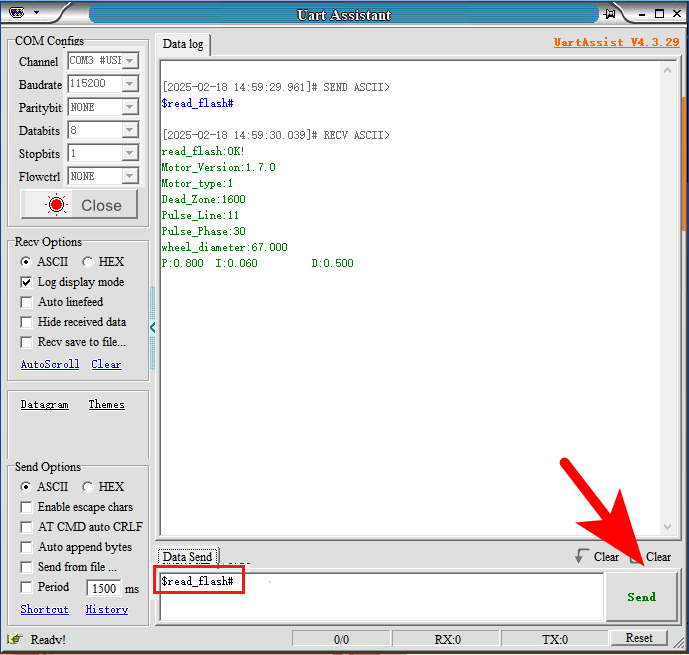
First, issue the command $read_flash#, which is to query the power-off saving parameters in the flash. It can save tire type, motor dead zone, motor phase line, motor reduction ratio, wheel diameter, and motor PID parameters.

Then, according to the parameters of the motor and tire, enter the send parameter configuration command in the send column below.
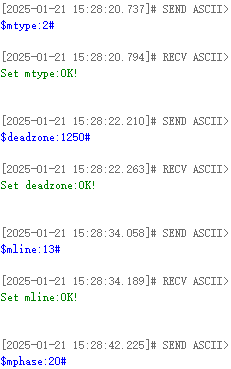
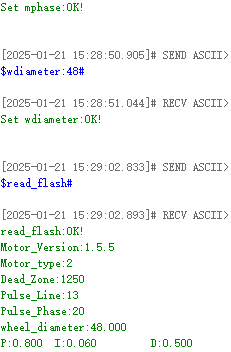
We can see that after each configuration command is issued, the driver board will send back an 'OK!' message, indicating that the setting is successful. Finally, use the command to view the flash to see that the parameters just modified have taken effect. The modification method of PID parameters is the same as these, but it generally does not need to be modified, so it will not be demonstrated here.

If you want to control the movement of the motor, send the command $spd:0,0,0,0# or $pwm:0,0,0,0#. The spd command controls the motor with an encoder, and the pwm command can control the motor with or without an encoder. Suppose I want to control the 310 motor plugged into Motor1 on the driver board, which has an encoder, then send $spd:100,0,0,0# to control it. To control the motor connected to Motor2, modify the second value: $spd:0,100,0,0#.

Motor introduction and usage
For Arduino

COMPANY

  • About us
  • Team Style
  • Blog

LEARNING & EXPLORATION

  • Tutorials
  • Edge AI hardware
  • Educational robots
  • Embedded intelligent hardware

WHERE TO BUY

  • Yahboom Online Store
  • Amazon
  • Alibaba
  • AliExpress
  • Mercado

TECHNOLOGY SUPPORT

  • Email: support@yahboom.com

BE A DISTRIBUTOR

  • Email: sales@yahboom.com
QR Code

Copyright © 2017-2026 Yahboom. All Rights Reserved.

EN/中文