Welcome to Muto S2 Robot repository
Using your own Jetson board, Muto S2 cannot start normally
If using your own Jetson board, Yahboom Muto S2 cannot start normally. Please read the following tutorial carefully.
If using your own Jetson board, Yahboom Muto S2 cannot start normally. Please read the following tutorial carefully.1. Background introduction2. Jetson series board and boot media description3. Check the JetPack version on your own Jetson series boardCase-1: You can boot your Jetson board normally, and enter the command terminal normally.Case-2: There are no system files in your own U disk or SSD. Currently, you cannot start the Jetson board normally and enter the command terminal.4. Jetson Nano board startup stepsCase-1: The Jetpack version of your Jetson board is the same as the Jetpack version of Yahboom robot car.Case-2: The Jetpack version for your Jetson board is not the same as the Jetpack version for Yahboom robot car.Case-3: You can't check the JetPack version on your own Jetson series boardWrite official system image (SDK)1. Preparation2.Format TF card2.1 Delete all partitions2.2 Create a new partition2.3 Install SD card3. Virtual Machine3.1 Virtual Machine capacity expansion3.2 Allocate space3.3 Connect virtual machine 4. Write system by SDK Manager4.1 Select Jetson board model4.2 Options5. Start up Jetson NANO boardWrite EMMC systemWrite EMMC boot1. Make Jetson Nano connect to virtual machine2.Start write boot fileNote
1. Background introduction
Note: In order to ensure that Muto S2 car can start normally, users need to ensure that the JetPack version in their Jetson board system is consistent with the Jetpack version in the Muto S2 car system provided by Yahboom.
If you did not purchase Yahboom's Jetson board, when using other brands of Jetson board, maybe you will find that Muto S2 cannot start normally.
The following tutorial provides a detailed solution to this problem.
2. Jetson series board and boot media description
About Jetson series board:
Jetson Nano board: Use a U disk as the boot medium.
Jetson Orin Nano/Jetson Orin NX board: Use a SSD as boot media.
About Jetpack version in the boot media system:
- The U disk(For Jetson NANO) included in the Muto S2 robot kit has been written with a system image file dedicated to the Muto S2 car. This system image file include JetPack 4.6.3
3. Check the JetPack version on your own Jetson series board
Your Jetson motherboard currently has two cases.
Case-1: You can boot your Jetson board normally, and enter the command terminal normally.
Start your Jetson board, enter the operating system and command terminal.
Open the terminal, enter the command
jtopand press Enter, jtop will display a real-time updated system status page.After the
jtoppage is displayed, click the menu page6 INFOwith the mouse.At this time, the page will display the version information of components such as Jetpack, CUDA, cuDNN, OpenCV, TensorRT, etc.
Take Jetson Nano as an example, as shown below. My current Jetpack system version is 4.6
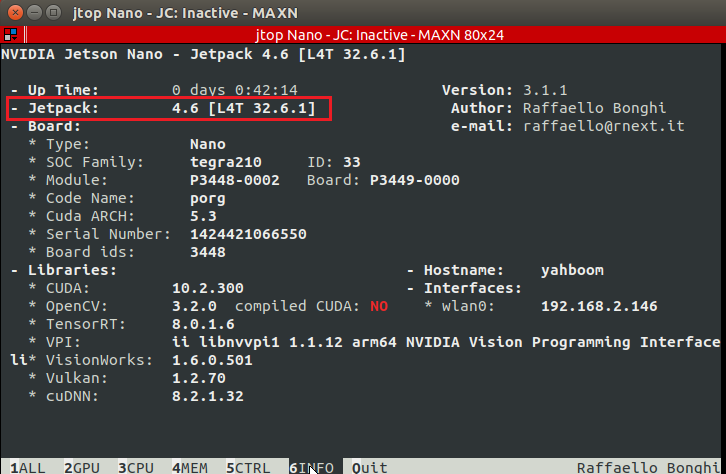
If the
jtoptool is not installed in the system, you can refer to the following command to install it.# Install pip3sudo apt-get updatesudo apt install python3-pip# Install jtopsudo -H pip3 install -U jetson-stats# Run jtop servicesudo systemctl restart jetson_stats.service# Restart the systemreboot
Case-2: There are no system files in your own U disk or SSD. Currently, you cannot start the Jetson board normally and enter the command terminal.
- Please read following 【4.3 Sections】
4. Jetson Nano board startup steps
Case-1: The Jetpack version of your Jetson board is the same as the Jetpack version of Yahboom robot car.
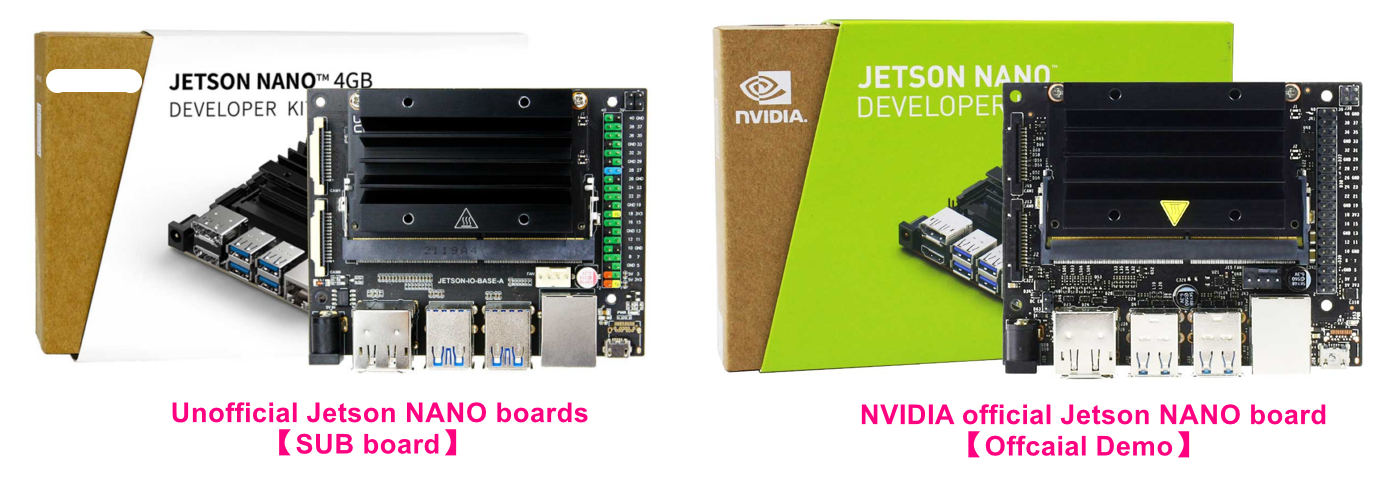
NVIDAI officail Jetson NANO board: Remove the TF card on the core board, directly plug in the U disk provided by Yahboom, and turn on the power switch to start robot car normally.
According to the test, if your Jetson NANO board contains jetpack4.6.3, directly plug in the U disk provided by Yahboom, robot car can be started normally.
Unofficial Jetson NANO board(with EMMC): Please refer to the tutorial 《Write EMMC Boot》, follow the tutorial to write the universal boot to the Jetson NANO SUB board, then plug in the U disk, robot car can start normally.
Case-2: The Jetpack version for your Jetson board is not the same as the Jetpack version for Yahboom robot car.
NVIDAI officail Jetson NANO board: Please refer to the tutorial 《Write official system image (SDK)》to write jetpack 4.6.3 to the Jeston NANO board.
Then, remove the TF card on the core board, directly plug in the U disk provided by Yahboom, and turn on the power switch to start robot car normally.
Unofficial Jetson NANO board(with EMMC): Please refer to the tutorial 《Write EMMC Boot》to write the universal boot to the Jetson NANO SUB board, then plug in the U disk, robot car can start normally.
Case-3: You can't check the JetPack version on your own Jetson series board
NVIDAI officail Jetson NANO board: Please refer to the tutorial 《Write official system image (SDK)》to write jetpack 4.6.3 to the Jeston NANO board.
Then, remove the TF card on the core board, directly plug in the U disk provided by Yahboom, and turn on the power switch to start robot car normally.
Unofficial Jetson NANO board(with EMMC): Please refer to the tutorial 《Write EMMC system》to write jetpack 4.6.3 to the Jeston NANO board.
Then, please refer to the tutorial 《Write EMMC boot》to write the universal boot to the Jetson NANO SUB board.
Next, plug in the U disk, robot car can start normally.
Write official system image (SDK)
1. Preparation
- PC Software
Ubuntu 18.04 system
xYahboom has provided Ubuntu 18.04 virtual machine images and has installed SDKmanager. Users can download the virtual machine files directly on Yahboom's website.Use VMware software to open the virtual machine.Virtual machine username: yahboomPassword: yahboomYou can also install SDKmanager on your own Ubuntu system according to the following method.
1)Open NVIDIA's jetpack download website:SDK Manager | NVIDIA Developer
2)Register/log in to NVIDIA account.
3)In Ubuntu18.04 virtual machine system, click to download SDK Manager.
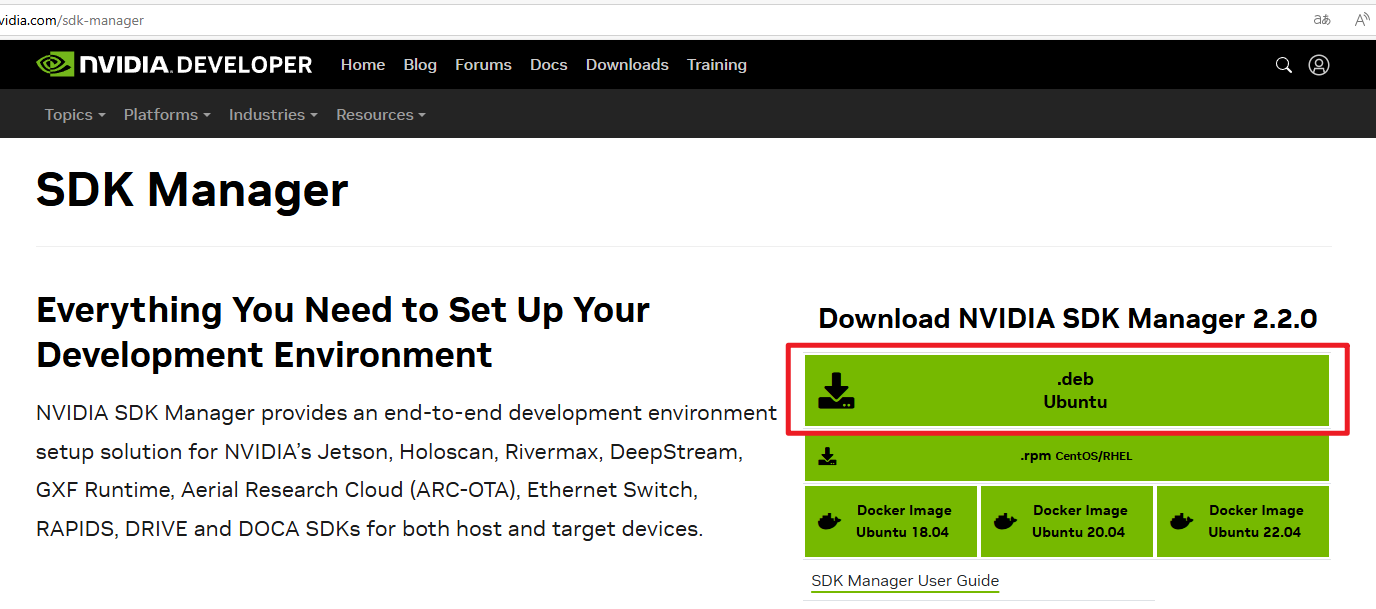
Input following command to enter the path of the .deb file you just downloaded.
(For example, i download it to the Downloads directory here.)
xxxxxxxxxxcd Downloads/
Input following command to install SDK Manager.
xxxxxxxxxxsudo dpkg -i sdkmanager_2.2.0-12021_amd64.deb
- Hardware
Card reader and TF card: TF card needs to be formatted before writing into the system.
Jumper cap: Short-circuit FC REC and GND pins (enter flash mode), short-circuit DC enable (J48).
DC power adapter: Use jumper cap to short-circuit DC enable (J48) when using this power supply method.
MicroUSB data cable: Used to connect to a computer to transfer data.

2.Format TF card
It is recommended to use DiskGenius software to directly format the disk partition of the SD card and generate an exfat partition.
xxxxxxxxxxOnly show one way to format the partition. You can also use other software.The computer's built-in disk management can also perform the corresponding operation.
2.1 Delete all partitions
Download DiskGenius software link: https://www.diskgenius.com/download.php
For this operation, you must select the disk corresponding to the SD card. If you select the wrong drive letter, data on other disks will be lost.
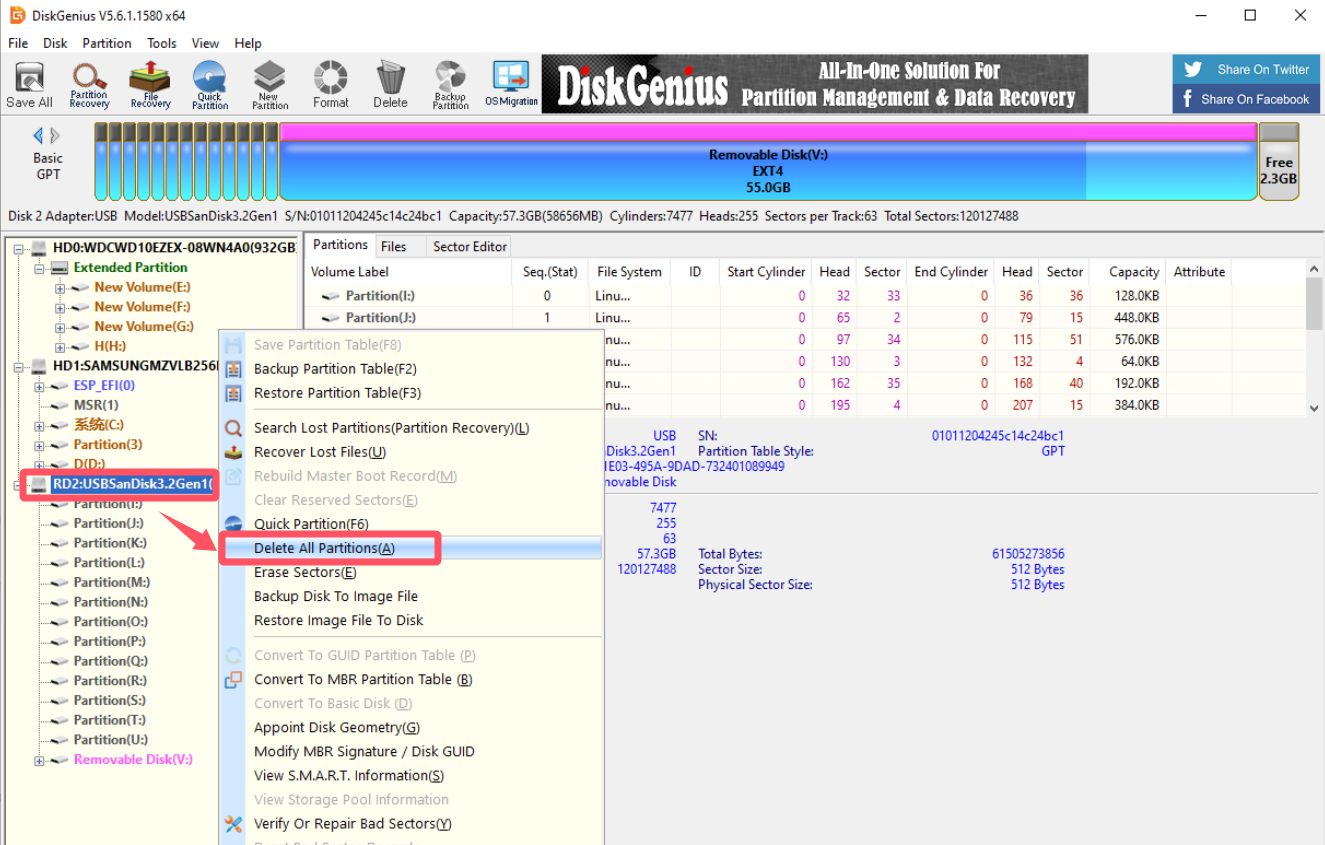
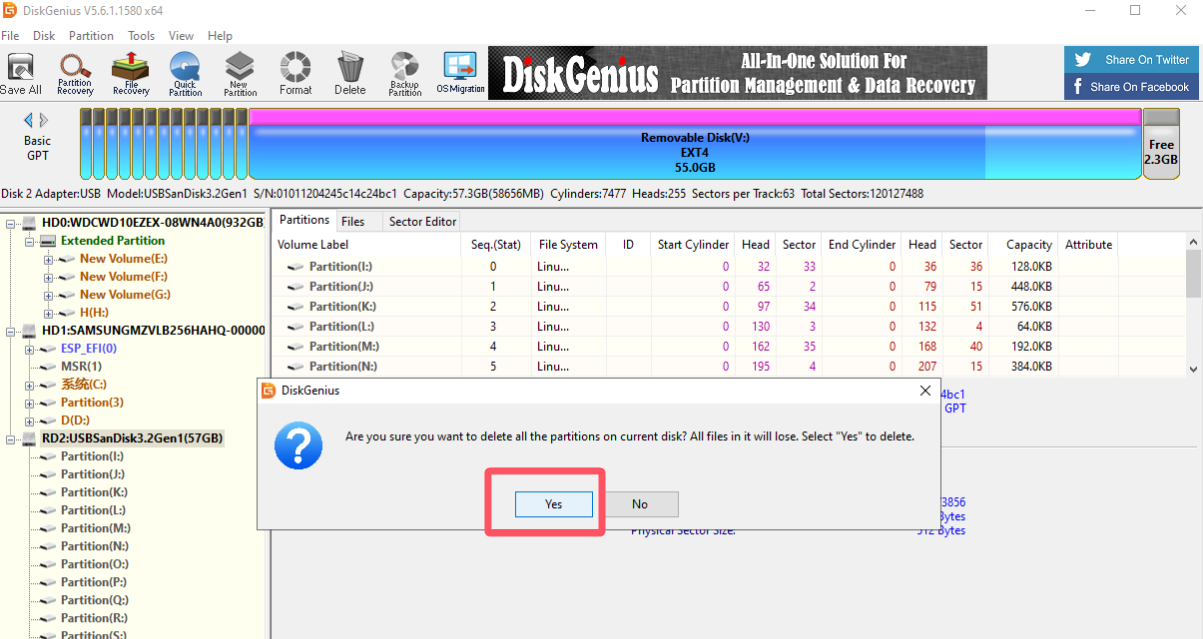
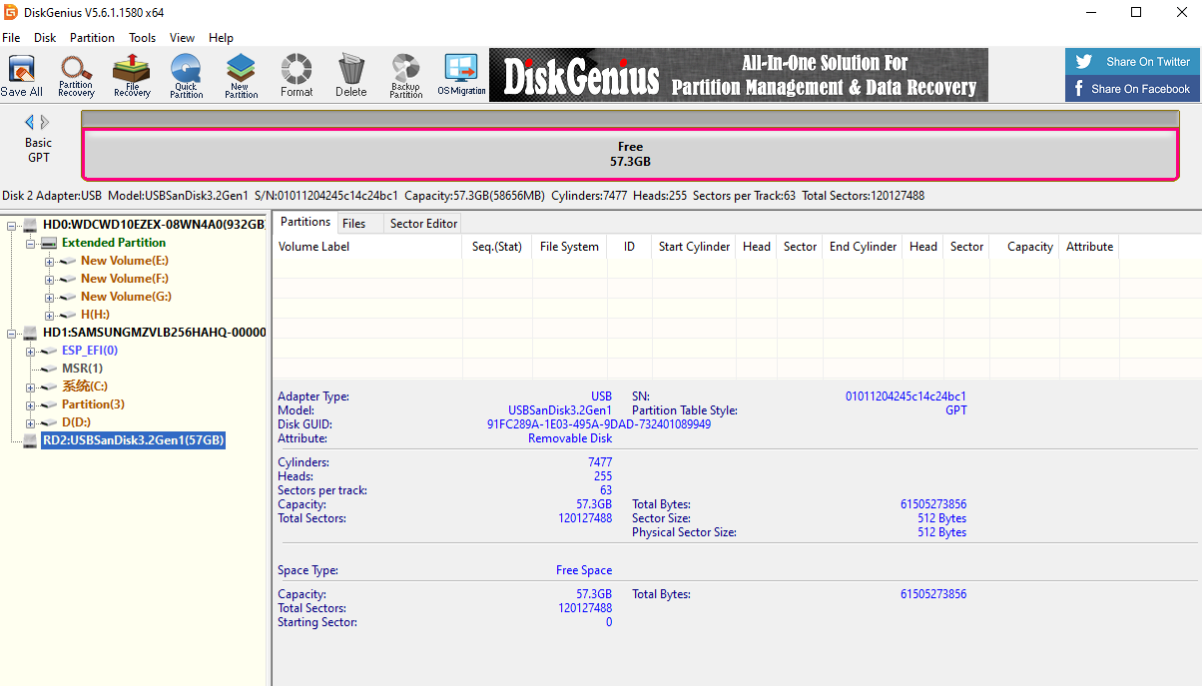
Click "Confirm" to change.
2.2 Create a new partition
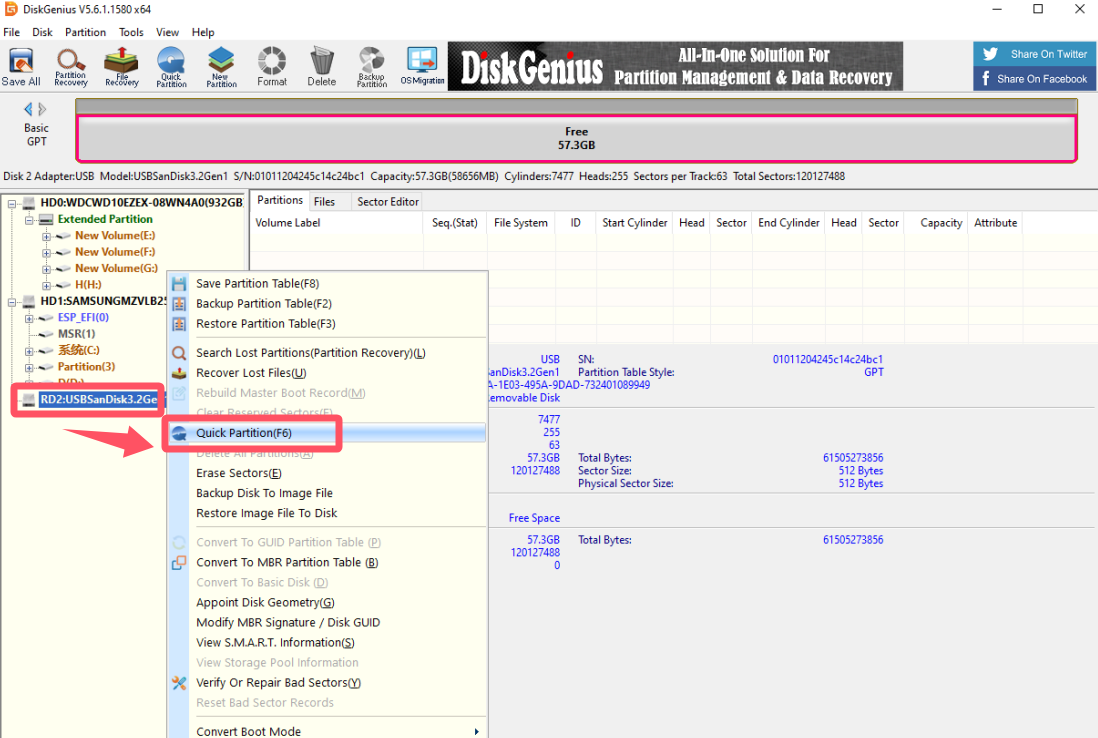
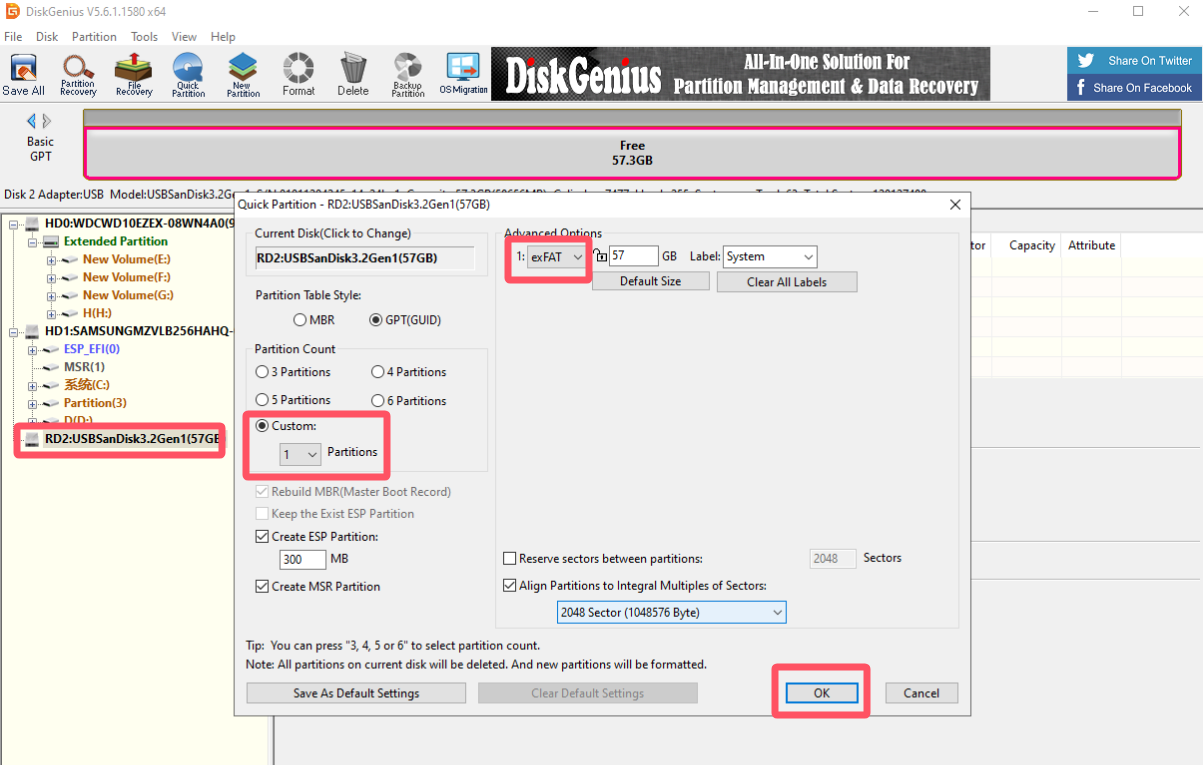
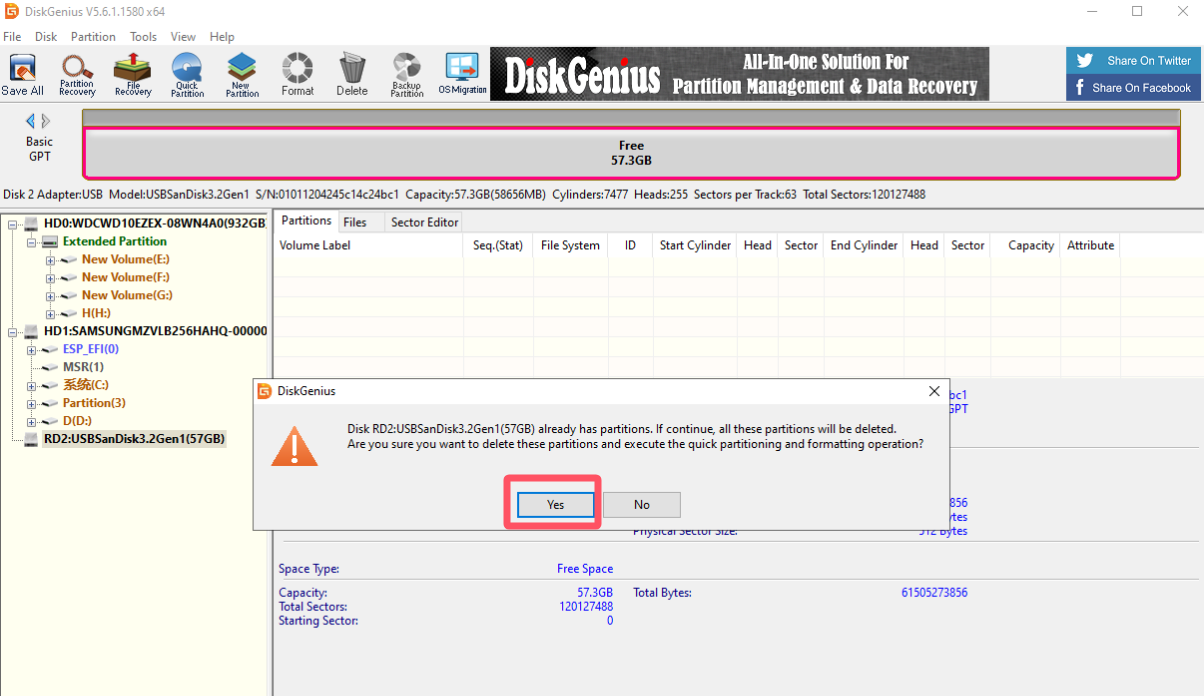
After the above operations, the U disk will show all the space on your computer.
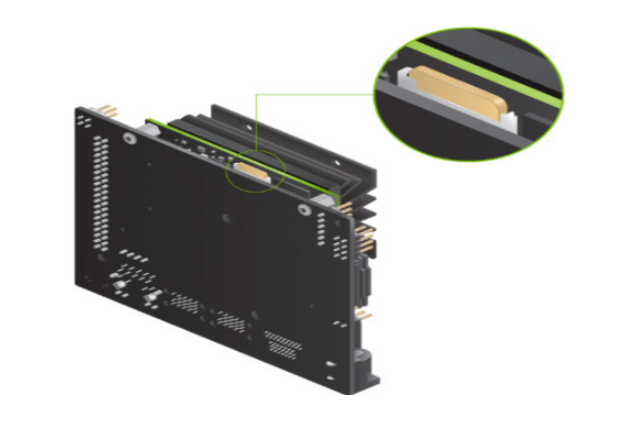
2.3 Install SD card
Insert the formatted SD card into the TF card slot on the Jetson NANO board.
3. Virtual Machine
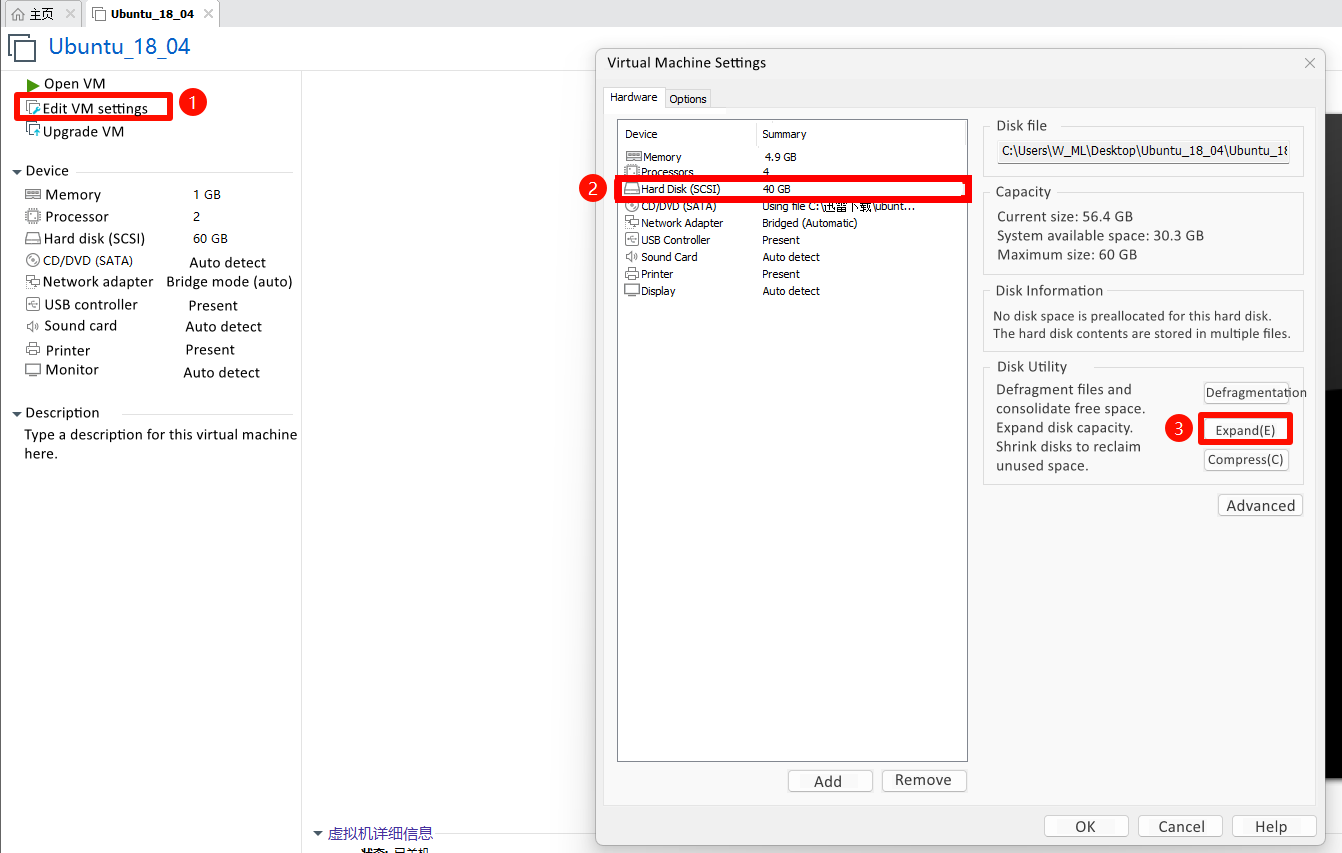
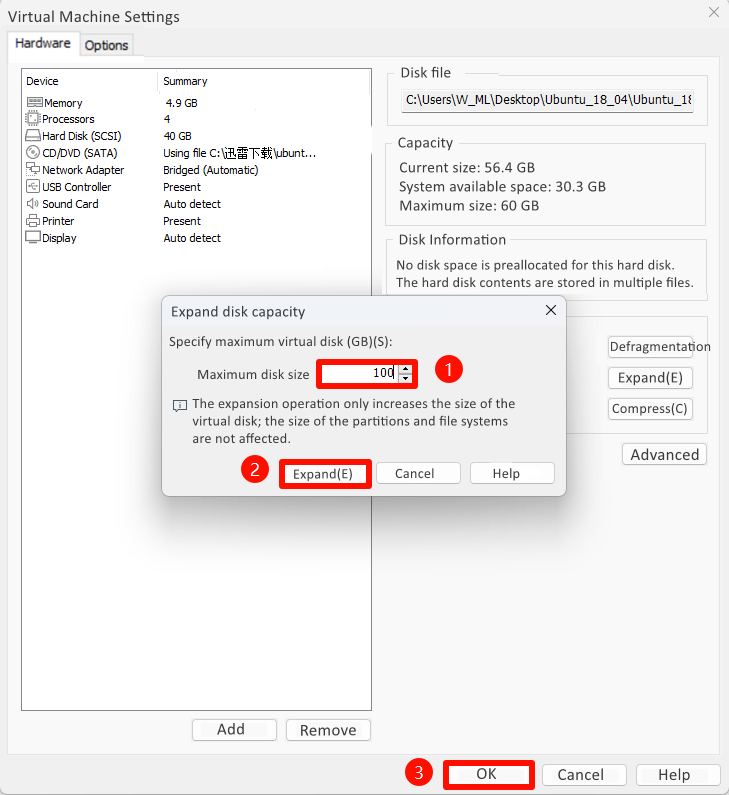
3.1 Virtual Machine capacity expansion
The virtual machine image we provide needs to be expanded to 100G.
xxxxxxxxxxIf the capacity is not expanded, writing to the system may fail!
3.2 Allocate space
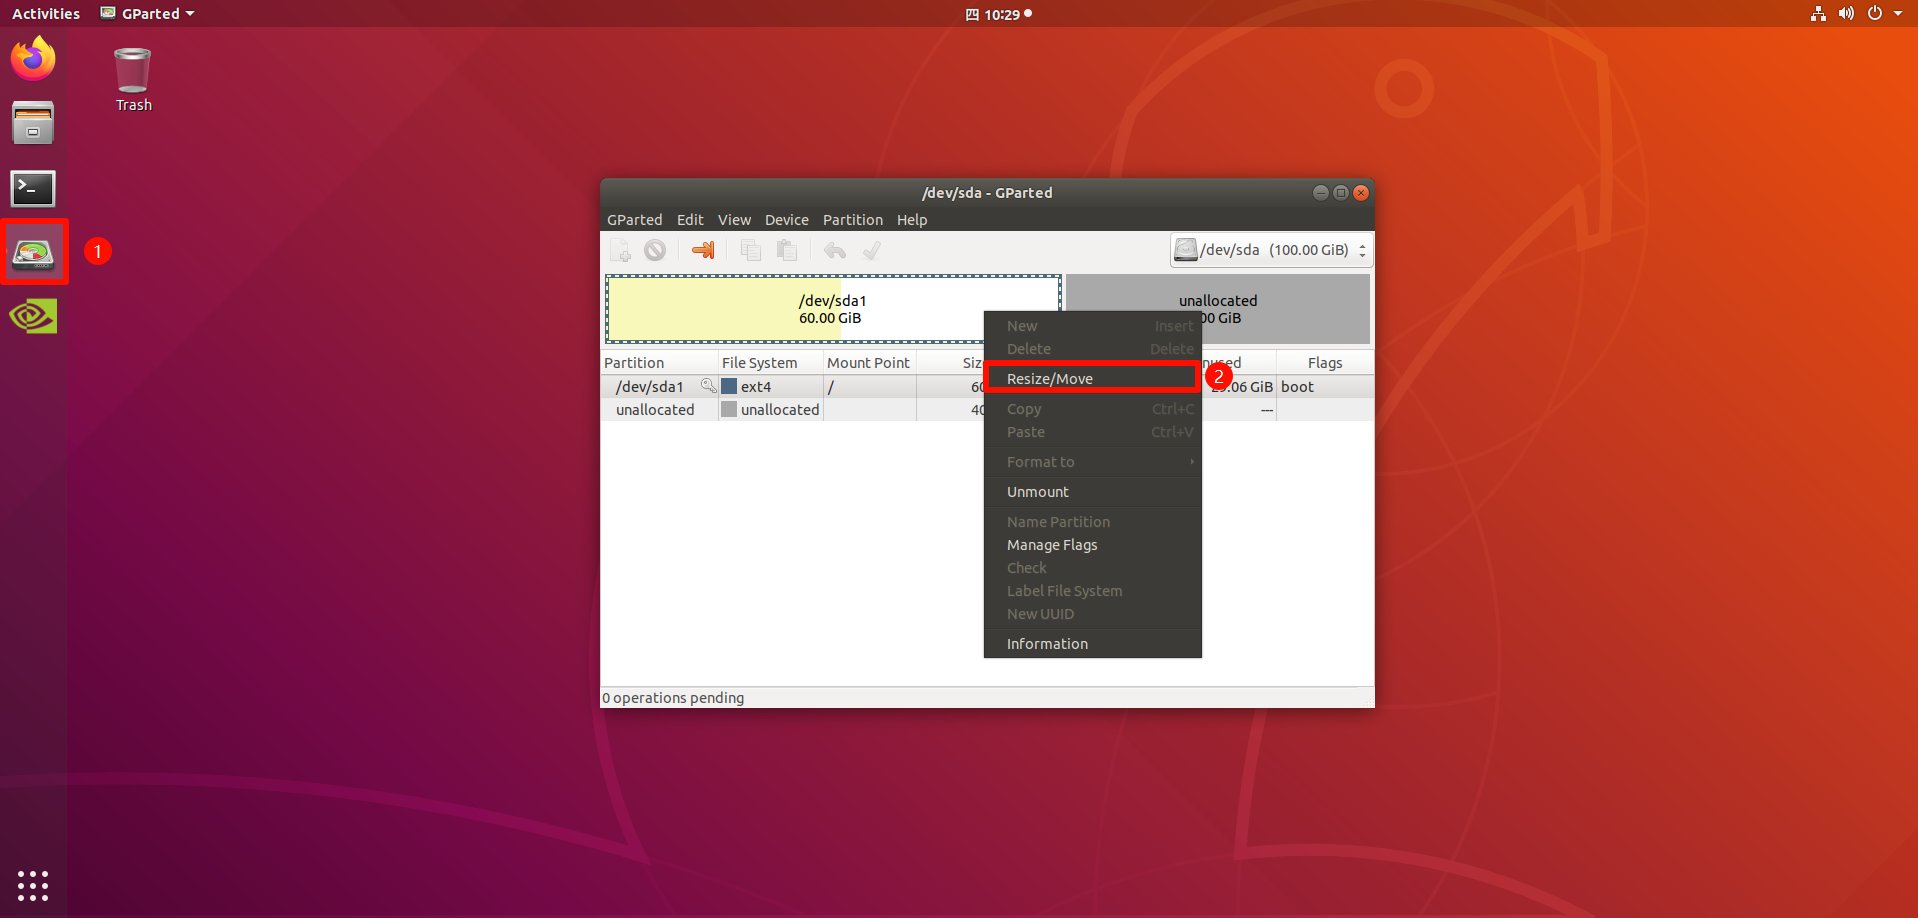
Open the "GParted" software in system.
If you use your own Ubuntu system. Input following command to install "GParted" tool
xxxxxxxxxxsudo apt install gparted
As shown below. Right-click and choose "Resize/Move"
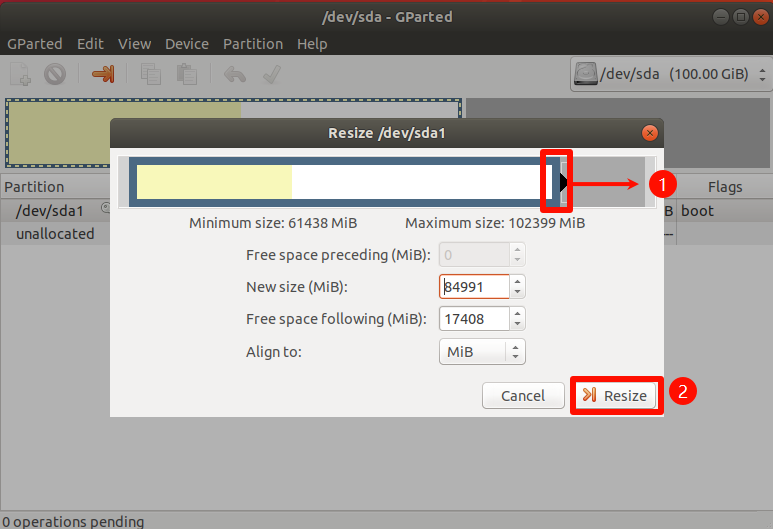
Then, system will display the interface shown below. Drag the border of the movable space to the far right.
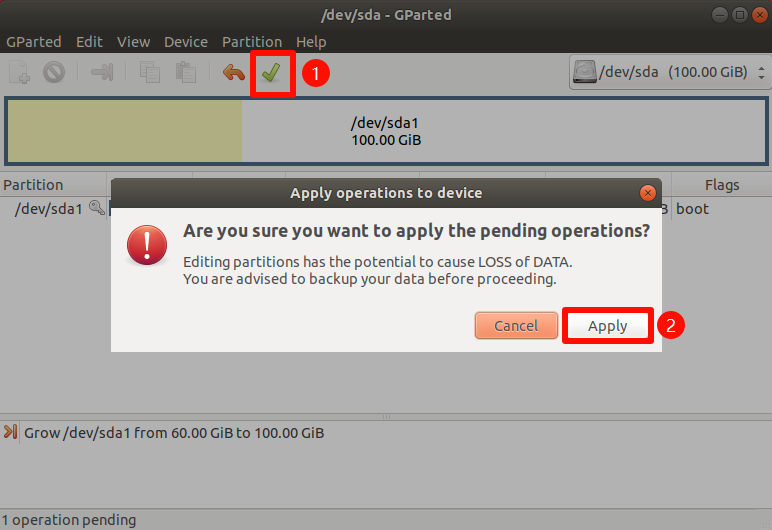
After completing the above operations, close the "GParted" tool.
3.3 Connect virtual machine
After using the DC power adapter to power the device, connect the microUSB cable to the computer.
xxxxxxxxxxIf the indicator light on the Jetson NANO board does not light up when DC power is supplied, you can try plugging and unplugging the DC port (number 4 in the figure below).

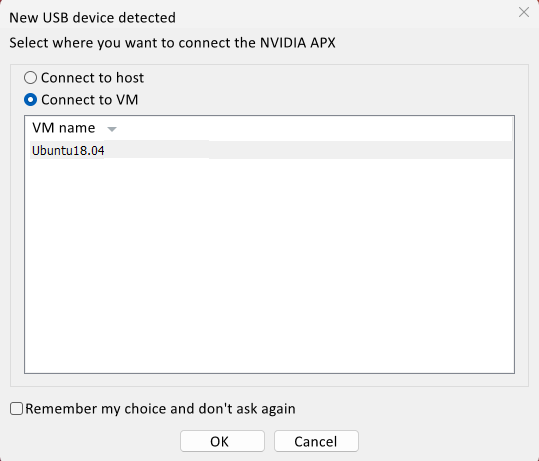
After connecting to the computer, a pop-up window "New USB device detected" will appear on the computer interface.
Click the "Connect to virtual machine" option to connect.
Here is another way to connect a USB device to a virtual machine:
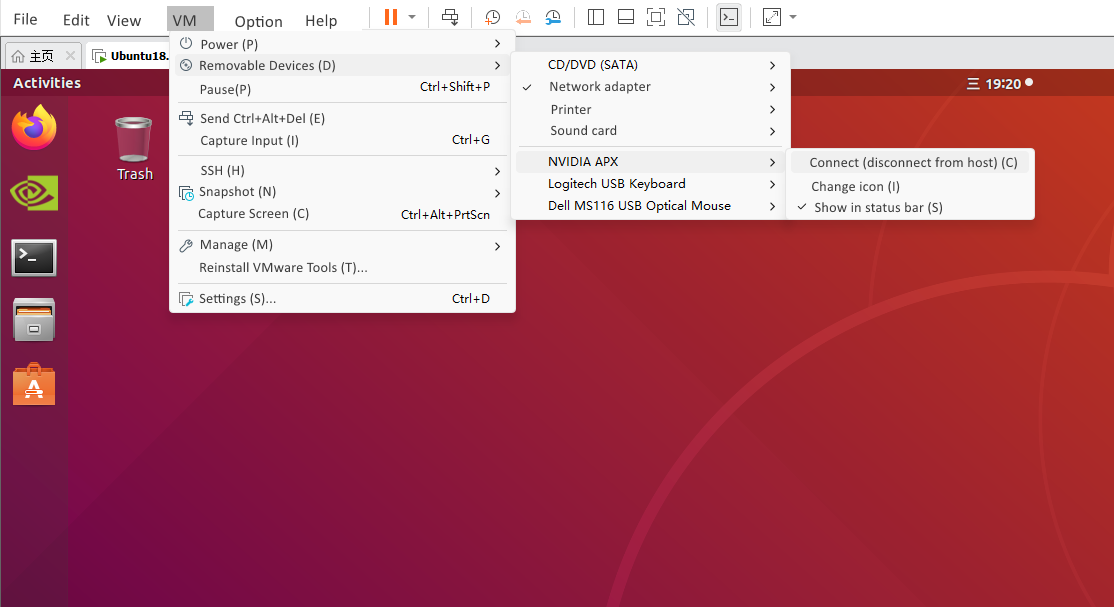
4. Write system by SDK Manager
Open the system "SDK Manager" software and log in to your account.
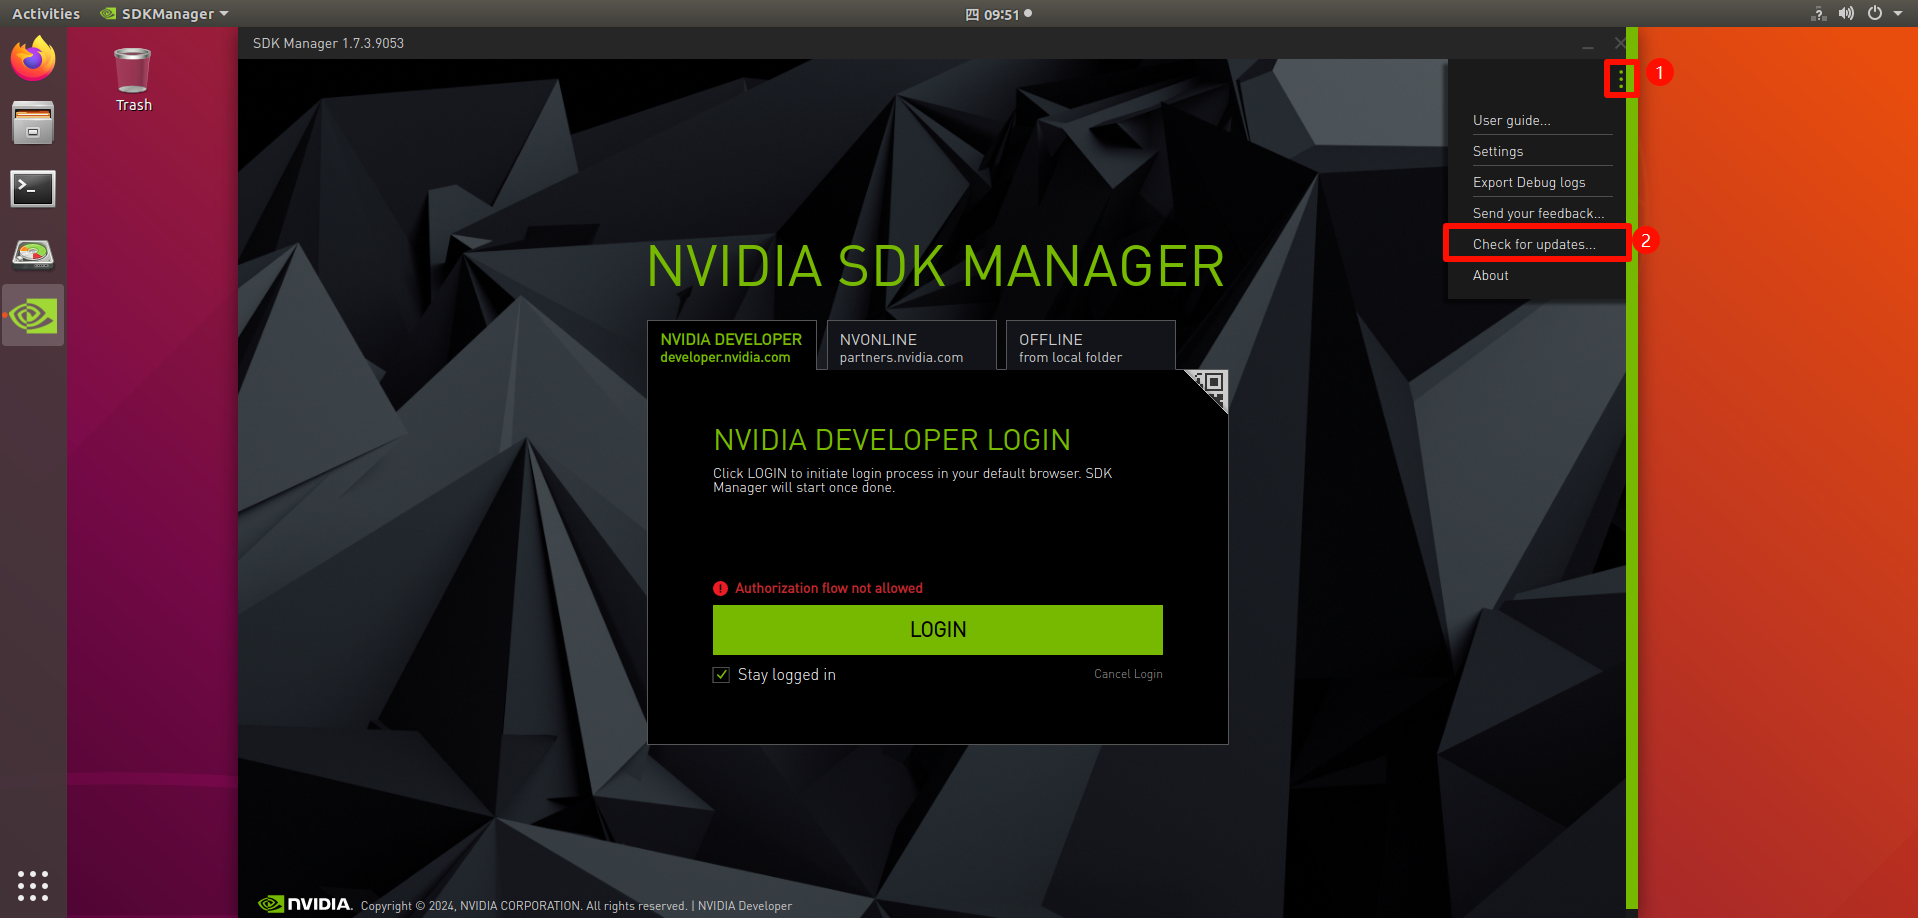
xxxxxxxxxx# Since the new version of SDKmanager cannot select the older version of jetpack, we can use the following command to start the old version of SDKmanager and select the required jetpack version sdkmanager --archived-versions If when logging in to your account, the virtual machine system pops up a web page showing an invalid request. As shown below.
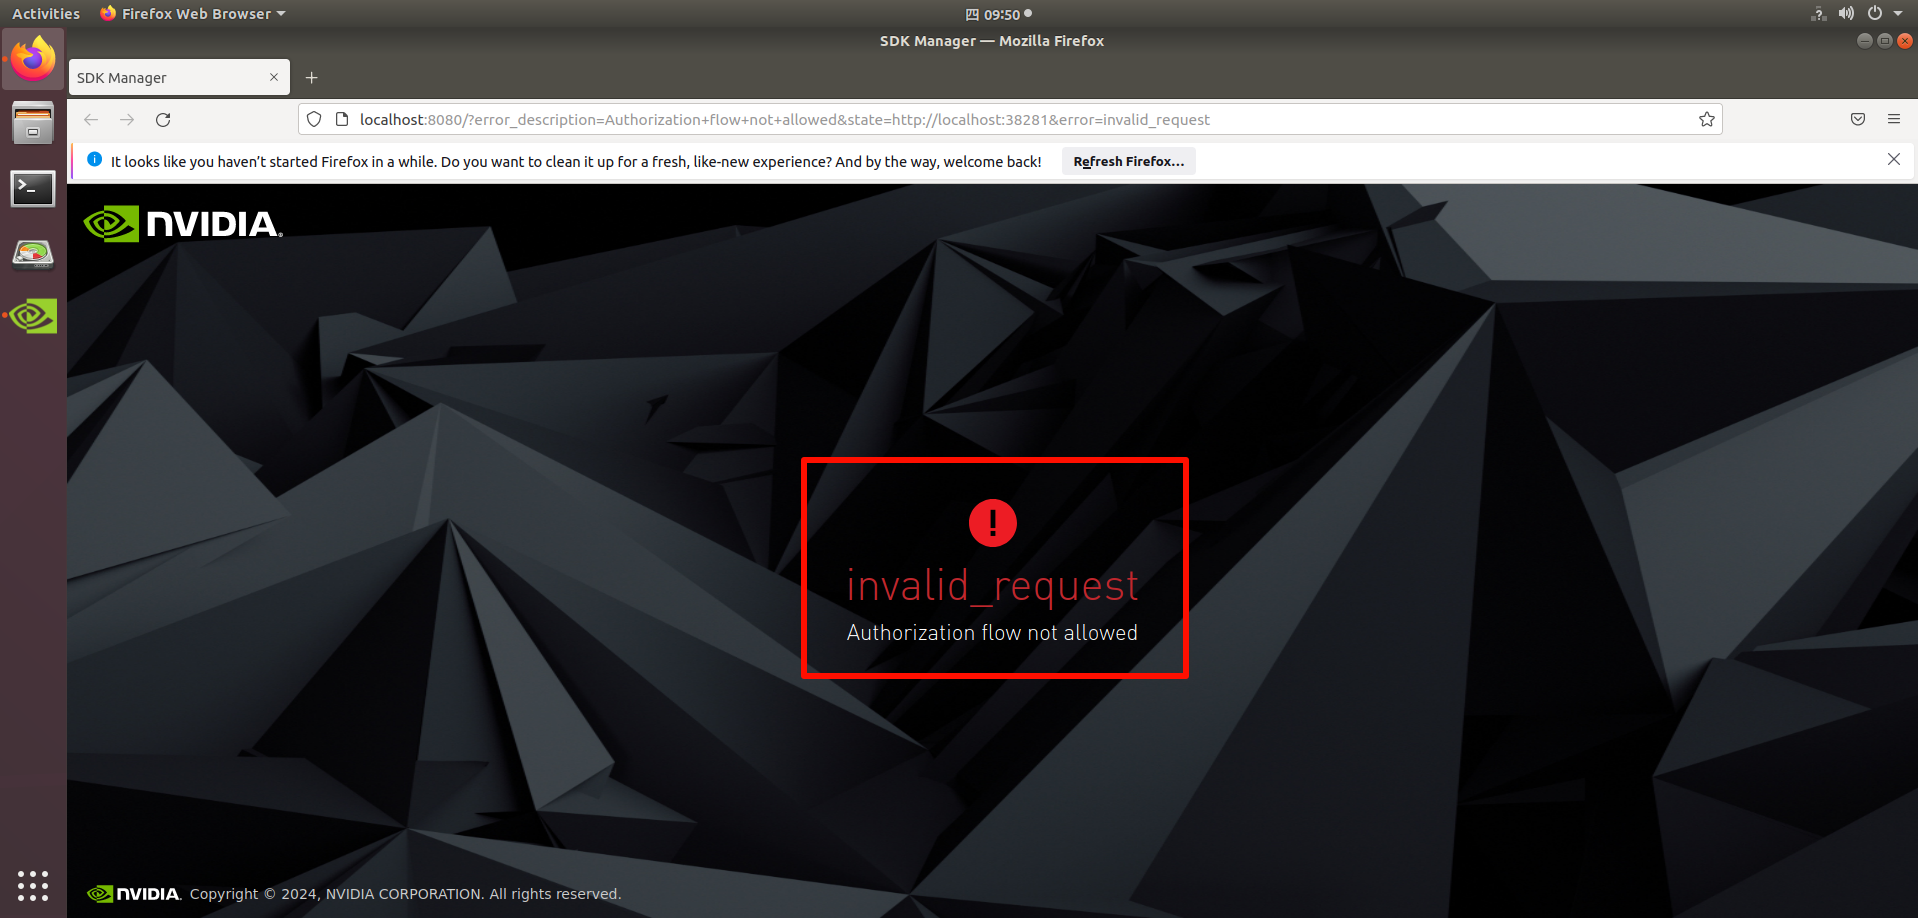
Solution: After updating the software version as shown in the figure below, log in to the account again.
4.1 Select Jetson board model
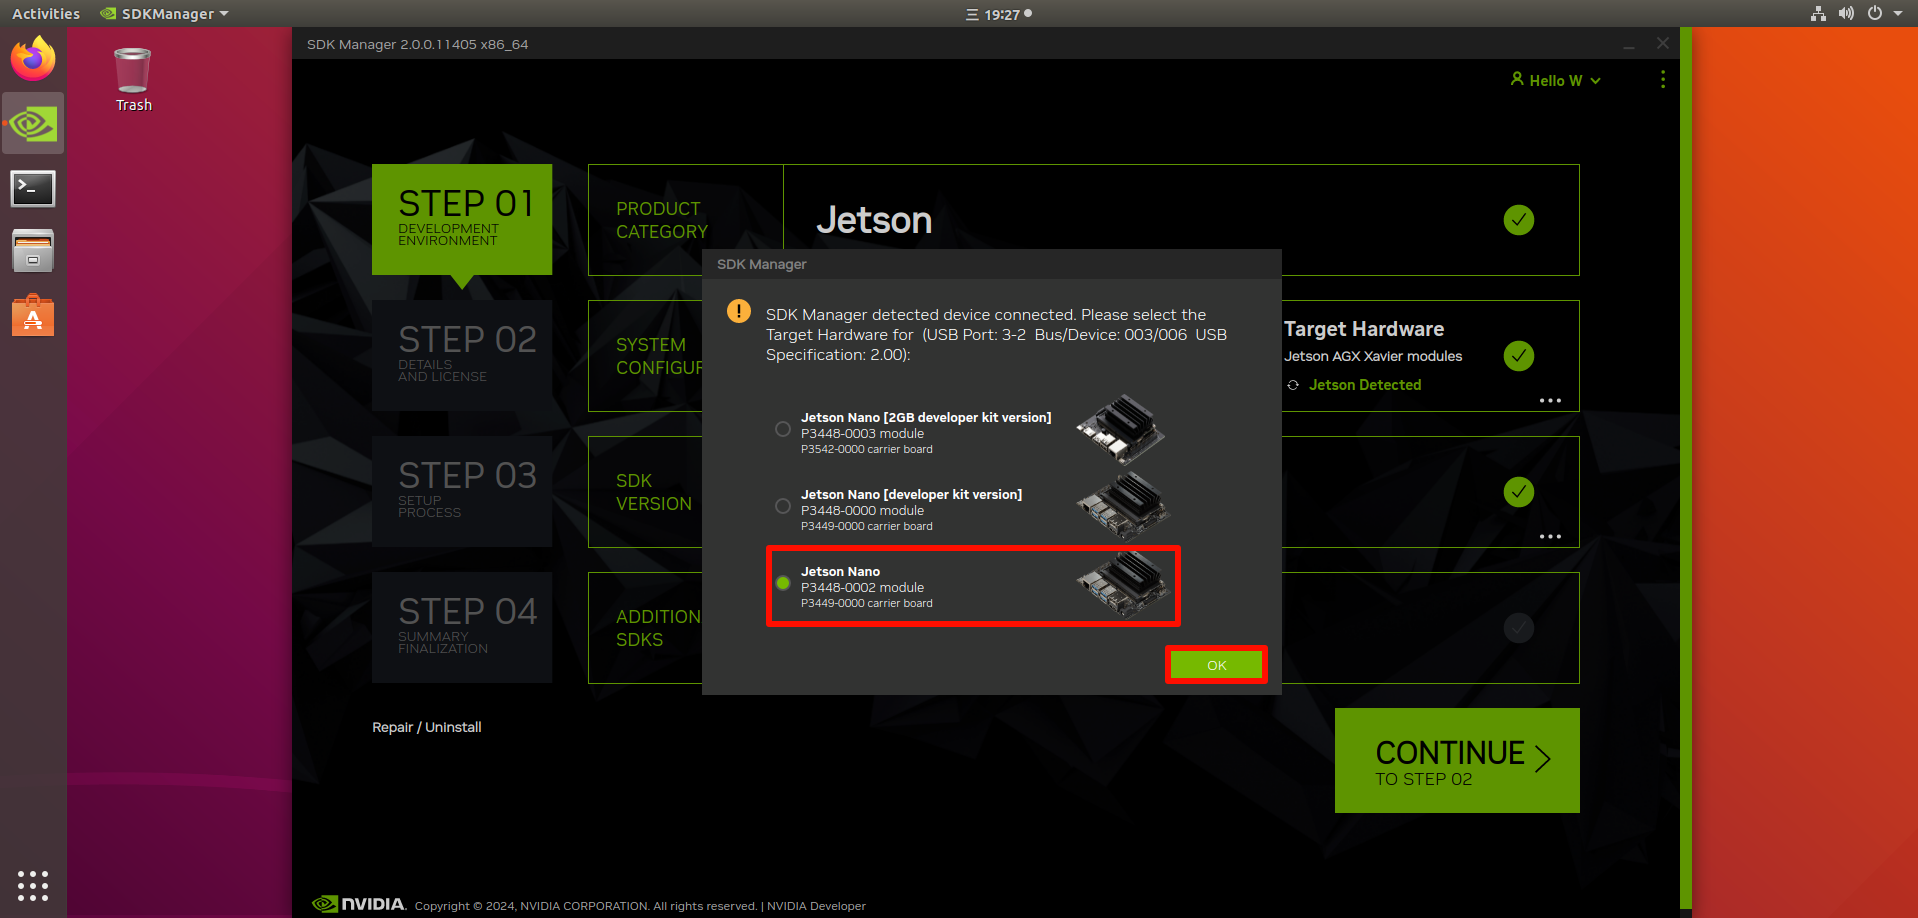
4.2 Options
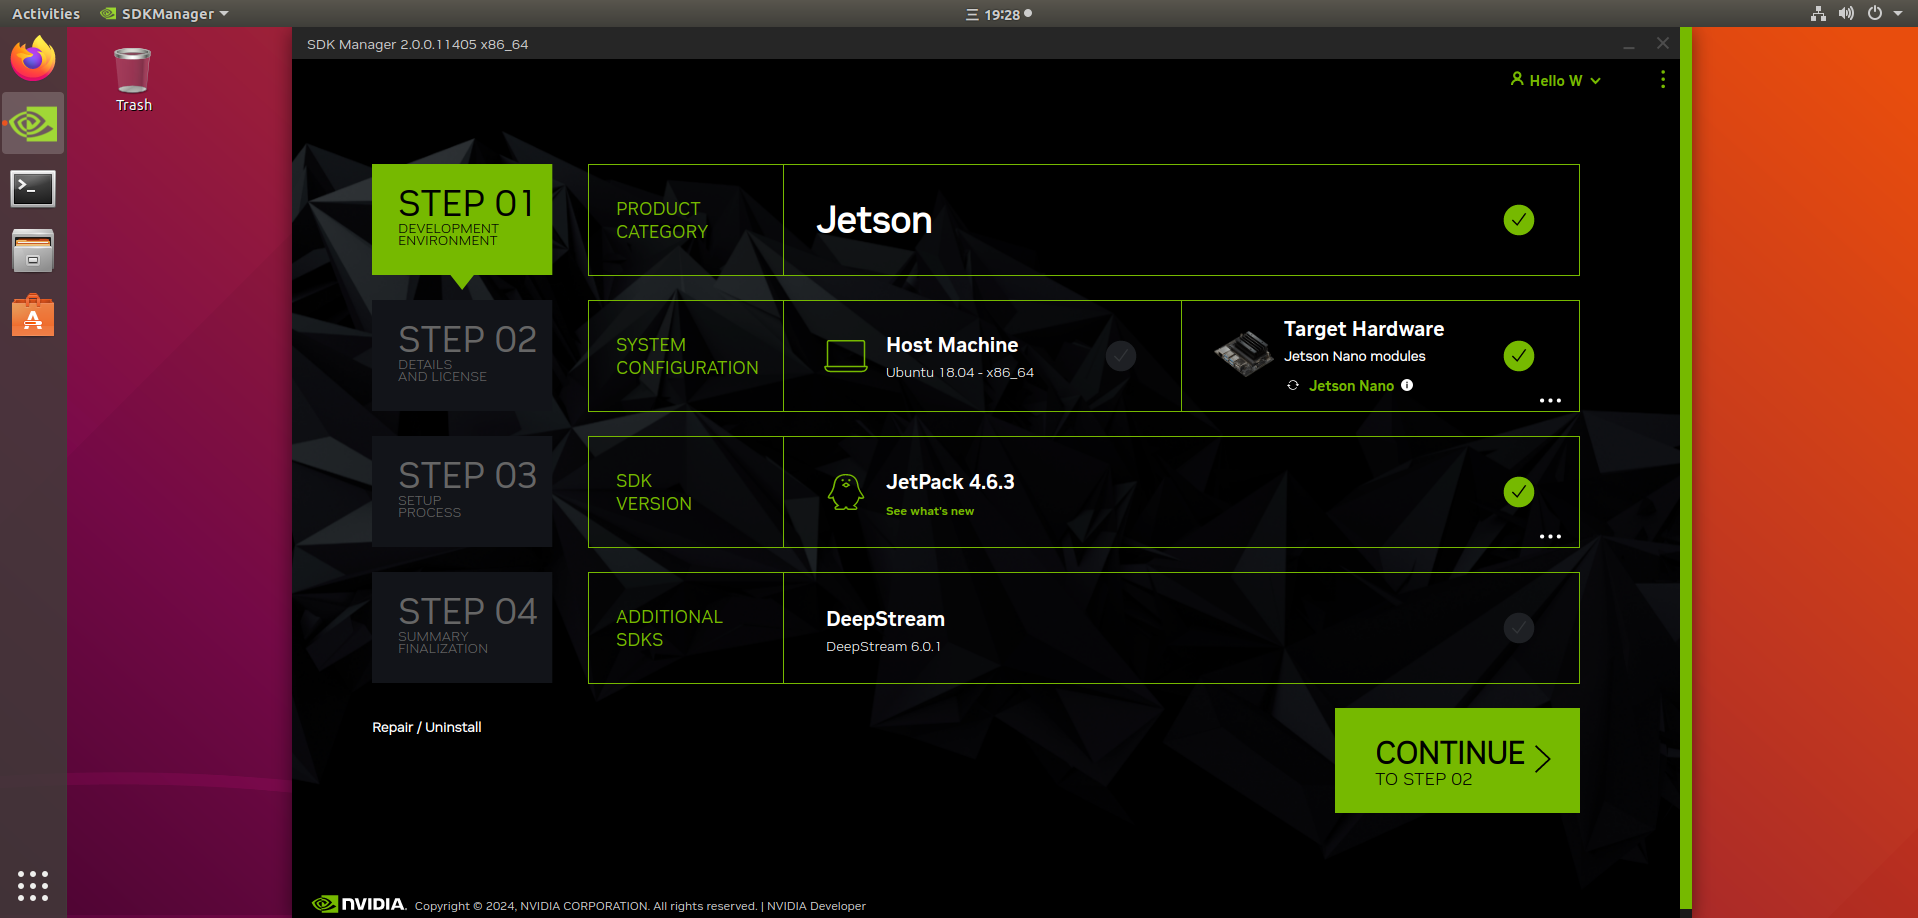
STEP1
Select the JetPack version. Here we take version 4.6.3 as an example.
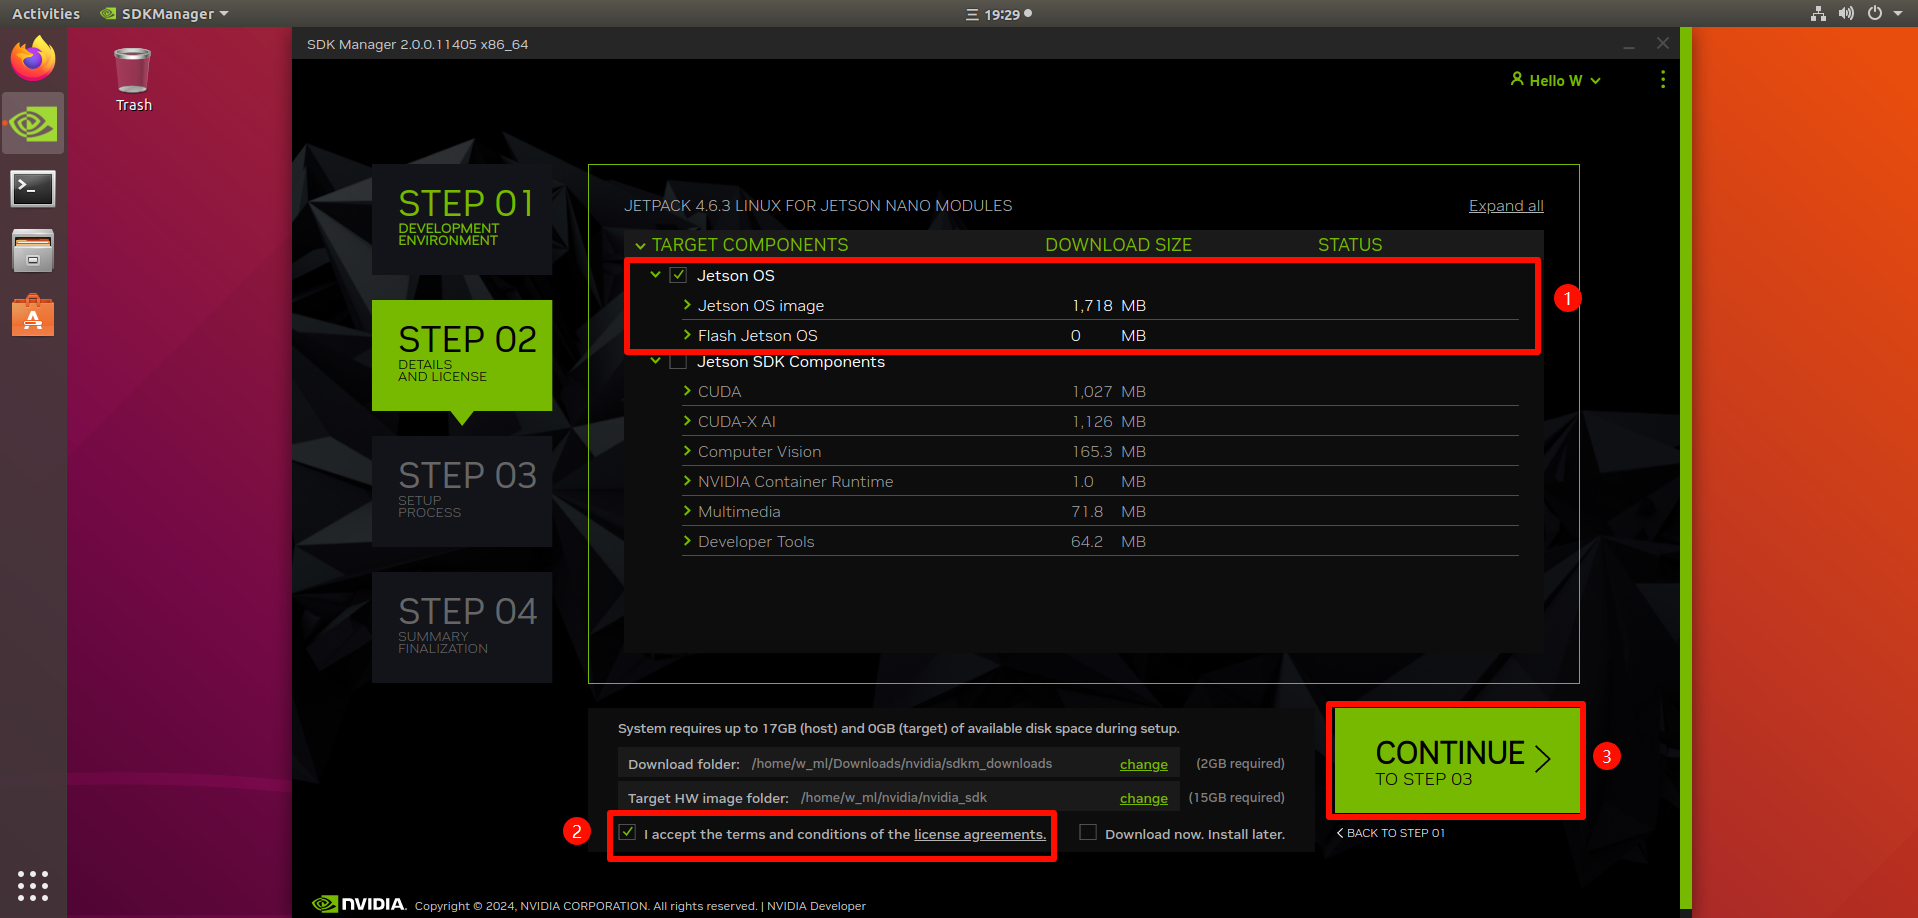
STEP2
As shown in the figure below, select the corresponding option.
You need to enter the password to confirm, and follow the system prompts to complete it.
xxxxxxxxxxIf the system prompts that the disk space is insufficient when executing this step, we need to check whether the system disk space is insufficient, and continue to expand the virtual machine disk space.
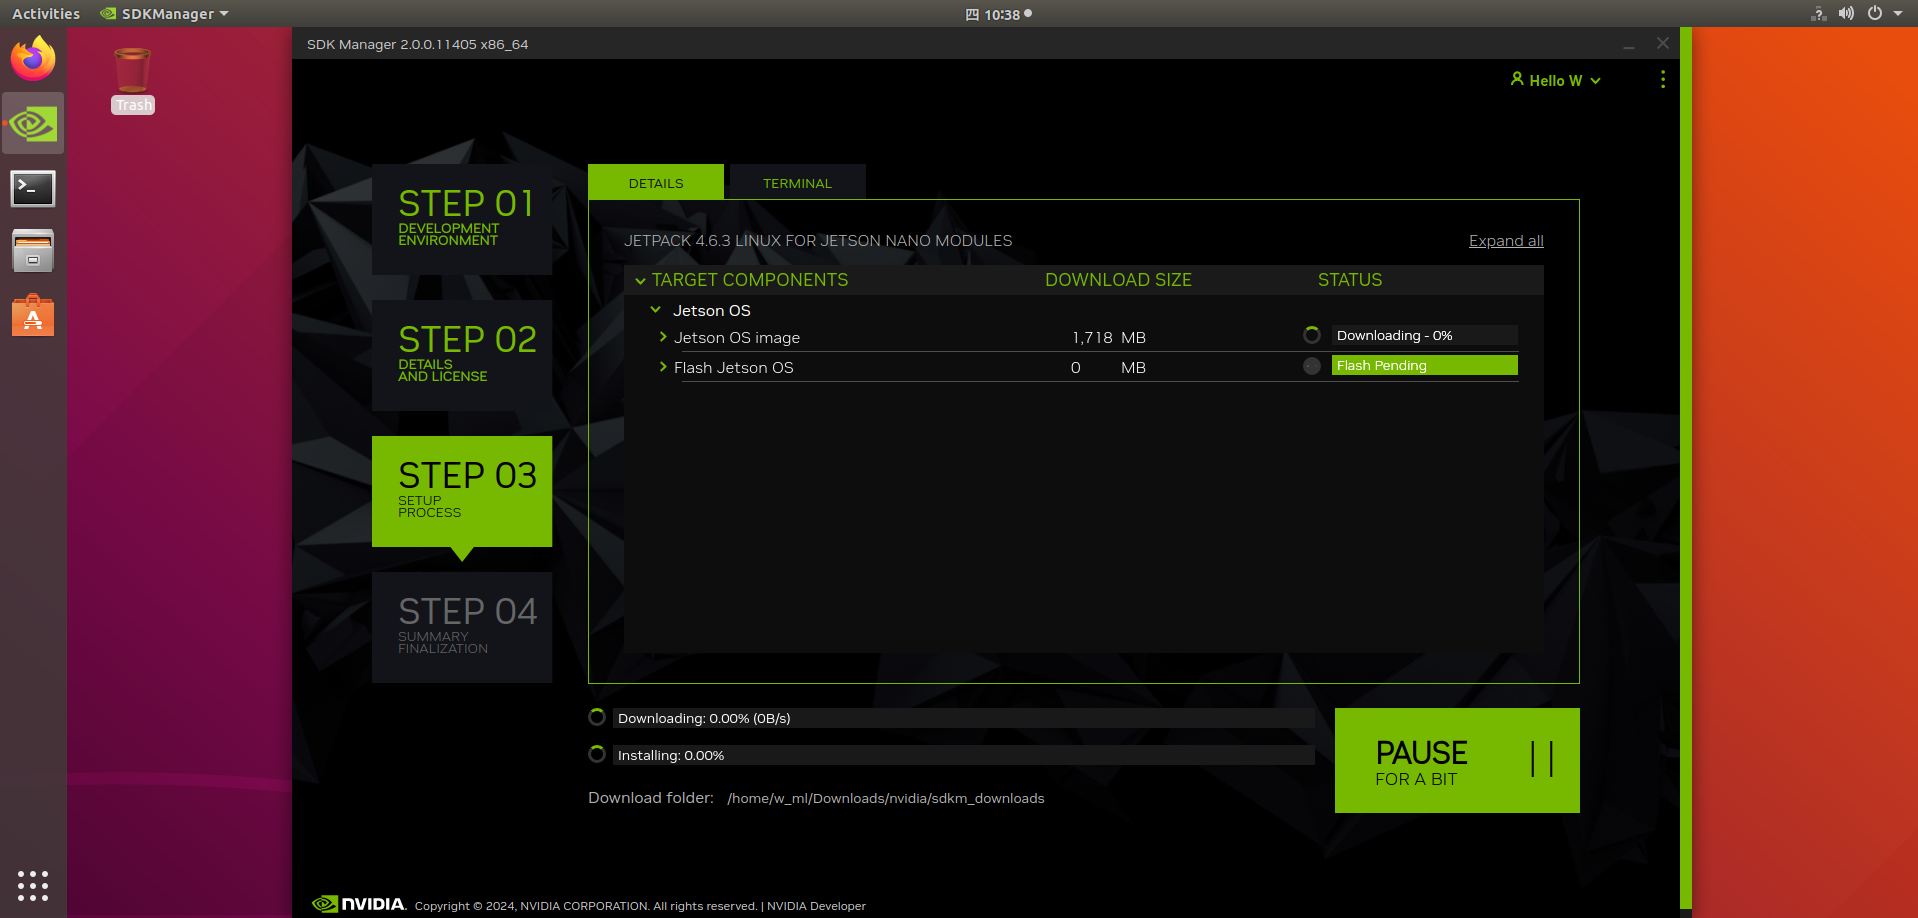
STEP3
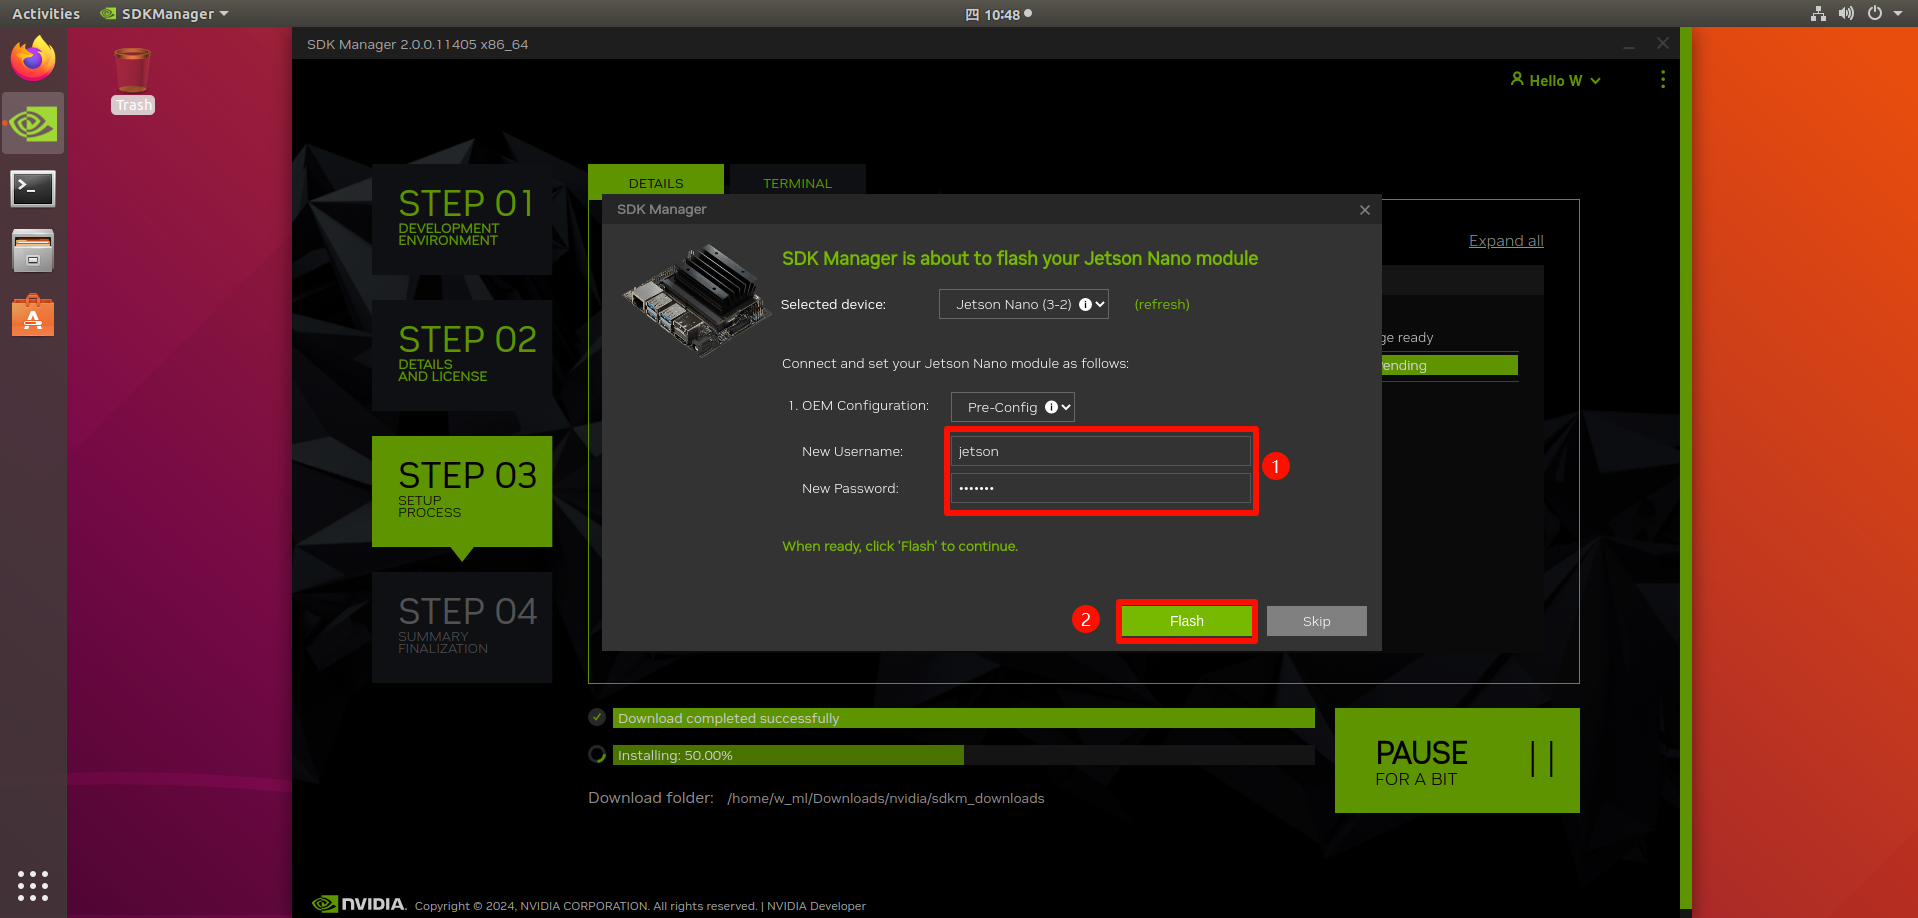
Wait for the system to download and install.
You will need to enter your username and password during the installation.
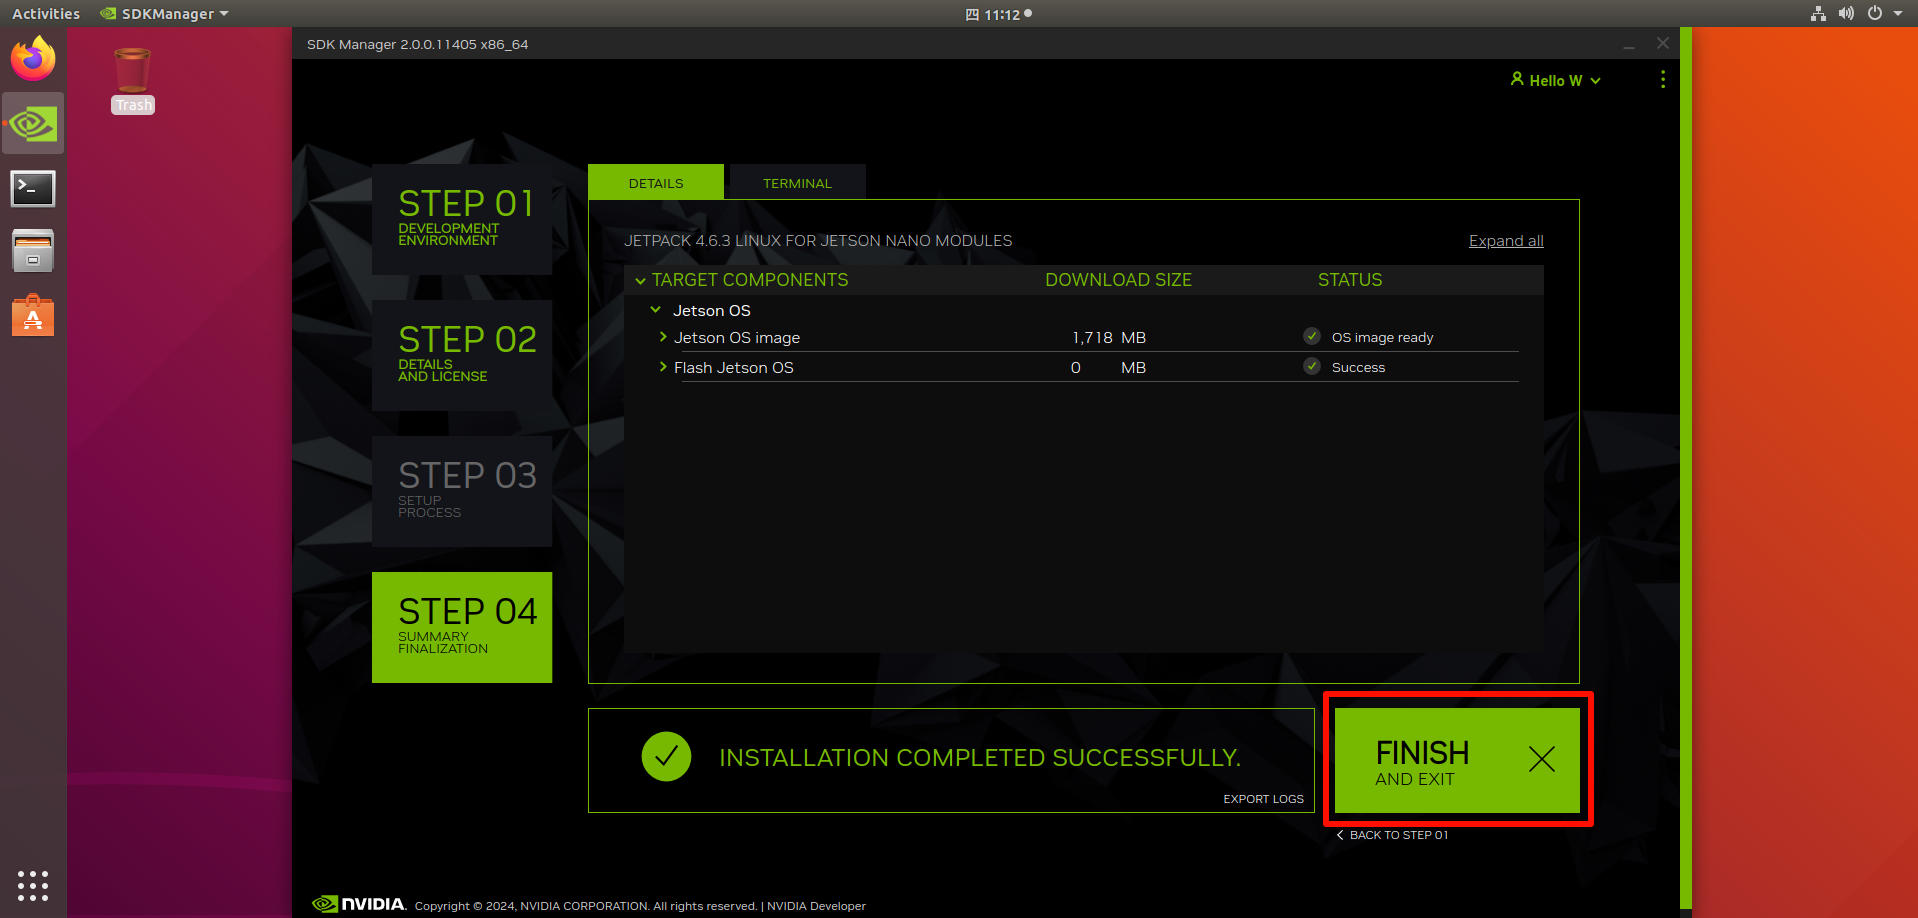
According to the above steps, you can complete writing Jetpack4.4.1 to the Jetson NANO board.
xxxxxxxxxxIf writing fails, you can follow the tutorial again and try a few more times.
5. Start up Jetson NANO board
Frist, unplug the data cable and DC power adapter that connect the Jetson NANO board to the computer.
Then, unplug the jumper cap that shorts the FC REC and GND pins on Jetson NANO board.
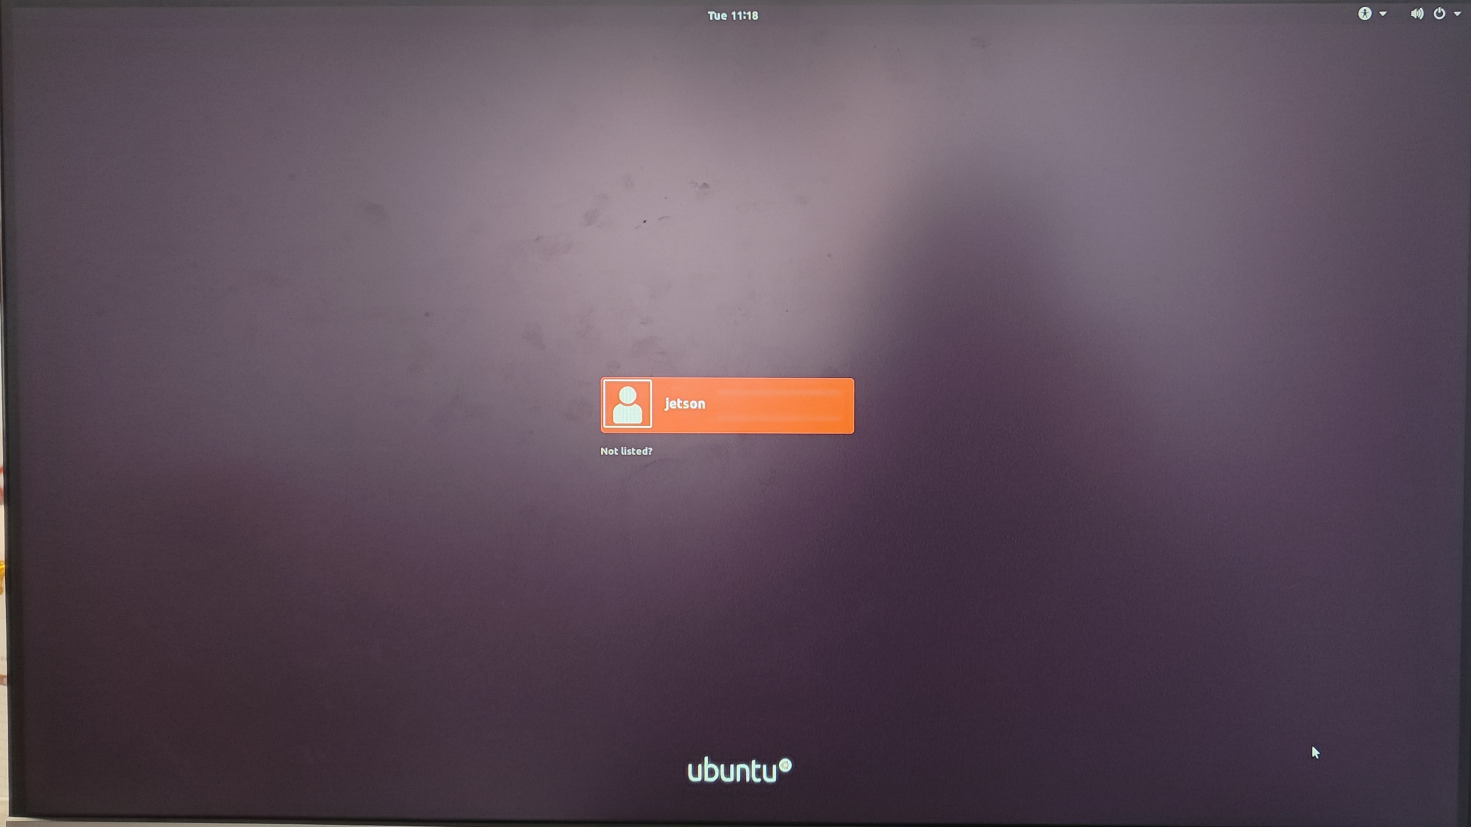
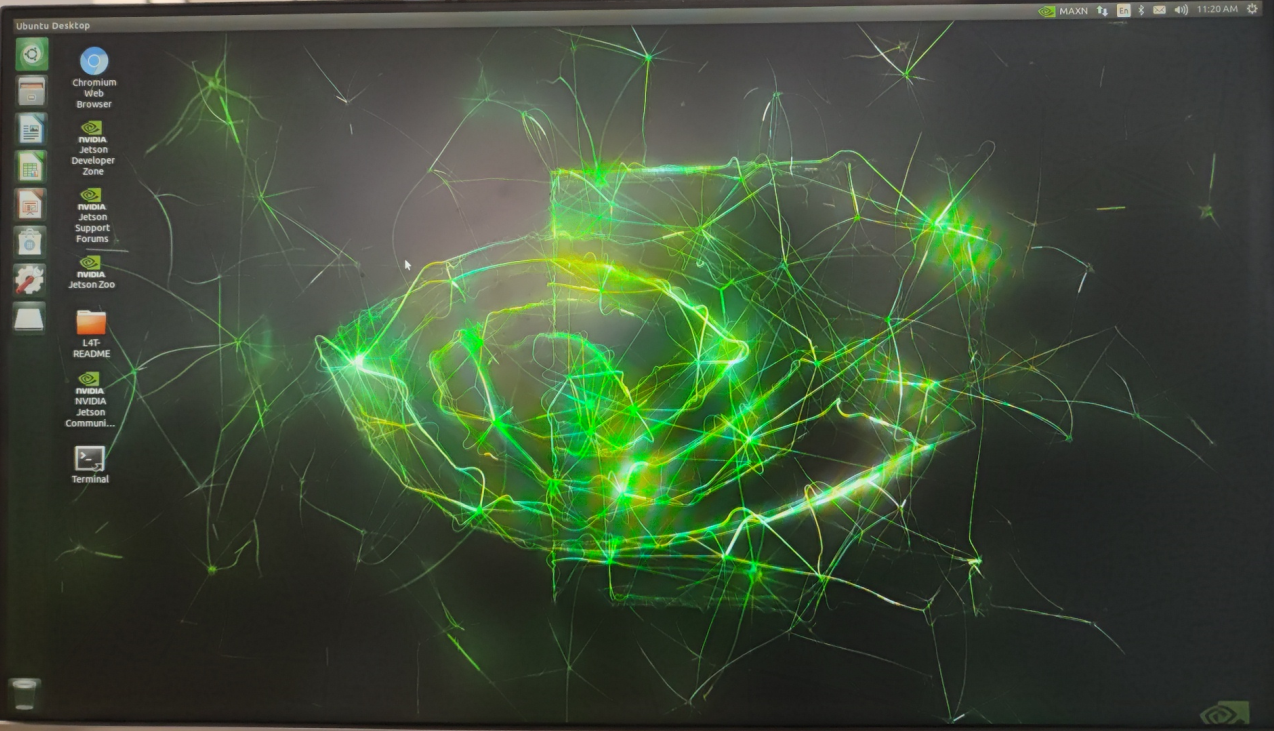
Boot the system: If the DC power adapter is used for power supply (you need to use a jumper cap to short-circuit the DC enable (J48)), connect the monitor to confirm whether the system can boot normally.
As shown below. If the display shows the following, it means the system can start normally.
Write EMMC system
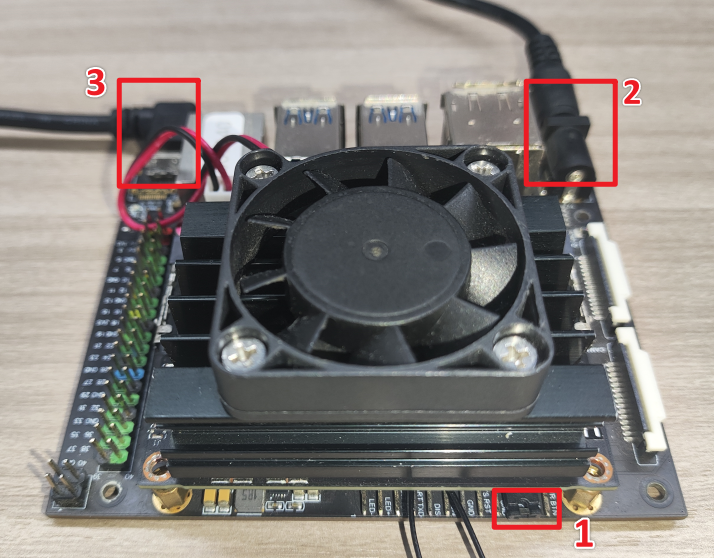
- Hardware
1)Jumper cap: short-circuit FC REC and GND pins (enter flash mode).
2)DC power adapter.
3)MicroUSB data cable: connect to computer to transfer data.
- Software
Ubuntu 18.04 system
xxxxxxxxxxYahboom has provided Ubuntu 18.04 virtual machine images and has installed SDKmanager. Users can download the virtual machine files directly on Yahboom's website.Use VMware software to open the virtual machine.Virtual machine username: yahboomPassword: yahboomYou can also install SDKmanager on your own Ubuntu system according to the following method.
1)Open NVIDIA's jetpack download website:SDK Manager | NVIDIA Developer
2)Register/log in to NVIDIA account.
3)In Ubuntu18.04 virtual machine system, click to download SDK Manager.
Input following command to enter the path of the .deb file you just downloaded.
(For example, i download it to the Downloads directory here.)
xxxxxxxxxxcd Downloads/
Input following command to install SDK Manager.
xxxxxxxxxxsudo dpkg -i sdkmanager_2.2.0-12021_amd64.deb
- Write Step
Please refer to 4. Write system by SDK Manager in 《Write official system image (SDK)》.
Write EMMC boot
Important: Once you have written this boot file into the EMMC of the Jetson NANO SUB board according to the following tutorial, you can directly insert the U disk in the robot car into the Jetson NANO SUB board (or write the car image file we provide into your own U disk).
Then, you can directly start up robot car. Don't worry about the Jetpack version.
1. Make Jetson Nano connect to virtual machine
- Prepare the Jetson Nano SUB board, jumper cap, display, mouse and keyboard, etc.
- As shown in the figure below, let Jetson Nano SUB enter the system REC flashing mode.
Connect the jumper cap to the FC REC and GND pins, that is, the second and third pins of the carrier board. As shown below.
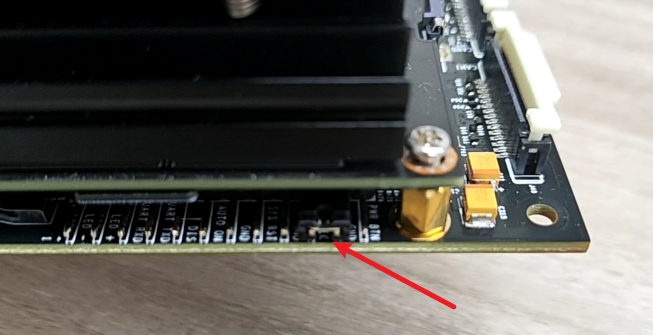
Connect the power supply and insert the microUSB data cable.
Since the jumper cap has been connected to the FC REC and GND pins in the previous step, the Jetson NANO board will automatically enter the REC flashing mode after powering on.
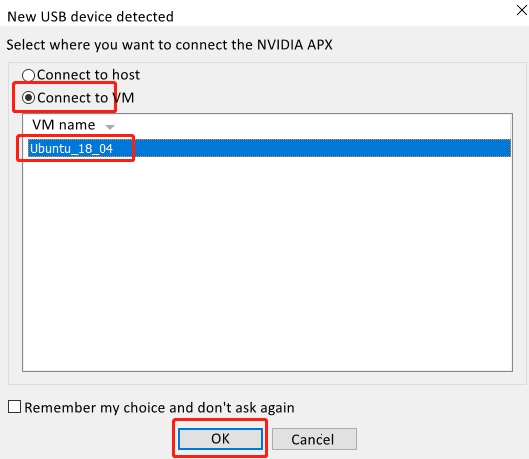
Generally, after connecting the Jetson NANO motherboard and the computer via a Micro USB data cable, the following window will pop up on the computer.
We need to select the device to connect to the virtual machine.
2.Start write boot file
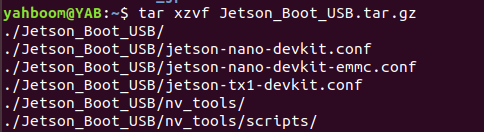
- Please transfer the Jetson_Boot_USB.tar.gz file in the Yahboom tutorials to the Ubuntu 18.04 system and open the terminal to run the decompression command.
xxxxxxxxxxtar xzvf Jetson_Boot_USB.tar.gz
As shown below.
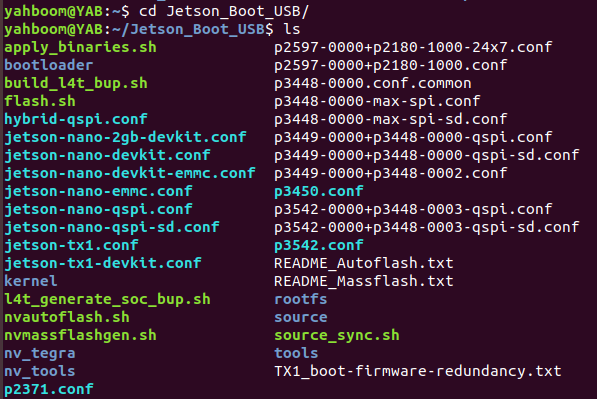
- After extracted, input following command to enter the Jetson_Boot_USB folder.
xxxxxxxxxxcd Jetson_Boot_USB/ls
As shown below.
- Input following command to write the EMMC boot file.
xxxxxxxxxxsudo ./flash.sh -r jetson-nano-devkit-emmc mmcblk0p1
As shown below.
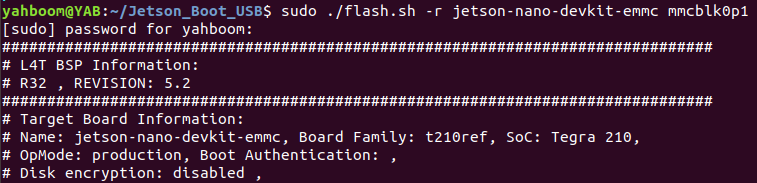
- Wait for the file to be written. If successful, the system will prompt "The target t210ref has been flashed successfully. Reset the board to boot from internal eMMC."
As shown below.

If an error message appears, please confirm whether the Jetson Nano SUB board is connected normally and enters the flashing mode.
Reconnect according to the first step. And try again.
After the write is completed, please unplug the jumper cap(FC REC and GND pins) of the Jetson Nano SUB, insert the U disk, and restart the Jetson NANO board.
Note: If you are using the virtual machine provided by Yahboom, which already contains the Jetson_Boot_USB file, you do not need to transfer it to the system again.
Note
- Before performing any write or system update operations, please back up the original important data on the Jetson board. Once written or updated, it cannot be restored.
- When writing the boot or system, make sure to use the tutorials and tools that match the motherboard model.
- If you encounter any problems during the startup process, please refer to the official NVIDIA documentation of the motherboard for troubleshooting and solutions.