Welcome to Muto S2 Robot repository
2.Color tracking
2、color tracking
2.1 Introduction to gameplay
This course mainly uses the robot's camera to obtain the camera picture, select a color, and then put the object of the selected color into the camera picture, frame the color object with a circle in the picture in real time, move the color object, and the circle will track the color object. Note that the robot will not move during this process, only the camera pan/tilt will track the color object.
2.2 Core content analysis
Color_HSV defines the HSV value of a color. Since the color of an object has color differences and light effects, if the recognition of a certain color is inaccurate, you can adjust the course based on the color HSV value. After adjusting for the best effect, record the data and update the HSV value of the corresponding color. .
Color_HSV = {'Red': ([0, 43, 46], [10, 255, 255]),'Green': ([35, 43, 46], [77, 255, 255]),'Blue': ([100, 43, 46], [124, 255, 255]),'Yellow': ([26, 43, 46], [34, 255, 255])}
Red objects are tracked by default.
xxxxxxxxxxcolor_lower = np.array(Color_HSV["Red"][0])color_upper = np.array(Color_HSV["Red"][1])
Each time a key is pressed, the color_lower and color_upper of the color HSV values are updated.
xxxxxxxxxxdef on_button_clicked(b):global color_lower, color_upper, g_stop_programALL_Uncheck()b.icon = 'check'with output:print("Button clicked:", b.description)if b.description == Name_widgets['Close_Camera'][g_ENABLE_CHINESE]:# 停止线程,释放摄像头 Stop the thread and release the cameraButton_Start.icon = 'uncheck'g_stop_program = Trueb.icon = 'uncheck'elif b.description == Name_widgets['Red'][g_ENABLE_CHINESE]:color_lower = np.array(np.array(Color_HSV["Red"][0]))color_upper = np.array(np.array(Color_HSV["Red"][1]))elif b.description == Name_widgets['Green'][g_ENABLE_CHINESE]:color_lower = np.array(np.array(Color_HSV["Green"][0]))color_upper = np.array(np.array(Color_HSV["Green"][1]))elif b.description == Name_widgets['Blue'][g_ENABLE_CHINESE]:color_lower = np.array(np.array(Color_HSV["Blue"][0]))color_upper = np.array(np.array(Color_HSV["Blue"][1]))elif b.description == Name_widgets['Yellow'][g_ENABLE_CHINESE]:color_lower = np.array(np.array(Color_HSV["Yellow"][0]))color_upper = np.array(np.array(Color_HSV["Yellow"][1]))
Control the robot's camera pan/tilt function, which uses the PID algorithm to calculate the angle at which the servo needs to rotate.
xxxxxxxxxxdef robot_control(x, y, radius):global g_last_x, g_last_y# print("raw:", x, y)if -20 < x < 20:x = 0if -20 < y < 20:y = 0value_x = int(PID_X.incremental(x))value_y = int(PID_Y.incremental(y))value_x = limit_value(value_x + g_last_x, 0, 180)value_y = limit_value(value_y + g_last_y, 0, 115)g_last_x = value_xg_last_y = value_y# print("angle:", value_x, value_y)g_bot.Gimbal_1_2(value_x, value_y)
The PID algorithm uses an incremental PID algorithm, and the PID parameters can be adjusted according to the actual effect to optimize the tracking effect.
xxxxxxxxxxdef incremental(self, current_value, limit=0):self.err = self.setPoint - current_valueresult = self.last_result + self.Kp * (self.err - self.err_next) + self.Ki * self.err + self.Kd * (self.err - 2 * self.err_next + self.err_last)self.err_last = self.err_nextself.err_next = self.errif limit > 0:if result > limit:result = limitif result < -limit:result = -limitself.last_result = resultreturn result
The program function of processing the camera screen will read the camera image, then analyze the HSV value, obtain the position information of the color object, draw it with a circular frame, and finally display it through the image control.
xdef task_processing():global color_lower, color_upper, g_stop_programglobal g_start_functiont_start = time.time()m_fps = 0while g_camera.isOpened():if g_stop_program:breakret, frame = g_camera.read()PID_slider_value()# 根据HSV值处理图像 The image is processed according to the HSV valuehsv = cv2.cvtColor(frame, cv2.COLOR_BGR2HSV)mask = cv2.inRange(hsv, color_lower, color_upper)cnts = cv2.findContours(mask.copy(), cv2.RETR_EXTERNAL, cv2.CHAIN_APPROX_SIMPLE)[-2]if len(cnts) > 0:cnt = max (cnts, key = cv2.contourArea)(color_x, color_y), color_radius = cv2.minEnclosingCircle(cnt)if color_radius > 10:# 将检测到的颜色用圆形线圈标记出来 Mark the detected colors with circular coilscv2.circle(frame, (int(color_x), int(color_y)), int(color_radius), (255,0,255), 2)if g_start_function:robot_control(int(color_x-320), int(color_y-240), int(color_radius))m_fps = m_fps + 1fps = m_fps / (time.time() - t_start)if (time.time() - t_start) >= 2:m_fps = fpst_start = time.time() - 1cv2.putText(frame, "FPS " + str(int(fps)), (10,20), cv2.FONT_HERSHEY_SIMPLEX, 0.5, (0,255,255), 1)# 图像传输给显示组件 The image is transmitted to the display componentimage_widget.value = bgr8_to_jpeg(frame)time.sleep(.01)g_camera.release()
2.3 Operation
Open the jupyterLab client and find the code path:
xxxxxxxxxxmuto/Samples/AI_Samples/02_color_tracking/color_tracking.ipynb
Click to run all cells, and then scroll to the bottom to see the generated controls.

Select the color that needs to be tracked. For example, if you select yellow here, the camera will track the yellow object. If you move the color block, the camera will follow the object and try to keep the object in the middle of the screen. Note that the color you choose should be clearly different from the background color, otherwise it may cause interference.
If the camera pan/tilt tracking effect is not ideal, you can adjust the PID parameters below to optimize the tracking effect. X represents the left and right direction, and Y represents the up and down direction.
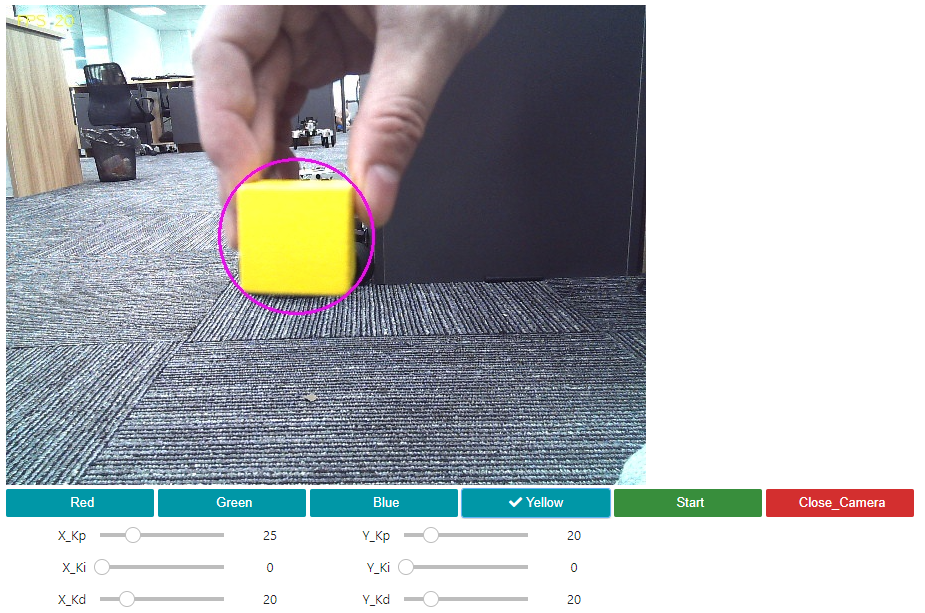
Finally click the Close_Camera button to close the camera.