Welcome to Muto S2 Robot repository
2.TensorFlow basic tutorial
2、TensorFlow basic tutorial
The Raspberry Pi motherboard series does not currently support this tutorial.
2.1、TensorFlow overview
2.1.1、definition
TensorFlow™It is a symbolic mathematics system based on data flow programming (dataflow programming),It is widely used in the programming implementation of various machine learning (machine learning) algorithms. Its predecessor is Google neural network algorithm library DistBelief.
TensorflowIt has a multi-level structure and can be deployed on various servers, PC terminals and web pages and supports GPU and TPU high performance Numerical calculation, is widely used in Google’s internal product development and scientific research in various fields.
2.1.2、core components
The core components of distributed TensorFlow (core runtime) include: distribution center (distributed master), executor (dataflow executor/worker service), kernel application (kernel implementation) and the bottom [device layer] (https://baike. baidu.com/item/Device Layer/8983070) (device layer)/Network Layer (networking layer).
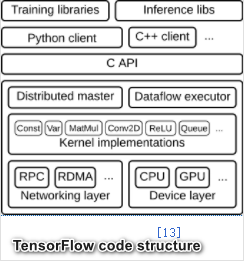
1)、(distributed master)
The distribution center clips subgraphs from the input data flow graph, divides them into operational fragments and starts executors. The distribution center performs preset operational optimizations when processing the data flow graph.Including common subexpression elimination, constant folding, etc.
2)、Graph operations run in processes and devices, and send and receive results from other executors. Distributed TensorFlow has a parameter server to aggregate and update model parameters returned by other executors. The executor will choose to perform parallel computing and GPU acceleration when scheduling local devices.
3)、The kernel application is responsible for a single graph operation, including mathematical calculations, array manipulation, control flow, and state management operations. The kernel application uses Eigen to perform parallel calculations of tensors, cuDNN libraries, etc. to perform GPU acceleration, and gemmlowp to perform low numerical precision calculations. In addition, users can perform low numerical precision calculations in the kernel application. Register additional kernels (fused kernels) to improve the efficiency of basic operations such as activation functions and their gradient calculations.
2.2、TensorFlow 2
2.2.1、Introduction
TensorFlow is a deep learning open source tool released by Google in November 2015. We can use it to quickly build deep neural networks and train deep learning models. The main purpose of using TensorFlow and other open source frameworks is to provide us with a module toolbox that is more conducive to building deep learning networks, so that the code can be simplified during development, and the final model will be more concise and easy to understand.
2.2.2、Upgrade direction
1)、Easily build models using Keras and Eager Execution.
2)、Enable robust production model deployment on any platform.
3)、Provide powerful experimental tools for research.
4)、Simplify APIs by cleaning up obsolete APIs and reducing duplication.
2.3、TensorFlow basic concept syntax
2.3.1、Tensor
1)、Tensor is the core data unit of TensorFlow, which is essentially an array of arbitrary dimensions. We call a 1-dimensional array a vector, a 2-dimensional array a matrix, and a tensor can be regarded as an N-dimensional array.
2)、In TensorFlow, each Tensor has two basic properties: data type (default: float32) and shape. The data types are roughly as shown in the following table.
| Tensor type | describe |
|---|---|
| tf.float32 | 32-bit floating point number |
| tf.float64 | 64-bit floating point number |
| tf.int64 | 64-bit signed integer |
| tf.int32 | 32-bit signed integer |
| tf.int16 | 16-bit signed integer |
| tf.int8 | 8-bit signed integer |
| tf.uint8 | 8-bit unsigned integer |
| tf.string | variable length byte array |
| tf.bool | boolean |
| tf.complex64 | Real and imaginary numbers |
3)、According to different uses, there are two main tensor types in TensorFlow, as shown below
tf.Variable :The variable Tensor needs to specify an initial value and is often used to define variable parameters, such as the weights of neural networks.
tf.constant :Constant Tensor needs to specify an initial value to define a tensor that does not change.
4)、Define a variable Tensor
Create a new python file, name it Tensor_Variable, and then give it execution permissions.
sudo chmod a+x Tensor_Variable.py
Paste the following code inside,
xxxxxxxxxximport tensorflow as tfv = tf.Variable([[1, 2], [3, 4]]) # 2D variable of shape (2, 2)print(v)Run tests
xxxxxxxxxxpython3 Tensor_Variable.py
Output:
xxxxxxxxxx<tf.Variable 'Variable:0' shape=(2, 2) dtype=int32, numpy=array([[1, 2],[3, 4]], dtype=int32)>
5)Define a constant Tensor
Create a new python file, name it Tensor_constant, and then give it execution permissions.
xxxxxxxxxxsudo chmod a+x Tensor_constant.py
Paste the following code inside
xxxxxxxxxximport tensorflow as tfv = tf.constant([[1, 2], [3, 4]]) # 2D variable of shape (2, 2)print(v)Run tests
xxxxxxxxxxpython3 Tensor_constant.py
output
xxxxxxxxxx<tf.Tensor: id=9, shape=(2, 2), dtype=int32, numpy=array([[1, 2],[3, 4]], dtype=int32)>
If you look closely, you will find that the output tensor has three attributes: shape, data type dtype, and NumPy array.
6)Commonly used methods to create new special constant tensors:
tf.zeros:Create a new constant Tensor with the specified shape and all 0s
Example:c = tf.zeros([2, 2]) # 2x2 constant Tensor with all zeros
output,
xxxxxxxxxx<tf.Tensor: id=12, shape=(2, 2), dtype=float32, numpy=array([[0., 0.],[0., 0.]], dtype=float32)
tf.ones_like:refer to a shape,Create a new constant Tensor with all 1’s
Example: v = tf.ones_like(c) # A constant Tensor that is consistent with the shape (shape) of tensor c and is all 1. Note that the shape here refers to the attribute shape of the tensor
output,
xxxxxxxxxx<tf.Tensor: id=15, shape=(3, 3), dtype=float32, numpy=array([[1., 1.],[1., 1.]],dtype=float32)
tf.fill:Output Creates a new constant Tensor with the specified shape and all scalar values.
Example: a = tf.fill([2, 3], 6) # 2x3 constant Tensor with all 6s
output,
xxxxxxxxxx<tf.Tensor: id=18, shape=(2, 3), dtype=int32, numpy=array([[6, 6, 6],[6, 6, 6]], dtype=int32)>
tf.linspace:Create an equally spaced sequence.
output:c = tf.linspace(1.0, 10.0, 5, name="linspace")
output,
xxxxxxxxxx<tf.Tensor: id=22, shape=(5,), dtype=float32, numpy=array([ 1. , 3.25, 5.5 , 7.75, 10. ], dtype=float32)>
tf.range:Create a sequence of numbers
Example:c = tf.range(start=2, limit=8, delta=2)
output,
xxxxxxxxxx<tf.Tensor: id=26, shape=(5,), dtype=int32, numpy=array([2, 4, 6, 8], dtype=int32)>
This part of the code can be referred to:
xxxxxxxxxx~/TensorFlow_demo/tensor_init.py
2.3.2、Use the Eager Execution (dynamic graph) mechanism to perform operations on tensors
1)、Changes in the tensor operation mechanism of TensorFlow2 and TensorFlow1.x
The dynamic graph mechanism is the biggest difference between TensorFlow2.x and TensorFlow1.x. It is similar to PyTorch and simplifies the code and execution process.
2)、Take tensor addition as an example to illustrate,
Create a new python file, name it tensor_plus, and then give it execution permissions.
xxxxxxxxxxsudo chmod a+x tensor_plus.py
Paste the following code inside.
xxxxxxxxxximport tensorflow as tfa = tf.fill([2, 3], 6)b = tf.fill([2, 3], 2)c = a + bprint(a)print(b)print(c)Run tests,
xxxxxxxxxxpython3 tensor_plus.py
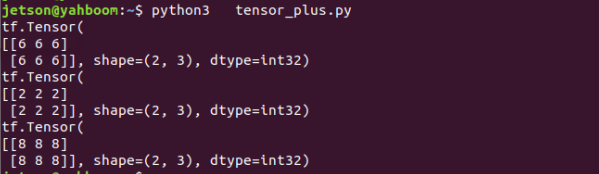
It can be found that the execution process of this python is the same, and if it is in Tersorflow1.x, a session needs to be established, and the addition operation in the session is performed.
3)、TensorFlow commonly used APIs:
tf.math:The mathematical calculation module provides a large number of mathematical calculation functions.
tf.linalg:The linear algebra module provides a large number of linear algebra calculation methods and classes.
tf.image:The image processing module provides classes such as image cropping, transformation, encoding, and decoding.
tf.train:Provides components for training such as optimizers, learning rate decay strategies, etc.
tf.nn:Provides underlying functions for building neural networks to help implement various functional layers of deep neural networks.
tf.keras:The original Keras framework high-level API. Contains high-order neural network layers in the original tf.layers.
tf.data:The input data processing module provides classes such as tf.data.Dataset for encapsulating input data, specifying batch size, etc.
For usage of these commonly used APIs, please refer to the official documentation:
Module: tf | TensorFlow Core v2.8.0 (google.cn)
https://tensorflow.google.cn/api_docs/python/tf
2.3.3、Neural Networks
1)、Neural network is a mathematical model that exists in the nervous system of a computer. It is connected by a large number of neurons and performs calculations. It changes the internal structure based on external information and is often used to compare input and output. Model complex relationships. The structure of a basic neural network has an input layer, a hidden layer, and an output layer. The picture below is a neural network diagram,
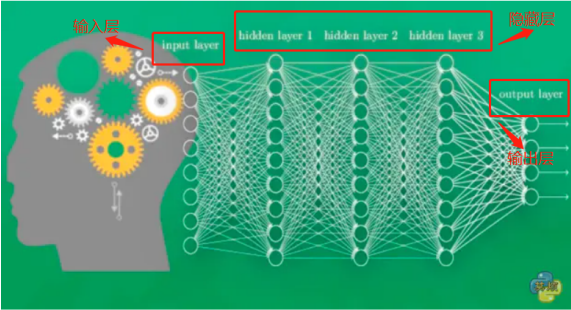
2)、Input layer: receives sensory information
3)、Hidden layer: processing of input information;
4)、Output layer: outputs the computer’s knowledge of the input information.
2.3.4、Build and train neural networks(kear)
1)、Import data data
xxxxxxxxxxx_train = datasets.load_iris().datay_train = datasets.load_iris().target
For more information on data, please refer to:tf.data.Dataset | TensorFlow Core v2.8.0 (google.cn)
https://tensorflow.google.cn/api_docs/python/tf/data/Dataset
2)、Define a structural network that describes a neural network
xxxxxxxxxxmodel = tf.keras.models.Sequential()
Example:
xxxxxxxxxxmodel = tf.keras.Sequential([ tf.keras.layers.Dense(3, activation='softmax', kernel_regularizer=tf.keras.regularizers.l2())])The input parameters represent the network structure from the input layer to the output layer. Generally, there are the following three:
straighten layer:tf.keras.layers.Flatten()
Please refer to the official documentation:tf.keras.layers.Flatten | TensorFlow Core v2.8.0 (google.cn)
https://tensorflow.google.cn/api_docs/python/tf/keras/layers/Flatten
Fully connected layer:tf.keras.layers.Dense()
Please refer to the official documentation:tf.keras.layers.Dense | TensorFlow Core v2.8.0 (google.cn)
https://tensorflow.google.cn/api_docs/python/tf/keras/layers/Dense
convolution layer:tf.keras.layers.Conv2D()
Please refer to the official documentation:tf.keras.layers.Conv2D | TensorFlow Core v2.8.0 (google.cn)
https://tensorflow.google.cn/api_docs/python/tf/keras/layers/Conv2D
3)、Configuring the training method for training a neural network
xxxxxxxxxxmodel.compile( optimizer = 优化器, loss = 损失函数, metrics = [“准确率”])
Example:
xxxxxxxxxxmodel.compile(optimizer=tf.keras.optimizers.SGD(lr=0.1), loss=tf.keras.losses.SparseCategoricalCrossentropy(from_logits=False), metrics=[tf.keras.metrics.sparse_categorical_accuracy])The input parameters are composed of the following three parts:
optimizer:
Mainly set the learning rate lr, learning decay rate decay and momentum parameters.
loss:loss function
metrics:Multiple accuracy rates can be specified.
For the specific values of the three parameters, please refer to:tf.keras.Model | TensorFlow Core v2.8.0 (google.cn)
https://tensorflow.google.cn/api_docs/python/tf/keras/Model
4)、Execute training process
xxxxxxxxxxmodel.fit(x=Input features of the training set,y=Labels of the training set,batch_size=Specify the number of samples included in each batch when performing gradient descent,epochs=value when training terminates,validation_data = (Input features of the test set, labels of the test set),validataion_split = The ratio of scores from training set to test set,validation_freq = The number of epoch intervals for testing)
Example:
xxxxxxxxxxmodel.fit(x_train, y_train, batch_size=32, epochs=5, validation_data=(x_test, y_test), validation_freq=1)For specific parameter settings, please refer to:tf.keras.Model | TensorFlow Core v2.8.0 (google.cn)
https://tensorflow.google.cn/api_docs/python/tf/keras/Model
5)、Print network structure and parameter statistics
xxxxxxxxxxmodel.summary()
For specific parameter settings, please refer to:tf.keras.Model | TensorFlow Core v2.8.0 (google.cn)
https://tensorflow.google.cn/api_docs/python/tf/keras/Model
2.3.4、Training neural network example - classic example of training cat and dog images
1)、Code path reference
xxxxxxxxxx~/TensorFlow_demo/cats_dogs_demo.py
2)、Run program
xxxxxxxxxxcd TensorFlow_demo/python3 cats_dogs_demo.py
3)、Screenshot of program running
When pictures of kittens and puppies appear, in the picture display window, press the q key to continue executing the program.
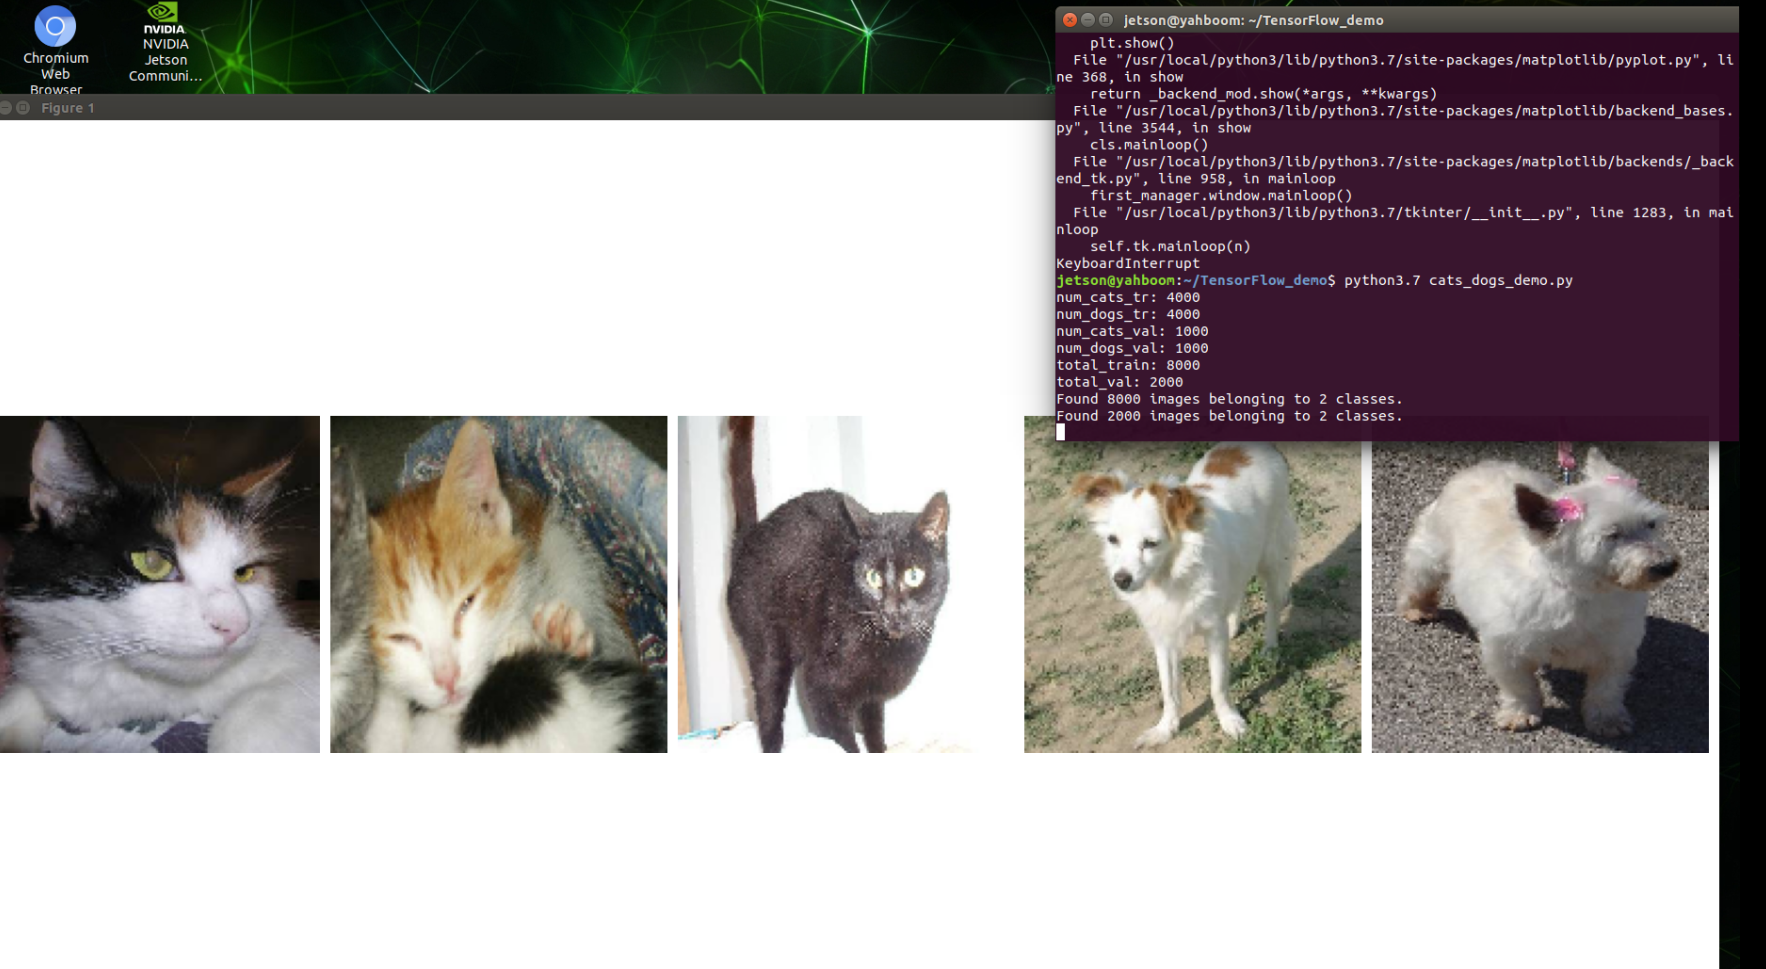
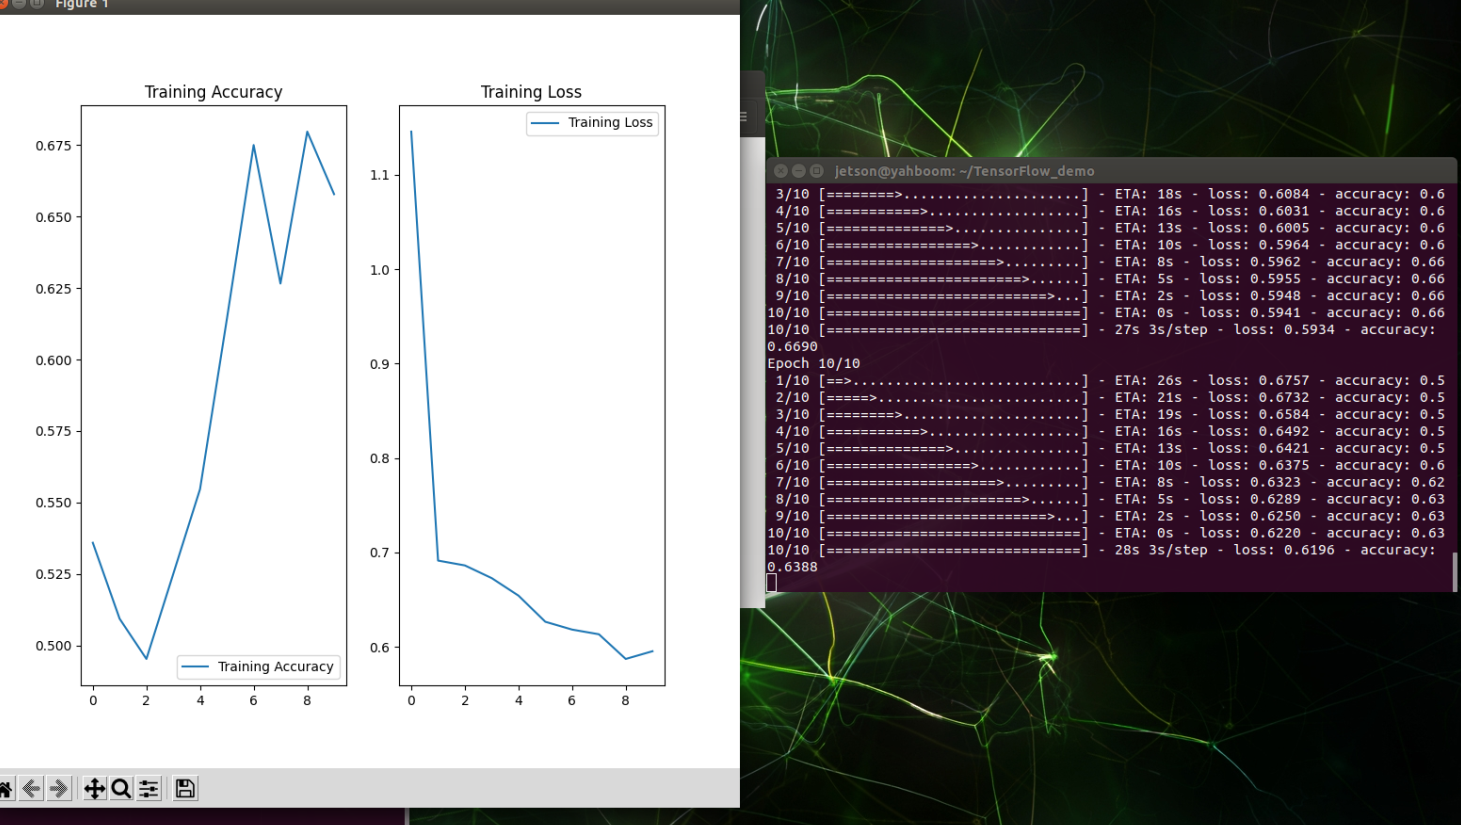
The number of training epochs for this model is 10, and the number of sample batches is 10. The coordinate curve on the left shows that as the number of training times increases, the accuracy acc and error loss will increase and decrease.