yahboom
HomeLearn
Solution
Blog
Online Store
About Us
EN/中文
Muto S2 Robot📖
1.Introduction to Muto Robot
  • 1.Introduction to Muto Robot
  • 2.Accessories introduction
  • 3.Precautions for battery
  • 4.FAQ
2.Assembly and write system
  • 1.Raspberry Pi write system
  • 2.Jetson Nano write sytem
  • 3. Robot assembly tutorial
  • 4. Installation Video Part1-Part5
  • 4. Installation Video Part6-Part10
3.Remote control course
  • 1.Close APP control process
  • 2.Mobile APP remote control tutorial
  • 3.USB wireless handle remote control
4.Linux basic course
  • 1.Introduction to Linux system
  • 2.Ubuntu file system
  • 3.Ubuntu common commands
  • 4.Ubuntu common editors
  • 5.Ubuntu software operation commands
  • 6.Virtual machine installation
  • 7.SSH remote control
  • 8.VNC remote control
  • 9.Transfer files remotely
  • 10.Driver library and communication
  • 11.Static IP and hotspot mode
  • 12.Bind device ID
  • 13.Capacity expansion and resource allocation
  • 14.Update system software sources
  • 15.Set root user password
  • 16.sudo free password
  • 17.Connect to WiFi network
  • 18.View system version
  • 19.Customized service management
  • 20.Back up system image
5.JupyterLab course
  • 1.ReadMe before operate
  • 2.Environment setup
  • 3.Basic usage tutorial
  • 4.Widgets configuration
  • 5.Widgets controls use
6.Jetson NANO course
  • 1.About JetsonNano system
  • 2.Network configuration and Jtop
  • 3.swap space increased
  • 4.API usage of GPIO library
  • 5.Hardware library configuration
  • 6.Pin reading function
  • 7.Pin level output control
  • 8.Control LED
  • 9.Jetson Nano communicates with external device serial ports
  • 10.jetson nano I2C communication
7.Raspberry Pi course
  • 1.Python usage
  • 2.Use APT to install Python packages
  • 3.Python virtual environment
  • 4.GPIO Zero
  • 5.Pin output high and low levels
  • 6.Pin reads high and low levels
  • 7.Pin output PWM
  • 8.Serial communication
  • 9.I2C communication
8.Robot basic course
  • 1.Control buzzer
  • 2.Control PWM servo
  • 3.Control bus servo
  • 4.Robot forward and backward
  • 5.Robot move left and right
  • 6.Robot rotate left and right
  • 7.Control height
  • 8.Control head
  • 9.Action group performance
  • 10.Read data
  • 11.Host computer control
  • 12.Camera driver
9.Open Source CV course
  • 1.Introduction to Open Source CV
  • 2.Image reading and display
  • 3.Picture writing
  • 4.Image Quality
  • 5.Pixel operations
  • 6.Image zoom
  • 7.Picture cut
  • 8.Picture pan
  • 9.Picture mirroring
  • 10.Affine transformation
  • 11.Picture rotation
  • 12.perspective transformation
  • 13.Grayscale processing
  • 14.Binary image
  • 15.Edge green detection
  • 16.Line segment drawing
  • 17.Rectangular circle drawing
  • 18.Text and picture drawing
7.AI vision course
  • 0.Color HSV value calibration
  • 1.Color recognition
  • 2.Color tracking
  • 3.Color following
  • 4.Color recognition action group
  • 5.Face detection
  • 6.Face tracking
  • 7.Greet people
  • 8.QR code recognition
  • 9.QR code instructions
  • 10.visual line following
  • 11.Motion learning
  • 12.Teach pendant synchronized action
8.Machine deep learning
  • 1.KNN
  • 2.TensorFlow basic tutorial
  • 3.Basic use of PyTorch
  • 4.Yolov5 detects objects in real time
  • 5.Jetson-inference environment construction(selective viewing)
  • 6.Object detection and action
  • 7.Body movement control robot
  • 8.Gesture controlled robot
Remote login control
  • 1. VNC and SSH remote login
  • 2. Jupyter lab login and case code running
9.FAQnew
  • Using your own Jetson board, Muto S2 cannot start normally
Download
  • APP(iOS/Android)
  • SystemFile_For_RPi5
  • System_for_RPi4
  • System_for_JetsonNANO
  • Hardware and protocol
  • Instruction manual
  • Jetson_Boot_USB.tar.gz
Download ZIP

Welcome to Muto S2 Robot repository

15.Edge green detection

15.Edge green detection

The purpose of edge detection is to significantly reduce the data size of the image while retaining the original image attributes. There are currently many algorithms for edge detection. Although the Canny algorithm is old, it can be said that it is a standard algorithm for edge detection and is still widely used in research. Canny edge detection is a technology that extracts useful structural information from different visual objects and greatly reduces the amount of data to be processed. It has been widely used in various computer vision systems. Canny found that the requirements for edge detection on different vision systems are relatively similar. Therefore, an edge detection technology with broad application significance can be implemented. General standards for edge detection include:

Detecting edges with a low error rate means capturing as many edges as possible in the image as accurately as possible. The detected edge should be located exactly at the center of the real edge. A given edge in the image should be marked only once, and where possible, noise in the image should not produce false edges. To meet these requirements, Canny uses the calculus of variations. The optimal function in the Canny detector is described by the sum of four exponential terms, which can be approximated by the first derivative of the Gaussian function.

Among the currently commonly used edge detection methods, the Canny edge detection algorithm is one of the strictly defined methods that can provide good and reliable detection. Because it has the advantages of meeting the three criteria of edge detection and being simple to implement, it has become one of the most popular algorithms for edge detection.

The Canny edge detection algorithm can be divided into the following 5 steps:

  1. Use Gaussian filter to smooth the image and filter out noise.
  2. Calculate the gradient intensity and direction of each pixel in the image.
  3. Apply non-maximum suppression to eliminate spurious responses caused by edge detection.
  4. Apply Double-Threshold detection to determine real and potential edges.
  5. Finally complete edge detection by suppressing isolated weak edges.

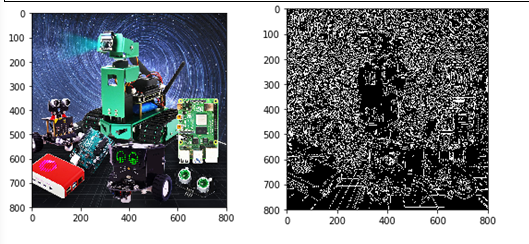
Code path:muto/Samples/OpenCV/03_Image processing and text drawing/03_1Edge detection 1.ipynb

​x
#Method 1
import cv2
import   numpy as np
import   random
import   matplotlib.pyplot as plt

img = cv2.imread('image0.jpg',1)
imgInfo =   img.shape
height =   imgInfo[0]
width =   imgInfo[1]
#cv2.imshow('src',img)
#canny 1   gray 2 gauss 3 canny
gray =   cv2.cvtColor(img,cv2.COLOR_BGR2GRAY)
imgG =   cv2.GaussianBlur(gray,(3,3),0)
dst =   cv2.Canny(img,50,50) #Image convolution——》th
#   cv2.imshow('dst',dst)

    # cv2.waitKey(0)
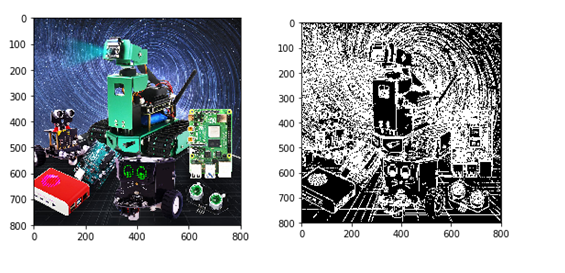
Comparing two pictures

xxxxxxxxxx
img_bgr2rgb1   = cv2.cvtColor(img, cv2.COLOR_BGR2RGB)
plt.imshow(img_bgr2rgb1)
    plt.show()
xxxxxxxxxx
img_bgr2rgb1   = cv2.cvtColor(dst, cv2.COLOR_BGR2RGB)
plt.imshow(img_bgr2rgb1)
plt.show()

Code path:/home/dofbot/Dofbot/4.opencv/3.draw_picture/03_Edge_detection_2.ipynb

xxxxxxxxxx
#Method 2
import cv2
import   numpy as np
import   random
import math
img =   cv2.imread('image0.jpg',1)
imgInfo =   img.shape
height =   imgInfo[0]
width =   imgInfo[1]
# cv2.imshow('src',img)
# sobel 1 Operator template 2 Image convolution 3 Threshold judgment
# [1 2   1          [ 1 0 -1

#  0 0 0            2 0 -2
# -1 -2 -1   ]       1 0 -1 ]

# [1 2 3 4]   [a b c d] a*1+b*2+c*3+d*4 = dst
#   sqrt(a*a+b*b) = f>th
gray =   cv2.cvtColor(img,cv2.COLOR_BGR2GRAY)
dst =   np.zeros((height,width,1),np.uint8)
for i in   range(0,height-2):
    for j in range(0,width-2):
        gy =   gray[i,j]*1+gray[i,j+1]*2+gray[i,j+2]*1-gray[i+2,j]*1-gray[i+2,j+1]*2-gray[i+2,j+2]*1

        gx =   gray[i,j]+gray[i+1,j]*2+gray[i+2,j]-gray[i,j+2]-gray[i+1,j+2]*2-gray[i+2,j+2]

        grad = math.sqrt(gx*gx+gy*gy)
        if grad>50:
            dst[i,j] = 255
        else:
            dst[i,j] = 0
#   cv2.imshow('dst',dst)
    # cv2.waitKey(0)

Binary image
Line segment drawing

COMPANY

  • About us
  • Team Style
  • Blog

LEARNING & EXPLORATION

  • Tutorials
  • Edge AI hardware
  • Educational robots
  • Embedded intelligent hardware

WHERE TO BUY

  • Yahboom Online Store
  • Amazon
  • Alibaba
  • AliExpress
  • Mercado

TECHNOLOGY SUPPORT

  • Email: support@yahboom.com

BE A DISTRIBUTOR

  • Email: sales@yahboom.com
QR Code

Copyright © 2017-2026 Yahboom. All Rights Reserved.

EN/中文