yahboom
HomeLearn
Solution
Blog
Online Store
About Us
EN/中文
Jetson Orin NX SUPER📖
01.Get started
  • 01. Learning route
  • 02. Get started quickly
  • 03. System Update Notes
  • 04.Disabling automatic updates and troubleshooting issues
02.Jetson basic course
  • 01.Jetson board introduction
  • 02.Write Jetson original system
  • 03.Installing Jetson environment
  • 04.Backup SSD system
  • 05.Restore initial image system
  • 06.Upgrade to SUPER version
  • 07.Write SUPER boot
  • 08.SSD expansion
  • 09.Jetpack old system upgraded to Yahboom SUPER factory system
  • 10.Write the system onto your own solid-state drive
03.Basic setting course
  • 01.Basic knowledge
  • 02.Network configuration
  • 03.SSH remote login
  • 04.VNC remote control
  • 05.Remote file transfer
  • 06.Jtop tool
  • 07.Exchange space expansion
  • 08.Use VSCode
  • 09.Use VMware
04.GPIO control course
  • 01.GPIO description
  • 02.GPIO library installation
  • 03.GPIO reading
  • 04.GPIO output
  • 05.Serial communication
  • 06.I2C communication
05.Vision basic course
  • 01.CSI camera preview
  • 02.USB camera preview
  • 03.Use Jupyter Lab
  • 04.Use JetCam
06.OpenCV basic course
  • 01.Image reading
  • 02.Image saving
  • 03.Image modification
  • 04.Image scaling
  • 05.Image cropping
  • 06.Image translation
  • 07.Image mirroring
  • 08.Image grayscale conversion
  • 09.Image binarization
  • 10.Image edge detection
  • 11.Add line segments
  • 12.Add rectangles
  • 13.Add circular shape
  • 14.Add ellipses
  • 15.Add polygons
  • 16.Add Text
  • 17.Preview USB camera image
  • 18.Preview CSI camera image
07.Vision advanced course
01.Environment construction
  • 01.TensorFlow
  • 02.PyTorch
  • 03.Torchvision
02.DeepStream development
  • 01.DeepStream environment
  • 02.Four types of detection(traffic)
03.YOLO11 development
  • 01.YOLO environment construction
  • 02.CLI use
  • 03.Object detection
  • 04.Instance segmentation
  • 05.Pose estimation
  • 06.Image classification
  • 07.Oriented object detection
  • 08.Model conversion
  • 09.Dataset annotation
  • 10.Model training conversion
  • 11.Model prediction
04.Mediapipe development
  • 01.Mediapipe environment
  • 02.Hand detection
  • 03.Face detection
  • 04.Face effects
  • 05.3D object recognition
  • 06.Virtual brush
  • 07.Gesture recognition
  • 08.Finger control
  • 09.Posture estimation
  • 10.Face mask
  • 11.Overall detection
  • 12.Green scene removal(Human)
05.QR code recognition
  • 01.QR code recognition
06.YOLO26 development
  • 01.YOLO environment constructionnew
  • 02.CLI usenew
  • 03.Object detectionnew
  • 04.Instance segmentationnew
  • 05.Pose estimationnew
  • 06.Image classificationnew
  • 07.Oriented object detectionnew
  • 08.Model conversionnew
  • 09.Dataset annotationnew
  • 10.Model training conversionnew
  • 11.Model predictionnew
08.Docker basic course
  • 01.Docker introduction
  • 02.Docker installation
  • 03.Docker command
  • 04.Docker usage
  • 05.Docker interaction
09.ROS1-Melodic
01.ROS1 basic course
  • 01. Introduction to ROS
  • 02. Project file structure
  • 03. Common commands and tools
  • 04. Publisher
  • 05. Subscribers
  • 06. Customize topic messages and use
  • 07. Client
  • 08. Server
  • 09. Customize service messages and usage
  • 10. TF release and monitoring
02.ROS1 vision course
  • 00.Must read before running
  • 01.Camera preview
  • 02.QR code
  • 03.Human posture estimation
  • 04.Target detection
  • 05.AR vision
  • 06.Opencv application
  • 07.ROS+Opencv basics
  • 08.Mediapipe development
10.ROS2-Humble
01.ROS2 basic course
  • 01.Introduction to ROS2
  • 02.ROS2 install Humble
  • 03.ROS2 development environment
  • 04.ROS2 workspace
  • 05.ROS2 function package
  • 06.ROS2 node
  • 07.ROS2 topic communication
  • 08.ROS2 service communication
  • 09.ROS2 action communication
  • 10.ROS2 custom interface message
  • 11.ROS2 parameter service case
  • 12.ROS2 meta-function package
  • 13.ROS2 distributed communication
  • 14.ROS2 DDS
  • 15.ROS2 time related API
  • 16.ROS2 common command tools
  • 17.ROS2 rviz2 use
  • 18.ROS2 rqt toolbox
  • 19.ROS2 Launch startup file configuration
  • 20.ROS2 recording and playback tool
  • 21.ROS2 URDF model
  • 22.ROS2 Gazebo simulation platform
  • 23.ROS2 TF2 coordinate transformation
02.ROS2 vision course
  • 01.Camera preview (USB)
  • 02.Camera preview (CSI)
  • 03.Camera calibration (USB)
  • 04.Camera calibration (CSI)
  • 05.AR vision (USB)
  • 06.AR vision (CSI)
11.Offline AI model coursenew
Offline large model (Text Interaction)
  • 1.AI large model environment deployment
  • 2.Install large model dialogue platform
  • 3.Meta Al Llama3.2 model
  • 4.Alibaba Cloud Qwen3 model
  • 5.Microsoft Phi-4-mini model
  • 6.DeepSeek DeepSeek-R1 model
  • 7.Alibaba Cloud Qwen2.5v visual multimodal large model
  • 8.Google Gemma3 visual multimodal large model
  • 9.Lava visual multimodal large model
  • 10.MiniCPM-V visual multimodal large model
  • 11.Multimodal visual understand application
  • 12.Multimodal text image application
  • 13.Multimodal video analysis application
  • 14.Multi module visual position application
  • 15.Multimodal table scanning application
  • 16.Multimodal autonomous agent application
Offline large model (Voice Interaction)
  • 0.Voice interaction hardware connection (ReadMe)
  • 1.Offline speech to text (ASR)
  • 2.Offline text to speech (TTS)
  • 3.AI large model voice interaction
  • 4.Multimodal visual understand speech interaction
  • 5.Multimodal text and graphics application
  • 6.Multimodal video analysis application
  • 7.Multi module visual position application
  • 8.Multimodal table scanning application
  • 9.Multimodal autonomous proxy application
  • 10.AI large model offline voice assistant
12.Online AI model coursenew
Online large model (Text Interaction)
  • 1.OpenRouter large model API aggregation platform
  • 2.Multimodal visual understand application
  • 3.Multimodal visual localization application
  • 4.Multimodal table scanning application
  • 5.Multimodal autonomous proxy application
Online large model (Voice Interaction)
  • 0.Voice interaction hardware connection (ReadMe)
  • 1.Online speech to text (ASR)
  • 2.Online text to speech (TTS)
  • 3.AI large model voice interaction
  • 4.Multimodal visual understand speech interaction
  • 5.Multi module visual position application
  • 6.Multimodal table scanning application
  • 7.Multimodal autonomous proxy application
  • 8.AI large model online voice assistant
13.NVIDIA lsaac ROS coursenew
  • 1.Build lsaac ROS environment
  • 2.Deep segmentation
  • 3.DNN stereoscopic depth
  • 4.Free space segmentation
  • 5.Image distortion processing
  • 6.Image segmentation
  • 7.3D scene reconstruction and mapping
  • 8.Object detection
  • 9.3D attitude estimation
  • 10.Visual SLAM
14.OpenClaw Deployment and Basic Usagenew
  • 01.OpenClaw Quick Start on Jetson Platform
  • 02.OpenClaw Deployment
  • 03.OpenClaw WhatsApp Plugin Application
  • 04.OpenClaw WebChat Interaction
  • 05.OpenClaw TUI Interaction
  • 06.OpenClaw Tools Introduction
  • 07.OpenClawGate Gateway User Manual
  • 08.OpenClaw Features Overview
  • 09.OpenClawHub Introduction (Skill Installation)
  • 10.OpenClaw Application - File Management
  • 11.OpenClaw Application - Camera
  • 12.OpenClaw Application - Browser Control
  • 13.OpenClaw Application - Script Execution
  • 14.OpenClaw Application - AI Programming (Peripheral & GPIO Control)
  • 15.OpenClaw Application - Dedicated AI Assistant
  • 16.OpenClaw Web Search Capability Configuration
15.OpenClaw Advanced Developmentnew
1.Preparation Before Use
  • 1. Peripheral Hardware Configuration
  • 2. OpenClaw API Key Configuration
  • 3. OpenClaw Model Switching
  • 4. OpenClaw Prompts
  • 5. AI Voice Interaction Configuration
  • 6. Three Dialogue Configuration Tests
2.OpenClaw AI Programming Peripheral Control
  • 1. Servo Control
  • 2. RGB Strip
  • 3. OLED Display
  • 4. Temperature and Humidity Sensor
  • 5. Camera Application
  • 6. AI Script Peripheral Control
3.OpenClaw Peripheral Integration Applications
  • 1. Plant Care Assistant
  • 2. AI Calorie Estimation
  • 3. AI Rock Paper Scissors Game
  • 4. AI Pet
  • 5. AI Weather Station
  • 6. Temperature and Humidity Dashboard
  • 7. Scheduled Tasks
Download
  • System_File
  • VM_File
  • 3D_Model_File
  • Data_Sheet_File
  • Software_Tools
  • Code
  • Instruction_Manual
  • ROS2_Basic_VM
Download ZIP

Welcome to Jetson Orin NX SUPER repository

当製品の日本語版マニュアル資料は、こちらからご取得ください。

17.ROS2 rviz2 use

17. Using ROS2 Rviz2

1. Introduction to Rviz2

During robot development, various functions require analysis at the data level, making it difficult to quickly understand their impact. For example, for robot models, we need to understand the design's appearance and the positions of the model's numerous internal coordinate systems during motion.

For robotic arm motion planning and mobile robot autonomous navigation, we need to visualize the robot's surrounding environment, the planned path, and, of course, sensor information, such as cameras, 3D cameras, and lidar. Data is used for calculations, while visualization is for human viewing.

Therefore, data visualization can greatly improve development efficiency. Rviz2 is such a data visualization software for robot development. It can handle everything from robot models, sensor information, and environmental information.

2. Preparation

  • If you have a physical robot, you can launch Rviz on the robot controller to practice this lesson. If you don't have a physical robot, you can use Gazebo to simulate a TurtleBot3 robot to simulate the lidar, camera, and other components, facilitating subsequent data visualization.

Note: The following installation steps are optional. If you have a physical robot and have set up multi-machine communication, you can directly use the actual robot's radar information. You can choose to use the actual radar or a simulated robot. The following information is for users without a physical robot.

  • This lesson uses a simulated robot as an example to teach you the visualization capabilities of Rviz2. The operation process is the same for both real and simulated robots.
  • Install the TutleBot3 simulator package
xxxxxxxxxx
sudo apt install ros-${ROS_DISTRO}-turtlebot3*
  • Install the ROS and Gazebo bridge tool
xxxxxxxxxx
sudo apt install ros-${ROS_DISTRO}-ros-gz
  • Set the TurtleBot3 robot type environment variable
xxxxxxxxxx
export TURTLEBOT3_MODEL=waffle
  • Start the Gazebo simulation environment
xxxxxxxxxx
ros2 launch turtlebot3_gazebo turtlebot3_world.launch.py
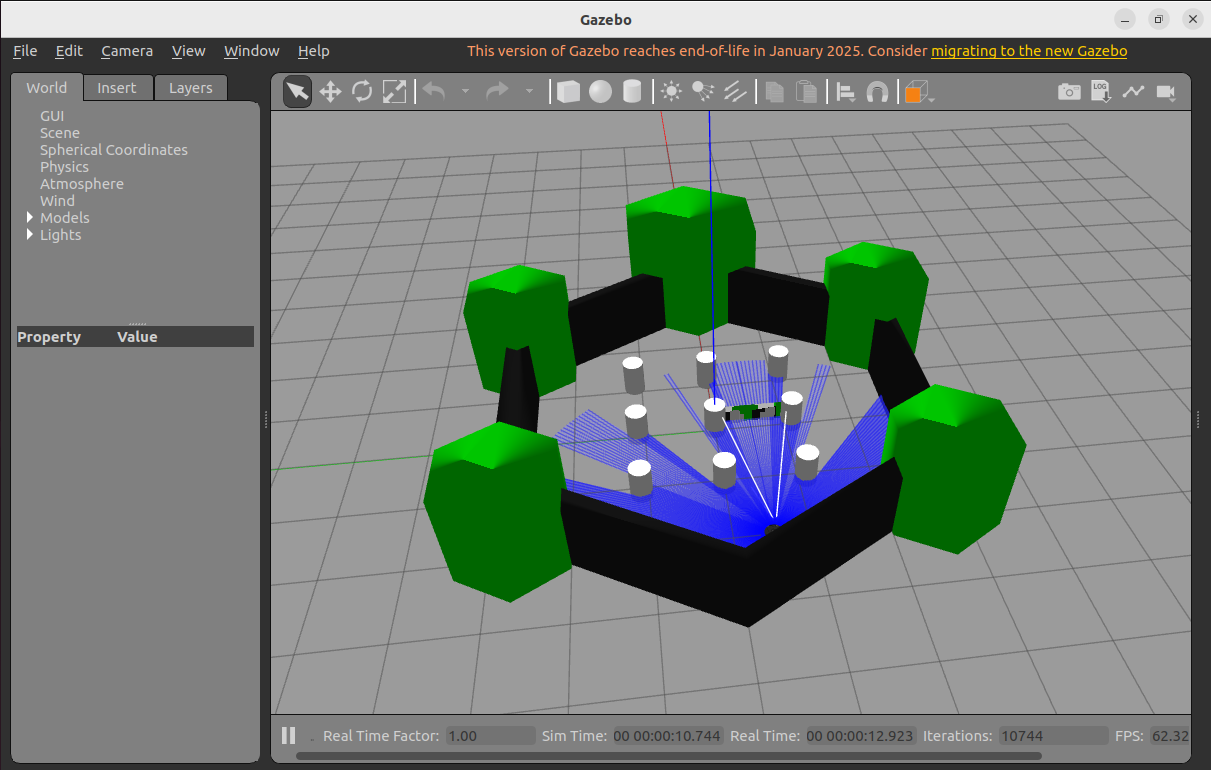
image-20250905164250419

3. Starting Rviz2

Open a terminal and run the following command to start it:

xxxxxxxxxx
rviz2

If starting in Docker, make sure the GUI is enabled.
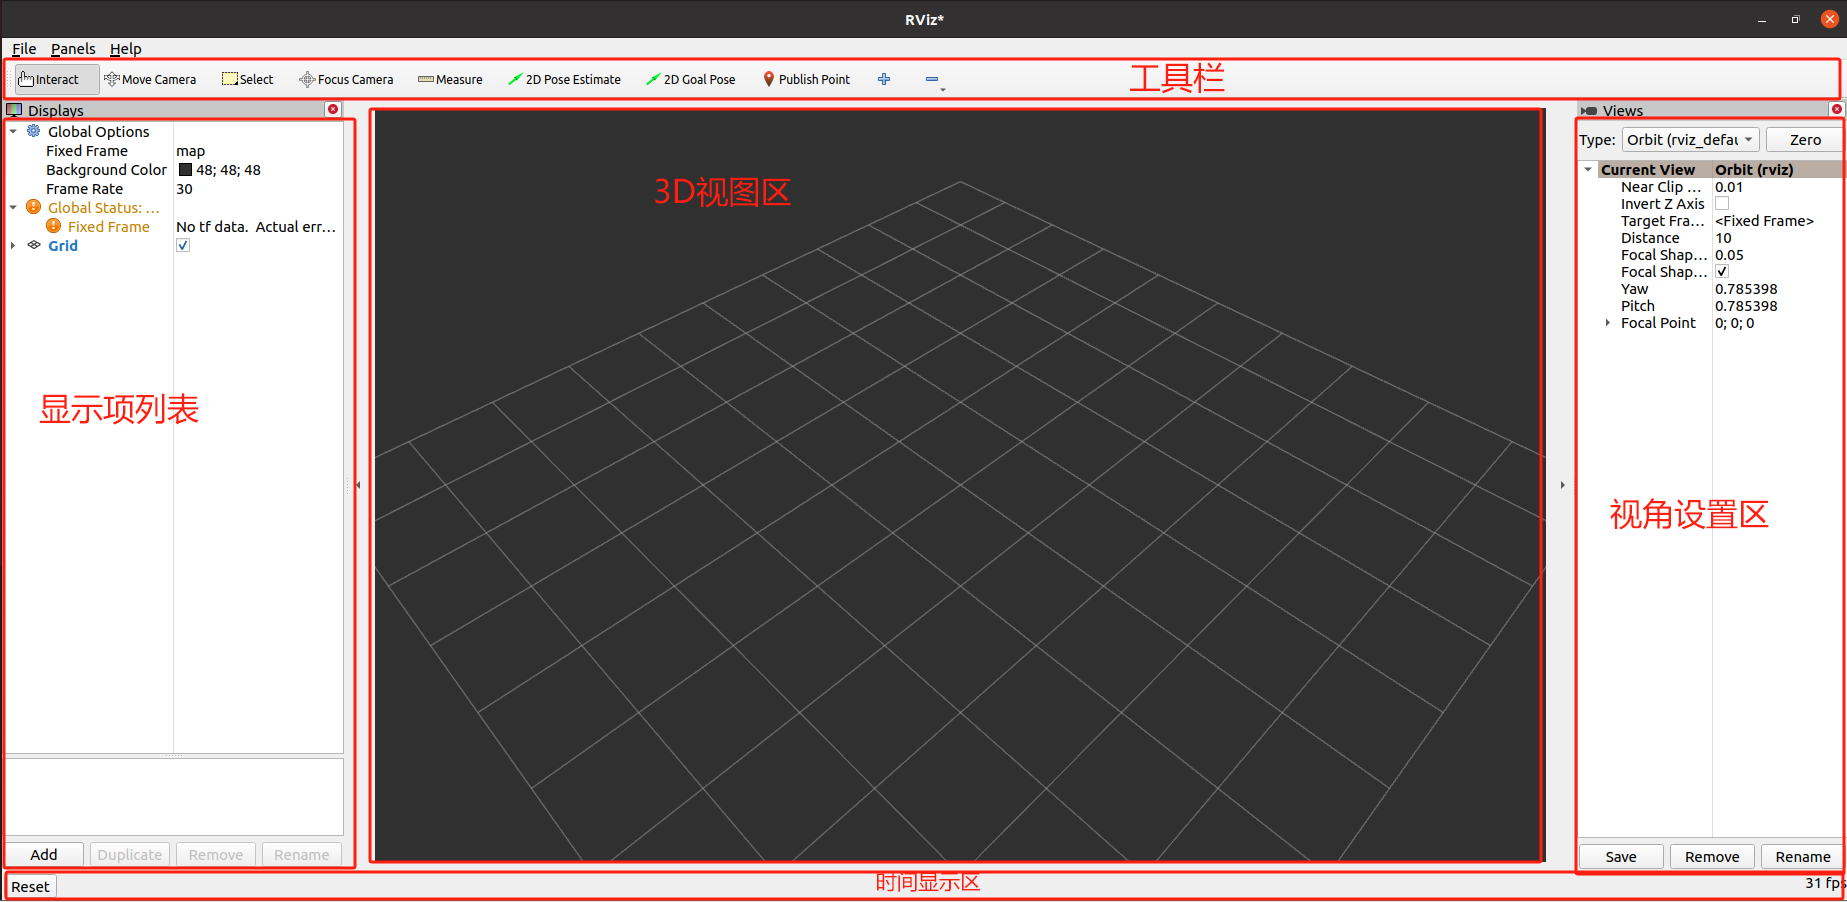
image-20231031104047357

4. Image Data Visualization

Click "Add" in the Displays window on the left, find the Image display item, and confirm it to add it to the display list. Then, configure the image topic to which the display item is subscribed. You can then view the robot's camera image.
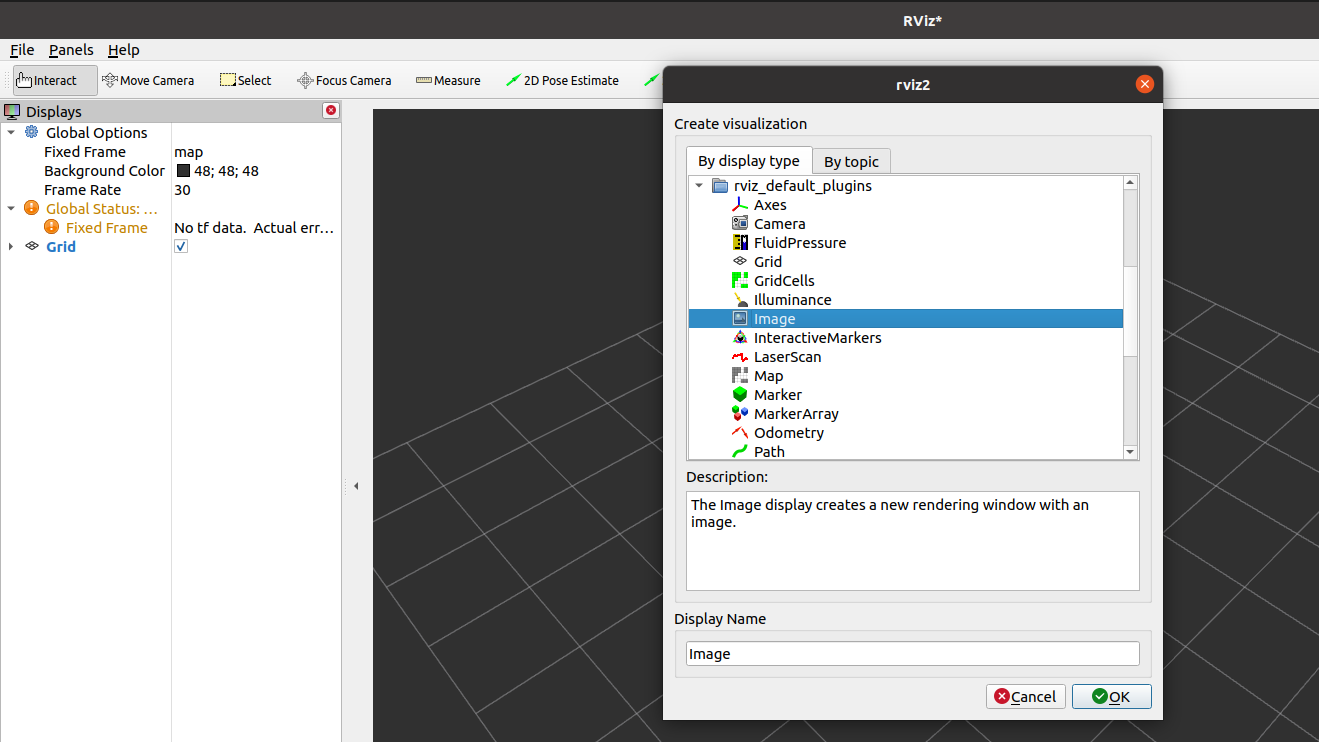
image-20231031104244974

  • Select Fixed Frame as the base_footprint coordinate system, and place the coordinate transformation error.
  • Select the camera color image topic /camera/image_raw.
  • Now you can see the current simulated robot's view in the Camera window.
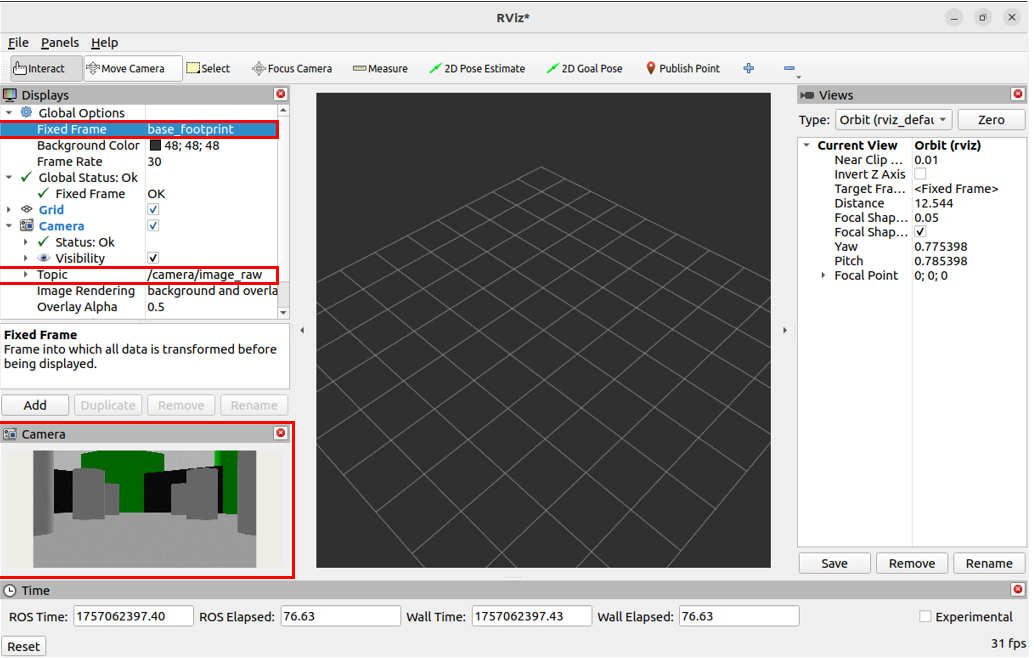
image-20250905165626951

5. Radar Data Visualization

Click "Add" in the Displays window on the left, select Laserscan, and then configure the subscription topic name. You should now see the laser dot.
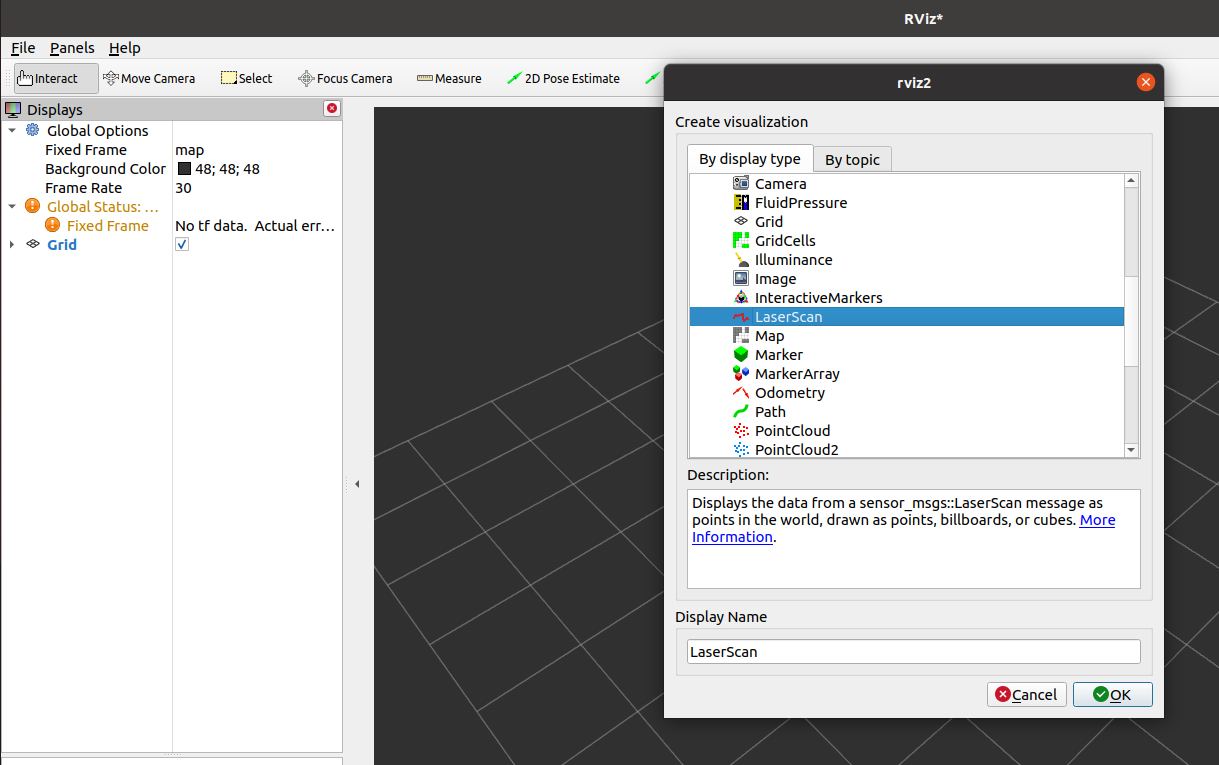
image-20231031104528033

  • Select /sacn in the LaserScan topic.
  • Now you can see the LiDAR point cloud outline.
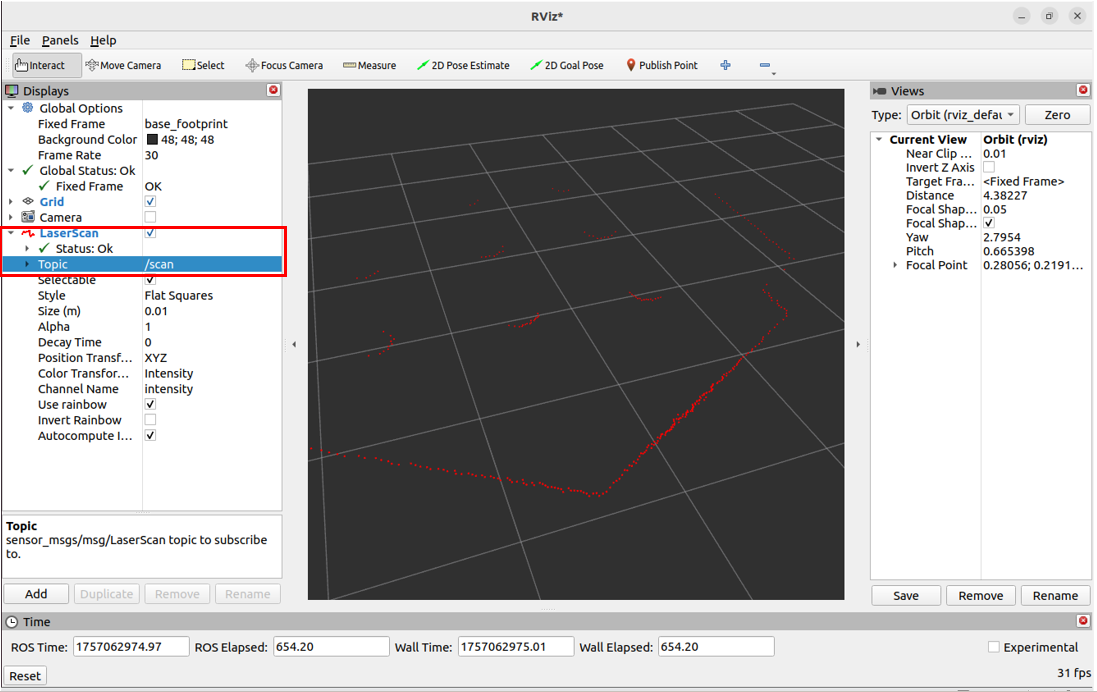
image-20250905170346004

6. Robot Model Visualization

Click "Add" in the Displays window on the left and select RobotModel.
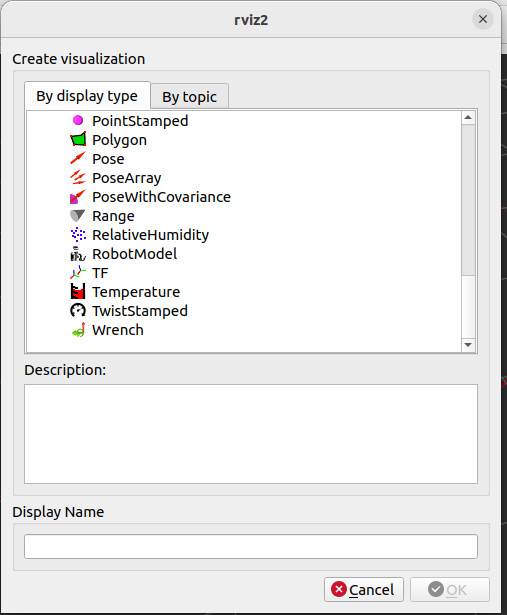
image-20250905170711426

  • In the robot's DescriptionTopic, select /robot_deseription.
  • Now you can see the robot model visualized in Rviz2.
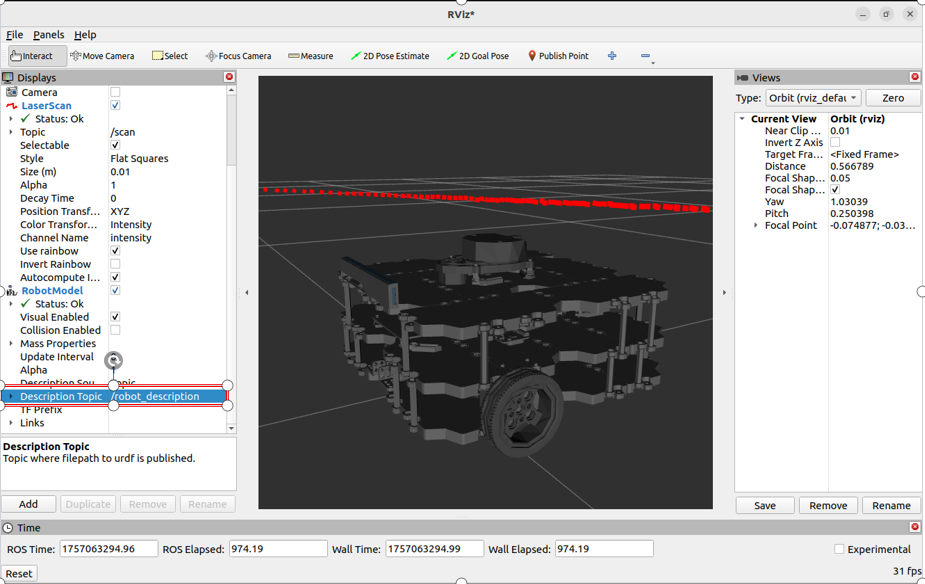
image-20250905170923074

7. Other Data Visualizations

The rivz_default_plugins section lists many commonly used data visualization plugins. Feel free to try them out.
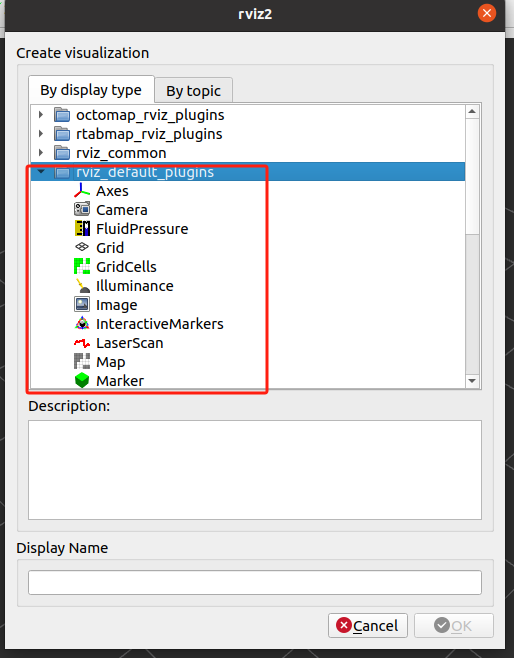
image-20231031104758824

ROS2 common command tools
ROS2 rqt toolbox

COMPANY

  • About us
  • Team Style
  • Blog

LEARNING & EXPLORATION

  • Tutorials
  • Edge AI hardware
  • Educational robots
  • Embedded intelligent hardware

WHERE TO BUY

  • Yahboom Online Store
  • Amazon
  • Alibaba
  • AliExpress
  • Mercado

TECHNOLOGY SUPPORT

  • Email: support@yahboom.com

BE A DISTRIBUTOR

  • Email: sales@yahboom.com
QR Code

Copyright © 2017-2026 Yahboom. All Rights Reserved.

EN/中文