yahboom
HomeLearn
Solution
Blog
Online Store
About Us
EN/中文
Jetson Orin NX SUPER📖
01.Get started
  • 01. Learning route
  • 02. Get started quickly
  • 03. System Update Notes
  • 04.Disabling automatic updates and troubleshooting issues
02.Jetson basic course
  • 01.Jetson board introduction
  • 02.Write Jetson original system
  • 03.Installing Jetson environment
  • 04.Backup SSD system
  • 05.Restore initial image system
  • 06.Upgrade to SUPER version
  • 07.Write SUPER boot
  • 08.SSD expansion
  • 09.Jetpack old system upgraded to Yahboom SUPER factory system
  • 10.Write the system onto your own solid-state drive
03.Basic setting course
  • 01.Basic knowledge
  • 02.Network configuration
  • 03.SSH remote login
  • 04.VNC remote control
  • 05.Remote file transfer
  • 06.Jtop tool
  • 07.Exchange space expansion
  • 08.Use VSCode
  • 09.Use VMware
04.GPIO control course
  • 01.GPIO description
  • 02.GPIO library installation
  • 03.GPIO reading
  • 04.GPIO output
  • 05.Serial communication
  • 06.I2C communication
05.Vision basic course
  • 01.CSI camera preview
  • 02.USB camera preview
  • 03.Use Jupyter Lab
  • 04.Use JetCam
06.OpenCV basic course
  • 01.Image reading
  • 02.Image saving
  • 03.Image modification
  • 04.Image scaling
  • 05.Image cropping
  • 06.Image translation
  • 07.Image mirroring
  • 08.Image grayscale conversion
  • 09.Image binarization
  • 10.Image edge detection
  • 11.Add line segments
  • 12.Add rectangles
  • 13.Add circular shape
  • 14.Add ellipses
  • 15.Add polygons
  • 16.Add Text
  • 17.Preview USB camera image
  • 18.Preview CSI camera image
07.Vision advanced course
01.Environment construction
  • 01.TensorFlow
  • 02.PyTorch
  • 03.Torchvision
02.DeepStream development
  • 01.DeepStream environment
  • 02.Four types of detection(traffic)
03.YOLO11 development
  • 01.YOLO environment construction
  • 02.CLI use
  • 03.Object detection
  • 04.Instance segmentation
  • 05.Pose estimation
  • 06.Image classification
  • 07.Oriented object detection
  • 08.Model conversion
  • 09.Dataset annotation
  • 10.Model training conversion
  • 11.Model prediction
04.Mediapipe development
  • 01.Mediapipe environment
  • 02.Hand detection
  • 03.Face detection
  • 04.Face effects
  • 05.3D object recognition
  • 06.Virtual brush
  • 07.Gesture recognition
  • 08.Finger control
  • 09.Posture estimation
  • 10.Face mask
  • 11.Overall detection
  • 12.Green scene removal(Human)
05.QR code recognition
  • 01.QR code recognition
06.YOLO26 development
  • 01.YOLO environment constructionnew
  • 02.CLI usenew
  • 03.Object detectionnew
  • 04.Instance segmentationnew
  • 05.Pose estimationnew
  • 06.Image classificationnew
  • 07.Oriented object detectionnew
  • 08.Model conversionnew
  • 09.Dataset annotationnew
  • 10.Model training conversionnew
  • 11.Model predictionnew
08.Docker basic course
  • 01.Docker introduction
  • 02.Docker installation
  • 03.Docker command
  • 04.Docker usage
  • 05.Docker interaction
09.ROS1-Melodic
01.ROS1 basic course
  • 01. Introduction to ROS
  • 02. Project file structure
  • 03. Common commands and tools
  • 04. Publisher
  • 05. Subscribers
  • 06. Customize topic messages and use
  • 07. Client
  • 08. Server
  • 09. Customize service messages and usage
  • 10. TF release and monitoring
02.ROS1 vision course
  • 00.Must read before running
  • 01.Camera preview
  • 02.QR code
  • 03.Human posture estimation
  • 04.Target detection
  • 05.AR vision
  • 06.Opencv application
  • 07.ROS+Opencv basics
  • 08.Mediapipe development
10.ROS2-Humble
01.ROS2 basic course
  • 01.Introduction to ROS2
  • 02.ROS2 install Humble
  • 03.ROS2 development environment
  • 04.ROS2 workspace
  • 05.ROS2 function package
  • 06.ROS2 node
  • 07.ROS2 topic communication
  • 08.ROS2 service communication
  • 09.ROS2 action communication
  • 10.ROS2 custom interface message
  • 11.ROS2 parameter service case
  • 12.ROS2 meta-function package
  • 13.ROS2 distributed communication
  • 14.ROS2 DDS
  • 15.ROS2 time related API
  • 16.ROS2 common command tools
  • 17.ROS2 rviz2 use
  • 18.ROS2 rqt toolbox
  • 19.ROS2 Launch startup file configuration
  • 20.ROS2 recording and playback tool
  • 21.ROS2 URDF model
  • 22.ROS2 Gazebo simulation platform
  • 23.ROS2 TF2 coordinate transformation
02.ROS2 vision course
  • 01.Camera preview (USB)
  • 02.Camera preview (CSI)
  • 03.Camera calibration (USB)
  • 04.Camera calibration (CSI)
  • 05.AR vision (USB)
  • 06.AR vision (CSI)
11.Offline AI model coursenew
Offline large model (Text Interaction)
  • 1.AI large model environment deployment
  • 2.Install large model dialogue platform
  • 3.Meta Al Llama3.2 model
  • 4.Alibaba Cloud Qwen3 model
  • 5.Microsoft Phi-4-mini model
  • 6.DeepSeek DeepSeek-R1 model
  • 7.Alibaba Cloud Qwen2.5v visual multimodal large model
  • 8.Google Gemma3 visual multimodal large model
  • 9.Lava visual multimodal large model
  • 10.MiniCPM-V visual multimodal large model
  • 11.Multimodal visual understand application
  • 12.Multimodal text image application
  • 13.Multimodal video analysis application
  • 14.Multi module visual position application
  • 15.Multimodal table scanning application
  • 16.Multimodal autonomous agent application
Offline large model (Voice Interaction)
  • 0.Voice interaction hardware connection (ReadMe)
  • 1.Offline speech to text (ASR)
  • 2.Offline text to speech (TTS)
  • 3.AI large model voice interaction
  • 4.Multimodal visual understand speech interaction
  • 5.Multimodal text and graphics application
  • 6.Multimodal video analysis application
  • 7.Multi module visual position application
  • 8.Multimodal table scanning application
  • 9.Multimodal autonomous proxy application
  • 10.AI large model offline voice assistant
12.Online AI model coursenew
Online large model (Text Interaction)
  • 1.OpenRouter large model API aggregation platform
  • 2.Multimodal visual understand application
  • 3.Multimodal visual localization application
  • 4.Multimodal table scanning application
  • 5.Multimodal autonomous proxy application
Online large model (Voice Interaction)
  • 0.Voice interaction hardware connection (ReadMe)
  • 1.Online speech to text (ASR)
  • 2.Online text to speech (TTS)
  • 3.AI large model voice interaction
  • 4.Multimodal visual understand speech interaction
  • 5.Multi module visual position application
  • 6.Multimodal table scanning application
  • 7.Multimodal autonomous proxy application
  • 8.AI large model online voice assistant
13.NVIDIA lsaac ROS coursenew
  • 1.Build lsaac ROS environment
  • 2.Deep segmentation
  • 3.DNN stereoscopic depth
  • 4.Free space segmentation
  • 5.Image distortion processing
  • 6.Image segmentation
  • 7.3D scene reconstruction and mapping
  • 8.Object detection
  • 9.3D attitude estimation
  • 10.Visual SLAM
14.OpenClaw Deployment and Basic Usagenew
  • 01.OpenClaw Quick Start on Jetson Platform
  • 02.OpenClaw Deployment
  • 03.OpenClaw WhatsApp Plugin Application
  • 04.OpenClaw WebChat Interaction
  • 05.OpenClaw TUI Interaction
  • 06.OpenClaw Tools Introduction
  • 07.OpenClawGate Gateway User Manual
  • 08.OpenClaw Features Overview
  • 09.OpenClawHub Introduction (Skill Installation)
  • 10.OpenClaw Application - File Management
  • 11.OpenClaw Application - Camera
  • 12.OpenClaw Application - Browser Control
  • 13.OpenClaw Application - Script Execution
  • 14.OpenClaw Application - AI Programming (Peripheral & GPIO Control)
  • 15.OpenClaw Application - Dedicated AI Assistant
  • 16.OpenClaw Web Search Capability Configuration
15.OpenClaw Advanced Developmentnew
1.Preparation Before Use
  • 1. Peripheral Hardware Configuration
  • 2. OpenClaw API Key Configuration
  • 3. OpenClaw Model Switching
  • 4. OpenClaw Prompts
  • 5. AI Voice Interaction Configuration
  • 6. Three Dialogue Configuration Tests
2.OpenClaw AI Programming Peripheral Control
  • 1. Servo Control
  • 2. RGB Strip
  • 3. OLED Display
  • 4. Temperature and Humidity Sensor
  • 5. Camera Application
  • 6. AI Script Peripheral Control
3.OpenClaw Peripheral Integration Applications
  • 1. Plant Care Assistant
  • 2. AI Calorie Estimation
  • 3. AI Rock Paper Scissors Game
  • 4. AI Pet
  • 5. AI Weather Station
  • 6. Temperature and Humidity Dashboard
  • 7. Scheduled Tasks
Download
  • System_File
  • VM_File
  • 3D_Model_File
  • Data_Sheet_File
  • Software_Tools
  • Code
  • Instruction_Manual
  • ROS2_Basic_VM
Download ZIP

Welcome to Jetson Orin NX SUPER repository

当製品の日本語版マニュアル資料は、こちらからご取得ください。

6. Three Dialogue Configuration Tests

OpenClaw Three Chat Modes Configuration Testing

OpenClaw Three Chat Modes Configuration Testing1. Course Overview2. Introduction to Three Chat Modes2.1 whatsapp Mode2.2 TUI Mode2.3 Voice Interaction Mode3. whatsapp Chat Configuration and Testing3.1 Install whatsapp Plugin3.2 Testing Method3.3 Common Issues4. TUI Chat Configuration and Testing4.1 Startup Method4.2 Testing Method5. AI Voice Interaction Configuration and Testing5.1 Pre-startup Preparation5.2 Startup Method5.3 Testing Method5.4 Judgment Criteria5.5 Common Issues6. Comparison of Three Modes7. Recommended Testing Order

1. Course Overview

This course will introduce three commonly used chat modes in OpenClaw, and provides configuration and testing methods for each:

  • WhatsApp chat
  • Local TUI chat
  • AI voice interaction chat

After completing this course, you will be able to choose the most suitable chat mode for your scenario and complete basic verification.

Note: WhatsApp bot and AI voice interaction use the default model. If you need to change the default large model, see [03. OpenClaw Switching Models]

2. Introduction to Three Chat Modes

2.1 whatsapp Mode

Suitable scenarios:

  • Remote control via phone
  • Let multiple people experience OpenClaw together

Features:

  • No need to stay next to the device at all times
  • Suitable for demonstrating "remote natural language control"

2.2 TUI Mode

Suitable scenarios:

  • Local debugging
  • Quick testing
  • Troubleshooting model and skill invocation issues

Features:

  • Most direct method
  • Easiest way to view commands and results

2.3 Voice Interaction Mode

Suitable scenarios:

  • Complete AI interaction experience
  • Voice wake and voice control
  • Desktop assistant experience

Features:

  • Most immersive interaction experience

3. whatsapp Chat Configuration and Testing

If the AI voice module + speaker is an optional add-on, Feishu chat, TUI, and WhatsApp chat need to play back OpenClaw's replies. You can run the following program in the terminal. AI voice module chat does not need to run it again.

  • Modify the broadcast parameter
/home/jetson/voice_to_openclaw/.env
​x
# Option A: Domestic Version (Bailian)
ENABLE_TTS=true
TTS_ENGINE=cosyvoice_http
TTS_API_URL=https://dashscope.aliyuncs.com/api/v1/services/audio/tts/SpeechSynthesizer
TTS_MODEL=cosyvoice-v3-flash
TTS_VOICE=longanhuan
TTS_FORMAT=wav
TTS_SAMPLE_RATE=24000
TTS_VOLUME=50
TTS_SPEECH_RATE=1.0
TTS_PITCH_RATE=1.0
TTS_TIMEOUT=60
WAKE_ACK_TEXT=I'm here.
TTS_MAX_CHARS=200
TTS_TRUNCATE_MODE=smart
​
# Option B: Overseas Version (iFlytek International)
ENABLE_TTS=true
TTS_ENGINE=xunfei_ws
TTS_API_URL=wss://tts-api.xfyun.cn/v2/tts
TTS_VOICE=x4_xiaoyan
TTS_SAMPLE_RATE=16000
TTS_VOLUME=50
TTS_TIMEOUT=60
XUNFEI_TTS_SPEED=50
XUNFEI_TTS_PITCH=50
XUNFEI_TTS_TEXT_ENCODING=UTF8
XUNFEI_TTS_SIGN_HOST=ws-api.xfyun.cn
WAKE_ACK_TEXT=I am here.
TTS_MAX_CHARS=200
TTS_TRUNCATE_MODE=smart
TTS_LOCK_PATH=/tmp/voice_to_openclaw_tts.lock
# Terminal log language: zh / en
UI_LANGUAGE=zh
xxxxxxxxxx
ENABLE_TTS=true  # This parameter controls whether to broadcast. After modification, save and run the following program in the terminal
  • Enter the following in the terminal
xxxxxxxxxx
cd ~/voice_to_openclaw
source .venv/bin/activate
python -m src.openclaw_session_tts

image-20260529190411588

3.1 Install whatsapp Plugin

Enter in terminal:

xxxxxxxxxx
openclaw channels login --channel whatsapp

After execution, a QR code usually appears.
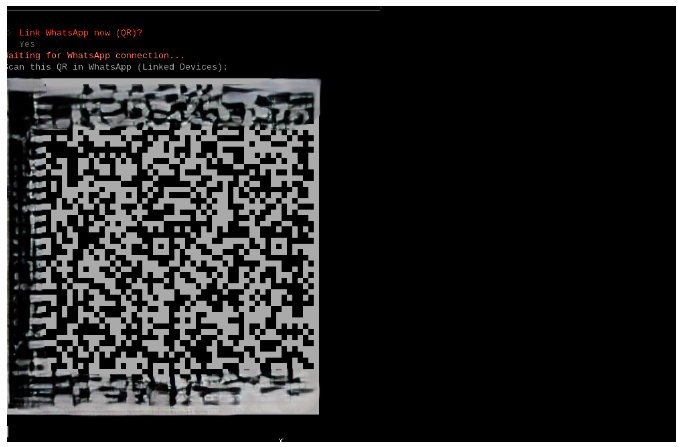
image-20260428121135578

  • Scan the QR code on the mobile phone to connect. "Linked after restart" appears, proving the connection is successful

image-20260509154627581

  • Open the newly created conversation to see the conversation ID
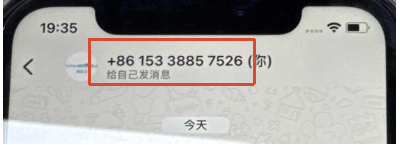
image-20260509155008132

  • Fill this into "allowFrom" in the openclaw.json file:
xxxxxxxxxx
nano /home/jetson/.openclaw/openclaw.json
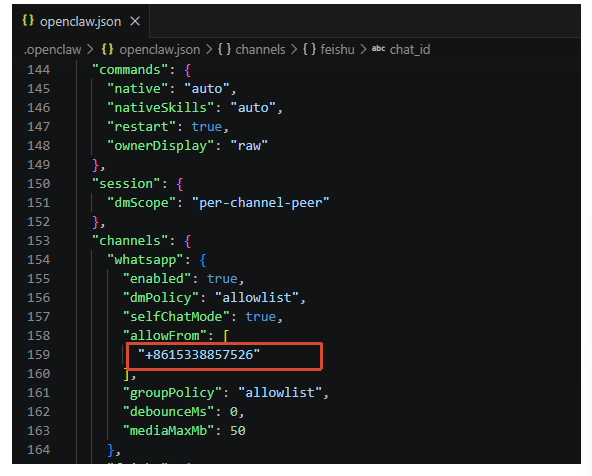
image-20260509155030351


  • Restart OpenClaw gateway
xxxxxxxxxx
openclaw gateway restart

3.2 Testing Method

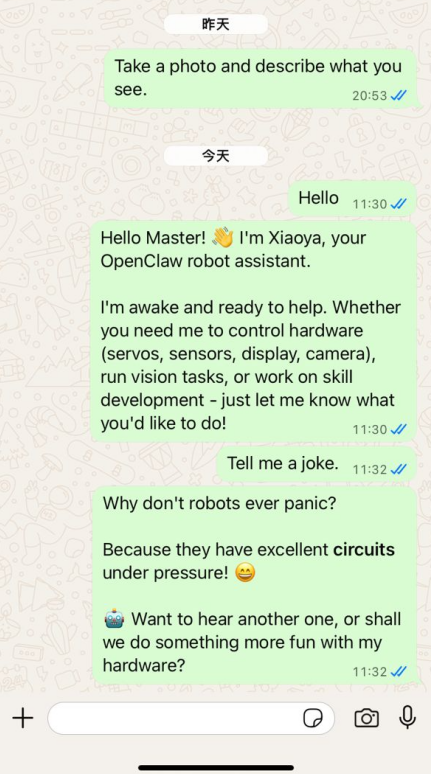
After creation is complete, you can directly send test messages in WhatsApp, for example:

  • Tell me a joke

image-20260428121335021


3.3 Common Issues

  • Cannot create bot after scanning QR code: Check network first

  • Creation succeeds but no reply: Check if the OpenClaw gateway has restarted


4. TUI Chat Configuration and Testing

4.1 Startup Method

Enter in terminal:

xxxxxxxxxx
openclaw tui

If startup is successful, you will enter the local terminal chat interface.
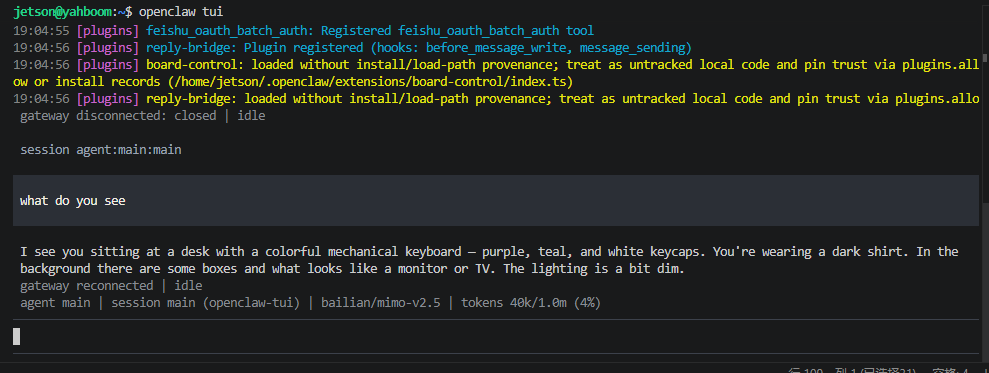
image-20260529190525361

4.2 Testing Method

It is recommended to first try the simplest chat messages:

  • Tell me a joke
  • Introduce yourself

If basic chat is normal, then test a hardware-related command, for example:

  • Change the RGB light to red
  • Display hello on the OLED
  • Read the current temperature and humidity
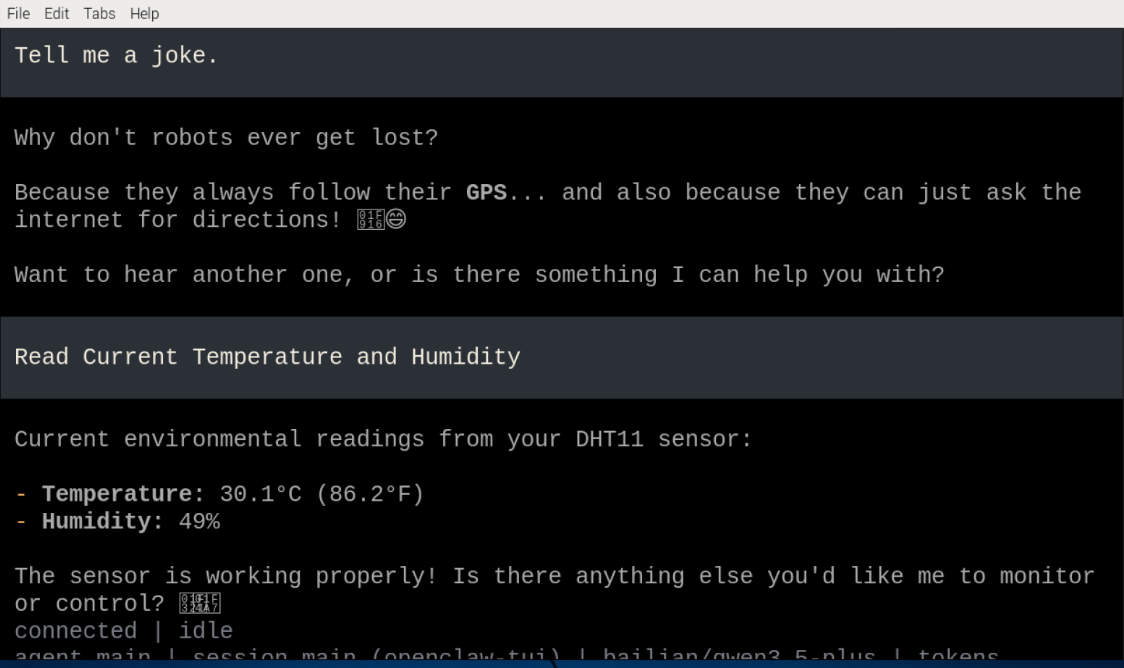
image-20260428121606743

5. AI Voice Interaction Configuration and Testing

5.1 Pre-startup Preparation

  • Requires optional AI voice interaction module + speaker

5.2 Startup Method

xxxxxxxxxx
cd /home/jetson/voice_to_openclaw
source .venv/bin/activate
python -m src.main

5.3 Testing Method

If using serial wake mode, first trigger wake with "Hi, yahboom".

Then you can try saying:

  • Tell me a joke
  • Turn on the RGB light
  • Display Welcome to OpenClaw on the OLED
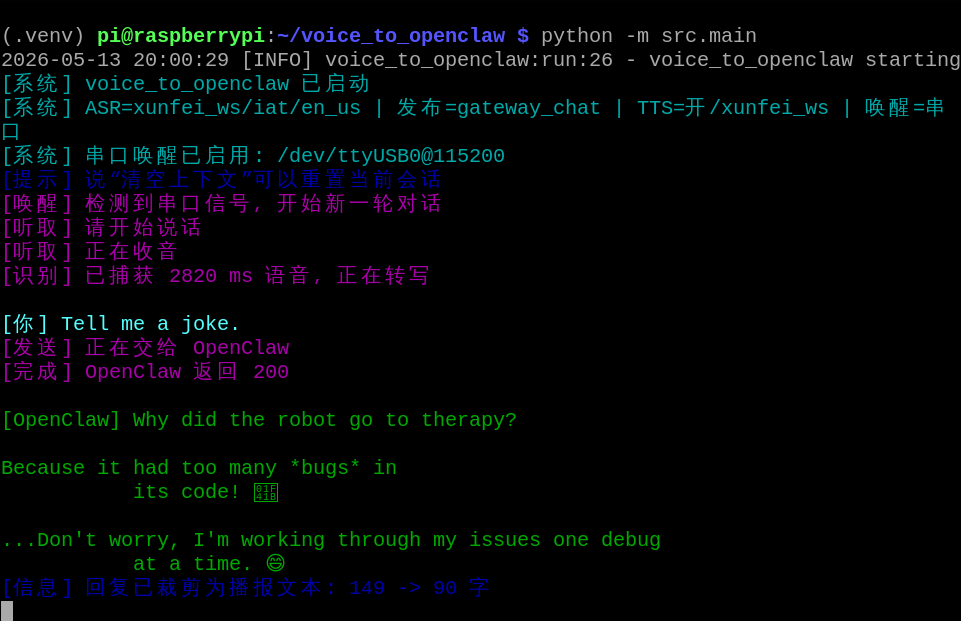
image-20260529190557153

5.4 Judgment Criteria

If the voice method can complete recognition and receive an OpenClaw reply, the following are most likely working correctly:

  • Microphone capture is normal
  • ASR is normal
  • OpenClaw publishing pipeline is normal
  • [Optional] TTS is normal

5.5 Common Issues

  • No response after wake: Check serial wake configuration first
  • Can wake but cannot recognize: Check ASR and API-KEY
  • Can recognize but does not execute: Check OpenClaw gateway configuration
  • Recognition works but no voice broadcast: Check TTS switch and speaker

6. Comparison of Three Modes

ModeSuitable ScenariosAdvantagesRecommended Positioning
WhatsAppRemote control, classroom demoConvenient for mobile and multi-person experienceDemonstrate "remote natural language control"
TUILocal debugging, command verificationMost direct, easiest to troubleshootPreferred basic debugging mode
Voice InteractionVoice wake, complete experienceMost immersive interaction experienceFinal demonstration mode

7. Recommended Testing Order

It is recommended to complete the three chat mode tests in the following order:

  1. First test openclaw tui
  2. Then test the WhatsApp bot
  3. Finally test AI voice interaction
AI Voice Interaction Configuration
Servo Control

COMPANY

  • About us
  • Team Style
  • Blog

LEARNING & EXPLORATION

  • Tutorials
  • Edge AI hardware
  • Educational robots
  • Embedded intelligent hardware

WHERE TO BUY

  • Yahboom Online Store
  • Amazon
  • Alibaba
  • AliExpress
  • Mercado

TECHNOLOGY SUPPORT

  • Email: support@yahboom.com

BE A DISTRIBUTOR

  • Email: sales@yahboom.com
QR Code

Copyright © 2017-2026 Yahboom. All Rights Reserved.

EN/中文