yahboom
HomeLearn
Solution
Blog
Online Store
About Us
EN/中文
Jetson ORIN NANO SUPER📖
01.Get started
  • 01. Learning route
  • 02. Get started quickly
  • 03. System Update Notesnew
  • 04. Disable automatic updates and troubleshooting issues
  • 05. Notes on Jetson Orin Nano Official Kitnew
02.Jetson basic course
  • 01.Jetson board introduction
  • 02.Write Jetson original system
  • 03.Installing Jetson environment
  • 04.Backup SSD system
  • 05.Restore initial image system
  • 06.Write SUPER original system(optional)
  • 07.Write SUPER boot (optional)
  • 08. SSD expansion
  • 09.Jetpack old system upgraded to Yahboom SUPER factory system
  • 10.Write the system onto your own solid-state drive
03.Basic setting course
  • 01.Basic knowledge
  • 02.Network configuration
  • 03.SSH remote login
  • 04.VNC remote control
  • 05.Remote file transfer
  • 06.Jtop tool
  • 07.Exchange space expansion
  • 08.Use VSCode
  • 09.Use VMware
04.GPIO control course
  • 01.GPIO description
  • 02.GPIO library installation
  • 03.GPIO reading
  • 04.GPIO output
  • 05.Serial communication
  • 06.I2C communication
05.Vision basic course
  • 01.CSI camera preview
  • 02.USB camera preview
  • 03.Use Jupyter Lab
  • 04.Use JetCam
06.OpenCV basic course
  • 01.Image reading
  • 02.Image saving
  • 03.Image modification
  • 04.Image scaling
  • 05.Image cropping
  • 06.Image translation
  • 07.Image mirroring
  • 08.Image grayscale conversion
  • 09.Image binarization
  • 10.Image edge detection
  • 11.Add line segments
  • 12.Add rectangles
  • 13.Add circular shape
  • 14.Add ellipses
  • 15.Add polygons
  • 16.Add Text
  • 17.Preview USB camera image
  • 18.Preview CSI camera image
07.Vision advanced course
01.Environment construction
  • 01.TensorFlow
  • 02.PyTorch
  • 03.Torchvision
02.DeepStream development
  • 01.DeepStream environment
  • 02.Four types of detection(traffic)
03.YOLO11 development
  • 01.YOLO environment construction
  • 02.CLI use
  • 03.Object detection
  • 04.Instance segmentation
  • 05.Pose estimation
  • 06.Image classification
  • 07.Oriented object detection
  • 08.Model conversion
  • 09.Dataset annotation
  • 10.Model training conversion
  • 11.Model prediction
04.Mediapipe development
  • 01.Mediapipe environment
  • 02.Hand detection
  • 03.Face detection
  • 04.Face effects
  • 05.3D object recognition
  • 06.Virtual brush
  • 07.Gesture recognition
  • 08.Finger control
  • 09.Posture estimation
  • 10.Face mask
  • 11.Overall detection
  • 12.Green scene removal(Human)
05.QR code recognition
  • QR code recognition
06.YOLO26 development
  • 01.YOLO environment constructionnew
  • 02.CLI usenew
  • 03.Object detectionnew
  • 04.Instance segmentationnew
  • 05.Pose estimationnew
  • 06.Image classificationnew
  • 07.Oriented object detectionnew
  • 08.Model conversionnew
  • 09.Dataset annotationnew
  • 10.Model training conversionnew
  • 11.Model predictionnew
08.Docker basic course
  • 01.Docker introduction
  • 02.Docker installation
  • 03.Docker command
  • 04.Docker usage
  • 05.Docker interaction
09.ROS1-Melodic
01.ROS1 basic course
  • 01. Introduction to ROS
  • 02. Project file structure
  • 03. Common commands and tools
  • 04. Publisher
  • 05. Subscribers
  • 06. Customize topic messages and use
  • 07. Client
  • 08. Server
  • 09. Customize service messages and usage
  • 10. TF release and monitoring
02.ROS1 vision course
  • 00.Must read before running
  • 01.Camera preview
  • 02.QR code
  • 03.Human posture estimation
  • 04.Target detection
  • 05.AR vision
  • 06.Opencv application
  • 07.ROS+Opencv basics
  • 08.Mediapipe development
10.ROS2-Humble
01.ROS2 basic course
  • 01.Introduction to ROS2
  • 02.ROS2 install Humble
  • 03.ROS2 development environment
  • 04.ROS2 workspace
  • 05.ROS2 function package
  • 06.ROS2 node
  • 07.ROS2 topic communication
  • 08.ROS2 service communication
  • 09.ROS2 action communication
  • 10.ROS2 custom interface message
  • 11.ROS2 parameter service case
  • 12.ROS2 meta-function package
  • 13.ROS2 distributed communication
  • 14.ROS2 DDS
  • 15.ROS2 time related API
  • 16.ROS2 common command tools
  • 17.ROS2 rviz2 use
  • 18.ROS2 rqt toolbox
  • 19.ROS2 Launch startup file configuration
  • 20.ROS2 recording and playback tool
  • 21.ROS2 URDF model
  • 22.ROS2 Gazebo simulation platform
  • 23.ROS2 TF2 coordinate transformation
02.ROS2 vision course
  • 01.Camera preview (USB)
  • 02.Camera preview (CSI)
  • 03.Camera calibration (USB)
  • 04.Camera calibration (CSI)
  • 05.AR vision (USB)
  • 06.AR vision (CSI)
11.Offline AI model coursenew
Offline large model (Text Interaction)
  • 1.AI large model environment deployment
  • 2.Install large model dialogue platform
  • 3.Meta Al Llama3.2 model
  • 4.Alibaba Cloud Qwen3 model
  • 5.Microsoft Phi-4-mini model
  • 6.DeepSeek DeepSeek-R1 model
  • 7.Alibaba Cloud Qwen2.5v visual multimodal large model
  • 8.Google Gemma3 visual multimodal large model
  • 9.Lava visual multimodal large model
  • 10.MiniCPM-V visual multimodal large model
  • 11.Multimodal visual understand application
  • 12.Multimodal text image application
  • 13.Multimodal video analysis application
  • 14.Multi module visual position application
  • 15.Multimodal table scanning application
  • 16.Multimodal autonomous agent application
Offline large model (Voice Interaction)
  • 0.Voice interaction hardware connection (ReadMe)
  • 1.Offline speech to text (ASR)
  • 2.Offline text to speech (TTS)
  • 3.AI large model voice interaction
  • 4.Multimodal visual understand speech interaction
  • 5.Multimodal text and graphics application
  • 6.Multimodal video analysis application
  • 7.Multi module visual position application
  • 8.Multimodal table scanning application
  • 9.Multimodal autonomous proxy application
  • 10.AI large model offline voice assistant
12.Online AI model coursenew
Online large model (Text Interaction)
  • 1.OpenRouter large model API aggregation platform
  • 2.Multimodal visual understand application
  • 3.Multimodal visual localization application
  • 4.Multimodal table scanning application
  • 5.Multimodal autonomous proxy application
Online large model (Voice Interaction)
  • 0.Voice interaction hardware connection (ReadMe)
  • 1.Online speech to text (ASR)
  • 2.Online text to speech (TTS)
  • 3.AI large model voice interaction
  • 4.Multimodal visual understand speech interaction
  • 5.Multi module visual position application
  • 6.Multimodal table scanning application
  • 7.Multimodal autonomous proxy application
  • 8.AI large model online voice assistant
13.NVIDIA lsaac ROS coursenew
  • 1.Build lsaac ROS environment
  • 2.Deep segmentation
  • 3.DNN stereoscopic depth
  • 4.Free space segmentation
  • 5.Image distortion processing
  • 6.Image segmentation
  • 7.3D scene reconstruction and mapping
  • 8.Object detection
  • 9.3D attitude estimation
  • 10.Visual SLAM
14.OpenClaw Deployment and Basic Usagenew
  • 01.OpenClaw Quick Start on Jetson Platform
  • 02.OpenClaw Deployment
  • 03.OpenClaw WhatsApp Plugin Application
  • 04.OpenClaw WebChat Interaction
  • 05.OpenClaw TUI Interaction
  • 06.OpenClaw Tools Introduction
  • 07.OpenClawGate Gateway User Manual
  • 08.OpenClaw Features Overview
  • 09.OpenClawHub Introduction (Skill Installation)
  • 10.OpenClaw Application - File Management
  • 11.OpenClaw Application - Camera
  • 12.OpenClaw Application - Browser Control
  • 13.OpenClaw Application - Script Execution
  • 14.OpenClaw Application - AI Programming (Peripheral & GPIO Control)
  • 15.OpenClaw Application - Dedicated AI Assistant
  • 16.OpenClaw Web Search Capability Configuration
15.OpenClaw Advanced Developmentnew
1.Preparation Before Use
  • 01. Peripheral Hardware Configuration
  • 02. OpenClaw API-KEY Configuration
  • 03. OpenClaw Model Switching
  • 04. OpenClaw Prompts
  • 05. AI Voice Interaction Configuration
  • 06. Three Dialogue Configuration Tests
2.OpenClaw AI Programming Peripheral Control
  • 1. Servo Control
  • 2. RGB Strip
  • 3. OLED Display
  • 4. Temperature and Humidity Sensor
  • 5. Camera Application
  • 6. AI Script Peripheral Control
3.OpenClaw Peripheral Integration Applications
  • 1. Plant Care Assistant
  • 2. AI Calorie Estimation
  • 3. AI Rock Paper Scissors Game
  • 4. AI Pet
  • 5. AI Weather Station
  • 6. Temperature and Humidity Dashboard
  • 7. Scheduled Tasks
Download
  • System_File
  • VM_File
  • 3D_Model_File
  • DataSheet_File
  • Software_Tools
  • Code
  • Instruction_Manual
  • ROS2_Basic_VM
Download ZIP

Welcome to Jetson ORIN NANO SUPER repository

当製品の日本語版マニュアル資料は、こちらからご取得ください。

03.Object detection

Object Detection

Object Detection1. Model Introduction2. Target Prediction: ImageEffect Preview3. Target Prediction: VideoEffect Preview4. Target Prediction: Real-time Detection4.1. USB CameraEffect Preview4.2. CSI CameraEffect PreviewReference Materials

Use Python to demonstrate Ultralytics: Object Detection effects on images, videos, and real-time detection.

1. Model Introduction

Object detection is a task that involves identifying the location and class of objects in images or video streams.

The output of an object detector is a set of bounding boxes that surround objects in the image, along with class labels and confidence scores for each box. If you need to identify objects of interest in a scene but don't need to know the exact position or precise shape of the objects, then object detection is a good choice.

2. Target Prediction: Image

Use yolo26n.engine to predict images in the ultralytics26 folder.

Enter the code folder:

cd /home/jetson/ultralytics/yahboom_demo

Run the code:

xxxxxxxxxx
python3 01.detection_image.py

Effect Preview

yolo recognition output image location: /home/jetson/ultralytics/output/
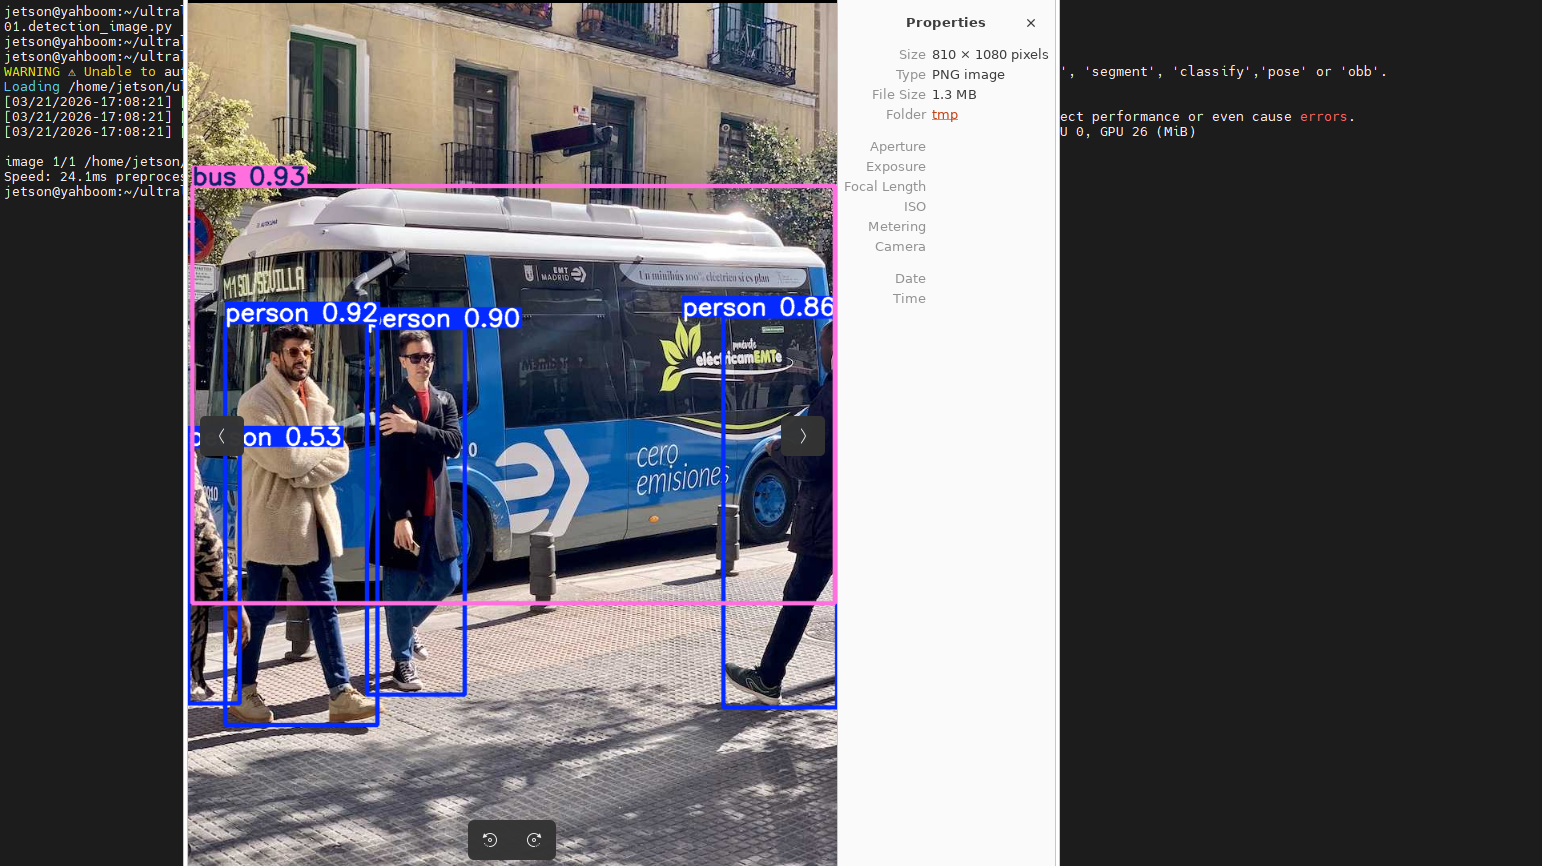
image-20260321170918873

Example code:

​x
from ultralytics import YOLO
​
# Load a model
model = YOLO("/home/jetson/ultralytics/yolo26n.engine")
​
# Run batched inference on a list of images
results = model("/home/jetson/ultralytics/assets/bus.jpg")  # return a list of Results objects
​
# Process results list
for result in results:
    boxes = result.boxes  # Boxes object for bounding box outputs
    # masks = result.masks  # Masks object for segmentation masks outputs
    # keypoints = result.keypoints  # Keypoints object for pose outputs
    # probs = result.probs  # Probs object for classification outputs
    # obb = result.obb  # Oriented boxes object for OBB outputs
    result.show()  # display to screen
    result.save(filename="/home/jetson/ultralytics/output/bus_output.jpg")  # save to disk
​

3. Target Prediction: Video

Use yolo26n_ncnn_model to predict videos in the ultralytics26 folder (not built-in ultralytics videos).

Enter the code folder:

xxxxxxxxxx
cd /home/jetson/ultralytics/yahboom_demo

Run the code:

xxxxxxxxxx
python3 01.detection_video.py

Effect Preview

yolo recognition output video location: /home/jetson/ultralytics/output/
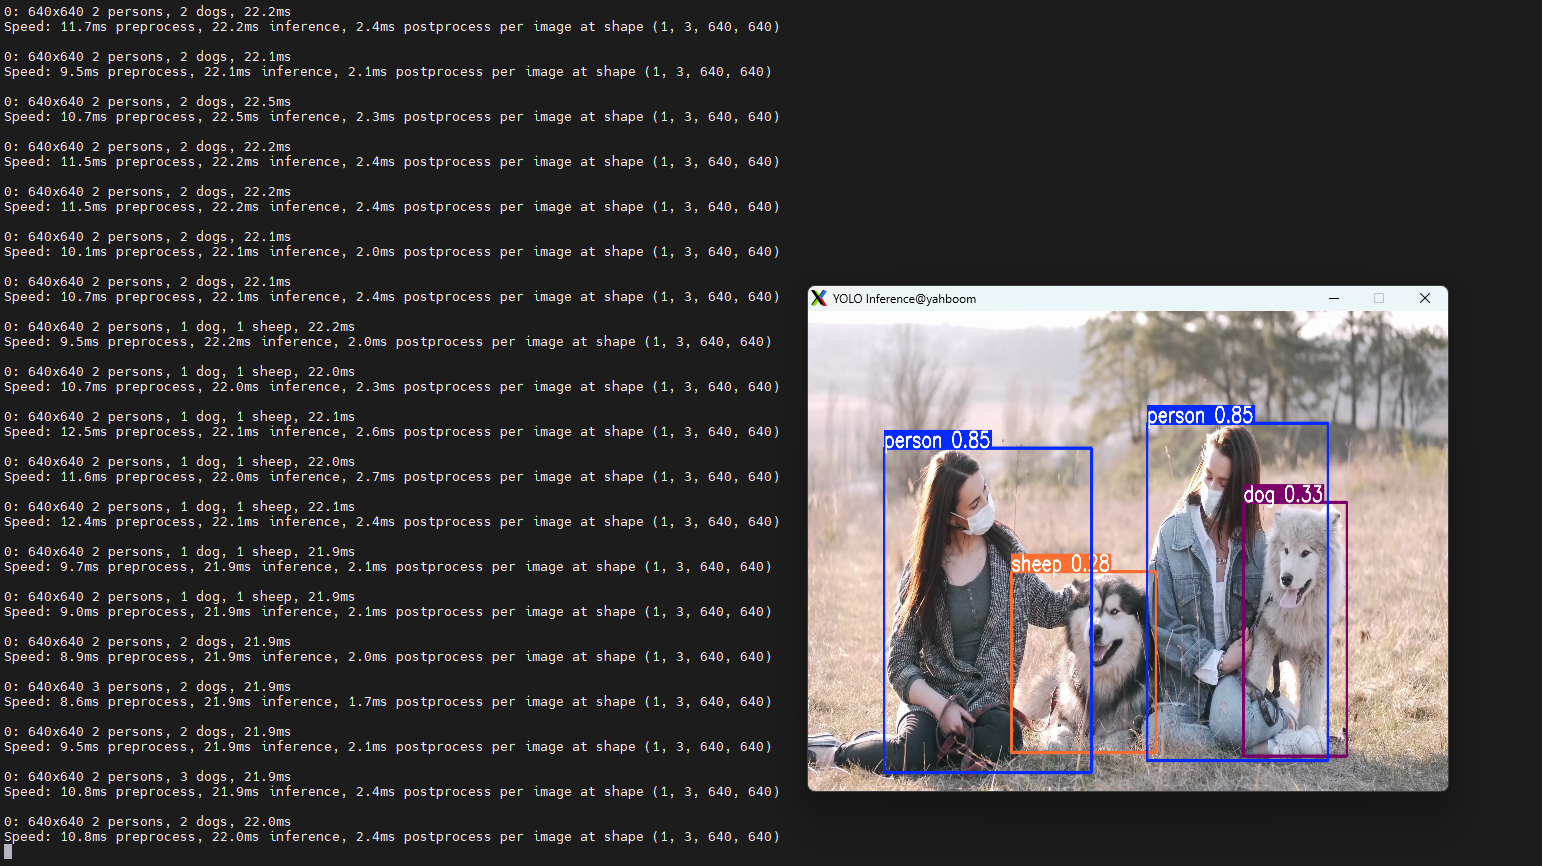
image-20260321171338093

Example code:

xxxxxxxxxx
import cv2
from ultralytics import YOLO
​
# Load the YOLO model
model = YOLO("/home/jetson/ultralytics/yolo26n.engine")
​
# Open the video file
video_path = "/home/jetson/ultralytics/ultralytics/videos/people_animals.mp4"
cap = cv2.VideoCapture(video_path)
​
# Get the video frame size and frame rate
frame_width = int(cap.get(cv2.CAP_PROP_FRAME_WIDTH))
frame_height = int(cap.get(cv2.CAP_PROP_FRAME_HEIGHT))
fps = int(cap.get(cv2.CAP_PROP_FPS))
​
# Define the codec and create a VideoWriter object to output the processed video
output_path = "/home/jetson/output/01.people_animals_output.mp4"
fourcc = cv2.VideoWriter_fourcc(*'mp4v')  # You can use 'XVID' or 'mp4v' depending on your platform
out = cv2.VideoWriter(output_path, fourcc, fps, (frame_width, frame_height))
​
# Loop through the video frames
while cap.isOpened():
    # Read a frame from the video
    success, frame = cap.read()
​
    if success:
        # Run YOLO inference on the frame
        results = model(frame)
​
        # Visualize the results on the frame
        annotated_frame = results[0].plot()
​
        # Write the annotated frame to the output video file
        out.write(annotated_frame)
​
        # Display the annotated frame
        cv2.imshow("YOLO Inference", cv2.resize(annotated_frame, (640, 480)))
​
        # Break the loop if 'q' is pressed
        if cv2.waitKey(1) & 0xFF == ord("q"):
            break
    else:
        # Break the loop if the end of the video is reached
        break
# Release the video capture and writer objects, and close the display window
cap.release()
out.release()
cv2.destroyAllWindows()

4. Target Prediction: Real-time Detection

4.1. USB Camera

Use yolo26n_ncnn_model to predict USB camera footage.

Enter the code folder:

xxxxxxxxxx
cd /home/jetson/ultralytics/yahboom_demo

Run the code: Click on the preview screen, press q key to terminate the program!

xxxxxxxxxx
python3 01.detection_camera_usb.py

Effect Preview

yolo recognition output video location: /home/jetson/ultralytics/output/
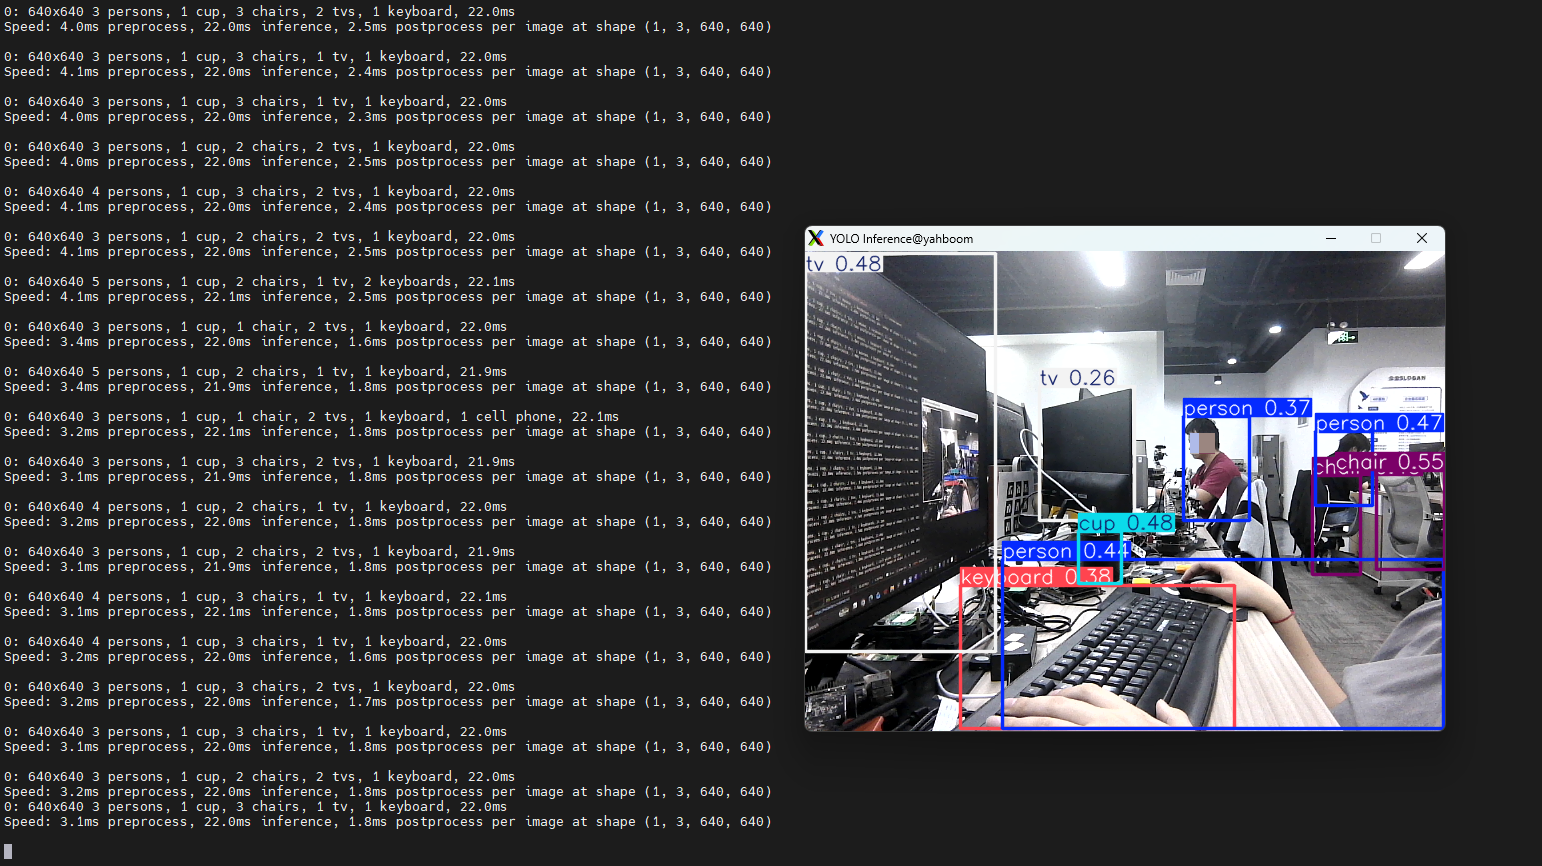
image-20260321171502424

Example code:

xxxxxxxxxx
import cv2
from ultralytics import YOLO
​
# Load the YOLO model
model = YOLO("/home/jetson/ultralytics/yolo26n.engine")
​
# Open the cammera
cap = cv2.VideoCapture(0)
cap.set(6, cv2.VideoWriter.fourcc('M', 'J', 'P', 'G'))
cap.set(cv2.CAP_PROP_FRAME_WIDTH, 640)
cap.set(cv2.CAP_PROP_FRAME_HEIGHT, 480)
​
# Get the video frame size and frame rate
frame_width = int(cap.get(cv2.CAP_PROP_FRAME_WIDTH))
frame_height = int(cap.get(cv2.CAP_PROP_FRAME_HEIGHT))
fps = int(cap.get(cv2.CAP_PROP_FPS))
​
# Define the codec and create a VideoWriter object to output the processed video
output_path = "/home/jetson/ultralytics/output/01.detection_camera_usb.mp4"
fourcc = cv2.VideoWriter_fourcc(*'mp4v')  # You can use 'XVID' or 'mp4v' depending on your platform
out = cv2.VideoWriter(output_path, fourcc, fps, (frame_width, frame_height))
​
# Loop through the video frames
while cap.isOpened():
    # Read a frame from the video
    success, frame = cap.read()
​
    if success:
        # Run YOLO inference on the frame
        results = model(frame)
​
        # Visualize the results on the frame
        annotated_frame = results[0].plot()
​
        # Write the annotated frame to the output video file
        out.write(annotated_frame)
​
​
        # Display the annotated frame
        cv2.imshow("YOLO Inference", cv2.resize(annotated_frame, (640, 480)))
​
        # Break the loop if 'q' is pressed
        if cv2.waitKey(1) & 0xFF == ord("q"):
            break
    else:
        # Break the loop if the end of the video is reached
        break
# Release the video capture and writer objects, and close the display window
cap.release()
out.release()
cv2.destroyAllWindows()
​

4.2. CSI Camera

For CSI camera related functions, please be sure to use VNC or directly use a physical display to watch!! Does not support X11 forwarding services like MobaXTerm

Use yolo26n_ncnn_model to predict CSI camera footage.

Enter the code folder:

xxxxxxxxxx
cd /home/jetson/ultralytics/yahboom_demo

Run the code: Click on the preview screen, press q key to terminate the program!

xxxxxxxxxx
python3 01.detection_camera_csi.py

Effect Preview

yolo recognition output video location: /home/jetson/ultralytics/output/
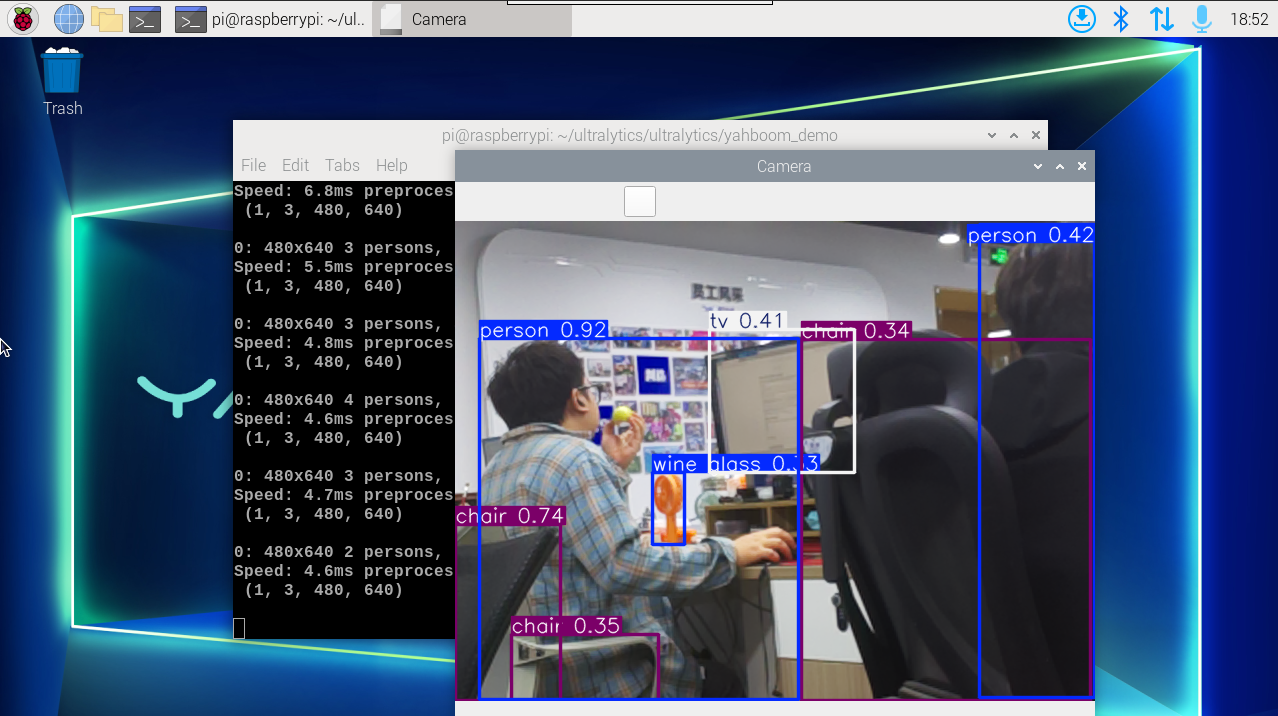
image-20241230153244636

Example code:

xxxxxxxxxx
import cv2
from ultralytics import YOLO
from jetcam.csi_camera import CSICamera
​
# Load the YOLO model
model = YOLO("/home/jetson/ultralytics/yolo26n.engine")
​
# Open the camera (CSI Camera)
cap = CSICamera(capture_device=0, width=640, height=480)
​
# Get the video frame size and frame rate
frame_width = 640
frame_height = 480
fps = 30
​
# Define the codec and create a VideoWriter object to output the processed video
output_path = "/home/jetson/ultralytics/output/01.detection_camera_csi.mp4"
fourcc = cv2.VideoWriter_fourcc(*'mp4v')  # You can use 'XVID' or 'mp4v' depending on your platform
out = cv2.VideoWriter(output_path, fourcc, fps, (frame_width, frame_height))
​
# Loop through the video frames
while True:
    # Read a frame from the camera
    frame = cap.read()
​
    if frame is not None:
        # Run YOLO inference on the frame
        results = model(frame)
​
        # Visualize the results on the frame
        annotated_frame = results[0].plot()
​
        # Write the annotated frame to the output video file
        out.write(annotated_frame)
​
        # Display the annotated frame
        cv2.imshow("YOLO Inference", cv2.resize(annotated_frame, (640, 480)))
​
        # Break the loop if 'q' is pressed
        if cv2.waitKey(1) & 0xFF == ord("q"):
            break
    else:
        # Break the loop if no frame is received (camera error or end of stream)
        print("No frame received, breaking the loop.")
        break
​
# Release the video capture and writer objects, and close the display window
cap.release()
out.release()
cv2.destroyAllWindows()
​

Reference Materials

Object Detection - Ultralytics YOLO Documentation

CLI use
Instance segmentation

COMPANY

  • About us
  • Team Style
  • Blog

LEARNING & EXPLORATION

  • Tutorials
  • Edge AI hardware
  • Educational robots
  • Embedded intelligent hardware

WHERE TO BUY

  • Yahboom Online Store
  • Amazon
  • Alibaba
  • AliExpress
  • Mercado

TECHNOLOGY SUPPORT

  • Email: support@yahboom.com

BE A DISTRIBUTOR

  • Email: sales@yahboom.com
QR Code
QR Code

Copyright © 2017-2026 Yahboom. All Rights Reserved.

EN/中文