Welcome to Jetson ORIN NANO SUPER repository
当製品の日本語版マニュアル資料は、こちらからご取得ください。
05. AI Voice Interaction Configuration
OpenClaw AI Voice Interaction Configuration
OpenClaw AI Voice Interaction Configuration1. Course Overview2. Voice Interaction Overall Pipeline3. Voice Configuration File Description3.1 Configuration File Location3.2 Minimum Configuration to Check Before Startup4. Key Parameter Description4.1 Voice Recognition Engine4.2 Microphone and Speaker Devices4.3 DashScope Authentication and ASR Model4.4 TTS Voice Broadcast Configuration4.5 OpenClaw Gateway Configuration Reference4.6 Serial Wake Configuration4.7 Chinese-English Switching Steps5. Start Voice Interaction5.1 Prepare Virtual Environment5.2 Startup Method5.3 If Other Interaction Methods Need Broadcast6. Configuration Verification Methods6.1 Verify Voice Program Can Start6.2 Verify Recognition and Publishing Process6.4 Verify TTS [Optional]7. Common Issues7.1 Program Startup Failure7.2 No Recognition Result After Wake7.3 Recognition Successful But OpenClaw Not Responding7.4 Can Recognize But No Voice Broadcast7.5 Serial Wake Failure8. Recommended Debugging Order
1. Course Overview
This course will introduce how to configure OpenClaw's AI voice interaction pipeline, including voice configuration file location, key parameter descriptions, startup methods, and common troubleshooting.
After completing this course, you will be able to:
Know which configuration file is used for AI voice interaction
Understand the meaning of key parameters in
.envCorrectly start the voice program
2. Voice Interaction Overall Pipeline
OpenClaw's current voice interaction process can be simply understood as:
Microphone collects voice
Program performs silence detection and segmentation
ASR engine recognizes voice into text
Recognition results are published to OpenClaw
OpenClaw returns results
[Optional]TTS broadcasts the returned results (reply content may be long, you can choose whether to broadcast)
The core configuration file for this pipeline is:
/home/jetson/voice_to_openclaw/.env3. Voice Configuration File Description
3.1 Configuration File Location
xxxxxxxxxx/home/jetson/voice_to_openclaw/.envIf this file does not exist, you can first copy from the template:
xxxxxxxxxxcd /home/jetson/voice_to_openclaw/cp .env.example .env3.2 Minimum Configuration to Check Before Startup
It is recommended to at least confirm the following items:
ASR_ENGINEDASHSCOPE_API_KEYDEVICESPEAKER_DEVICEOPENCLAW_CONFIG_PATHENABLE_SERIAL_WAKE
4. Key Parameter Description
4.1 Voice Recognition Engine
xxxxxxxxxxASR_ENGINE=dashscopeCurrently supports two modes:
dashscope: Tongyi Bailian native voice recognition interface, suitable for direct online use
For most beginners, it is recommended to keep:
xxxxxxxxxxASR_ENGINE=dashscope4.2 Microphone and Speaker Devices
xxxxxxxxxxDEVICE=0SPEAKER_DEVICE=0These two parameters determine which audio input device and output device the program uses.
Scenarios suitable for modification:
Multiple microphone devices
USB microphone is not the system default device
Speaker output is on the wrong device
If the voice program can start but cannot hear sound or record sound, check here first.
4.3 DashScope Authentication and ASR Model
Please log in to Alibaba Cloud Bailian to apply for an API key yourself
Link: Large Model Service Platform Bailian Console
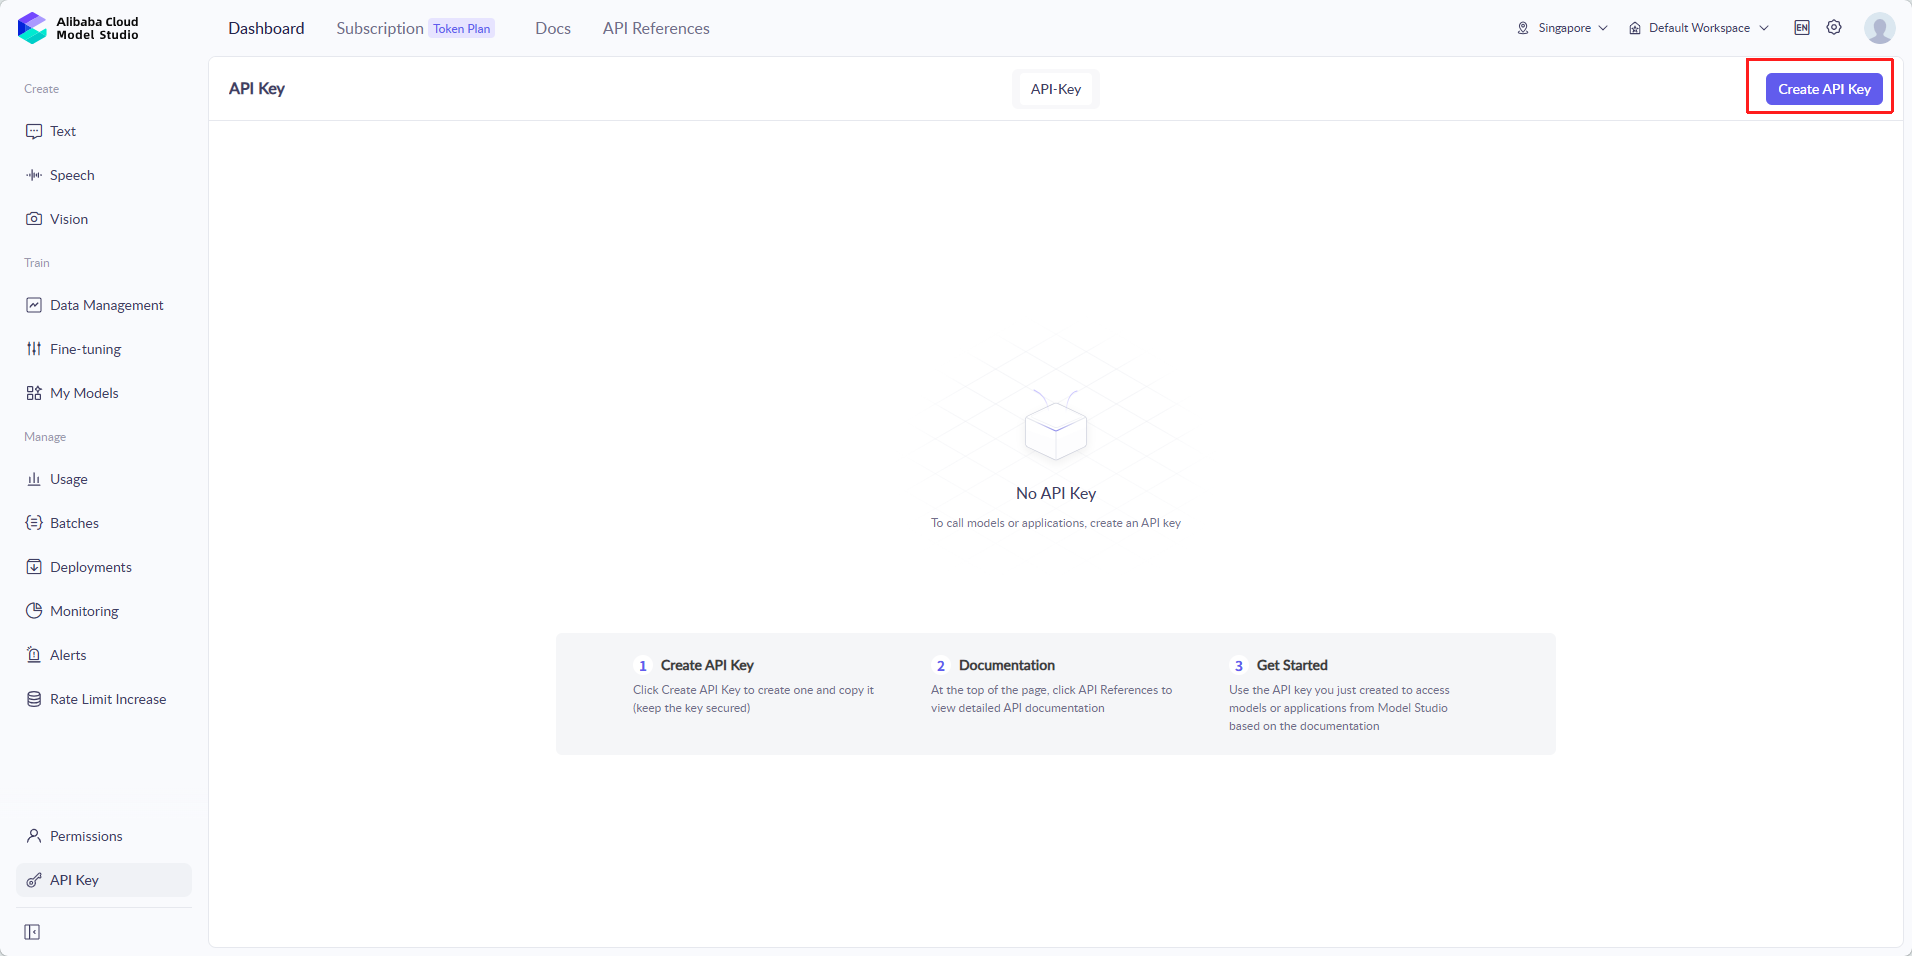
xxxxxxxxxxDASHSCOPE_API_KEY=DASHSCOPE_API_URL=https://dashscope.aliyuncs.com/api/v1/services/aigc/multimodal-generation/generationDASHSCOPE_ASR_MODEL=qwen3-asr-flashWhere:
DASHSCOPE_API_KEY: Must be filled with a valid API-KEYDASHSCOPE_API_URL: Default is already providedDASHSCOPE_ASR_MODEL: Default voice recognition model
If this is not configured correctly, common symptoms are:
Recognition failure after program startup
Authentication error return
Voice recognition request timeout or model error
4.4 TTS Voice Broadcast Configuration
xxxxxxxxxxENABLE_TTS=falseWAKE_ACK_TEXT=I am here。If you want voice broadcast after voice recognition, you can enable:
xxxxxxxxxxENABLE_TTS=trueCurrent common TTS parameters include:
DASHSCOPE_TTS_MODELDASHSCOPE_TTS_VOICEDASHSCOPE_TTS_VOLUMEDASHSCOPE_TTS_SPEECH_RATE
It is recommended to first get ASR working, then consider enabling TTS.
4.5 OpenClaw Gateway Configuration Reference
xxxxxxxxxxOPENCLAW_CONFIG_PATH=~/.openclaw/openclaw.jsonOPENCLAW_TIMEOUT=70 #Maximum retry time, waiting for OpenClaw reply. For long tasks, this time should be increasedOPENCLAW_RETRY=1This part of the configuration determines how the voice program sends recognition results to OpenClaw.
By default:
The program will read
openclaw.jsonAutomatically derive local gateway port
Automatically read gateway authentication token
Therefore, if voice recognition is successful but OpenClaw does not execute commands, check here first.
4.6 Serial Wake Configuration
xxxxxxxxxxENABLE_SERIAL_WAKE=trueMIC_SERIAL_PORT=/dev/ttyUSB0MIC_SERIAL_BAUDRATE=115200SERIAL_WAKE_REQUIRED=trueIf you use the matching voice module, it usually adopts serial wake mode.
Main functions are:
Normally wait for wake signal
Start collecting next voice segment after receiving wake signal
Return to waiting state after processing is complete
If there is no matching serial wake module, you can adjust as needed:
xxxxxxxxxxENABLE_SERIAL_WAKE=false4.7 Chinese-English Switching Steps
If you need to switch voice interaction from Chinese to English, it is recommended to directly modify the language parameters in .env, then restart the program.
Currently voice_to_openclaw/.env enables the domestic version (Bailian) by default.
Method 1: Overseas version (iFlytek International)
Main configuration items:
xxxxxxxxxxXUNFEI_ASR_LANGUAGE=en_cnXUNFEI_ASR_ACCENT=mandarin# Terminal log language: zh / enUI_LANGUAGE=enChinese recognition:
XUNFEI_ASR_LANGUAGE=zh_cnEnglish recognition:
XUNFEI_ASR_LANGUAGE=en_usWhen recognition language is changed to English,
XUNFEI_ASR_ACCENTis no longer needed; it can be commented out or kept with original value without being used
Example:
x# Chinese recognitionXUNFEI_ASR_LANGUAGE=zh_cnXUNFEI_ASR_ACCENT=mandarin
# English recognitionXUNFEI_ASR_LANGUAGE=en_us# XUNFEI_ASR_ACCENT=mandarinIf TTS is also enabled and you want English broadcast, you also need to change TTS_VOICE to an English voice tone you have activated; if you only want to verify English recognition first, just change the ASR language.
Method 2: Domestic version (Bailian)
Main configuration items:
xxxxxxxxxxDASHSCOPE_LANGUAGE=zhChinese recognition:
DASHSCOPE_LANGUAGE=zhEnglish recognition:
DASHSCOPE_LANGUAGE=en
Example:
xxxxxxxxxx# Chinese recognitionDASHSCOPE_LANGUAGE=zh# Terminal log language: zh / enUI_LANGUAGE=zhIf the Bailian solution also enables TTS, it is recommended to switch to the corresponding English voice tone simultaneously, otherwise it may happen that English recognition is normal but the broadcast still sounds like Chinese voice.
After modification is complete, re-execute the following startup command to take effect.
5. Start Voice Interaction
5.1 Prepare Virtual Environment
This step is not needed for factory images. If dependencies have not been installed, first execute:
xxxxxxxxxxcd /home/jetson/voice_to_openclawpython3 -m venv .venvsource .venv/bin/activatepip install -r requirements.txt5.2 Startup Method
xxxxxxxxxxcd /home/jetson/voice_to_openclawsource .venv/bin/activatepython -m src.mainIf startup is successful, the program will enter waiting for wake or waiting for voice input state.
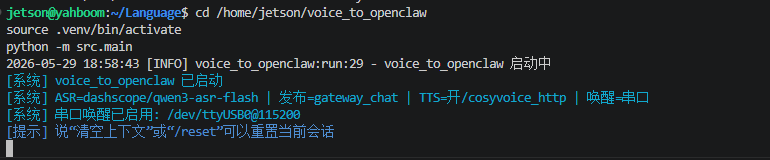
If you start English log, it will look like this,
xxxxxxxxxx# Terminal log language: zh / enUI_LANGUAGE=en
5.3 If Other Interaction Methods Need Broadcast
Change broadcast parameter configuration to True
xxxxxxxxxxENABLE_TTS=true Additionally start an independent listener, terminal input
xxxxxxxxxxcd ~/voice_to_openclawsource .venv/bin/activatepython -m src.openclaw_session_tts
6. Configuration Verification Methods
6.1 Verify Voice Program Can Start
Execute:
xxxxxxxxxxcd /home/jetson/voice_to_openclawsource .venv/bin/activatepython -m src.mainIf the program starts successfully and does not report errors immediately, it indicates that the basic environment is probably normal.
6.2 Verify Recognition and Publishing Process
Say "Hello, yahboom" to wake up, then you can try saying:
Tell me a joke
Display hello on OLED
If you can see OpenClaw returning text, it indicates:
Microphone collection is normal
ASR is normal
OpenClaw gateway publishing is normal
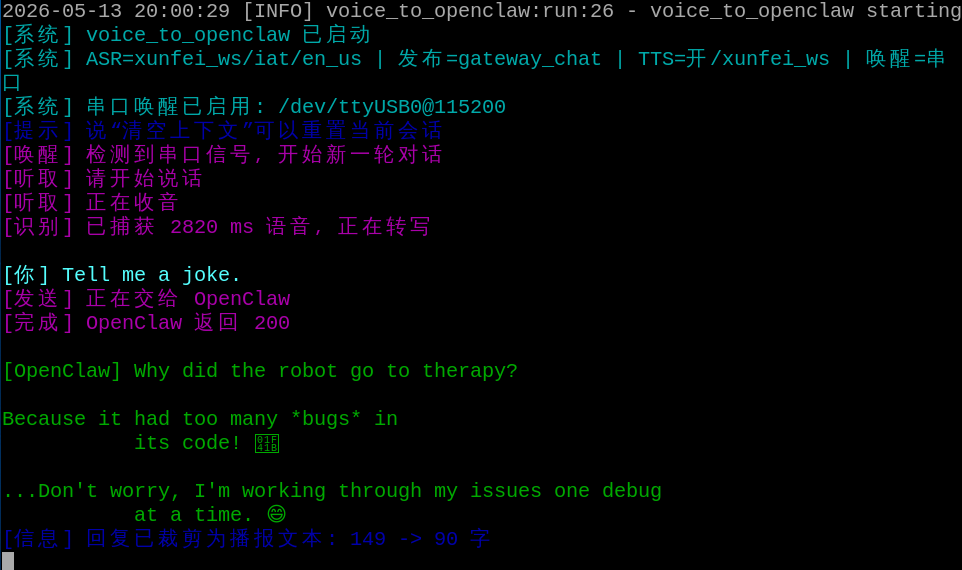
It has a cropping function; if it's too short, you can tell it a joke via voice.
6.4 Verify TTS [Optional]
If enabled:
xxxxxxxxxxENABLE_TTS=trueThen after OpenClaw returns results, you should be able to hear voice broadcast.
7. Common Issues
7.1 Program Startup Failure
Check first:
Whether
.venvexistsWhether dependencies have been installed
Whether
.envexists
7.2 No Recognition Result After Wake
Check first:
Whether
ASR_ENGINEis configured correctlyWhether
DASHSCOPE_API_KEYis validWhether microphone device number
DEVICEis correct
7.3 Recognition Successful But OpenClaw Not Responding
Check first:
Whether
OPENCLAW_CONFIG_PATHis correctWhether the gateway port in
openclaw.jsonis normalWhether OpenClaw gateway has been started
7.4 Can Recognize But No Voice Broadcast
Check first:
Whether
ENABLE_TTSistrueWhether
SPEAKER_DEVICEis correctWhether speaker is properly connected
7.5 Serial Wake Failure
Check first:
Whether
ENABLE_SERIAL_WAKEistrueWhether
MIC_SERIAL_PORTis correctWhether
MIC_SERIAL_BAUDRATEis correctWhether voice module serial device has been recognized by the system
8. Recommended Debugging Order
It is recommended to troubleshoot the voice pipeline in the following order:
First confirm the
.envfile existsThen confirm
DASHSCOPE_API_KEYhas been filled inStart the program and confirm no immediate errors
Check if wake is effective
Check if recognition is effective
Check if OpenClaw receives text
Finally check TTS broadcast