yahboom
HomeLearn
Solution
Blog
Online Store
About Us
EN/中文
RDK S100(P) Board📖
0. RDK S100(P) Developer Kit
  • 1. RDK S100(P) Official Tutorial
1. Introduction to RDK S100(P) Development Board
  • 1.1 Introduction to the RDK S100(P) Development Board
  • 1.2 Install Operating System
  • 1.3 Interface Descriptions
  • 1.4 Accessory installation
  • 1.5 Camera Expansion Board
  • 1.6 MCU Port Expansion Board
  • 1.7 Precautions for using 15.6-inch screens
2. Basic Settings Course
  • 2.1 Network Configuration
  • 2.2 Remote Login
  • 2.3 System Update
  • 2.4 Boot Auto-Start Configuration
  • 2.5 RDK Exclusive Command Usage
  • 2.6 Linux Command Usage
  • 2.7 Example of GPIO read and write operations
  • 2.8 Using USB Camera
  • 2.9 Using MIPI Camera
  • 2.10 SSD mounting
  • 2.11 Binocular camera depth algorithm
3. TogetheROS.Bot Vision Applications
  • 1. About TogetheROS. Bot
  • 2. System Installation
  • 3. Object Detection(YOLO)
  • 4. Image Classification(mobilenetv2)
  • 5. Image Segmentation(mobilenet_unet)
  • 6. Perception Algorithm(BEV)
  • 7. Human Detection and Tracking (Ultralytics YOLO Pose)
4.Offline AI model course
Offline large model (Text Interaction)
  • 1. AI large model environment deployment
  • 2. Install large model dialogue platform
  • 3. Meta AI Llama 3.2 model
  • 4. Alibaba Cloud Qwen3 model
  • 5. Microsoft Phi-4 mini model
  • 6. DeepSeek - DeepSeek-R1 model
  • 7. Alibaba Cloud Qwen2.5vl Visual Multimodal Large Model
  • 8. Google Gemma3 Visual Multimodal Large Model
  • 9. Lava Visual Multimodal Large Model
  • 10. MiniCPM-V Visual Multimodal Large Model
  • 11. Multimodal visual understand application
  • 12. Multimodal text to image application
  • 13. Multimodal visual localization application
  • 14. Multimodal table scanning application
  • 15. Multimodal Autonomous Agent Applications
Offline large model (Voice Interaction)
  • 0. Voice Interaction Hardware Connection (Must Read)
  • 1. Offline speech-to-text (ASR)
  • 2. Offline Text-to-Speech (TTS)
  • 3.AI large model voice interaction
  • 4. Multimodal visual understanding voice interaction
  • 5. Multimodal Text-to-Image application
  • 6. Multimodal video analytics application
  • 7. Multimodal visual localization application
  • 8. Multimodal table scanning application
  • 9. Multimodal autonomous agent application
  • 10. AI Large Model Offline Voice Assistant
5.Online AI model course
Online large model (Text Interaction)
  • 1.OpenRouter large model API aggregation platform
  • 2.Multimodal visual understand application
  • 3.Multimodal visual localization application
  • 4.Multimodal table scanning application
  • 5.Multimodal autonomous agent application
Online large model (Voice Interaction)
  • 0.Voice interaction hardware connection (ReadMe)
  • 1.Online speech to text (ASR)
  • 2.Online text to speech (TTS)
  • 3.AI large model voice interaction
  • 4.Multimodal visual understand speech interaction
  • 5.Multimodal visual localization application
  • 6.Multimodal table scanning application
  • 7.Multimodal autonomous proxy application
  • 8.AI large model online voice assistant
6.YOLO26 tutorials
  • 01.YOLO26 environment
  • 02.CLI use
  • 03.Object detection
  • 04.Instance segmentation
  • 05.Pose estimation
  • 06.Image classification
  • 07.Oriented object detection
  • 08.Model conversion
  • 09.Dataset annotation
  • 10.Model training - conversion
  • 11.Model prediction
7.OpenClaw Advanced Development
  • 1.OpenClaw Deployment
  • 2.OpenClaw WhatsApp Plugin Application
  • 3.OpenClaw WebChat Interaction
  • 4.OpenClaw TUI Interaction
  • 5.OpenClaw Tools Introduction
  • 6.OpenClawGate Gateway User Manual
  • 7.OpenClaw Features Overview
  • 8.OpenClawClawHub Introduction (Skill Installation)
  • 9.OpenClaw Application - File Management
  • 10.OpenClaw Application - Camera
  • 11.OpenClaw Application - Browser Control
  • 12.OpenClaw Application - Script Execution
  • 13.OpenClaw Application - AI Programming (Peripheral & GPIO Control)
  • 14.OpenClaw Application - Dedicated AI Assistant
  • 15.OpenClaw Web Search Capability Configuration
8.ROS2 basic course
  • 1.Introduction to ROS2
  • 2.ROS2 install Humble
  • 3.ROS2 development environment
  • 4.ROS2 workspace
  • 5.ROS2 function package
  • 6.ROS2 node
  • 7.ROS2 topic communication
  • 8.ROS2 service communication
  • 9.ROS2 action communication
  • 10.ROS2 custom interface message
  • 11.ROS2 parameter service case
  • 12.ROS2 meta-function package
  • 13.ROS2 distributed communication
  • 14.ROS2 DDS
  • 15.ROS2 time related API
  • 16.ROS2 common command tools
  • 17.ROS2 rviz2 use
  • 18.ROS2 rqt toolbox
  • 19.ROS2 Launch startup file configuration
  • 20.ROS2 recording and playback tool
  • 21.ROS2 URDF model
  • 22.ROS2 Gazebo simulation platform
  • 23.ROS2 TF2 coordinate transformation
Download
  • Annex_File
  • Code
Download ZIP

Welcome to RDK S100(P) Board repository

7.ROS2 topic communication

7. ROS2 Topic Communication

1. Introduction to Topic Communication

Topic communication is the most frequently used communication method in ROS2. A publisher publishes data on a specified topic, and subscribers who subscribe to that topic receive the data.

Topic communication is based on the publish/subscribe model, as shown in the figure:

image8

Topic data transmission is a process where the data is transmitted from one node to another. The object sending data is called a publisher, and the object receiving data is called a subscriber. Each topic must have a name, and the data transmitted must have a fixed data type.

Next, we will explain how to implement topic communication between nodes using Python.

2. Create a New Package

  • Switch to the src directory of the workspace
  • Create a new pkg_topic package
xxxxxxxxxx
ros2 pkg create pkg_topic --build-type ament_python --dependencies rclpy --node-name publisher_demo

After executing the above command, the pkg_topic package will be created, along with a publisher_demo node and the relevant configuration files.
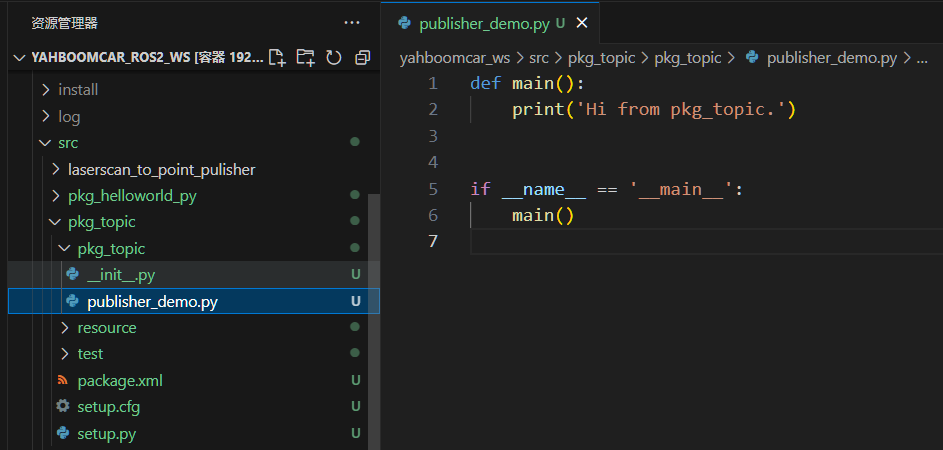
image-20231023170921392

3. Publisher Implementation

3.1 Create a Publisher

Next, edit [publisher_demo.py] to implement the publisher functionality and add the following code:

xxxxxxxxxx
#Import the rclpy library
import rclpy
from rclpy.node import Node
#Import String messages
from std_msgs.msg import String 
#Create a Topic_Pub node subclass that inherits from the Node base
class Topic_Pub(Node):
    def __init__(self,name):
        super().__init__(name)
        #Create a publisher using the create_publisher function. The passed parameters are:
        #Topic data type, topic name, and queue length for storing messages
        self.pub = self.create_publisher(String,"/topic_demo",1) 
        #Create a timer that enters the interrupt handler every 1 second. The passed parameters are:
        #Interval between interrupt executions, interrupt handler function
        self.timer = self.create_timer(1,self.pub_msg)
    #Define the interrupt handler function
    def pub_msg(self):
        msg = String()  #Create a String variable, msg
        msg.data = "Hi,I send a message." #Assign data to msg
        self.pub.publish(msg) #Publish topic data
        
#Main function
def main():
    rclpy.init() #Initialization
    pub_demo = Topic_Pub("publisher_node") #Create a Topic_Pub class object, passing in the node name as a parameter
    rclpy.spin(pub_demo)     #Execute the rclpy.spin function, passing in the Topic_Pub class object just created as a parameter
    pub_demo.destroy_node()  #Destroy the node object
    rclpy.shutdown()         #Shut down the ROS2 Python interface


3.2 Editing the Configuration File
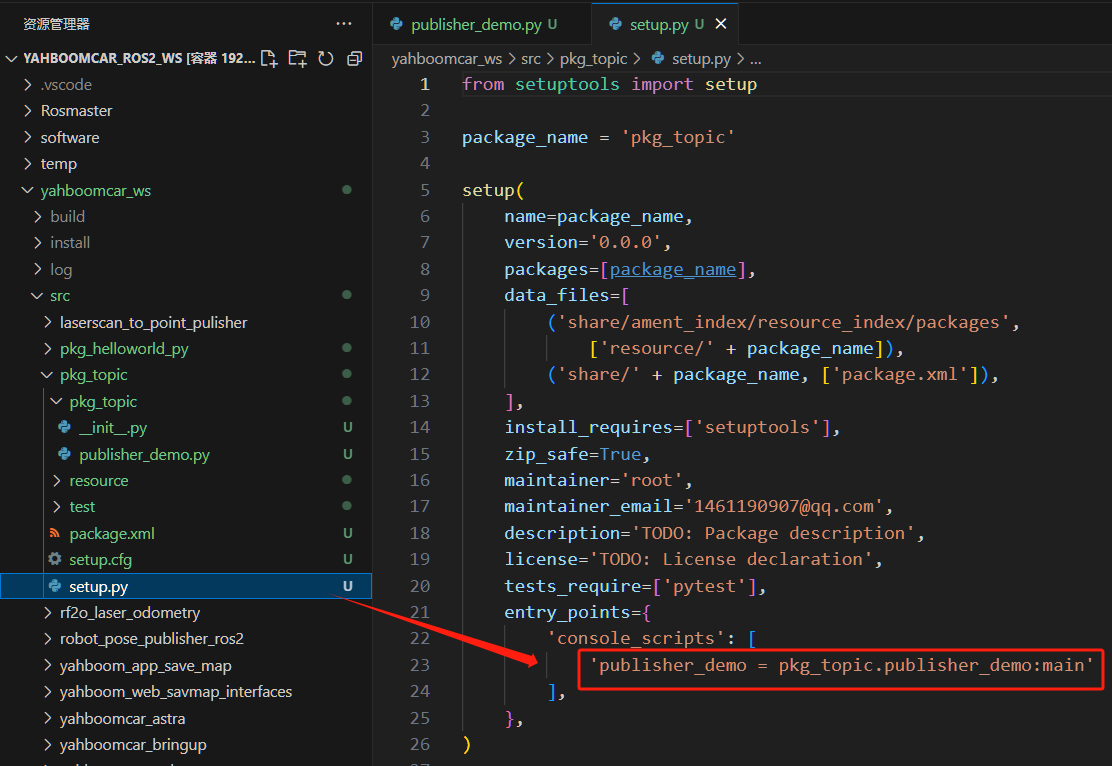
image-20231023173312172


3.3 Compiling the Package

  • Compiling the Package
xxxxxxxxxx
colcon build --packages-select pkg_topic
  • Refresh the environment variables in the workspace
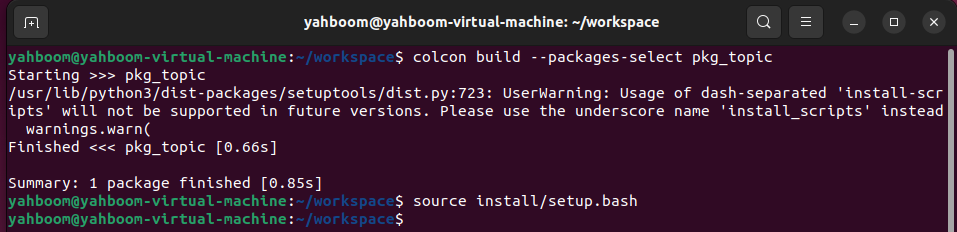
image-20250905115606561

3.4 Running the Program

  • After refreshing the environment variables, run the command
xxxxxxxxxx
ros2 run pkg_topic publisher_demo

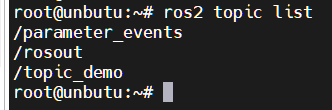
After the program successfully runs, nothing is printed. We can use the ros2 topic tool to view the data. First, check if there are any topics being published. Open another terminal and enter:

xxxxxxxxxx
ros2 topic list

image-20231023173728019

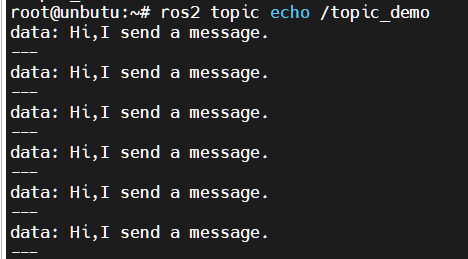
This topic_demo is the topic data defined in the program. Next, we'll use ros2 topic echo to print this data. In the terminal, enter:

xxxxxxxxxx
ros2 topic echo /topic_demo

image-20231023173821223

As you can see, the output "Hi, I send a message." from the terminal matches the line msg.data = "Hi, I send a message." in our code.

4. Subscriber Implementation

4.1 Creating a Subscriber

Create a new file, [subscriber_demo.py], in the same directory as [publisher_demo.py].
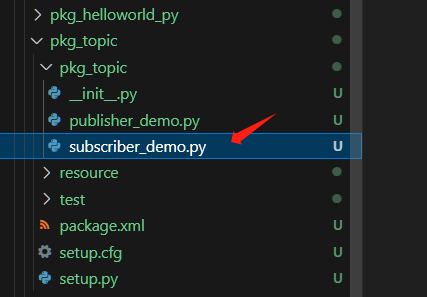
image-20231023174819565

Next, edit [subscriber_demo.py] to implement the subscriber functionality and add the following code:

xxxxxxxxxx
#Import related libraries
import rclpy
from rclpy.node import Node
from std_msgs.msg import String
​
class Topic_Sub(Node):
    def __init__(self,name):
        super().__init__(name)  
        #Create a subscriber using create_subscription. The passed parameters are: topic data type, topic name, callback function name, and queue length.
        self.sub = self.create_subscription(String,"/topic_demo",self.sub_callback,1) 
    #Callback function executes the program: prints the received message.
    def sub_callback(self,msg):
        # print(msg.data,flush=True)
        self.get_logger().info(msg.data)
​
​
​
def main():
    rclpy.init() #Initialize the ROS2 Python interface.
    sub_demo = Topic_Sub("subscriber_node")#Create the object and initialize it.
    rclpy.spin(sub_demo)
    sub_demo.destroy_node()  #Destroy the node object
    rclpy.shutdown()         #Shut down the ROS2 Python interface


4.2 Editing the Configuration File
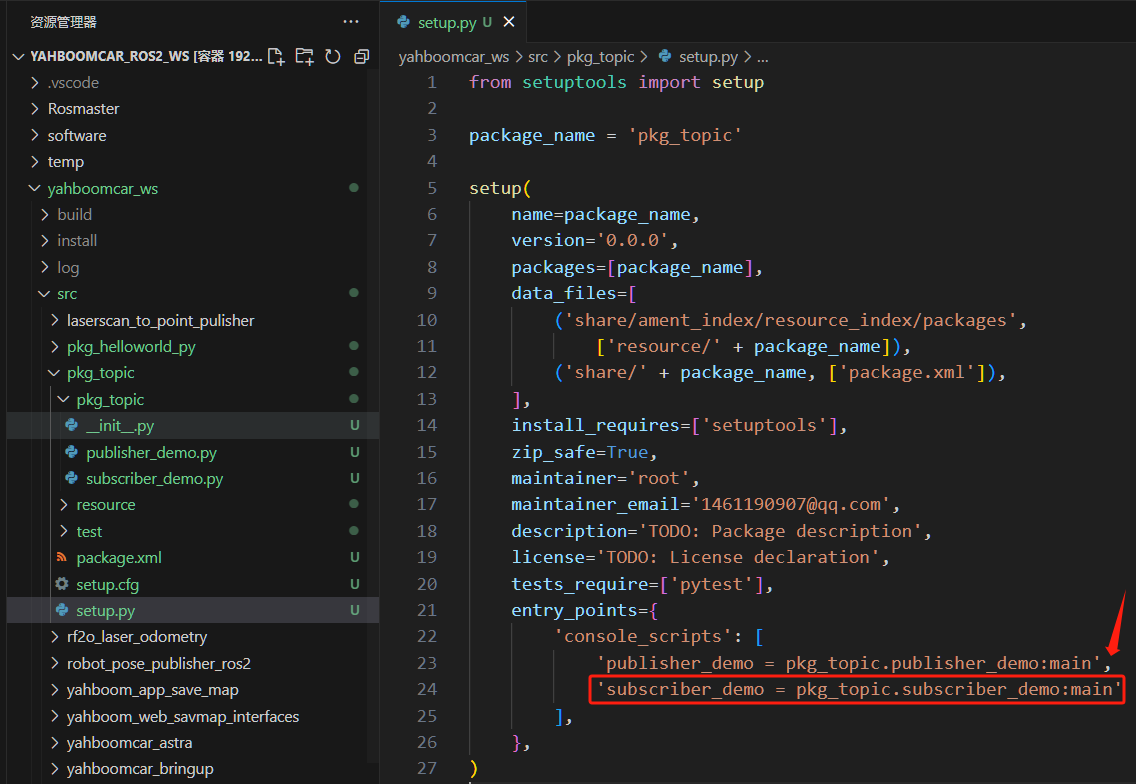
image-20231023175338754


4.3 Compile the Workspace

  • Compile the package
xxxxxxxxxx
colcon build --packages-select pkg_topic
  • Refresh the environment variables in the workspace

image-20250905115606561

4.4 Run the Program

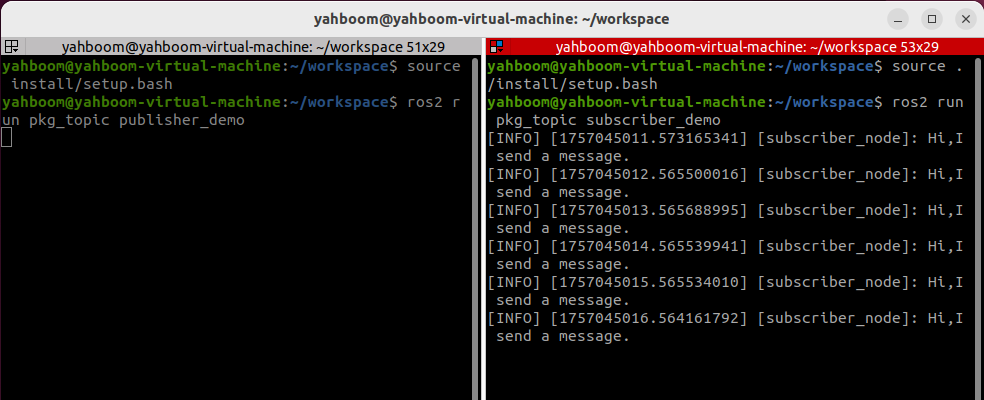
Execute the following command in a separate terminal:

xxxxxxxxxx
# Start the publisher node
ros2 run pkg_topic publisher_demo
# Start the subscriber node
ros2 run pkg_topic subscriber_demo

image-20250905120356726

As shown in the figure above, the terminal running the subscriber node will print the information published by the publisher, /topic_demo.

ROS2 node
ROS2 service communication

COMPANY

  • About us
  • Team Style
  • Blog

LEARNING & EXPLORATION

  • Tutorials
  • Edge AI hardware
  • Educational robots
  • Embedded intelligent hardware

WHERE TO BUY

  • Yahboom Online Store
  • Amazon
  • Alibaba
  • AliExpress
  • Mercado

TECHNOLOGY SUPPORT

  • Email: support@yahboom.com

BE A DISTRIBUTOR

  • Email: sales@yahboom.com
QR Code

Copyright © 2017-2026 Yahboom. All Rights Reserved.

EN/中文