yahboom
HomeLearn
Solution
Blog
Online Store
About Us
EN/中文
RDK S100(P) Board📖
0. RDK S100(P) Developer Kit
  • 1. RDK S100(P) Official Tutorial
1. Introduction to RDK S100(P) Development Board
  • 1.1 Introduction to the RDK S100(P) Development Board
  • 1.2 Install Operating System
  • 1.3 Interface Descriptions
  • 1.4 Accessory installation
  • 1.5 Camera Expansion Board
  • 1.6 MCU Port Expansion Board
  • 1.7 Precautions for using 15.6-inch screens
2. Basic Settings Course
  • 2.1 Network Configuration
  • 2.2 Remote Login
  • 2.3 System Update
  • 2.4 Boot Auto-Start Configuration
  • 2.5 RDK Exclusive Command Usage
  • 2.6 Linux Command Usage
  • 2.7 Example of GPIO read and write operations
  • 2.8 Using USB Camera
  • 2.9 Using MIPI Camera
  • 2.10 SSD mounting
  • 2.11 Binocular camera depth algorithm
3. TogetheROS.Bot Vision Applications
  • 1. About TogetheROS. Bot
  • 2. System Installation
  • 3. Object Detection(YOLO)
  • 4. Image Classification(mobilenetv2)
  • 5. Image Segmentation(mobilenet_unet)
  • 6. Perception Algorithm(BEV)
  • 7. Human Detection and Tracking (Ultralytics YOLO Pose)
4.Offline AI model course
Offline large model (Text Interaction)
  • 1. AI large model environment deployment
  • 2. Install large model dialogue platform
  • 3. Meta AI Llama 3.2 model
  • 4. Alibaba Cloud Qwen3 model
  • 5. Microsoft Phi-4 mini model
  • 6. DeepSeek - DeepSeek-R1 model
  • 7. Alibaba Cloud Qwen2.5vl Visual Multimodal Large Model
  • 8. Google Gemma3 Visual Multimodal Large Model
  • 9. Lava Visual Multimodal Large Model
  • 10. MiniCPM-V Visual Multimodal Large Model
  • 11. Multimodal visual understand application
  • 12. Multimodal text to image application
  • 13. Multimodal visual localization application
  • 14. Multimodal table scanning application
  • 15. Multimodal Autonomous Agent Applications
Offline large model (Voice Interaction)
  • 0. Voice Interaction Hardware Connection (Must Read)
  • 1. Offline speech-to-text (ASR)
  • 2. Offline Text-to-Speech (TTS)
  • 3.AI large model voice interaction
  • 4. Multimodal visual understanding voice interaction
  • 5. Multimodal Text-to-Image application
  • 6. Multimodal video analytics application
  • 7. Multimodal visual localization application
  • 8. Multimodal table scanning application
  • 9. Multimodal autonomous agent application
  • 10. AI Large Model Offline Voice Assistant
5.Online AI model course
Online large model (Text Interaction)
  • 1.OpenRouter large model API aggregation platform
  • 2.Multimodal visual understand application
  • 3.Multimodal visual localization application
  • 4.Multimodal table scanning application
  • 5.Multimodal autonomous agent application
Online large model (Voice Interaction)
  • 0.Voice interaction hardware connection (ReadMe)
  • 1.Online speech to text (ASR)
  • 2.Online text to speech (TTS)
  • 3.AI large model voice interaction
  • 4.Multimodal visual understand speech interaction
  • 5.Multimodal visual localization application
  • 6.Multimodal table scanning application
  • 7.Multimodal autonomous proxy application
  • 8.AI large model online voice assistant
6.YOLO26 tutorials
  • 01.YOLO26 environment
  • 02.CLI use
  • 03.Object detection
  • 04.Instance segmentation
  • 05.Pose estimation
  • 06.Image classification
  • 07.Oriented object detection
  • 08.Model conversion
  • 09.Dataset annotation
  • 10.Model training - conversion
  • 11.Model prediction
7.OpenClaw Advanced Development
  • 1.OpenClaw Deployment
  • 2.OpenClaw WhatsApp Plugin Application
  • 3.OpenClaw WebChat Interaction
  • 4.OpenClaw TUI Interaction
  • 5.OpenClaw Tools Introduction
  • 6.OpenClawGate Gateway User Manual
  • 7.OpenClaw Features Overview
  • 8.OpenClawClawHub Introduction (Skill Installation)
  • 9.OpenClaw Application - File Management
  • 10.OpenClaw Application - Camera
  • 11.OpenClaw Application - Browser Control
  • 12.OpenClaw Application - Script Execution
  • 13.OpenClaw Application - AI Programming (Peripheral & GPIO Control)
  • 14.OpenClaw Application - Dedicated AI Assistant
  • 15.OpenClaw Web Search Capability Configuration
8.ROS2 basic course
  • 1.Introduction to ROS2
  • 2.ROS2 install Humble
  • 3.ROS2 development environment
  • 4.ROS2 workspace
  • 5.ROS2 function package
  • 6.ROS2 node
  • 7.ROS2 topic communication
  • 8.ROS2 service communication
  • 9.ROS2 action communication
  • 10.ROS2 custom interface message
  • 11.ROS2 parameter service case
  • 12.ROS2 meta-function package
  • 13.ROS2 distributed communication
  • 14.ROS2 DDS
  • 15.ROS2 time related API
  • 16.ROS2 common command tools
  • 17.ROS2 rviz2 use
  • 18.ROS2 rqt toolbox
  • 19.ROS2 Launch startup file configuration
  • 20.ROS2 recording and playback tool
  • 21.ROS2 URDF model
  • 22.ROS2 Gazebo simulation platform
  • 23.ROS2 TF2 coordinate transformation
Download
  • Annex_File
  • Code
Download ZIP

Welcome to RDK S100(P) Board repository

2.9 Using MIPI Camera

Using MIPI Camera

Using MIPI Camera1. Environment Preparation2. Running Method3. Expected ResultsPrecautions

To achieve environmental awareness capabilities, robotic products typically incorporate sensors such as cameras and ToF sensors. To reduce the cost of sensor adaptation and usage for users, TogetheROS.Bot encapsulates various commonly used sensors and abstracts them into the hobot_sensor module, supporting ROS standard image messages. When the configured sensor parameters do not match the connected camera, the program will automatically adapt to the correct sensor type.

Note:

Running this section requires first learning the TogetheROS.Bot visual application chapter and installing the TROS environment.

1. Environment Preparation

  • Connect the power supply.

  • Connect the MIPI camera module to the development board's MIPI CSI interface. Note that the black side should be facing upwards.
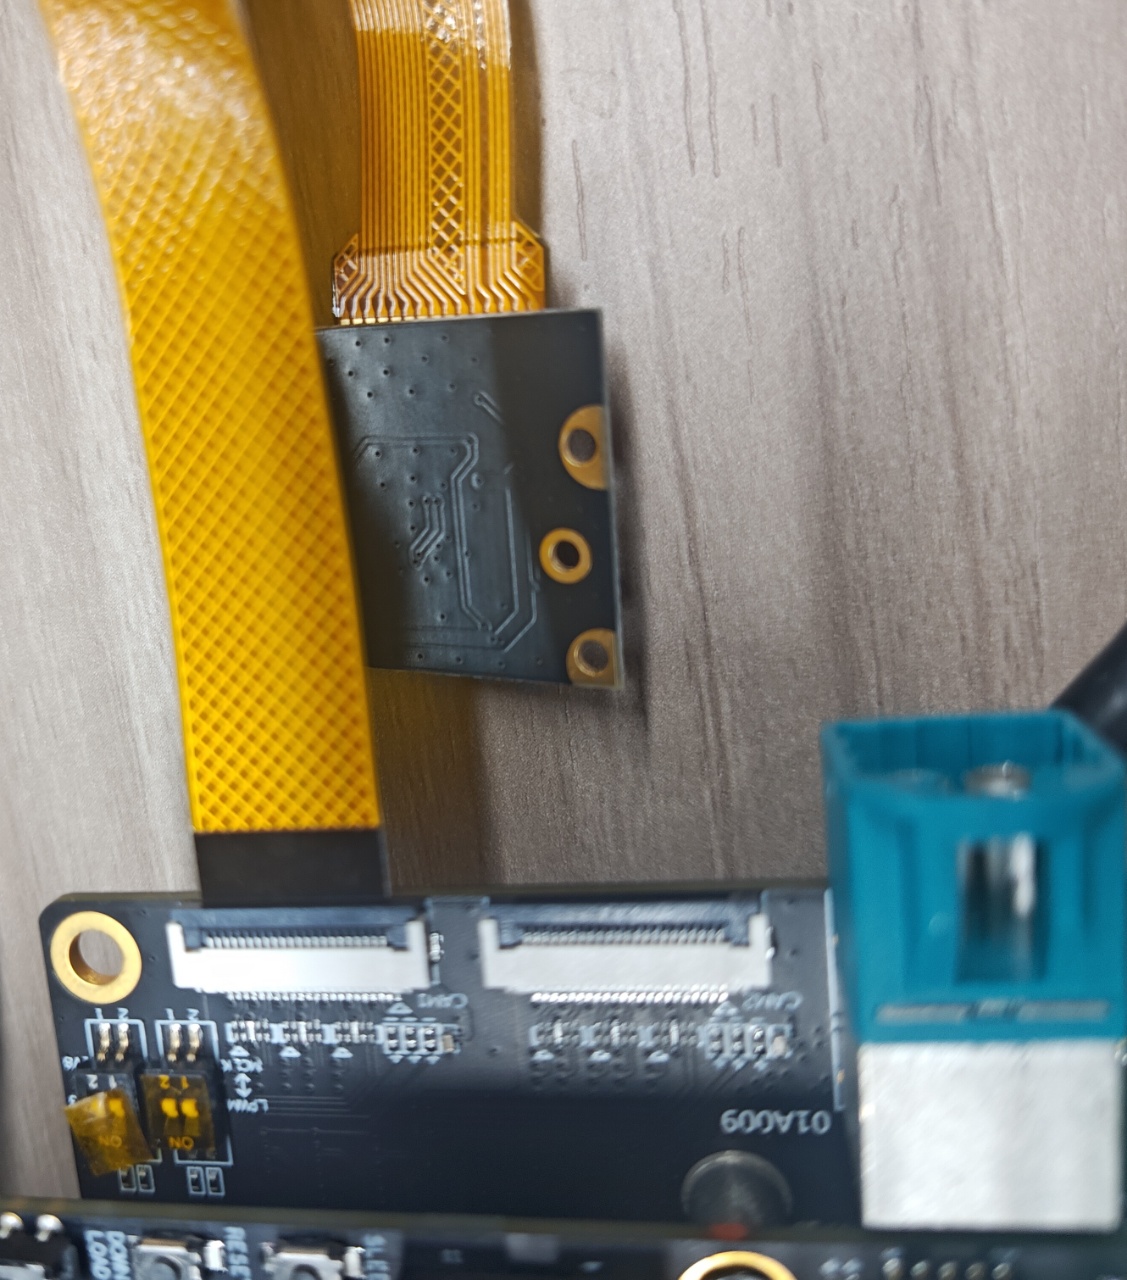
    image-20241018175744117

  • Connect the development board to the monitor via an HDMI cable.

  • Log in to the RDK S100(P) via MobaXterm or other SSH tools.

2. Running Method

  • Log in to the RDK via SSH and determine the camera model; here, IMX219 is used as an example.

  • Start the hobot_sensor node using the following command:

    # Configure the tros.b environment
    source /opt/tros/humble/setup.bash
    xxxxxxxxxx
    # Launched using the launch method
    ros2 launch mipi_cam mipi_cam.launch.py mipi_video_device:=IMX219
  • If the program outputs the following information, it means the node has started successfully.

    xxxxxxxxxx
    [INFO] [launch]: All log files can be found below /root/.ros/log/2022-06-11-15-16-13-641715-ubuntu-8852
    [INFO] [launch]: Default logging verbosity is set to INFO
    [INFO] [mipi_cam-1]: process started with pid [8854]
    ...

3. Expected Results

  • To view the IMX219 camera image on the web, since raw data is being published, JPEG image encoding is required. Two separate terminals are needed: one to subscribe to the MIPI data and encode it into JPEG, and another to publish it via a web service.

    xxxxxxxxxx
    # Configure the tros.b environment
    source /opt/tros/humble/setup.bash
    ​x
    # Start encoding
    ros2 launch hobot_codec hobot_codec_encode.launch.py
    ​
    # Open another terminal
    # Configure the tros.b environment
    source /opt/tros/humble/setup.bash
    ​
    # Start the WebSocket connection.
    ros2 launch websocket websocket.launch.py websocket_image_topic:=/image_jpeg websocket_only_show_image:=true


  • Open a browser (Chrome/Firefox/Edge) on your PC and enter http://IP:8000 (where IP is the RDK IP address). Click on the web interface display in the upper left corner to see the real-time video output from the F37 camera. web-f37-codec
  • Query the camera intrinsic parameters on your PC (the specific data will depend on the camera calibration file). The command and results are as follows:

    xxxxxxxxxx
    root@ubuntu:~# source /opt/ros/humble/setup.bash
    xxxxxxxxxx
    root@ubuntu:~# ros2 topic echo /camera_info
      header:
    stamp:
      sec: 1662013622
      nanosec: 672922214
    frame_id: default_cam
    height: 1080
    width: 1920
    distortion_model: plumb_bob
    d:
    - 0.169978
    - -0.697303
    - -0.002944
    - -0.004961
    - 0.0
    k:
    - 1726.597634
    - 0.0
    - 904.979671
    - 0.0
    - 1737.359551
    - 529.123375
    - 0.0
    - 0.0
    - 1.0
    r:
    - 1.0
    - 0.0
    - 0.0
    - 0.0
    - 1.0
    - 0.0
    - 0.0
    - 0.0
    - 1.0
    p:
    - 1685.497559
    - 0.0
    - 881.6396
    - 0.0
    - 0.0
    - 1756.460205
    - 526.781147
    - 0.0
    - 0.0
    - 0.0
    - 1.0
    - 0.0
    binning_x: 0
    binning_y: 0
    roi:
    x_offset: 0
    y_offset: 0
    height: 0
    width: 0
    do_rectify: false


Precautions

  • Camera Connection and Disconnection Precautions

    It is strictly forbidden to connect or disconnect the camera while the development board is powered on, as this can easily damage the camera module.

  • If you encounter abnormal startup of the hobot_sensor node, you can troubleshoot the problem using the following steps:

    • Check the hardware connection.
    • Check if the tros.b environment is set up.
    • Check if the parameters are correct; please refer to README.md for details.
    • Note that the tros environment must be set up in every interface.
    • It is recommended to run the examples in root mode.
Using USB Camera
SSD mounting

COMPANY

  • About us
  • Team Style
  • Blog

LEARNING & EXPLORATION

  • Tutorials
  • Edge AI hardware
  • Educational robots
  • Embedded intelligent hardware

WHERE TO BUY

  • Yahboom Online Store
  • Amazon
  • Alibaba
  • AliExpress
  • Mercado

TECHNOLOGY SUPPORT

  • Email: support@yahboom.com

BE A DISTRIBUTOR

  • Email: sales@yahboom.com
QR Code

Copyright © 2017-2026 Yahboom. All Rights Reserved.

EN/中文