Welcome to STM32-BoardCar repository
8.K230 face tracking on PTZ
K230 Visual Pan-Tilt Tracking
K230 Visual Pan-Tilt Tracking1. Software - Hardware2. Brief Principle1. Hardware Schematic Diagram2. Physical Connection Diagram3. Control Principle3. Main Functions4. Partial Code Analysis5. Experimental Phenomenon
This tutorial is a comprehensive experiment combining multiple peripherals. You can understand each individual peripheral first before conducting this experiment.
1. Software - Hardware
STM32F103CubeIDE
STM32 Robot Development Board
K230 module + Two-dimensional electric pan-tilt + Electronic control: External connection
Type-C data cable or ST-Link: Used for program downloading or simulation of the development board
2. Brief Principle
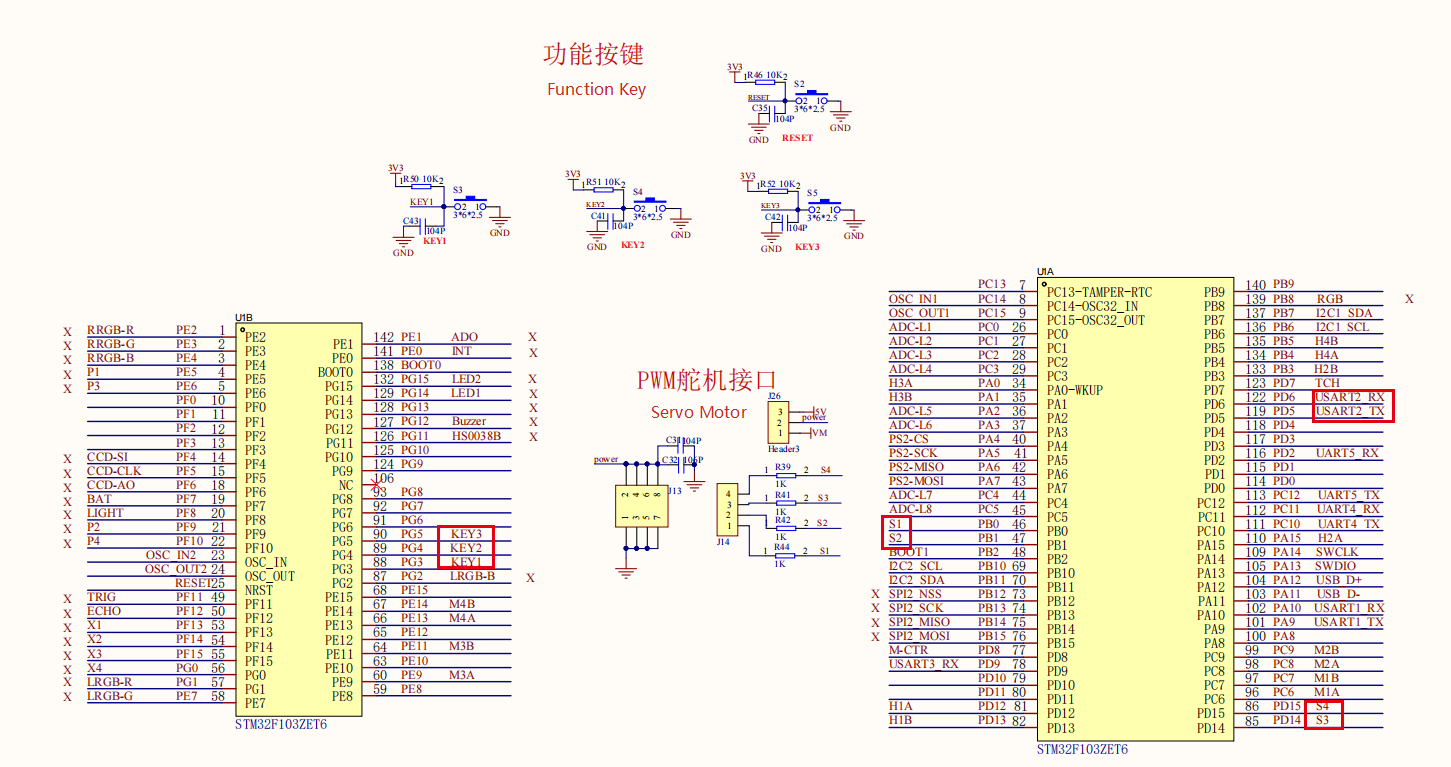
1. Hardware Schematic Diagram
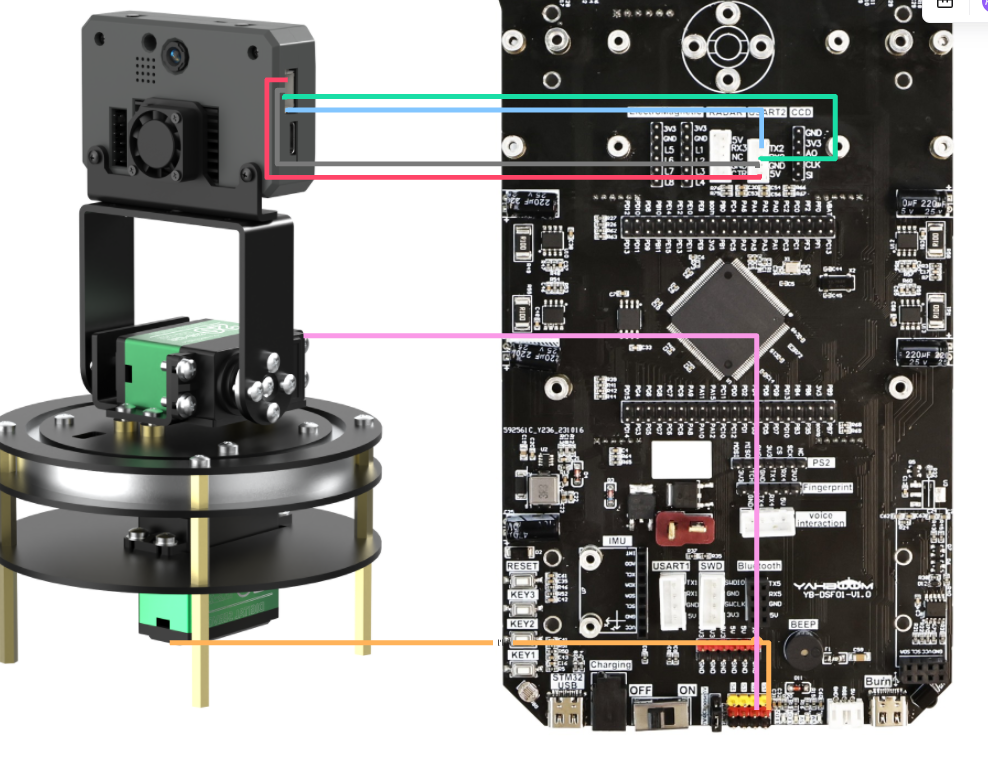
2. Physical Connection Diagram
K30 Pan-Tilt Wiring (Note: The wiring in the following figure is only for position reference. We provide K230 double-ended PH2.0 4Pin all-black wires at the factory, which have a foolproof design. You don't need to worry about wiring issues.)
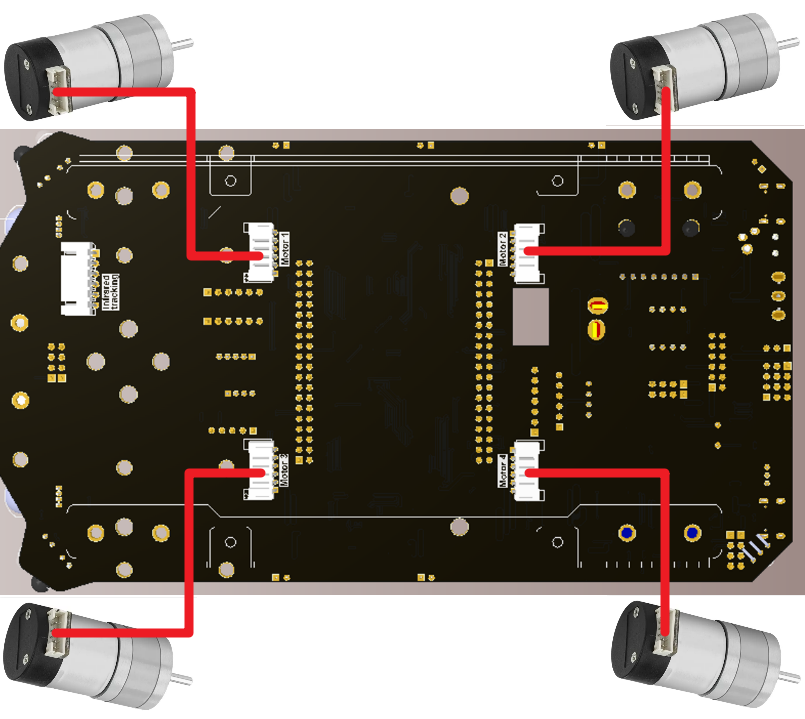
Motor Wiring
3. Control Principle
Program Flowchart
| Module | Function |
|---|---|
| K230 Vision Module | Recognize faces and send data to the microcontroller through the serial port |
| Two-dimensional Electric Pan-Tilt + Electronic Control | Control the movement of the K230 module's position |
Communication Protocol:
| Start Symbol | Length | Separator | Routine Number | Separator | x | Separator | y | Separator | w | Separator | h | End Symbol |
|---|---|---|---|---|---|---|---|---|---|---|---|---|
| $ | XX | , | 06 | , | XXX | , | XXX | , | XXX | , | XXX | # |
Microcontroller part: Receive the data sent by the K230 through the serial port, and parse and process each byte of the data. After extracting the valid data into an array, perform PID processing on the returned coordinates. Then, the microcontroller drives the servo motors according to the processed data to control the pan-tilt to follow the movement of the face.
3. Main Functions
Function: APP_K230X_PID_Calc
| Function Prototype | float APP_K230X_PID_Calc(float actual_value) |
|---|---|
| Function Description | Calculate the output value of the X-axis using PID |
| Input Parameter | The difference between the target value and the actual value in the X direction |
| Return Value | The output value of the incremental PID calculation for the X-axis |
Function: APP_K230Y_PID_Calc
| Function Prototype | float APP_K230Y_PID_Calc(float actual_value) |
|---|---|
| Function Description | Calculate the output value of the Y-axis using PID |
| Input Parameter | The difference between the target value and the actual value in the Y direction |
| Return Value | The output value of the incremental PID calculation for the Y-axis |
Function: APP_k230X_Y_Init
| Function Prototype | void APP_k230X_Y_Init(void) |
|---|---|
| Function Description | Initialize the X/Y axes of the K230 |
| Input Parameter | None |
| Return Value | None |
Function: PwmServo_Set_Angle
| Function Prototype | void PwmServo_Set_Angle(uint8_t index, uint8_t angle) |
|---|---|
| Function Description | Set the angle of the PWM servo motor |
| Input Parameter 1 | Servo motor number [0 - (Number of servo motors - 1)] (0: The servo motor in the bottom horizontal axis direction is connected to S1 of the development board; 1: The servo motor in the vertical direction is connected to S2 of the development board) |
| Input Parameter 2 | Angle value [0 - 180] |
| Return Value | None |
For the underlying driver, you can refer to [Chapter 3: Advanced Timer Tutorial] and [Chapter 4: Motor Control Tutorial].For the application layer, you can read the source code in the project files by yourself.
4. Partial Code Analysis
app_k230.c
xxxxxxxxxx// 此函数用于进行K230 X/Y轴的线性PID控制// This function is used for linear PID control of the K230 X/Y axesvoid APP_K230X_Y_Line_PID(void) { // 计算K230屏幕X轴的中间值,K230屏幕X轴为640,所以中间值为320 // Calculate the median value of the X-axis of the K230 screen. The X-axis of the K230 screen is 640, so the median value is 320 g_K230x_median = 320 - K230_data.k230_X; // 计算K230屏幕Y轴的中间值,K230屏幕Y轴为480,所以中间值为240 // Calculate the median value of the Y-axis of the K230 screen. The Y-axis of the K230 screen is 480, so the median value is 240 g_K230y_median = 240 - K230_data.k230_Y; // printf("%f\t %f\r\n", g_K230x_median, g_K230y_median); // if((my_abs(g_K230y_median ) <= 30) && (my_abs(g_K230x_median ) <= 40) ) // 不进行PID运算的区域 // Area without PID operation // { // return; // } // 进行X轴的PID计算,屏蔽符号差异 // Perform PID calculation on the X-axis, shielding symbol differences pid_output_K230x = (int)(APP_K230X_PID_Calc(-g_K230x_median)); // 进行Y轴的PID计算 // Perform PID calculation on the Y-axis pid_output_K230y = (int)(APP_K230Y_PID_Calc(g_K230y_median)); printf("%f\t %f\r\n", pid_output_K230x, pid_output_K230y); // 控制左右(X轴方向)舵机 --- S1舵机 // Control the left and right (X-axis direction) servo motor - S1 servo motor PwmServo_Set_Angle(0, 90 + pid_output_K230x); // 屏蔽符号差异后可如此编写 // It can be written like this after shielding the symbol differences // 控制上下(Y轴方向)舵机 --- S2舵机 // Control the up and down (Y-axis direction) servo motor - S2 servo motor PwmServo_Set_Angle(1, 90 + pid_output_K230y);}bsp_k230.c
xxxxxxxxxx/** * @brief PTO data parsing function * @param data_buf Pointer to the data buffer * @param num Data length * @note Parse the protocol data in the format of "Header, Field 1, Field 2, ..., Tail". */// 此函数用于解析PTO数据// This function is used to parse PTO datavoid Pto_Data_Parse(uint8_t *data_buf, uint8_t num) { // 提取协议头部和尾部 // Extract the protocol header and tail uint8_t pto_head = data_buf[0]; uint8_t pto_tail = data_buf[num - 1]; // 校验头部和尾部是否匹配 // Validate whether the header and tail match if (!(pto_head == PTO_HEAD && pto_tail == PTO_TAIL)) { return; } uint8_t data_index = 1; // 当前处理的字段索引(从1开始,跳过头部) // Index of the currently processed field (starting from 1, skipping the header) uint8_t field_index[PTO_BUF_LEN_MAX] = {0}; // 存储逗号位置的数组 // Array to store the positions of commas int i = 0; // 遍历数据查找逗号位置,并将逗号替换为字符串结束符'0' // Traverse the data to find the positions of commas and replace commas with the string terminator '\0' for (i = 1; i < num - 1; i++) { if (data_buf[i] == ',') { data_buf[i] = 0; // 将逗号替换为字符串结束符 // Replace the comma with the string terminator field_index[data_index] = i; // 记录逗号位置(字段结束位置) // Record the position of the comma (end position of the field) data_index++; // 字段索引递增 // Increment the field index } } // 处理没有逗号的情况(仅有一个数据字段) // Handle the case where there is no comma (only one data field) if (data_index == 1) { uint8_t len = num - 2; // 数据长度(去除头部和尾部) // Data length (excluding the header and tail) // 复制数据到lubiao数组并添加字符串结束符 // Copy the data to the lubiao array and add the string terminator memcpy(lubiao, (char*)data_buf + 1, len); lubiao[len] = '\0'; } else { // 处理多个逗号的情况(多个数据字段) // Handle the case where there are multiple commas (multiple data fields) for (i = 0; i < data_index; i++) { uint8_t start = field_index[i] + 1; // 字段起始位置(逗号后一位) // Starting position of the field (one position after the comma) uint8_t len; if (i == data_index - 1) { // 最后一个字段:长度为尾部前位置减去起始位置 // Last field: length is (position before the tail - starting position) len = (num - 1) - start; } else { // 中间字段:长度为下一个逗号位置减去起始位置 // Middle field: length is (next comma position - starting position) len = field_index[i + 1] - start; } // 特殊处理第7个字段(索引6)和第3个字段(索引2)为字符串 // Special handling for the 7th field (index 6) and the 3rd field (index 2) as strings if (i == 6 && data_index == 7) { memcpy(msg, (char*)data_buf + start, len); msg[len] = '\0'; } else if (i == 2 && data_index == 3) { memcpy(game, (char*)data_buf + start, len); game[len] = '\0'; } else { // 其他字段转换为整数 // Convert other fields to integers values[i] = Pto_Char_To_Int((char*)data_buf + start); } } // // (Commented validation logic) Validate data length field // uint8_t pto_len = values[0]; // if (pto_len != num) { // printf("pto_len error:%d , data_len:%d\n", pto_len, num); // return; // } // pto_id = values[1]; // Protocol ID field (unfinished assignment) } // 组合坐标数据(字段3 + 5为X,字段4 + 6为Y,假设字段索引从0开始) // Combine coordinate data (Field 3 + 5 is X, Field 4 + 6 is Y, assuming the field index starts from 0) K230_data.k230_X = values[2] + values[4]; K230_data.k230_Y = values[3] + values[5];}5. Experimental Phenomenon
After the program is successfully downloaded, you need to make the face appear within the K230 screen so that the K230 can recognize it. After recognition, press the Key1 button on the expansion board, and the pan-tilt will follow the movement of the face.
xxxxxxxxxxFor program downloading, you can refer to [Chapter 2: Development Environment Setup and Usage → 2.6 Program Download and Simulation].
How to download the K230 code:
Required tools: K230, SD card, CanMV IDE K230
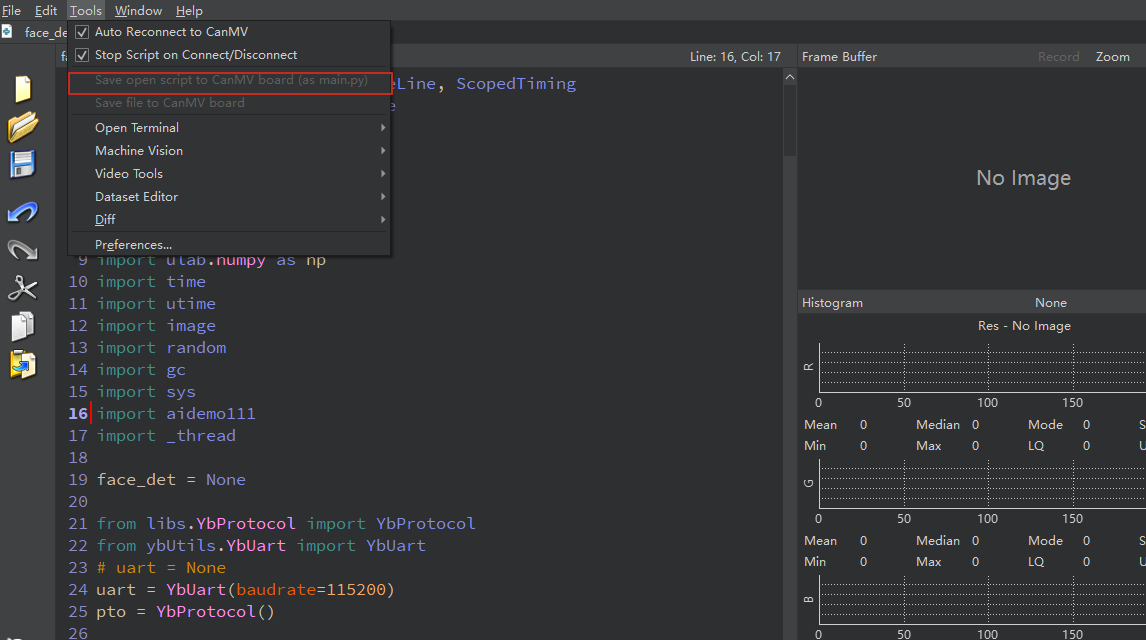
You need to find the face_detection.py file in the project folder, then drag it to CanMV IDE K230, and then choose to save the opened script as main.py to CanMV.