Welcome to STM32-BoardCar repository
12. I2C Communication (IIC)
I2C communication
I2C communication1、software-hardware2、Brief principle2.1、Hardware schematic diagram2.2、Physical connection diagram2.3、Principle of control3、Engineering configuration3.1、Notes3.2、Pin configuration4、Main function4.1、User function4.2、LL library function analysis5、Experimental phenomenon
This tutorial demonstrates: displaying content on a 0.91-inch OLED display driven by hardware I2C
1、software-hardware
STM32F103CubeIDE
STM32 robot expansion board
I2C: chip internal peripheral
OLED: External
Type-C cable or ST-Link
Download or simulate the program of the development board
2、Brief principle
2.1、Hardware schematic diagram
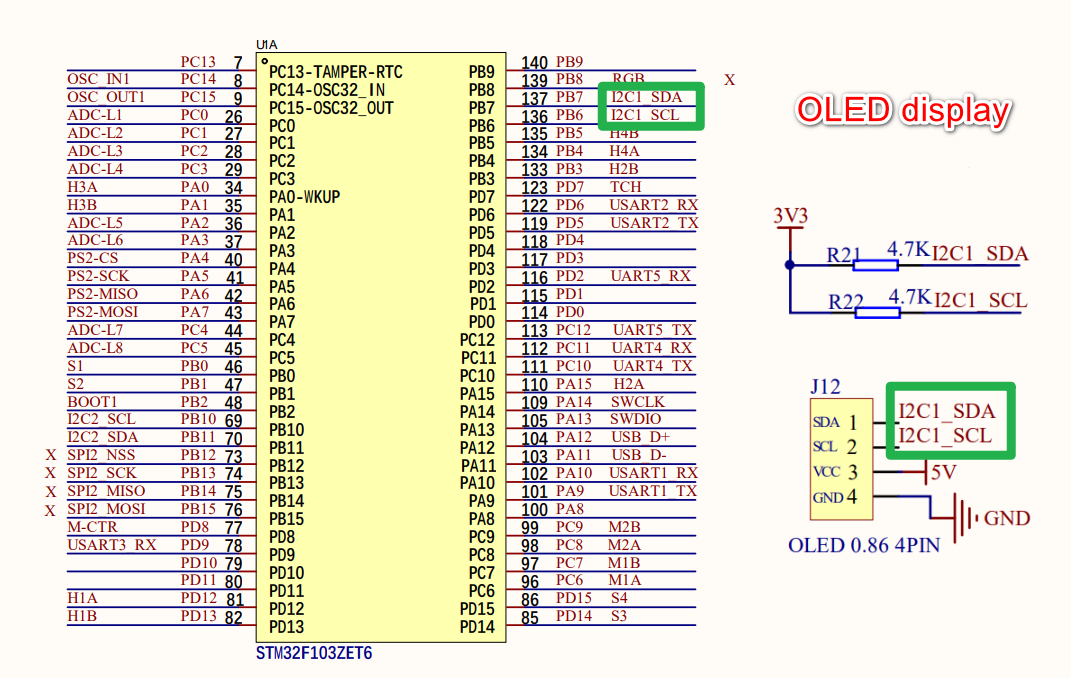
The schematic shows only the I2C (I2C1) interface used in the tutorial
2.2、Physical connection diagram
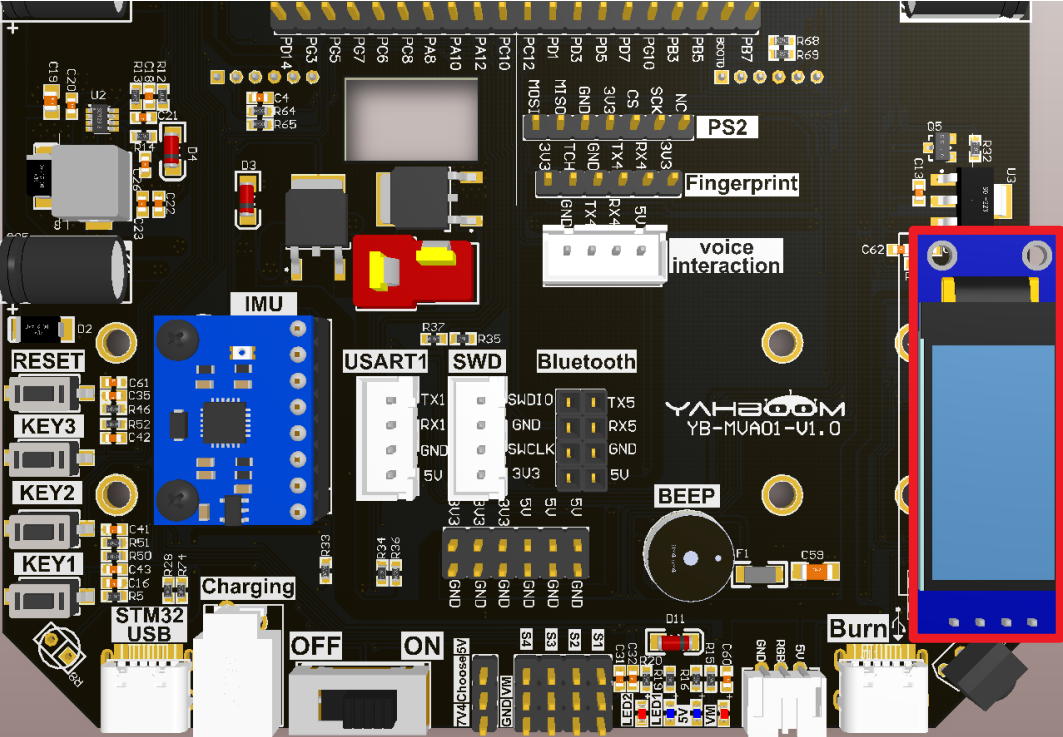
| OLED | STM32 expansion board |
|---|---|
| VCC | VCC |
| SCL | SCL |
| SDA | SDA |
| GND | GND |
2.3、Principle of control
- I2C
I2C (Inter-Integrated Circuit) bus is a serial communication protocol, which is composed of serial data line (SDA) and serial clock line (SCL).
Serial data line(SDA):Use to transfer data
All devices use the same data line and communicate by transmitting data in binary form.
Serial clock line(SCL):Use for synchronous data transfer
xxxxxxxxxxThe clock line generates pulses at a specific frequency to ensure that both the sending and receiving devices can transmit data in the same timing sequence.
Multi-device communication:The e I2C interface uses an addresse-based device identification mechanism to select the specific device to communicate with.
xxxxxxxxxxEach I2C device has a unique address that identifies the device; The master selects the specific device to communicate with by sending the device address
I2C communication
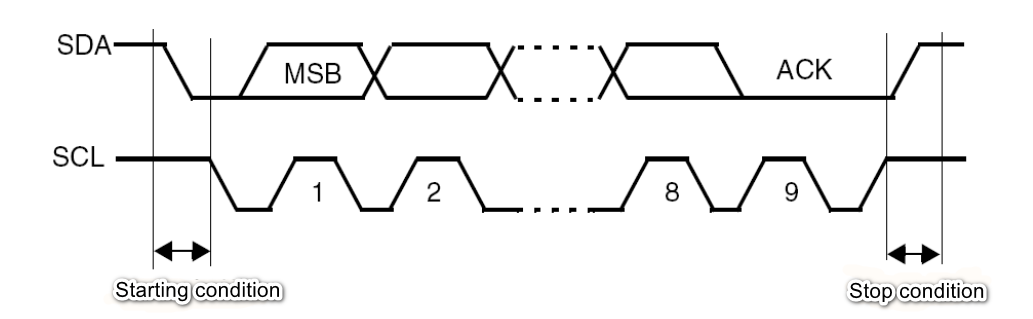
IIC bus timing diagram
Idle state
SCL high level, SDA high level;
Starting condition
SCL high level, SDA falling edge;
Stop condition
SCL high level, SDA rising edge;
Data transfer
SCL low, SDA rising edge or falling edge;
Signal of reply
When the slave receives the data, it sends a low level to the master to indicate successful reception.
Data validity
When the clock line is high, the data line must be stable; When the clock line is low, the data line is allowed to change.
xxxxxxxxxxSCL:The high level → is used for the beginning and end of the communicationSCL:The low level → is used to send and terminate data
3、Engineering configuration
Project Configuration: Prompt for configuration options during STM32CubeIDE project configuration
3.1、Notes
Omitted project configuration: New project, chip selection, project configuration, SYS for pin configuration, RCC configuration, clock configuration, and project configuration content
The project configuration part, which is not omitted, is the key point to configure in this tutorial.
xxxxxxxxxxPlease refer to [2. Development environment construction and use: STM32CubeIDE installation and use] to understand how to configure the omitted parts of the project.
3.2、Pin configuration
- Configure the specified pin function
You can directly select the corresponding pin number in the pin view, and the corresponding option will appear when the mouse is left clicked

- I2C
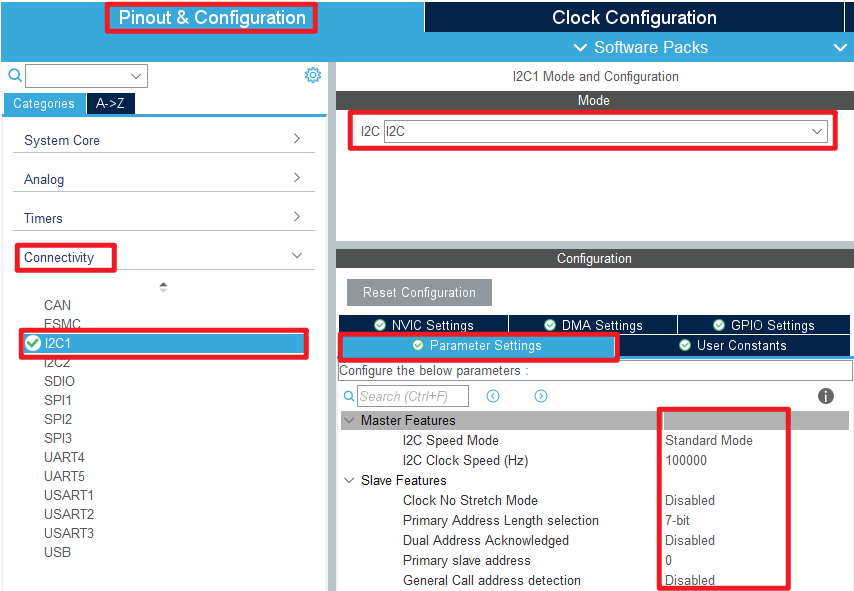
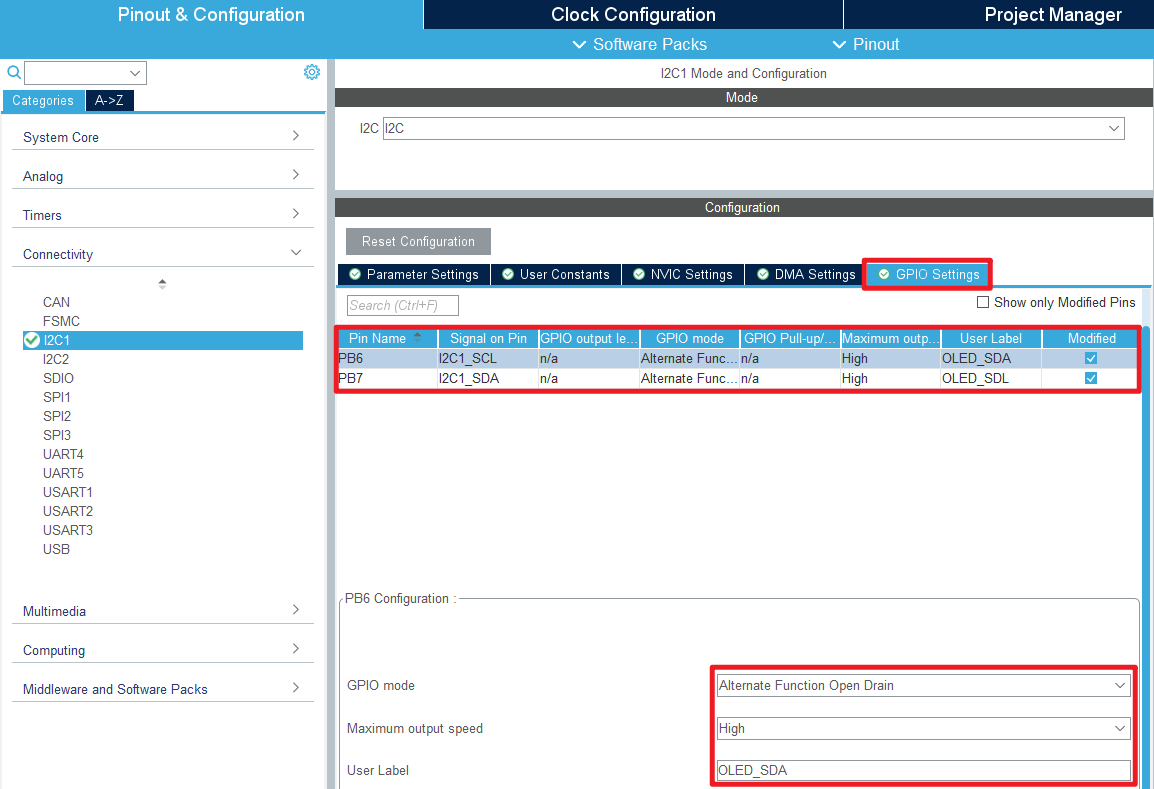
- Advanced Settings
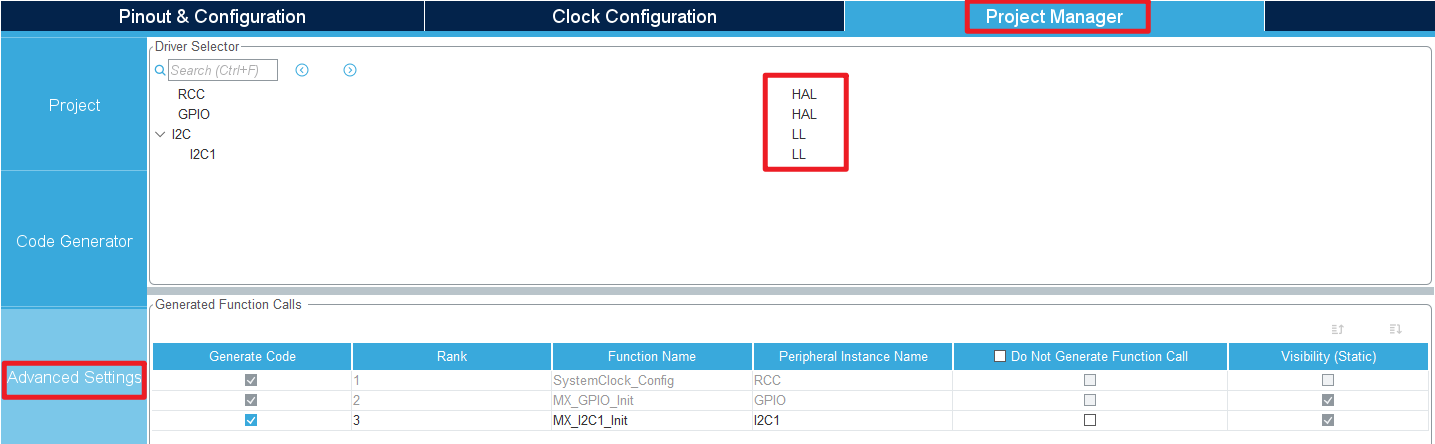
- Generating code

4、Main function
This paper mainly introduces the functional code written by users. Detailed code can be opened by yourself in the project file we provide, and enter the Bsp folder to view the source code.
4.1、User function
function:I2C_Send7bitAddress
| Function prototypes | void I2C_Send7bitAddress(I2C_TypeDef *I2Cx, uint8_t Address, uint8_t I2C_Direction) |
|---|---|
| Functional Description | Send slave device address |
| Input parameters1 | I2Cx:I2C handle address |
| Input parameters2 | Address:Slave device address |
| Input parameters3 | I2C_Direction:Read or write |
| None | None |
function:OLED_Init
| Function prototypes | void OLED_Init(void) |
|---|---|
| Functional Description | OLED initialization |
| Input parameters | None |
| Return value | None |
function:OLED_Draw_Line
| Function prototypes | void OLED_Draw_Line(char *data, uint8_t line, bool clear, bool refresh) |
|---|---|
| Functional Description | Write a single character |
| Input parameters1 | data:Displaying data |
| Input parameters2 | line:Number of rows |
| Input parameters3 | clear:Clear or not |
| Input parameters4 | refresh:refresh or not |
| Return value | None |
function:SSD1306_UpdateScreen
| Function prototypes | void SSD1306_UpdateScreen(void) |
|---|---|
| Functional Description | oled screen update display |
| Input parameters | None |
| Return value | None |
function:SSD1306_UpdateScreen
| Function prototypes | void SSD1306_Fill(SSD1306_COLOR_t color) |
|---|---|
| Functional Description | The oled screen cleared, but did not refresh the display |
| Input parameters | color:The color to display |
| Return value | None |
function:SSD1306_UpdateScreen
| Function prototypes | void SSD1306_GotoXY(uint16_t x, uint16_t y) |
|---|---|
| Functional Description | Sets the current cursor |
| Input parameters1 | x:Horizontal coordinate |
| Input parameters2 | y:Vertical coordinate |
| Return value | None |
function:SSD1306_DrawPixel
| Function prototypes | void SSD1306_DrawPixel(uint16_t x, uint16_t y, SSD1306_COLOR_t color) |
|---|---|
| Functional Description | Drawing a pixel |
| Input parameters1 | x:Horizontal coordinate |
| Input parameters2 | y:Vertical coordinate |
| Input parameters3 | color:The color to display |
| Return value | None |
4.2、LL library function analysis
LL library functions that have been covered in the previous tutorial will not be covered in the tutorial
xxxxxxxxxxIf you want to find the HAL library and LL library function analysis involved in the entire tutorial, you can view the documents in the folder [8. STM32 Manual: STM32F1_HAL Library and LL Library_User Manual]
function:LL_I2C_Init
| Function prototypes | uint32_t LL_I2C_Init(I2C_TypeDef *I2Cx, LL_I2C_InitTypeDef *I2C_InitStruct) |
|---|---|
| Functional Description | Initialize the I2C peripheral parameters |
| Input parameters1 | I2Cx:I2C handle address |
| Input parameters2 | I2C_InitStruct:I2C initialization structure that contains configuration information for specified I2C peripherals |
| Return value | None |
function:LL_I2C_Enable
| Function prototypes | void LL_I2C_Enable(I2C_TypeDef *I2Cx) |
|---|---|
| Functional Description | Enable the I2C peripheral |
| Input parameters | I2Cx:I2C handle address |
| Return value | None |
function:LL_I2C_GenerateStartCondition
| Function prototypes | void LL_I2C_GenerateStartCondition(I2C_TypeDef *I2Cx) |
|---|---|
| Functional Description | I2C communication start condition |
| Input parameters | I2Cx:I2C handle address |
| Return value | None |
function:LL_I2C_TransmitData8
| Function prototypes | void LL_I2C_TransmitData8(I2C_TypeDef *I2Cx, uint8_t Data) |
|---|---|
| Functional Description | Sends 8 bits of data to the specified I2C peripheral |
| Input parameters1 | I2Cx:I2C handle address |
| Input parameters2 | Data:data |
| Return value | None |
function:LL_I2C_GenerateStopCondition
| Function prototypes | void LL_I2C_GenerateStopCondition(I2C_TypeDef *I2Cx) |
|---|---|
| Functional Description | I2C communication end condition |
| Input parameters | I2Cx:I2C handle address |
| Return value | None |
5、Experimental phenomenon
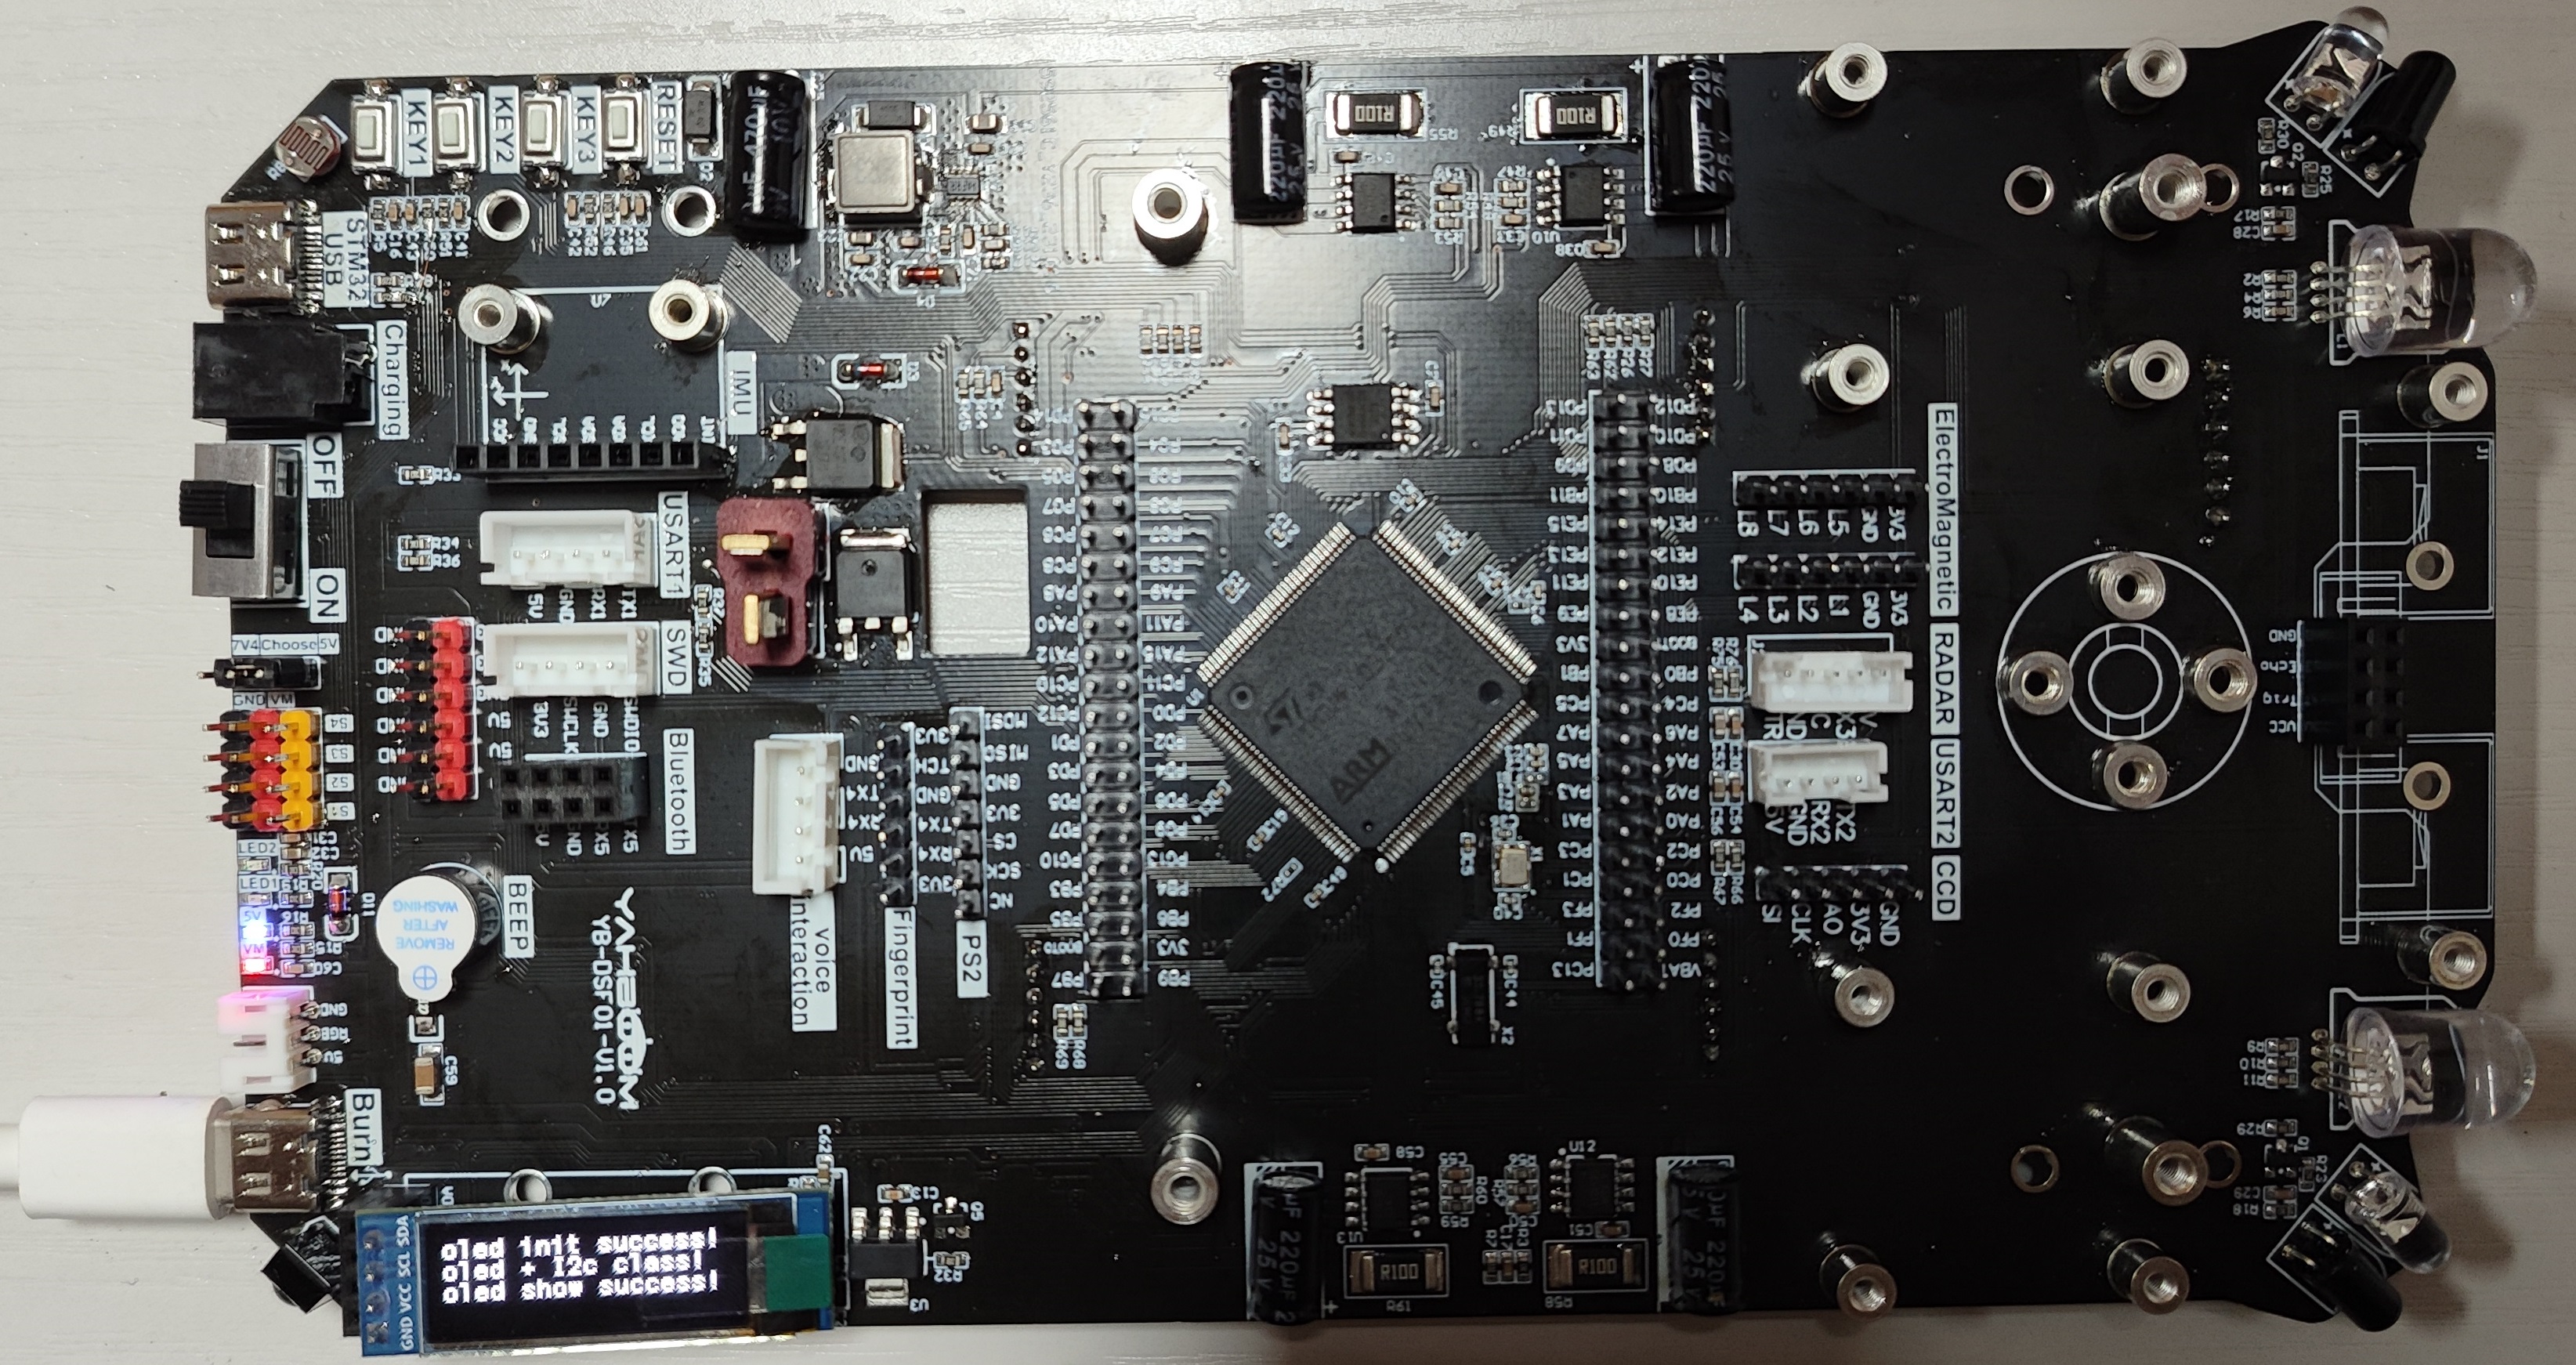
After downloading the program successfully, press the RESET button of the development board to observe the OLED display
xxxxxxxxxxFor program download, please refer to [2. Development environment construction and use: program download and simulation]
phenomenon:
OLED: The first line shows oled init success! , the second row shows oled + I2c class! The third row displays oled show success!