Welcome to STM32-BoardCar repository
15.K230 gesture control (voice)
K230 gesture control
K230 gesture controlPhysical connection diagramExperimental results of the routinePartial code analysis
Physical connection diagram
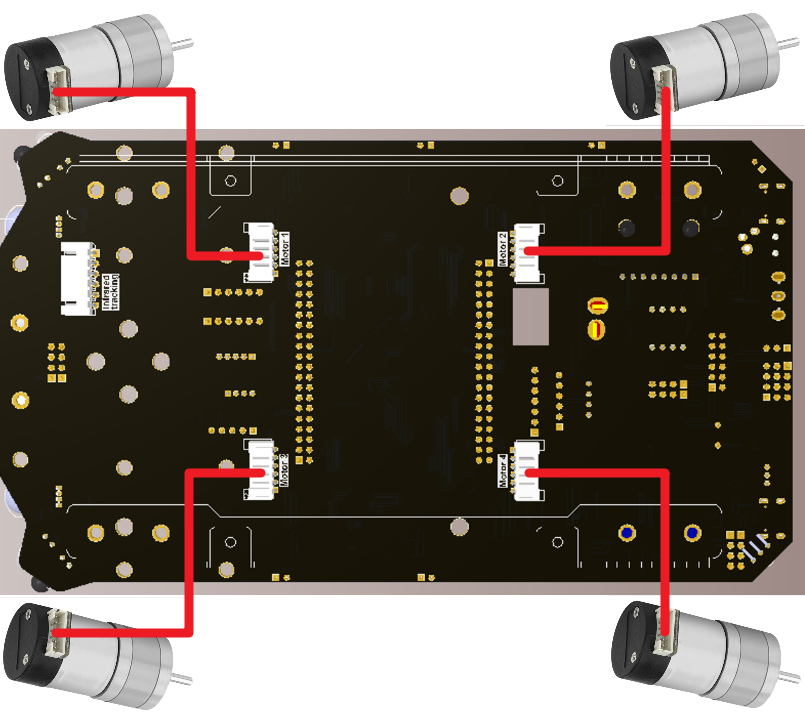
Motor wiring
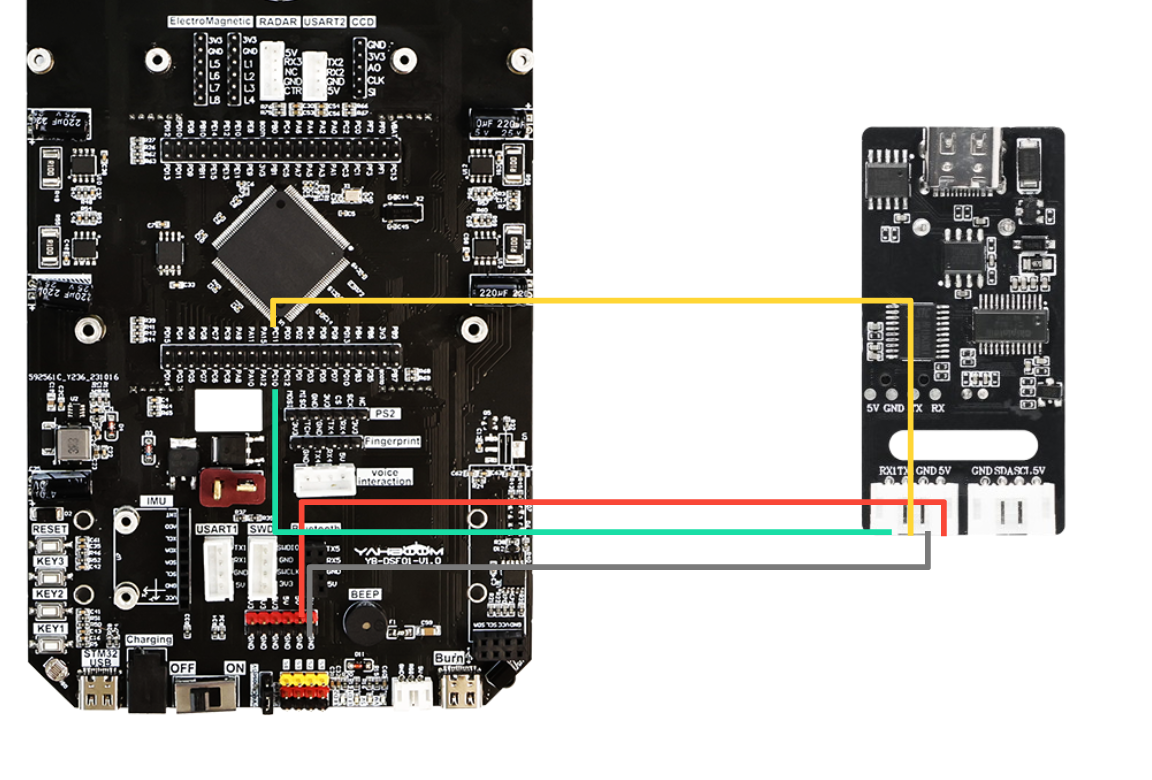
Voice module wiring
| Intelligent voice interaction module | STM32 |
|---|---|
| 5V | 5V |
| GND | GND |
| TX1 | PC11 |
| RX1 | PC10 |
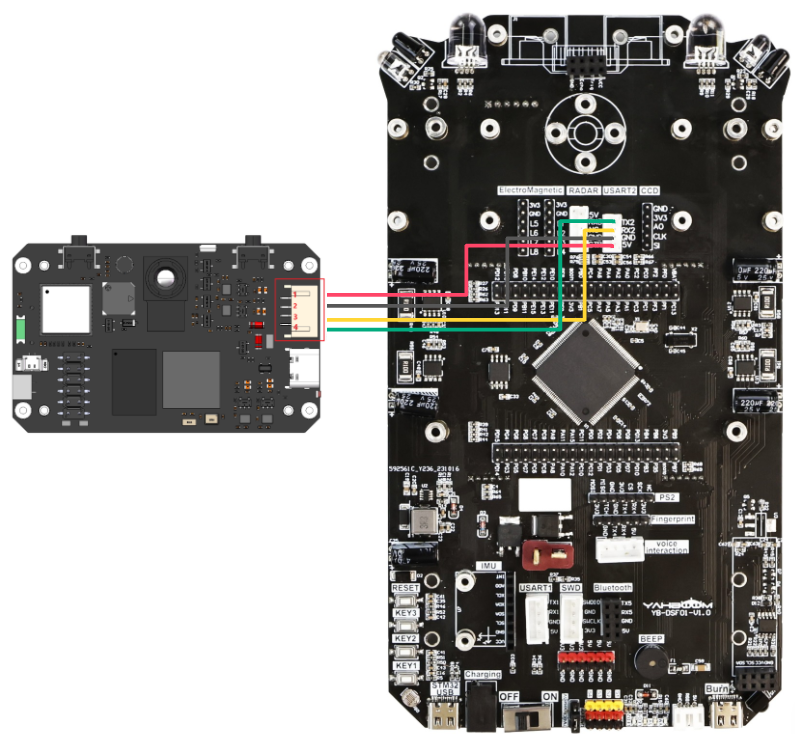
K230 wiring (Note: The wiring diagram below is for reference only. We are equipped with K230 dual-head PH2.0 4Pin all-black cable, with foolproof design, no need to worry about wiring problems)
Experimental results of the routine
Today we will learn how to use K230 to realize dynamic gesture recognition and play a simple game with the car
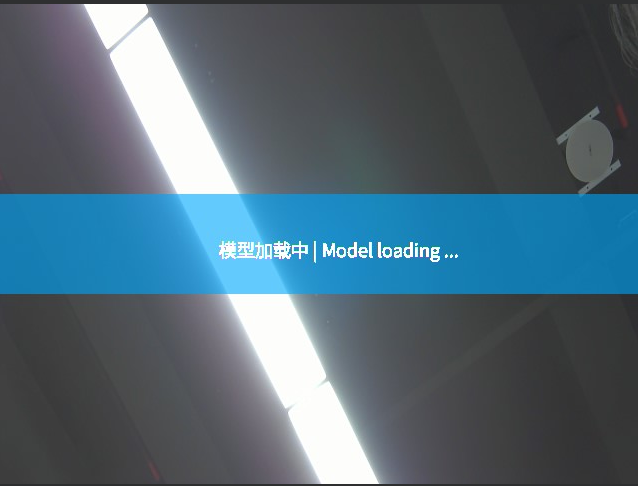
After waiting for the routine to run and load the model, we put our hand in front of the camera and wait for the gesture icon to appear in the upper left corner. The appearance of this icon means that K230 is ready to recognize gestures, and then perform the corresponding gesture waving behavior. The car will perform the corresponding actions. The specific operation can be seen in the following animation: Note: When connected to our AI voice interaction integrated module, there will be voice broadcast when the gesture action is detected. Users who have not purchased the voice module do not need to worry. Without the voice module, K230 can still implement this case, but there is no voice broadcast function

| Module | Function |
|---|---|
| k230 visual module | Recognize machine code and send data to the microcontroller through the serial port |
Communication protocol
| Experimental routine | Start character | Length | Delimiter | Routine number | Delimiter | msg | End character |
|---|---|---|---|---|---|---|---|
| Gesture recognition | $ | XX | , | 12 | , | ... | # |
msg: gesture information, up ‘UP’, down ‘DOWN’, left ‘LEFT’, right ‘RIGHT’, middle ‘MIDDLE’
The microcontroller receives the data sent by k230 through the serial port and processes the data. By judging whether the received data content is in the above frame format, we extract the msg after it meets the data frame format, and then perform recognition processing
** Voice module command words and protocols**
| Command words | Function type | Broadcast sentence | Broadcast mode | Send protocol | Receive protocol |
|---|---|---|---|---|---|
| UPWARD-GESTURE-DETECTED | Command | Recognize the forward gesture the car moves forward | By | AA 55 FF 64 FB | AA 55 FF 64 FB |
| DOWNWARD-GESTURE-DETECTED | Command | Recognize the backward gesture the car moves backward | By | AA 55 FF 65 FB | AA 55 FF 65 FB |
| LEFT-GESTURE-DETECTED | Command | Recognize the left gesture the car turns left | By | AA 55 FF 66 FB | AA 55 FF 66 FB |
| RIGHT-GESTURE-DETECTED | Command | Recognize the right gesture the car turns right | By | AA 55 FF 67 FB | AA 55 FF 67 FB |
K230 code burning
Required tools: K230, SD card, CanMV IDE K230
We find the dynamic_gesture.py file in the project folder and then copy it to CanMV IDE K230, then choose to save the opened script as main.py to CanMV
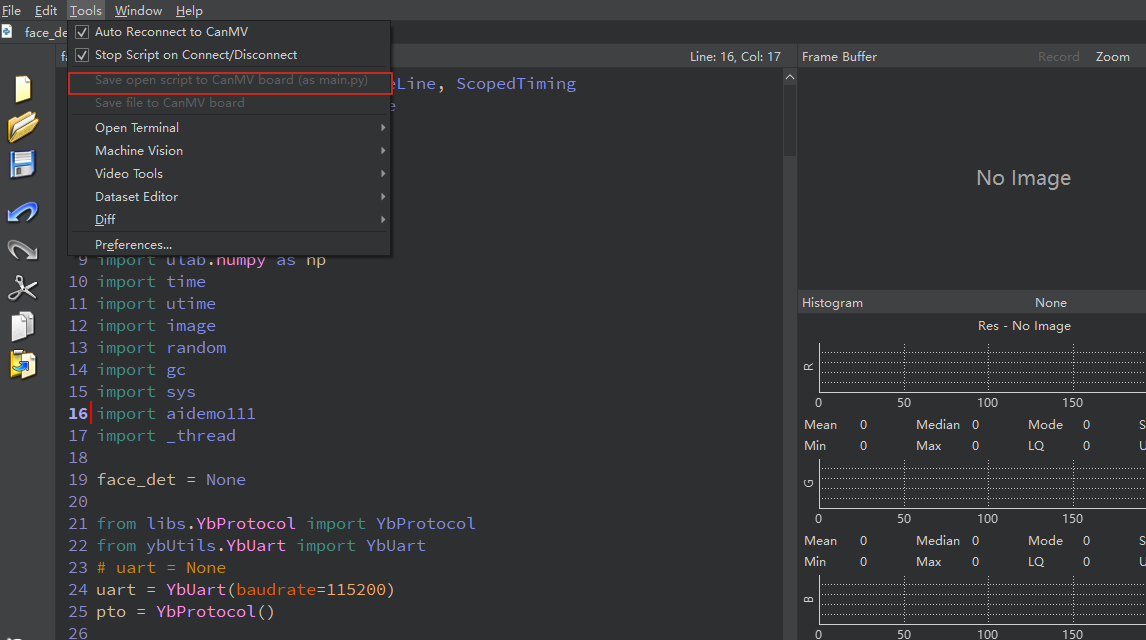
Voice module firmware burning
xxxxxxxxxxBurn the CI1302_ EN _ SingleMic_ V00916_UART1_115200_2M.bin file we provide to implement all cases related to the intelligent voice interaction module of this car. Only burn it once. For the burning method, see [Voice Interaction Control Tutorial] [Section 6] Voice Module Firmware Burning
Program flow chart
Partial code analysis
There are too many complete codes in this section, so only the key codes are explained here
Key codes for gesture recognition
xxxxxxxxxx    def run(self, input_np):        """        运行手势识别 / Run gesture recognition
        参数 / Parameter:        input_np: 输入图像 / Input image
        返回 / Returns:        根据当前状态返回检测结果或识别结果 / Returns detection or recognition results based on current state        """        if self.cur_state == self.TRIGGER:            # 手掌检测模式 / Hand detection mode            det_boxes = self.hand_det.run(input_np)            boxes = []            gesture_res = []
            for det_box in det_boxes:                # 获取检测框坐标 / Get detection box coordinates                x1, y1, x2, y2 = det_box[2], det_box[3], det_box[4], det_box[5]                w, h = int(x2 - x1), int(y2 - y1)
                # 过滤无效检测框 / Filter invalid detection boxes                if (h < (0.1 * self.rgb888p_size[1])):                    continue                if (w < (0.25 * self.rgb888p_size[0]) and                    ((x1 < (0.03 * self.rgb888p_size[0])) or                     (x2 > (0.97 * self.rgb888p_size[0])))):                    continue                if (w < (0.15 * self.rgb888p_size[0]) and                    ((x1 < (0.01 * self.rgb888p_size[0])) or                     (x2 > (0.99 * self.rgb888p_size[0])))):                    continue
                # 执行关键点检测 / Perform keypoint detection                self.hand_kp.config_preprocess(det_box)                hk_results, gesture_str = self.hand_kp.run(input_np)                boxes.append(det_box)                gesture_res.append((hk_results, gesture_str))
            return boxes, gesture_res        else:            # 动态手势识别模式 / Dynamic gesture recognition mode            idx, avg_logit = self.dg.run(input_np, self.his_logit, self.history)            return idx, avg_logit
    def draw_result(self, pl, output1, output2):        """        绘制识别结果 / Draw recognition results
        参数 / Parameters:        pl: 绘图层对象 / Drawing layer object        output1: 第一阶段输出(检测框) / First stage output (detection boxes)        output2: 第二阶段输出(关键点和手势) / Second stage output (keypoints and gestures)        """        # 清空绘图缓存 / Clear drawing cache        pl.osd_img.clear()        draw_img_np = np.zeros((self.display_size[1], self.display_size[0], 4), dtype=np.uint8)        draw_img = image.Image(self.display_size[0], self.display_size[1],                            image.ARGB8888, alloc=image.ALLOC_REF, data=draw_img_np)
        if self.cur_state == self.TRIGGER:            # 触发状态下的处理 / Processing in trigger state            for i in range(len(output1)):                hk_results, gesture = output2[i][0], output2[i][1]
                # 检测到"five"或"yeah"手势 / Detect "five" or "yeah" gesture                if ((gesture == "five") or (gesture == "yeah")):                    # 计算手势方向向量 / Calculate gesture direction vector                    v_x = hk_results[24] - hk_results[0]                    v_y = hk_results[25] - hk_results[1]                    angle = self.hand_kp.hk_vector_2d_angle([v_x,v_y], [1.0,0.0])                    if (v_y > 0):                        angle = 360 - angle
                    # 根据角度判断手势方向 / Determine gesture direction based on angle                    if ((70.0 <= angle) and (angle < 110.0)):  # 向上 / Upward                        if ((self.pre_state != self.UP) or (self.pre_state != self.MIDDLE)):                            self.vec_flag.append(self.pre_state)                        if ((len(self.vec_flag) > 10) or (self.pre_state == self.UP) or                            (self.pre_state == self.MIDDLE) or (self.pre_state == self.TRIGGER)):                            draw_img_np[:self.bin_height,:self.bin_width,:] = self.shang_argb                            self.cur_state = self.UP
                    elif ((110.0 <= angle) and (angle < 225.0)):  # 向右 / Rightward                        if (self.pre_state != self.RIGHT):                            self.vec_flag.append(self.pre_state)                        if ((len(self.vec_flag) > 10) or (self.pre_state == self.RIGHT) or                            (self.pre_state == self.TRIGGER)):                            draw_img_np[:self.bin_width,:self.bin_height,:] = self.you_argb                            self.cur_state = self.RIGHT
                    elif((225.0 <= angle) and (angle < 315.0)):  # 向下 / Downward                        if (self.pre_state != self.DOWN):                            self.vec_flag.append(self.pre_state)                        if ((len(self.vec_flag) > 10) or (self.pre_state == self.DOWN) or                            (self.pre_state == self.TRIGGER)):                            draw_img_np[:self.bin_height,:self.bin_width,:] = self.xia_argb                            self.cur_state = self.DOWN
                    else:  # 向左 / Leftward                        if (self.pre_state != self.LEFT):                            self.vec_flag.append(self.pre_state)                        if ((len(self.vec_flag) > 10) or (self.pre_state == self.LEFT) or                            (self.pre_state == self.TRIGGER)):                            draw_img_np[:self.bin_width,:self.bin_height,:] = self.zuo_argb                            self.cur_state = self.LEFT
                    self.m_start = time.time_ns()                self.his_logit = []
        else:            # 非触发状态下的处理 / Processing in non-trigger state            idx, avg_logit = output1, output2[0]
            # 处理不同状态下的手势动作 / Handle gesture actions in different states            if (self.cur_state == self.UP):                draw_img_np[:self.bin_height,:self.bin_width,:] = self.shang_argb                if ((idx == 15) or (idx == 10)):  # 向上挥动确认 / Upward wave confirmation                    self.vec_flag.clear()                    if (((avg_logit[idx] >= 0.7) and (len(self.his_logit) >= 2)) or                        ((avg_logit[idx] >= 0.3) and (len(self.his_logit) >= 4))):                        self.s_start = time.time_ns()                        self.cur_state = self.TRIGGER                        self.draw_state = self.DOWN                        self.history = [2]                    self.pre_state = self.UP                elif ((idx == 25) or (idx == 26)):  # 中间位置确认 / Middle position confirmation                    self.vec_flag.clear()                    if (((avg_logit[idx] >= 0.4) and (len(self.his_logit) >= 2)) or                        ((avg_logit[idx] >= 0.3) and (len(self.his_logit) >= 3))):                        self.s_start = time.time_ns()                        self.cur_state = self.TRIGGER                        self.draw_state = self.MIDDLE                        self.history = [2]                    self.pre_state = self.MIDDLE                else:                    self.his_logit.clear()
            # 处理其他方向的状态(RIGHT/DOWN/LEFT)的逻辑类似            # Similar logic for other directional states (RIGHT/DOWN/LEFT)            elif (self.cur_state == self.RIGHT):                draw_img_np[:self.bin_width,:self.bin_height,:] = self.you_argb                if  ((idx==16)or(idx==11)) :                    self.vec_flag.clear()                    if (((avg_logit[idx] >= 0.4) and (len(self.his_logit) >= 2)) or ((avg_logit[idx] >= 0.3) and (len(self.his_logit) >= 3))):                        self.s_start = time.time_ns()                        self.cur_state = self.TRIGGER                        self.draw_state = self.RIGHT                        self.history = [2]                    self.pre_state = self.RIGHT                else:                    self.his_logit.clear()            elif (self.cur_state == self.DOWN):                draw_img_np[:self.bin_height,:self.bin_width,:] = self.xia_argb                if  ((idx==18)or(idx==13)):                    self.vec_flag.clear()                    if (((avg_logit[idx] >= 0.4) and (len(self.his_logit) >= 2)) or ((avg_logit[idx] >= 0.3) and (len(self.his_logit) >= 3))):                        self.s_start = time.time_ns()                        self.cur_state = self.TRIGGER                        self.draw_state = self.UP                        self.history = [2]                    self.pre_state = self.DOWN                else:                    self.his_logit.clear()            elif (self.cur_state == self.LEFT):                draw_img_np[:self.bin_width,:self.bin_height,:] = self.zuo_argb                if ((idx==17)or(idx==12)):                    self.vec_flag.clear()                    if (((avg_logit[idx] >= 0.4) and (len(self.his_logit) >= 2)) or ((avg_logit[idx] >= 0.3) and (len(self.his_logit) >= 3))):                        self.s_start = time.time_ns()                        self.cur_state = self.TRIGGER                        self.draw_state = self.LEFT                        self.history = [2]                    self.pre_state = self.LEFT                else:                    self.his_logit.clear()
            self.elapsed_time = round((time.time_ns() - self.m_start)/1000000)
            # 超时处理 / Timeout handling            if ((self.cur_state != self.TRIGGER) and (self.elapsed_time > 2000)):                self.cur_state = self.TRIGGER                self.pre_state = self.TRIGGER
        # 绘制结果显示 / Draw result display        self.elapsed_ms_show = round((time.time_ns()-self.s_start)/1000000)        if (self.elapsed_ms_show < 1000):            # 根据不同状态绘制不同的箭头和文字 / Draw different arrows and text based on state            if (self.draw_state == self.UP):                draw_img.draw_arrow(self.display_size[0]//2, self.display_size[1]//2,                                self.display_size[0]//2, self.display_size[1]//2-100,                                (155,170,190,230), thickness=13)                draw_img.draw_string_advanced(self.display_size[0]//2-50,                                            self.display_size[1]//2-50, 32, "向上 UP")            elif (self.draw_state == self.LEFT):                draw_img.draw_arrow(self.display_size[0]//2, self.display_size[1]//2,                                self.display_size[0]//2-100, self.display_size[1]//2,                                (155,170,190,230), thickness=13)                draw_img.draw_string_advanced(self.display_size[0]//2-50,                                            self.display_size[1]//2-50, 32, "向左 LEFT")            elif (self.draw_state == self.DOWN):                draw_img.draw_arrow(self.display_size[0]//2,self.display_size[1]//2,self.display_size[0]//2,self.display_size[1]//2+100, (155,170,190,230), thickness=13)                             # 判断为向下挥动时,画一个向下的箭头                draw_img.draw_string_advanced(self.display_size[0]//2-50,self.display_size[1]//2-50,32,"向下 DOWN")            elif (self.draw_state == self.RIGHT):                draw_img.draw_arrow(self.display_size[0]//2,self.display_size[1]//2,self.display_size[0]//2+100,self.display_size[1]//2, (155,170,190,230), thickness=13)                               # 判断为向左挥动时,画一个向左的箭头                draw_img.draw_string_advanced(self.display_size[0]//2-50,self.display_size[1]//2-50,32,"向右 RIGHT")            elif (self.draw_state == self.MIDDLE):                draw_img.draw_circle(self.display_size[0]//2,self.display_size[1]//2,100, (255,170,190,230), thickness=2, fill=True)                       # 判断为五指捏合手势时,画一个实心圆                draw_img.draw_string_advanced(self.display_size[0]//2-50,self.display_size[1]//2-50,32,"中间 MIDDLE")        else:            self.draw_state = self.TRIGGER
        # 更新显示 / Update display        pl.osd_img.copy_from(draw_img)
yb_protocol.c
x/** * 协议解析函数 - 解析特定格式的数据帧 * 格式: [头部标识][字段1],[字段2],...,[字段n][尾部标识] * * Protocol parsing function - parses data frames in a specific format * Format: [Header Flag][Field1],[Field2],...,[Fieldn][Trailer Flag] * * @param data_buf 指向接收到的数据缓冲区的指针 Pointer to the received data buffer * @param num 数据缓冲区中的字节数 Number of bytes in the data buffer */void Pto_Data_Parse(uint8_t *data_buf, uint8_t num){ uint8_t pto_head = data_buf[0]; // 协议头部标识 Protocol header flag uint8_t pto_tail = data_buf[num-1]; // 协议尾部标识 Protocol trailer flag // 验证协议头部和尾部 Check protocol header and trailer if (!(pto_head == PTO_HEAD && pto_tail == PTO_TAIL)) { return; // 无效协议,退出 Invalid protocol, exit }
uint8_t data_index = 1; // 字段索引计数器 Field index counter uint8_t field_index[PTO_BUF_LEN_MAX] = {0}; // 存储每个字段的起始位置 Stores the start position of each field int i = 0;
// 解析逗号分隔符,将其替换为字符串结束符'\0' // Parse comma separators and replace them with string terminator '\0' for (i = 1; i < num-1; i++) { if (data_buf[i] == ',') { data_buf[i] = 0; // 将逗号替换为字符串结束符 Replace comma with string terminator field_index[data_index] = i; // 记录字段分隔位置 Record field separator position data_index++; // 增加字段计数器 Increment field counter } }
// 处理无逗号的纯字符串情况 - 通常用于路标识别 // Handle pure string case without commas - typically for road sign recognition if (data_index == 1) { uint8_t len = num - 2; // 计算字符串长度 Calculate string length memcpy(lubiao, (char*)data_buf+1, len); // 复制数据到路标缓冲区 Copy data to road sign buffer lubiao[len] = '\0'; // 确保字符串以'\0'结尾 Ensure string is null-terminated } else { // 处理多字段数据 Process multi-field data for (i = 0; i < data_index; i++) { uint8_t start = field_index[i] + 1; // 字段起始位置 Field start position uint8_t len;
if (i == data_index - 1) { // 最后一个字段,长度计算到尾部标记前 // Last field, calculate length up to the trailer flag len = (num - 1) - start; } else { // 中间字段,长度为下一个分隔符位置减去当前起始位置 // Middle field, length is the next separator position minus current start position len = field_index[i + 1] - start; }
// 特殊处理特定字段 Special handling for specific fields if (i == 6 && data_index == 7) { memcpy(msg, (char*)data_buf + start, len); // 复制消息字段 Copy message field msg[len] = '\0'; // 添加字符串结束符 Add string terminator } else if (i == 2 && data_index == 3) { memcpy(game, (char*)data_buf + start, len); // 复制游戏字段 Copy game field game[len] = '\0'; // 添加字符串结束符 Add string terminator } else { // 将字符转换为整数 Convert characters to integer values[i] = Pto_Char_To_Int((char*)data_buf + start); } }
// 协议长度验证 Protocol length verification uint8_t pto_len = values[0]; // 从协议中获取的长度 Length obtained from protocol if (pto_len != num) { printf("pto_len error:%d , data_len:%d\n", pto_len, num); return; // 长度不匹配,退出 Length mismatch, exit } pto_id = values[1]; // 存储协议ID Store protocol ID }}