Welcome to STM32-BoardCar repository
7. Independent watchdog(IWDG)
Independent watchdog
Independent watchdog1. Software-Hardware2. Brief principle1. Hardware schematic diagram2. Physical connection diagram3. Control principle3. Project configuration1. Description2. Pin configuration4. Main functions1. User function2. HAL library function analysis5. Experimental phenomena
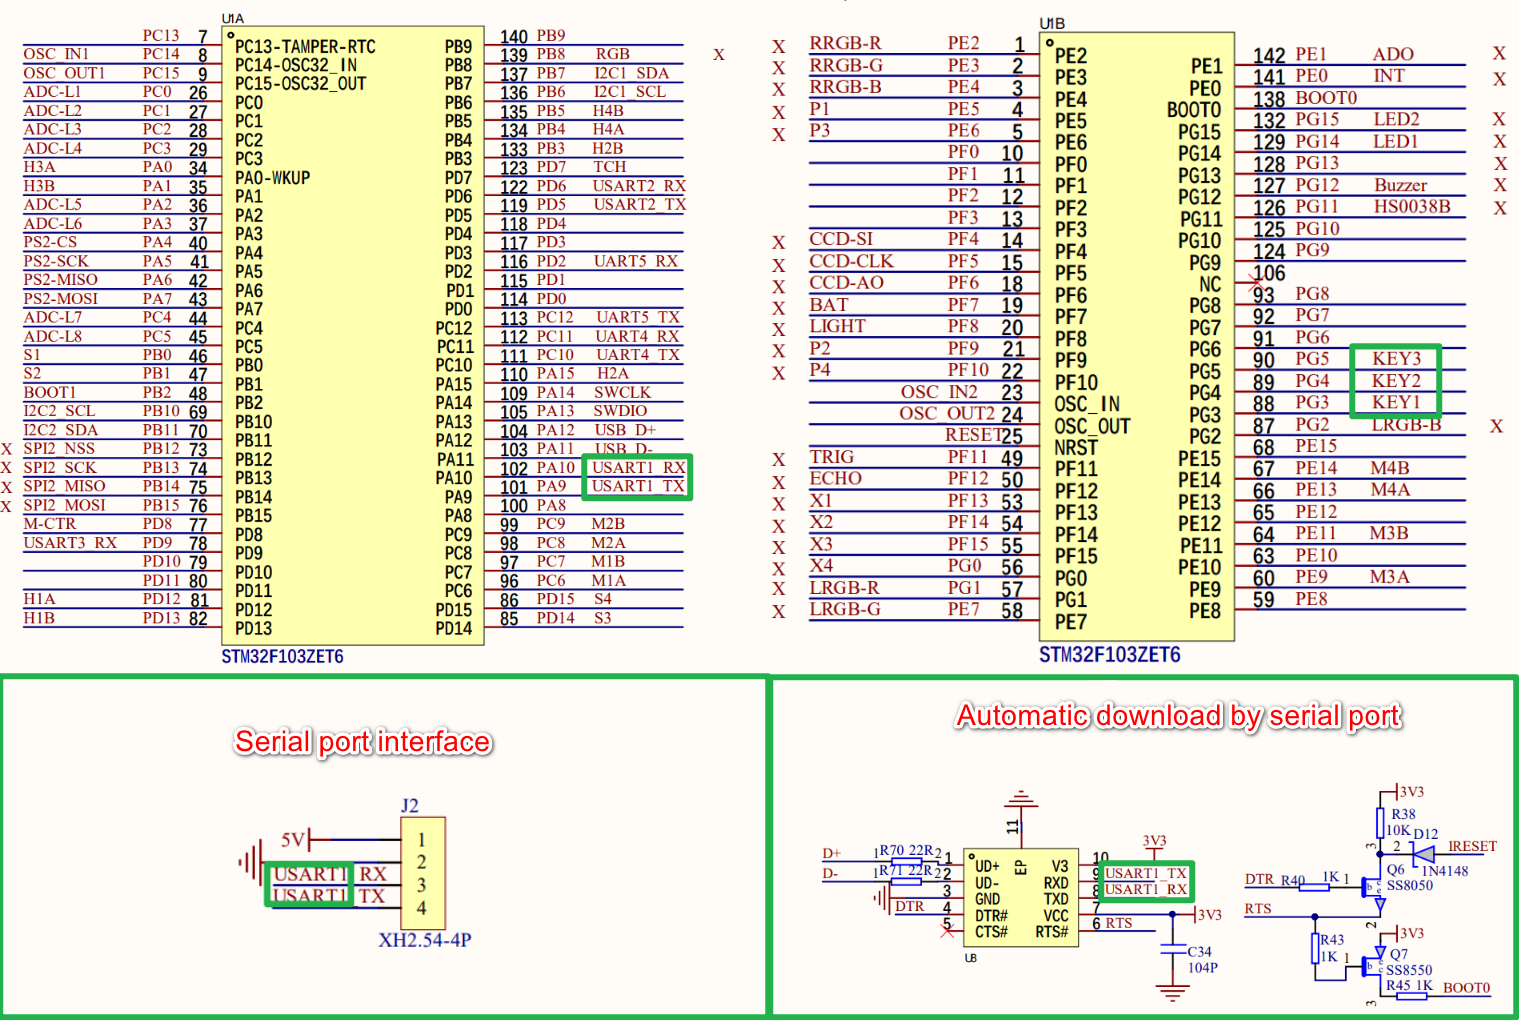
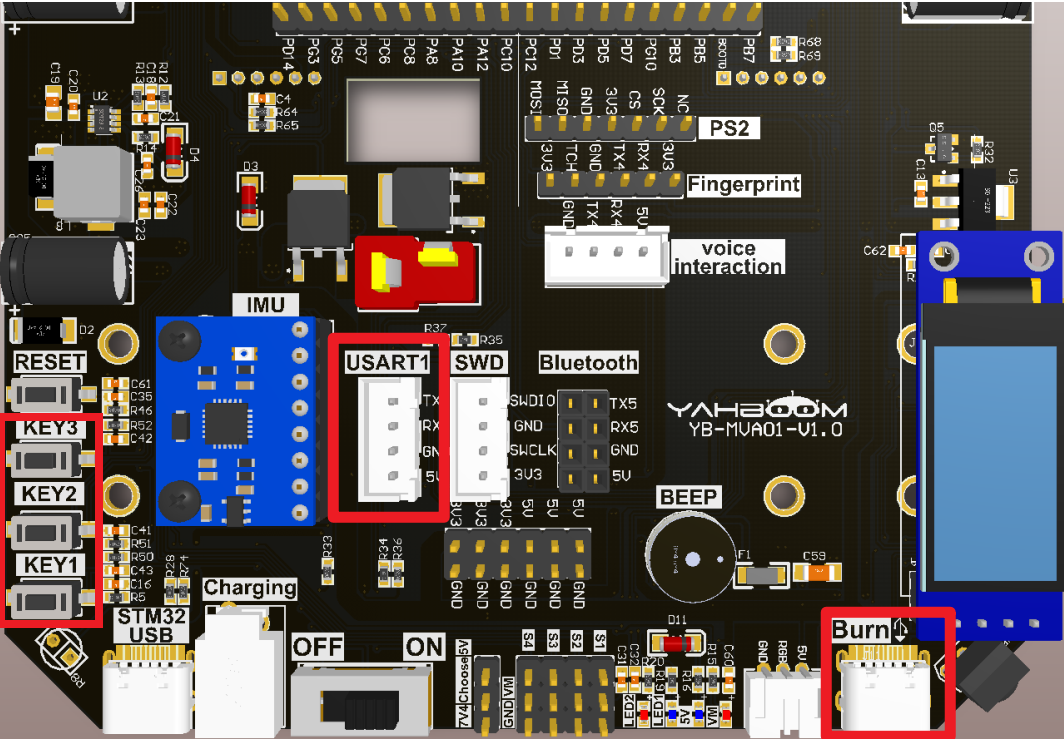
Demonstration in this tutorial: Combining the serial port (UASRT1) and button functions to demonstrate the Independent Watchdog (IWDG) timeout reset function.
1. Software-Hardware
STM32F103CubeIDE
STM32 Robot Development Board
USART, IWDG: chip internal peripherals
Button: onboard
Type-C data cable or ST-Link
Download programs or simulate the development board
2. Brief principle
1. Hardware schematic diagram
2. Physical connection diagram
3. Control principle
By using the button to reset the count value of the independent watchdog (IWDG), the dog feeding function is realized.
- Watchdog
STM32F103ZET6 has two built-in watchdogs (independent watchdog and window watchdog), which are mainly used for system fault detection and recovery.
| Watchdog | Function |
|---|---|
| Independent Watchdog | Used to detect whether the system is running normally |
| Window Watchdog | Used to detect system failures |
- Independent watchdog
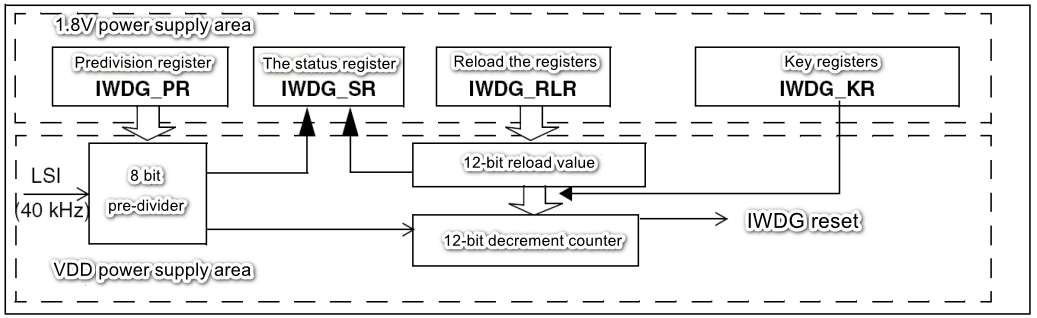
The independent watchdog (IWDG) is driven by a dedicated low-speed clock (LSI) and remains effective even if the main clock fails;
When the system does not feed the dog (reset the count value) within a certain period of time, the independent watchdog will trigger a reset operation to restart the system.
The main function of the independent watchdog is to prevent the system from entering an infinite loop or infinite delay and other fault states during operation, and to prevent the system from being unresponsive or crashing for a long time.
Independent watchdog feature
- Free running down counter
- After the watchdog is activated, a reset is generated when the counter counts to 0x000
- Clock is provided by independent RC oscillator (can operate in stop and standby modes)
- Watchdog Timeout: 40kHz input clock (LSI)
| Prescaler coefficient | PR[2:0] | Minimum time (ms): RL[11:0]=0x000 | Maximum time (ms): RL[11:0]=0xFFF |
|---|---|---|---|
| /4 | 0 | 0.1 | 409.6 |
| /8 | 1 | 0.2 | 819.2 |
| /16 | 2 | 0.4 | 1638.4 |
| /34 | 3 | 0.8 | 3276.8 |
| /64 | 4 | 1.6 | 6553.6 |
| /128 | 5 | 3.2 | 13107.2 |
| /256 | 6 or 7 | 6.4 | 26214.4 |
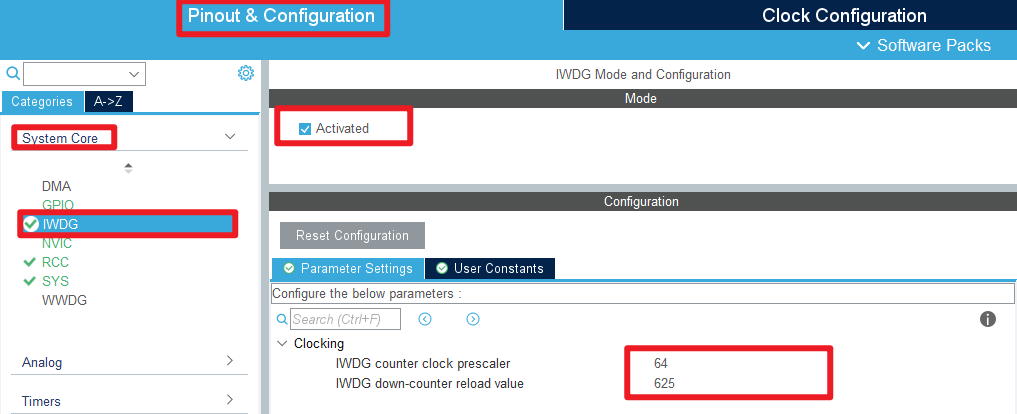
xxxxxxxxxxThe prescaler coefficient set in the tutorial is 64, and the reload value is 64
3. Project configuration
Project configuration: Prompt configuration options during STM32CubeIDE project configuration
1. Description
Omitted project configuration part: New project, chip selection, project configuration, SYS of pin configuration, RCC configuration, clock configuration and project configuration content
The project configuration part that is not omitted is the key point that needs to be configured in this tutorial.
xxxxxxxxxxPlease refer to [2. Development environment construction and use: STM32CubeIDE installation and use] to understand how to configure the omitted parts of the project.
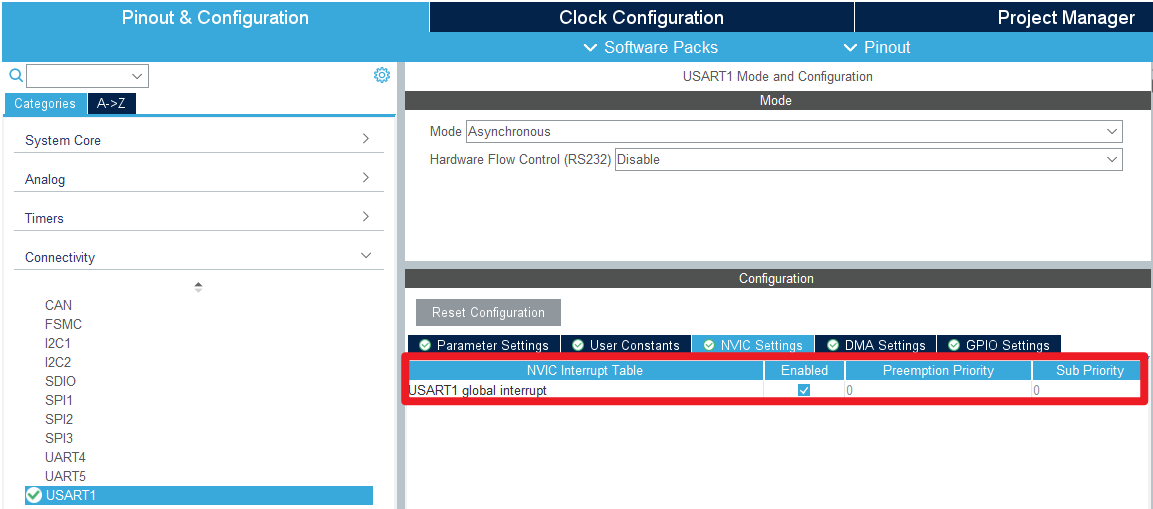
2. Pin configuration
- Configure specified pin function
You can directly select the corresponding pin number in the pin view, and the corresponding options will appear when you left-click the mouse.
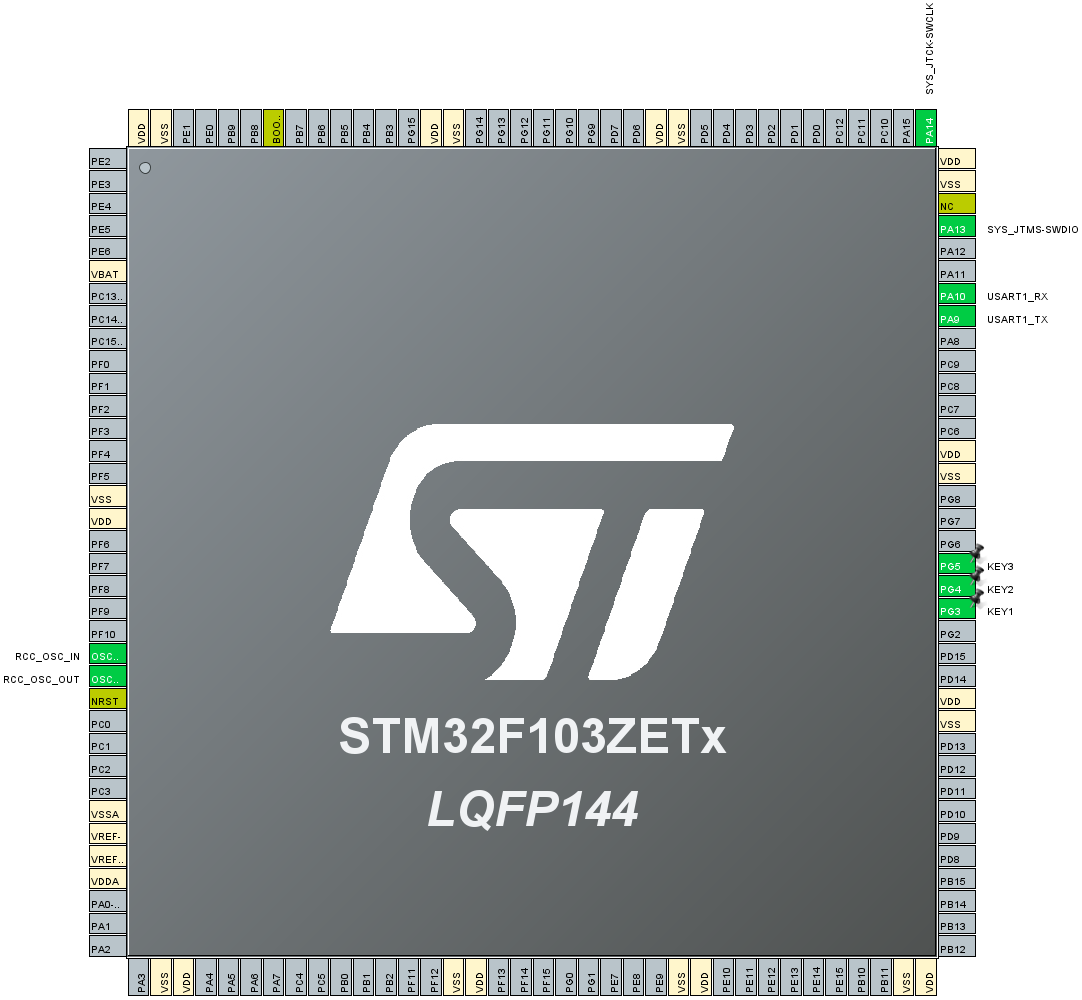
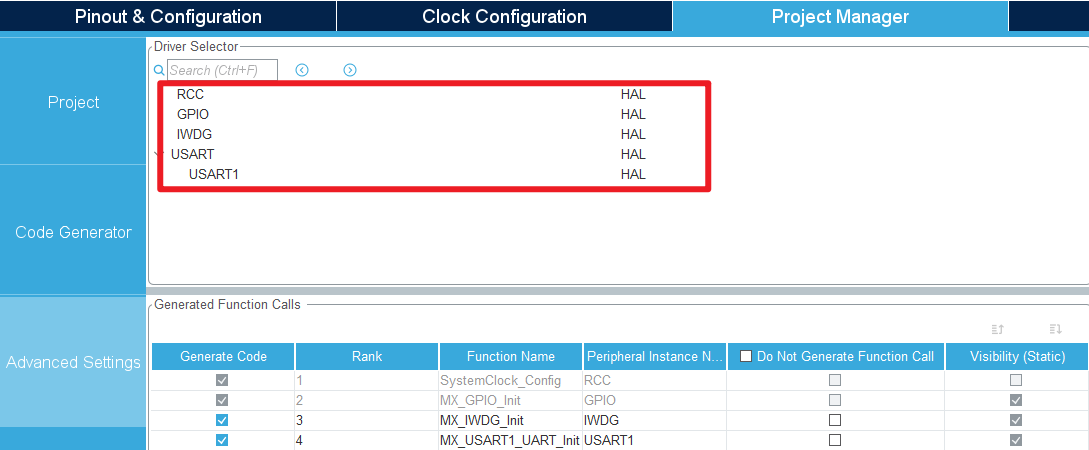
- GPIO
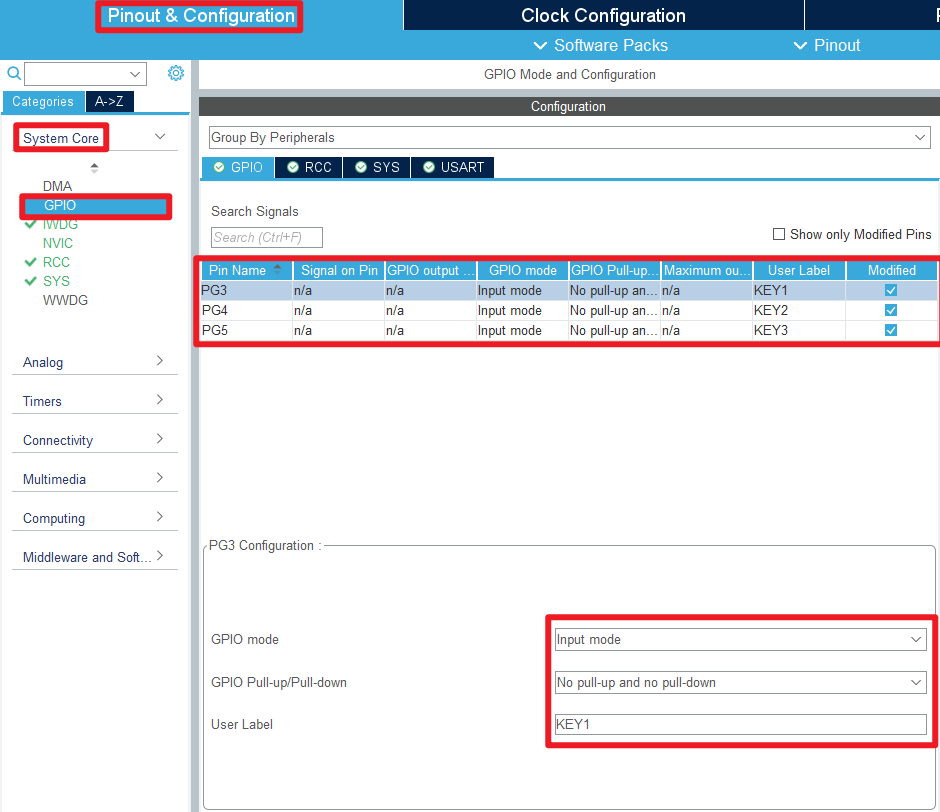
- IWDG
- USART
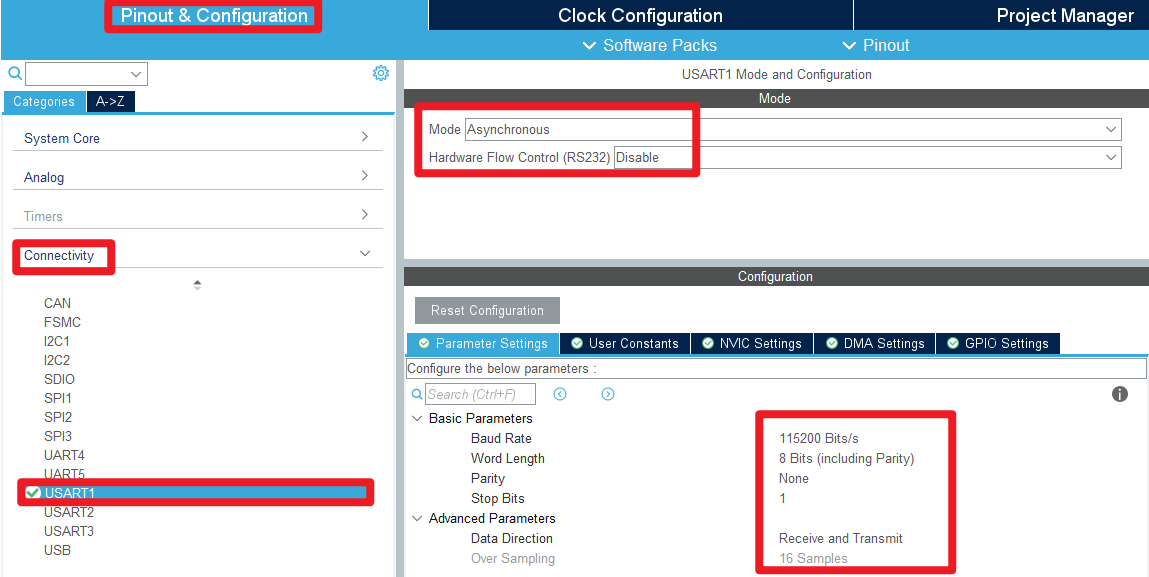
- Advanced Settings
- Generate code

4. Main functions
It mainly introduces the functional code written by the user. For detailed code, you can open the project file provided by us yourself and enter the Bsp folder to view the source code.
1. User function
Function: KeyX_is_Press
| Function prototype | uint8_t Key1_is_Press(void) |
|---|---|
| Function description | Detect whether the button is pressed |
| Input parameters | None |
| Output parameters | Key status: KEY_PRESS (1), KEY_RELEASE (0) |
xxxxxxxxxxKey2_is_Press and Key3_is_Press functions have the same function
Function: KeyX_Long_Press
| Function prototype | uint8_t Key1_Long_Press(uint16_t timeout) |
|---|---|
| Function description | Detect button long press status |
| Input parameters | Long press time |
| Output parameters | Key status: KEY_PRESS (1), KEY_RELEASE (0) |
xxxxxxxxxxKey3_Long_Press and Key2_Long_Press functions have the same function
Function: Key1_State
| Function prototype | uint8_t Key1_State(uint8_t mode) |
|---|---|
| Function description | Read key status |
| Input parameters | Mode: 0 means always returning 1, 1 means always returning 0 |
| Output parameters | Key status: KEY_PRESS (1), KEY_RELEASE (0) |
xxxxxxxxxxKey2_State and Key3_State functions have the same function
2. HAL library function analysis
The HAL library functions that have been introduced in the previous tutorial will not be introduced again in the tutorial!
xxxxxxxxxxIf you want to find the HAL library and LL library function analysis involved in the entire tutorial, you can view the documents in the folder [8. STM32 Manual: STM32F1_HAL Library and LL Library_User Manual]
Function: HAL_IWDG_Init
| Function prototype | HAL_StatusTypeDef HAL_IWDG_Init(IWDG_HandleTypeDef *hiwdg) |
|---|---|
| Function description | Initialize IWDG peripheral parameters |
| Input parameters | hiwdg: IWDG handle address |
| Return value | HAL status value: HAL_OK, HAL_ERROR, HAL_BUSY, HAL_TIMEOUT |
Function: HAL_IWDG_Refresh
| Function prototype | HAL_StatusTypeDef HAL_IWDG_Refresh(IWDG_HandleTypeDef *hiwdg) |
|---|---|
| Function description | Refresh IWDG (feed the dog) |
| Input parameters | hiwdg: IWDG handle address |
| Return value | HAL status value: HAL_OK, HAL_ERROR, HAL_BUSY, HAL_TIMEOUT |
5. Experimental phenomena
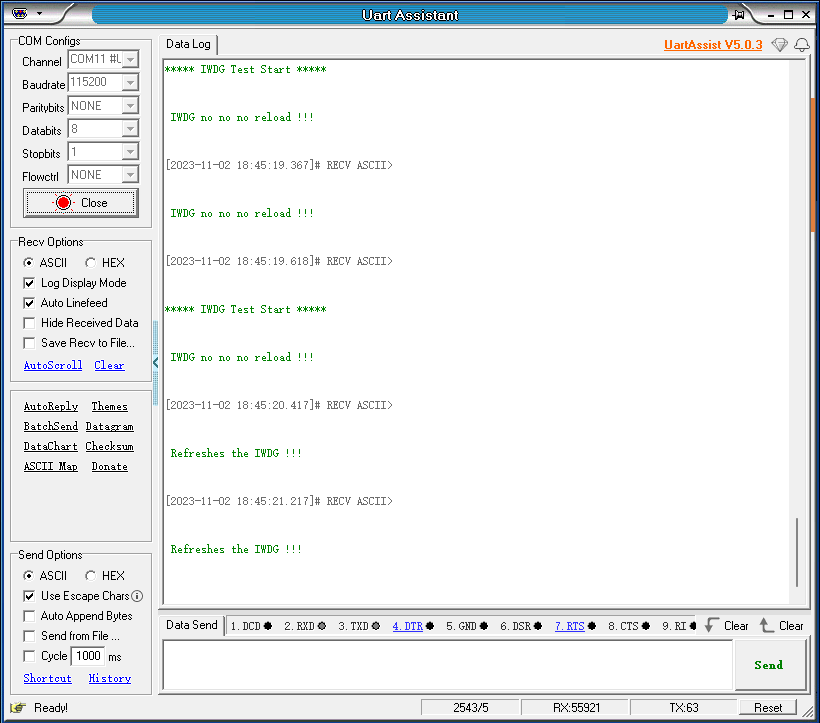
After successfully downloading the program, press the RESET button on the development board to open the serial port debugging assistant to observe the phenomenon!
xxxxxxxxxxFor program download, please refer to [2. Development environment construction and use: program download and simulation]
Phenomenon:
When the program is run for the first time, "**** IWDG Test Start *******" will be printed;
If you do not press the KEY1 key, the serial port debugging assistant will print the message "IWDG no no no reload!!!";
If the KEY1 key is pressed, the serial port debugging assistant will print the message "Refreshes the IWDG!!!".