Welcome to STM32-BoardCar repository
14.K230 color response (voice)
k230 color response
k230 color response1. Software-Hardware2. Brief principle1. Hardware schematic2. Physical connection diagram3. Control principle3. Main functions4. Partial code analysis5. Experimental phenomenon
This tutorial is a comprehensive experiment combining multiple peripherals. You can first understand a single peripheral and then conduct this experiment.
1. Software-Hardware
STM32F103CubeIDE
STM32 Robot Development Board
k230 module: external
Type-C data cable or ST-Link
Download or simulate the development board
2. Brief principle
1. Hardware schematic
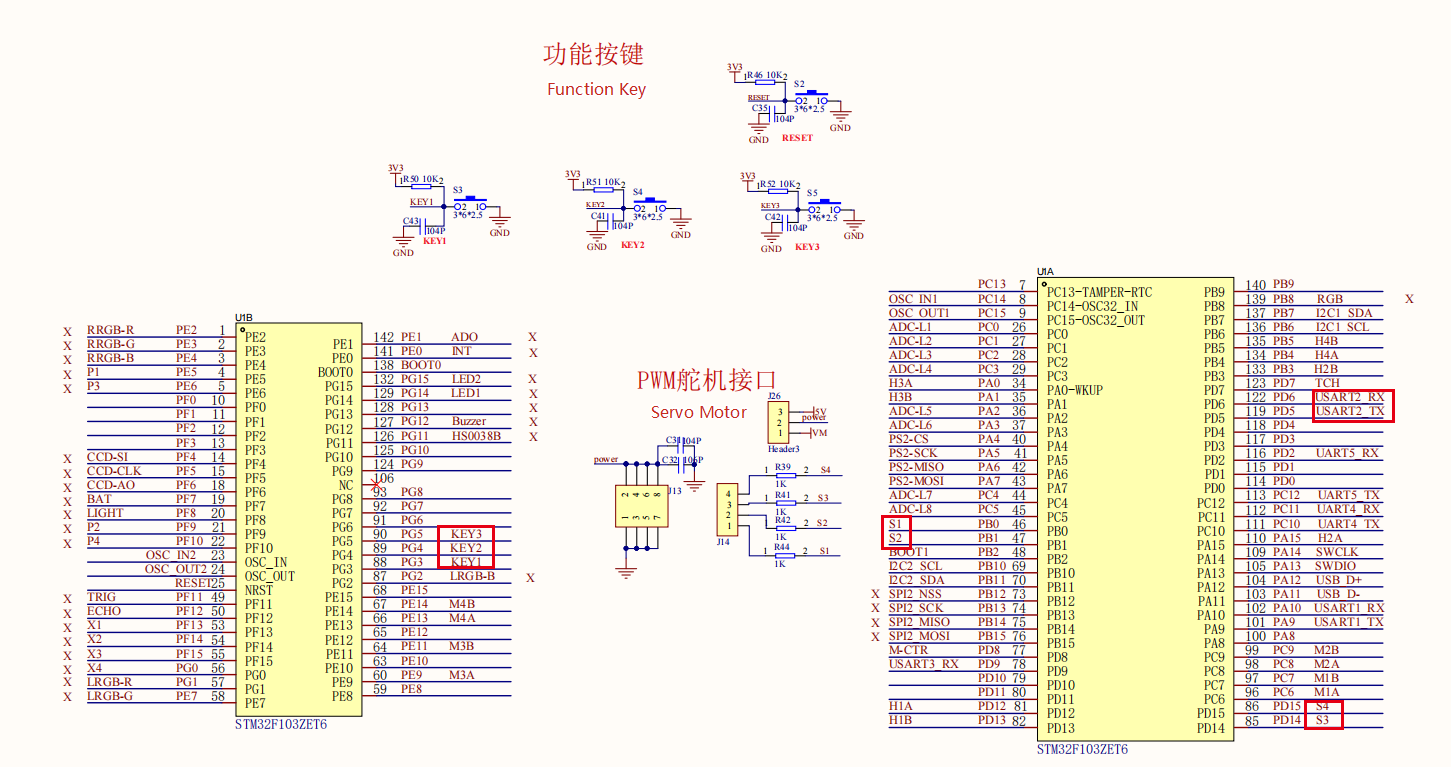
2. Physical connection diagram
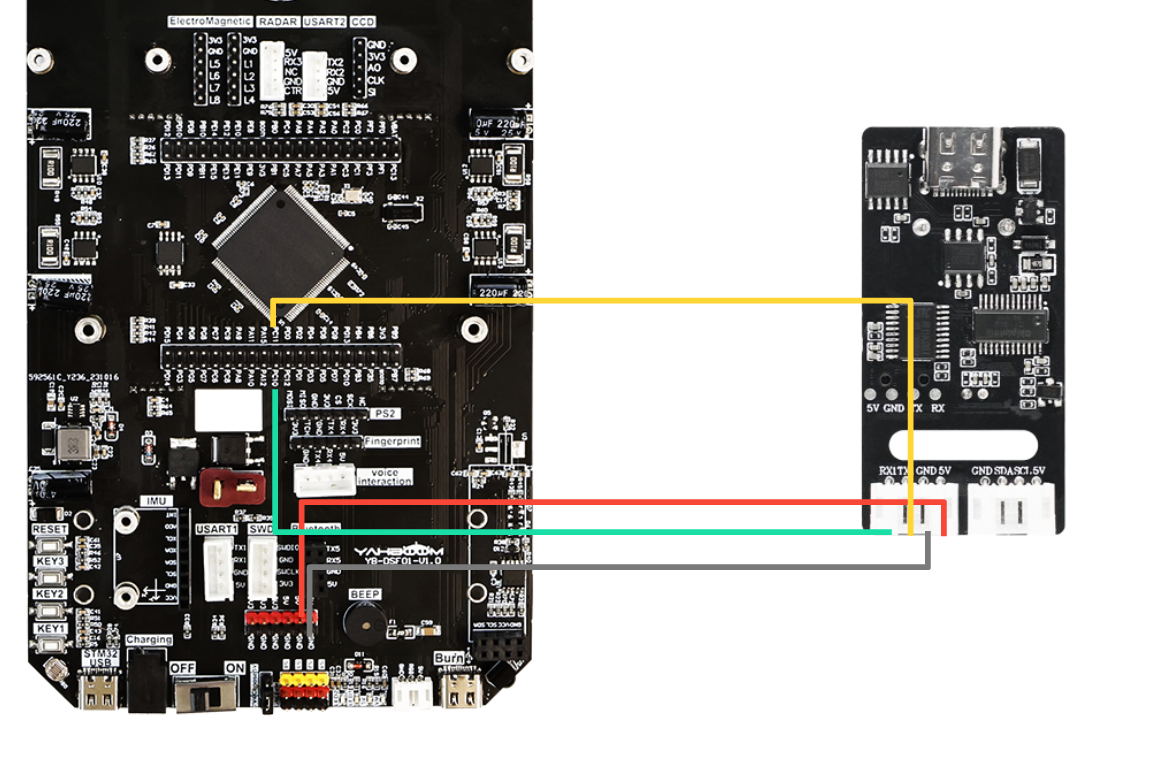
** Voice module wiring**
| Intelligent voice interaction module | STM32 |
|---|---|
| 5V | 5V |
| GND | GND |
| TX1 | PC11 |
| RX1 | PC10 |
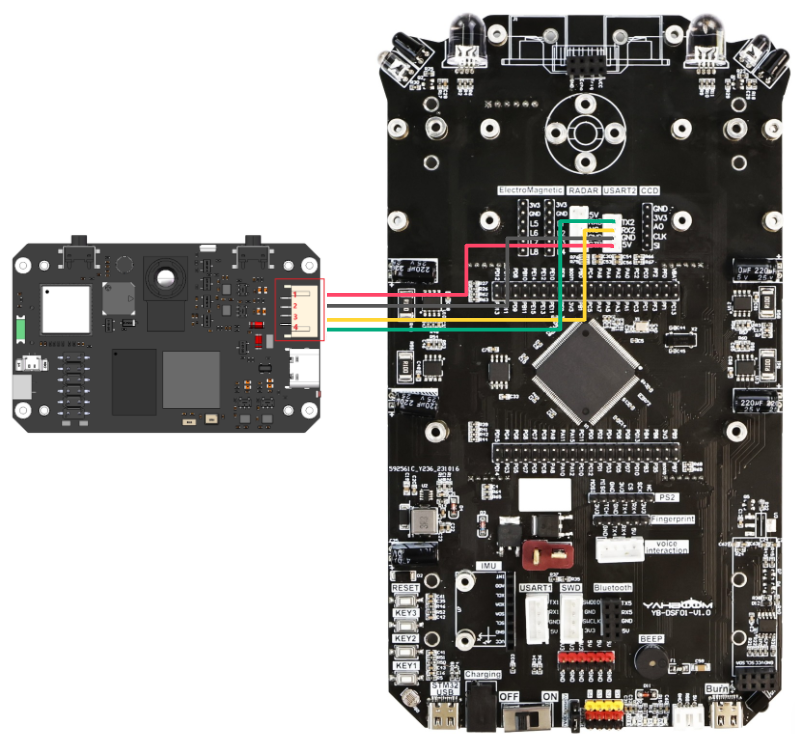
K230 wiring** (Note: The wiring in the figure below is for reference only. We are equipped with K230 double-headed PH2.0 4Pin all-black wire with fool-proof design, so you don’t have to worry about wiring problems)
Motor wiring
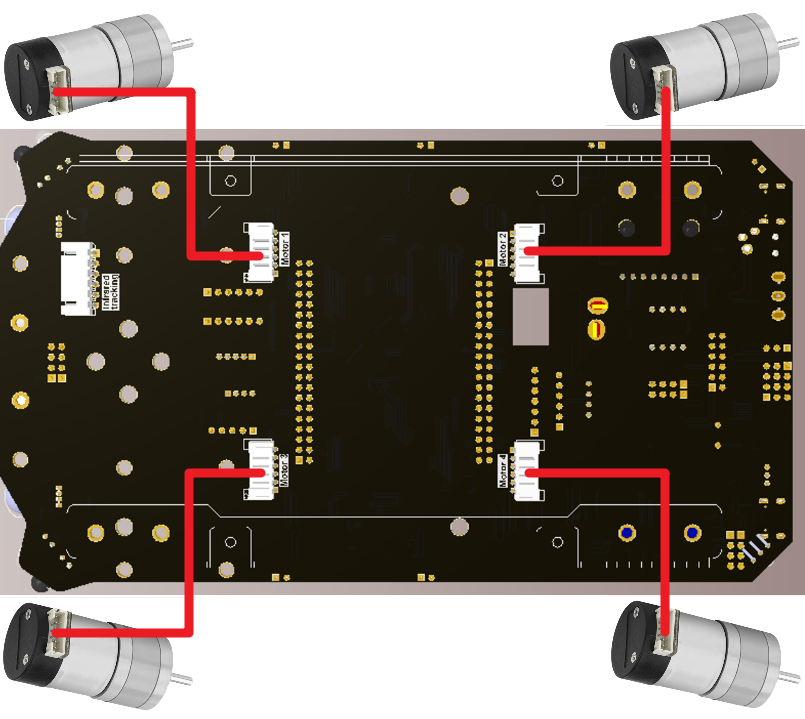
3. Control principle
Program flow chart
| Module | Function |
|---|---|
| k230 visual module | Identify color and send data to the microcontroller through the serial port |
Communication protocol:
When k230 identifies the color track, it will send a data frame through the serial port. The format is as follows
| Experimental routine | Start symbol | msg | End symbol |
|---|---|---|---|
| Color recognition | $ | GREEN, BLUE, RED | # |
Voice module command word
| Command word | Function type | Broadcast statement | Broadcast mode | Send protocol | Receive protocol |
|---|---|---|---|---|---|
| GREEN-DETECTED | Command word | Recognize green | By | AA 55 FF 43 FB | AA 55 FF 43 FB |
| BLUE-DETECTED | Command word | Recognize blue | By | AA 55 FF 44 FB | AA 55 FF 44 FB |
| RED-DETECTED | Command word | Recognize red | By | AA 55 FF 49 FB | AA 55 FF 49 FB |
MCU part:
Receive the data sent by k230 through the serial port and process each byte of the data. Extract msg from the data frame content and store it in the array. Then process the array data, and the MCU responds to the recognized color through the processed data.
3. Main functions
Function: Pto_Data_Parse
| Function prototype | void Pto_Data_Parse(uint8_t *data_buf, uint8_t num) |
|---|---|
| Function | Parse the data information returned by K230 |
| Input parameter 1 | Array pointer of received data |
| Input parameter 2 | Size of received data |
| Return value | None |
Function Car_Color**
| Function prototype | void Car_color(void) |
|---|---|
| Function | Car color response function |
| Return value | None |
For the underlying driver, you can refer to [Chapter 3: Advanced Timer Tutorial] and [Chapter 4: Motor Control Tutorial]For the application layer, you can read the source code in the project file by yourself
4. Partial code analysis
yb_protocol.c
x/** * K230数据解析函数 - K230 Data Parsing Function * 解析来自K230的特定格式数据,支持多种数据协议 * Parses specific format data from K230, supporting multiple data protocols * * @param data_buf 数据缓冲区 - Data buffer * @param num 数据长度 - Data length */void Pto_Data_Parse_K230(uint8_t *data_buf, uint8_t num){ uint8_t pto_head = data_buf[0]; // 协议头部标识 - Protocol header identifier uint8_t pto_tail = data_buf[num-1]; // 协议尾部标识 - Protocol tail identifier // 验证协议头和尾 - Validate protocol header and tail if (!(pto_head == PTO_HEAD && pto_tail == PTO_TAIL)) { return; }
uint8_t data_index = 1; // 字段索引计数器 - Field index counter uint8_t field_index[PTO_BUF_LEN_MAX1] = {0}; // 存储分隔符位置的数组 - Array to store delimiter positions int i = 0;
// 解析逗号分隔符,将其替换为字符串结束符'\0' // Parse comma delimiters and replace them with string terminator '\0' for (i = 1; i < num-1; i++) { if (data_buf[i] == ',') { data_buf[i] = 0; // 将逗号替换为字符串结束符 - Replace comma with string terminator field_index[data_index] = i; // 记录分隔符位置 - Record delimiter position data_index++; // 增加字段索引 - Increment field index } }
// 处理无逗号的纯字符串情况 - 路标识别 // Handle pure string case without commas - Road sign recognition if (data_index == 1) { uint8_t len = num - 2; // 计算字符串长度 - Calculate string length memcpy(lubiao, (char*)data_buf+1, len); // 复制字符串内容 - Copy string content lubiao[len] = '\0'; // 确保字符串以'\0'结尾 - Ensure string is null-terminated } else { // 处理多字段数据 - Process multi-field data for (i = 0; i < data_index; i++) { uint8_t start = field_index[i] + 1; // 字段起始位置 - Field start position uint8_t len; if (i == data_index - 1) { // 最后一个字段,长度计算到尾部标记前 // Last field, calculate length up to before the tail marker len = (num - 1) - start; } else { // 中间字段,长度为下一个分隔符位置减去当前起始位置 // Middle field, length is the next delimiter position minus current start position len = field_index[i + 1] - start; } // 根据字段索引处理不同类型的数据 // Process different types of data according to field index if (i == 6 && data_index == 7) { memcpy(msg, (char*)data_buf + start, len); // 复制消息内容 - Copy message content msg[len] = '\0'; // 添加字符串结束符 - Add string terminator } else if (i == 2 && data_index == 3) { memcpy(game, (char*)data_buf + start, len); // 复制游戏类型 - Copy game type game[len] = '\0'; // 添加字符串结束符 - Add string terminator } else { // 将字符转换为整数 - Convert characters to integer values1[i] = Pto_Char_To_Int((char*)data_buf + start); } } // 协议长度验证 - Protocol length validation uint8_t pto_len = values1[0]; if (pto_len != num) { printf("pto_len error:%d , data_len:%d\n", pto_len, num); return; } pto_id = values1[1]; // 保存协议ID - Save protocol ID } }bsp.c
xxxxxxxxxx/* * 控制RGB灯 * Control_RGB_t rgb_flag :对应语音模块发送给主机后两位id * * Voice control RGB light * Control_RGB_t rgb_flag: The last two digits of the id sent by the corresponding voice module to the host * */void Change_RGB(Control_RGB_t rgb_flag){    switch (rgb_flag)    {    case close_light:        RGB_OFF_ALL;        break;    case red_light:        Set_color_R(red);        Set_color_L(red);        break;    case green_light:        Set_color_R(green);        Set_color_L(green);        break;    case blue_light:        Set_color_R(blue);        Set_color_L(blue);        break;    case yellow_light:        Set_color_R(yellow);        Set_color_L(yellow);        break;    }
    //Send_Massage(rgb_flag,3);
5. Experimental phenomenon
After successfully downloading the program, place the color block in the detection range. When the color corresponding to the threshold appears in the camera range, the car starts to respond to the specified color. Note: Only red, blue and green can be recognized and responded. And when connecting our AI voice interaction integrated module, there will be voice broadcast when the specified color is detected. Users who have not purchased the voice module do not need to worry. The case can still be implemented without connecting the voice module K230, but there is no voice broadcast function
xxxxxxxxxxFor program download, please refer to [Chapter 2: Development Environment Construction and Use → 2.6 Program Download and Simulation]
Voice Module Firmware Burning
xxxxxxxxxxBurning the CI1302_EN_SingleMic_V00916_UART1_115200_2M.bin file we provide can realize all cases related to this car's intelligent voice interaction module. Only burn once. For the burning method, see [Voice Interaction Control Tutorial] [Section 6] Voice Module Firmware Burning
K230 Code Burning
Required tools: K230, SD card, CanMV IDE K230
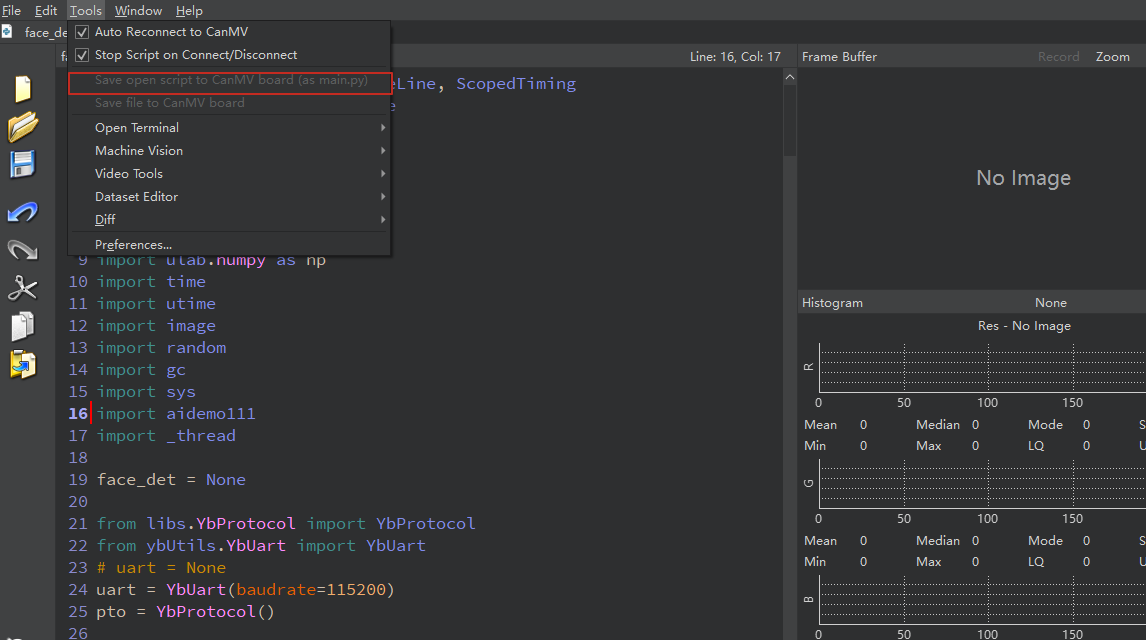
We find the k230_track_recong.py file in the project folder and then drag it to CanMV IDE K230, then choose to save the opened script as main.py to CanMV