Welcome to STM32-BoardCar repository
8. Window watchdog(WWDG)
Window watchdog
Window watchdog1. Software-Hardware2. Brief principle1. Hardware schematic diagram2. Physical connection diagram3. Control principle3. Project configuration1. Description2. Pin configuration4. Main functionsHAL library function analysis5. Experimental phenomena
Demonstration in this tutorial: Combining onboard LEDs (LED1 and LED2) to demonstrate the Window Watchdog (WWDG) hardware fault detection function.
1. Software-Hardware
STM32F103CubeIDE
STM32 Robot Development Board
WWDG: chip internal peripherals
LED1, LED2: onboard
Type-C data cable or ST-Link
Download programs or simulate the development board
2. Brief principle
1. Hardware schematic diagram
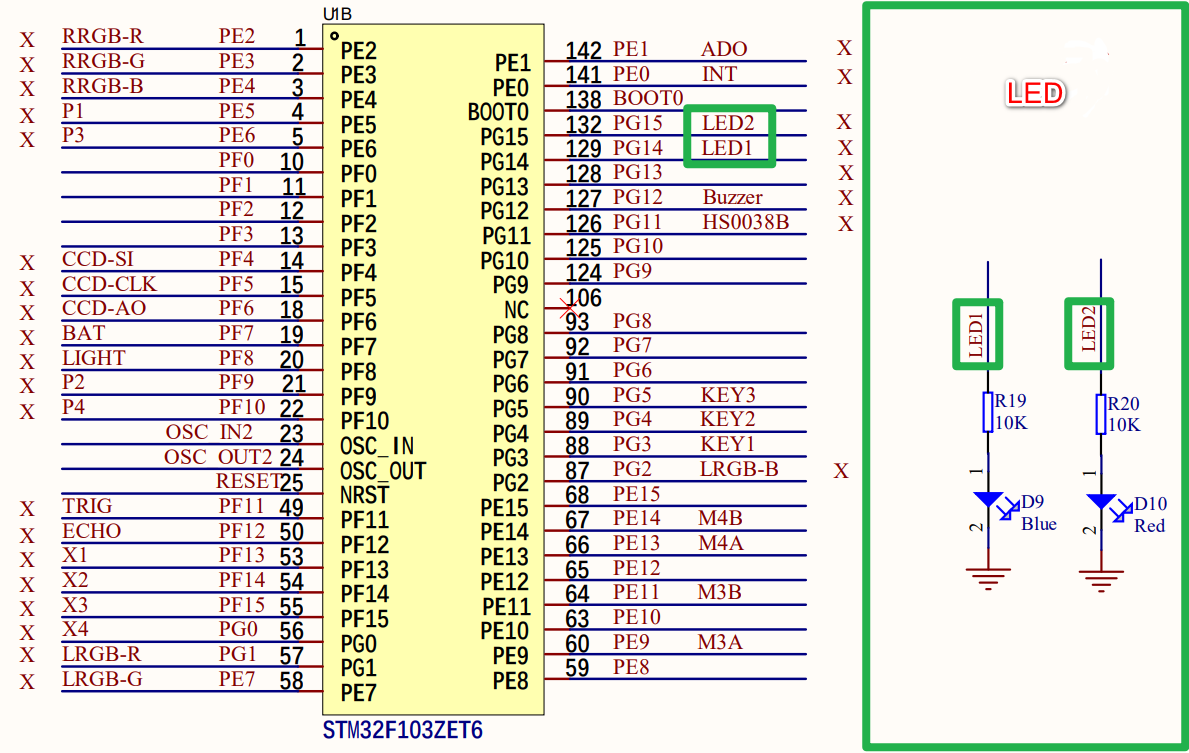
2. Physical connection diagram
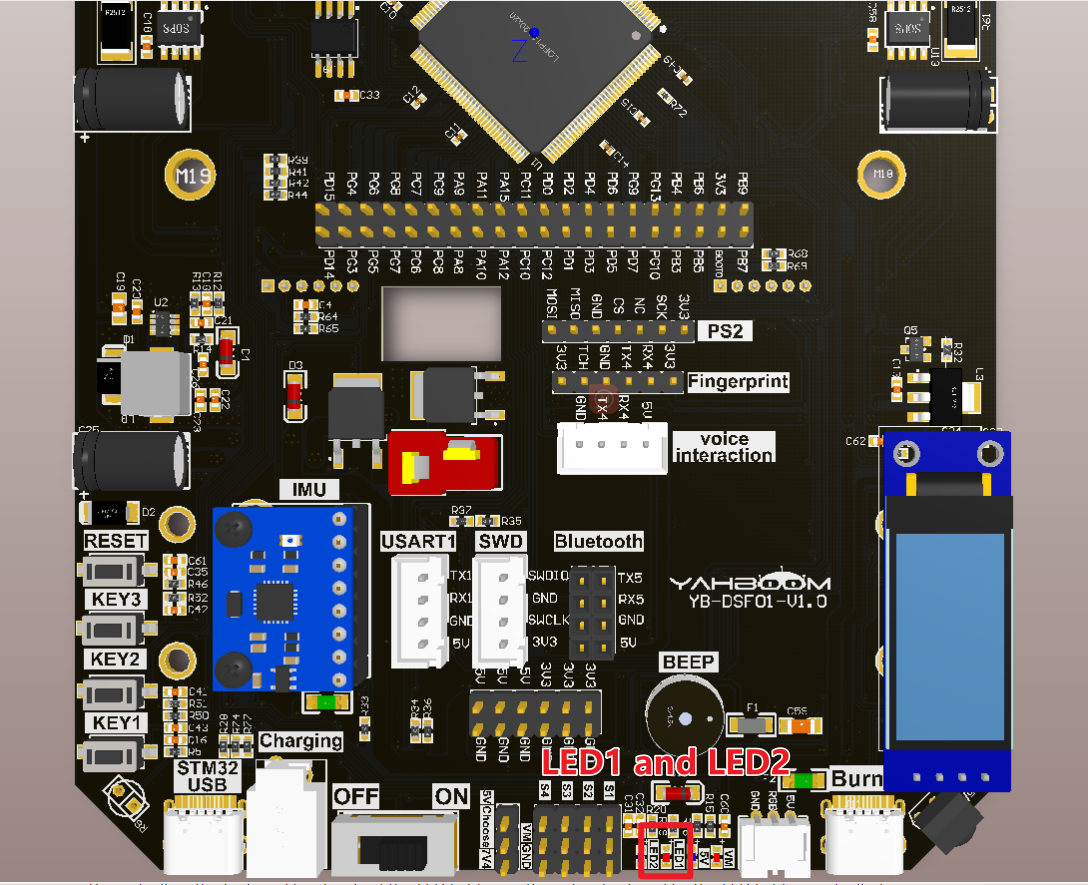
3. Control principle
Use window watchdog to detect program running status.
GPIO output
By controlling the high and low levels of the LED light pins, the color displayed by the LED light is controlled.
LED: high level on, low level off
| LED (schematic name) | Control pin | Function |
|---|---|---|
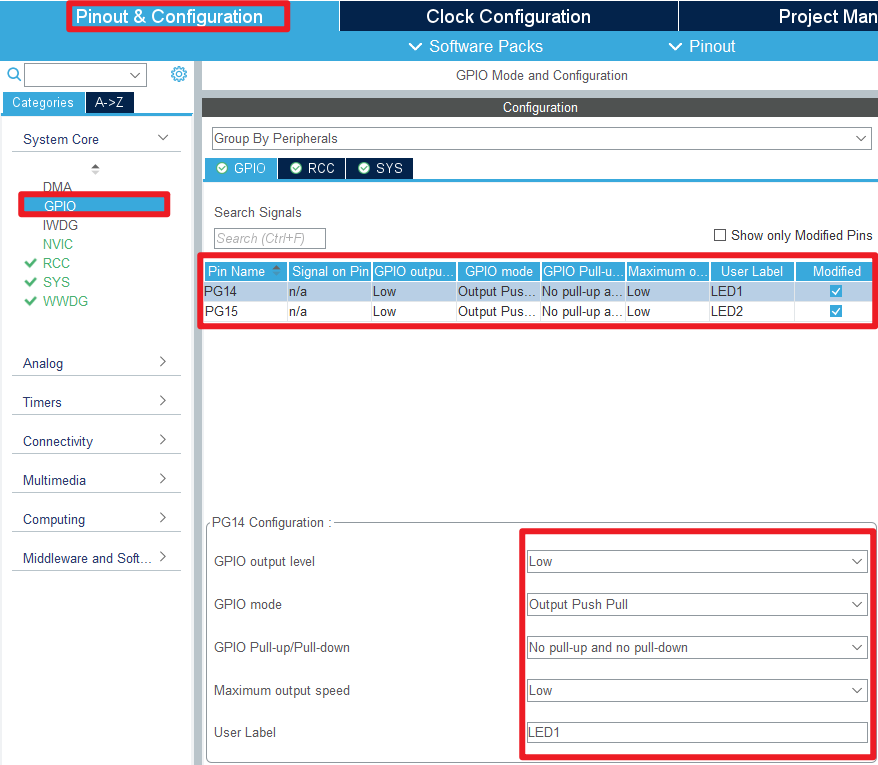
| LED1 | PG14 | Control LED1 on and off |
| LED2 | PG15 | Control LED2 on and off |
- Watchdog
STM32F103ZET6 has two built-in watchdogs (independent watchdog and window watchdog), which are mainly used for system fault detection and recovery.
| Watchdog | Function |
|---|---|
| Independent Watchdog | Used to detect whether the system is running normally |
| Window Watchdog | Used to detect system failures |
- Window Watchdog
The window watchdog (WWDG) is driven by the clock obtained by dividing the APB1 clock and configures the time window to detect abnormal late or premature operations of the application.
| Window Watchdog | Status |
|---|---|
| When the count value > the upper limit of the window, feed the dog | Reset |
| When the upper limit of the window > the count value > the lower limit of the window, feed the dog | Do not reset |
| Count value < window lower limit value | Reset |
xxxxxxxxxxThe main function of the window watchdog is to monitor the working status of the system and prevent deadlocks or infinite loops caused by software errors or unexpected events.
Independent watchdog feature
Free running down counter
conditional reset
- When the down counter is reloaded outside the window, a reset is generated
- When the value of the down counter is less than 0x40, a reset is generated
If watchdog is enabled and interrupts are enabled
- Early wake-up interrupt (EWI) is generated when the down counter equals 0x40, used to reload the counter to avoid WWDG reset
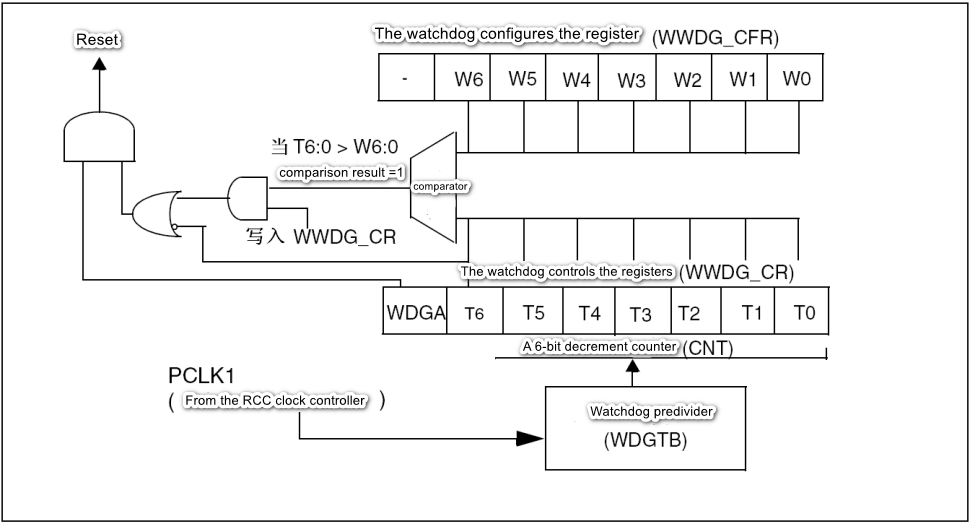
- Window watchdog timeout: PCLK1=36MHz
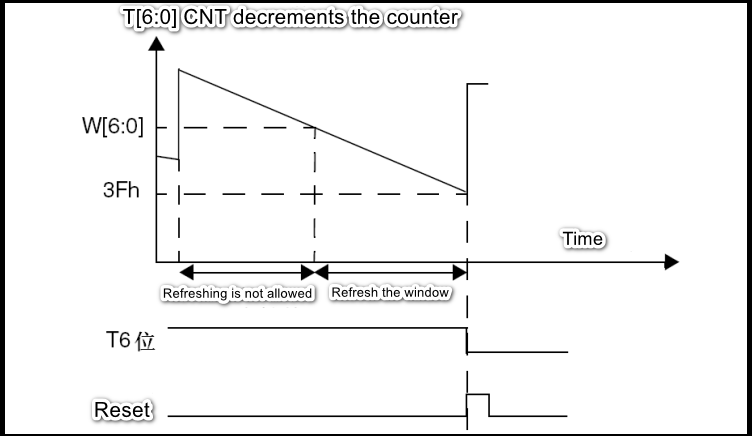
| WDGB | Minimum timeout | Maximum timeout |
|---|---|---|
| 0 | 113us | 7.28ms |
| 1 | 227us | 14.56ms |
| 2 | 455us | 29.12ms |
| 3 | 910us | 58.25ms |
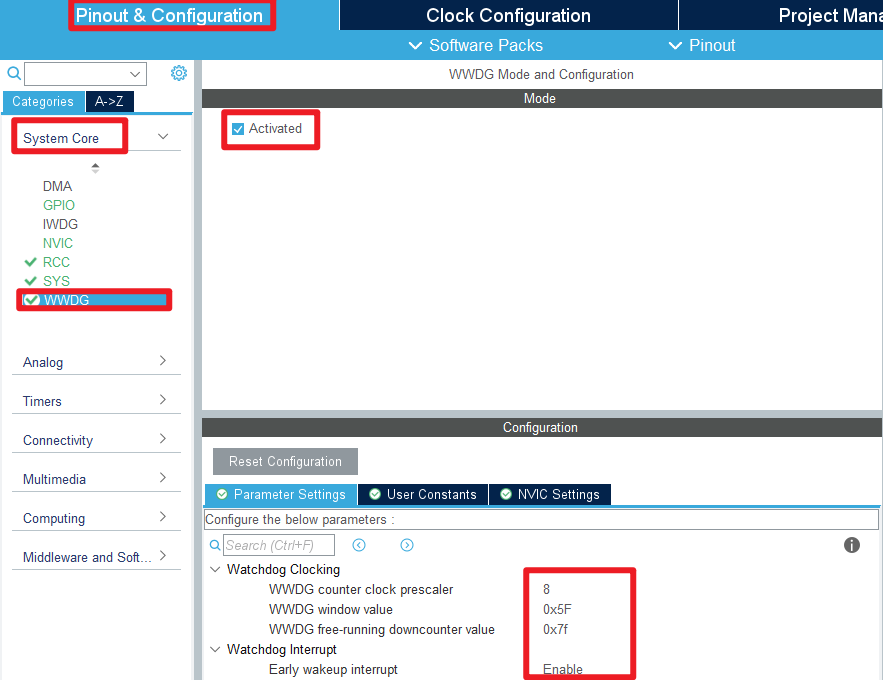
xxxxxxxxxxThe frequency division number set in the tutorial is 8, the window value is 5F, and the count value is 7F.
Example: Counter decrement time (PCLK1=36MHz, frequency division number is 8)
3. Project configuration
Project configuration: Prompt configuration options during STM32CubeIDE project configuration
1. Description
Omitted project configuration part: New project, chip selection, project configuration, SYS of pin configuration, RCC configuration, clock configuration and project configuration content
The project configuration part that is not omitted is the key point that needs to be configured in this tutorial.
xxxxxxxxxxPlease refer to [2. Development environment construction and use: STM32CubeIDE installation and use] to understand how to configure the omitted parts of the project.
2. Pin configuration
- Configure specified pin function
You can directly select the corresponding pin number in the pin view, and the corresponding options will appear when you left-click the mouse.
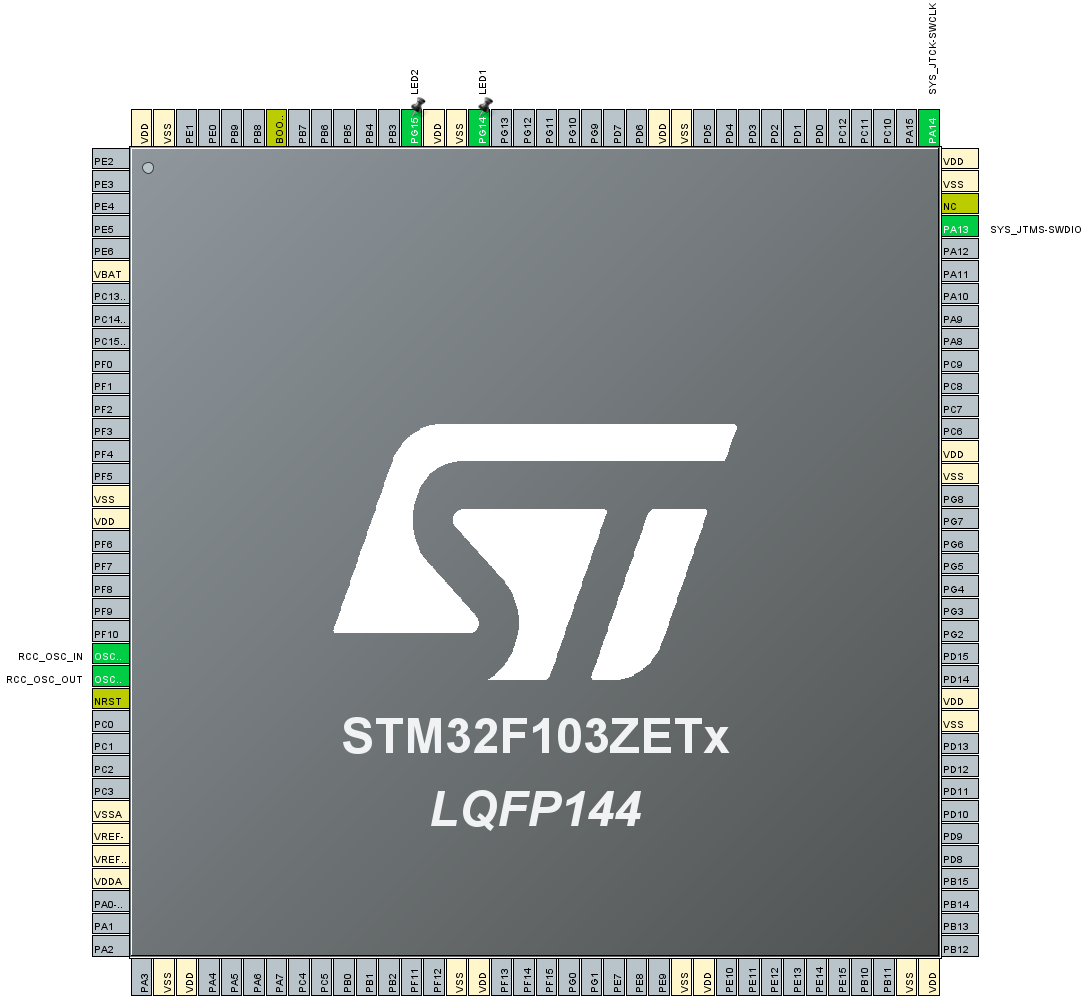
- GPIO
- WWDG
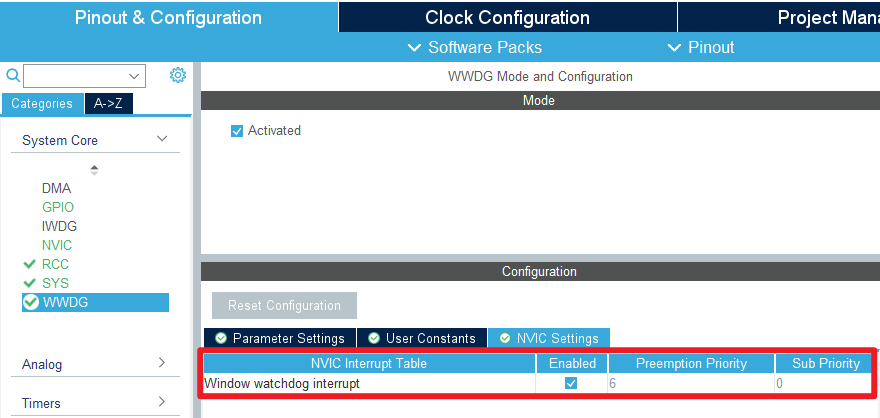
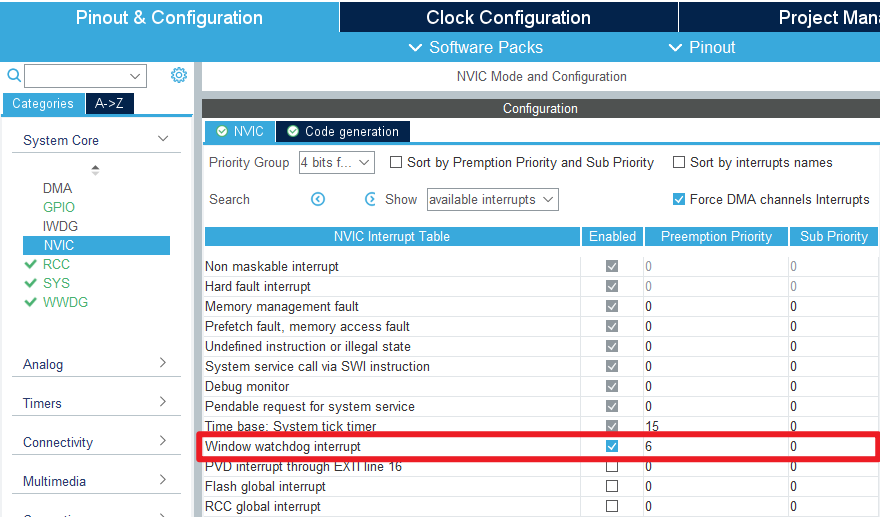
- NVIC
Modify interrupt priority
- Advanced Settings
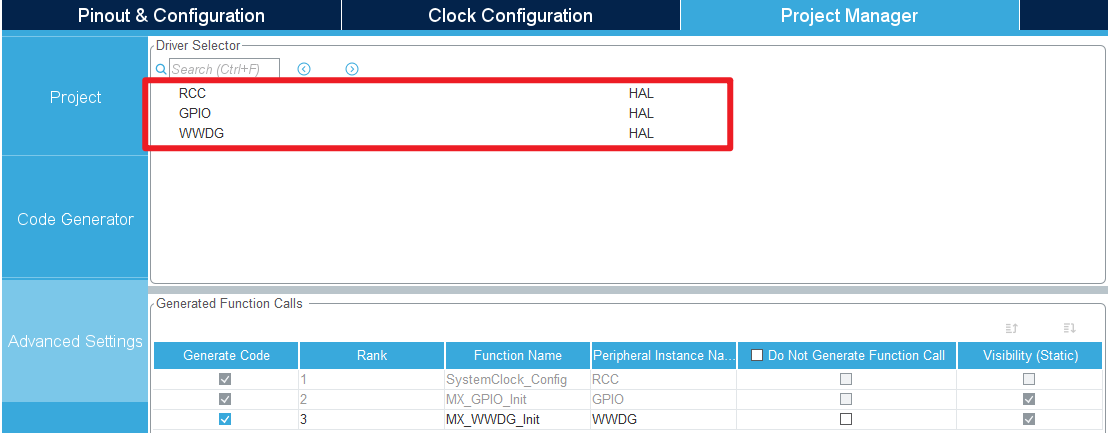
- Generate code

4. Main functions
It mainly introduces the functional code written by the user. For detailed code, you can open the project file provided by us yourself and enter the Bsp folder to view the source code. **
HAL library function analysis
The HAL library functions that have been introduced in the previous tutorial will not be introduced again in the tutorial!
xxxxxxxxxxIf you want to find the HAL library and LL library function analysis involved in the entire tutorial, you can view the documents in the folder [8. STM32 Manual: STM32F1_HAL Library and LL Library_User Manual]
Function: HAL_WWDG_Init
| Function prototype | HAL_StatusTypeDef HAL_WWDG_Init(WWDG_HandleTypeDef *hwwdg) |
|---|---|
| Function description | Initialize WWDG peripheral parameters |
| Input parameters | hwwdg: WWDG handle address |
| Return value | HAL status value: HAL_OK, HAL_ERROR, HAL_BUSY, HAL_TIMEOUT |
Function: HAL_WWDG_MspInit
| Function prototype | void HAL_WWDG_MspInit(WWDG_HandleTypeDef* wwdgHandle) |
|---|---|
| Function description | Initialize the clock and NVIC of WWDG peripherals |
| Input parameters | wwdgHandle: WWDG handle address |
| Return value | None |
Function: HAL_WWDG_IRQHandler
| Function prototype | void HAL_WWDG_IRQHandler(WWDG_HandleTypeDef *hwwdg) |
|---|---|
| Function description | WWDG interrupt handling function |
| Input parameters | hwwdg: WWDG handle address |
| Return value | None |
Function: HAL_WWDG_Refresh
| Function prototype | HAL_StatusTypeDef HAL_WWDG_Refresh(WWDG_HandleTypeDef *hwwdg) |
|---|---|
| Function description | Refresh WWDG (feed the dog) |
| Input parameters | hwwdg: WWDG handle address |
| Return value | HAL status value: HAL_OK, HAL_ERROR, HAL_BUSY, HAL_TIMEOUT |
Function: HAL_WWDG_EarlyWakeupCallback
| Function prototype | void HAL_WWDG_EarlyWakeupCallback(WWDG_HandleTypeDef *hwwdg) |
|---|---|
| Function description | Window watchdog wake-up interrupt processing callback function |
| Input parameters | hwwdg: WWDG handle address |
| Return value | None |
5. Experimental phenomena
After downloading the program successfully, press the RESET button of the development board and observe the development board phenomenon!
xxxxxxxxxxFor program download, please refer to [2. Development environment construction and use: program download and simulation]
Phenomenon:
Feed the dog: LED2 goes off, LED1 flashes
The dog is not fed: LED1 goes out and LED2 flashes, indicating that the hardware watchdog is abnormal.
For experimental phenomena, you can see [Window Watchdog_Experimental Phenomenon.mp4]