Welcome to RDK X5 MagicBox repository
2.Remote login
Remote Login
1.4 Remote Login
This chapter is intended to introduce users who need to remotely access the development board through their personal computer (PC) on how to remotely login via serial port and network (VNC, SSH) methods.
tip
Before remote login via network, the development board needs to be connected to the network via wired Ethernet or wireless WiFi, and the IP address needs to be configured:
Wired Ethernet: The development board defaults to static IP mode. For the IP address, refer to the [Network Status Confirmation] section.
Flash Connection Port: The development board uses a static IP address by default, with an IP address of
192.168.128.10, a subnet mask of255.255.255.0, and a gateway of192.168.128.1.Wireless WiFi: The development board's IP address is generally assigned by the router and can be viewed in the device command line using the
ifconfigcommand for the wlan0 network.
Network Status Confirmation
tip
The IP addresses corresponding to different versions of the images are as follows:
| Board Series | Image Version | Ethernet Port IP Address |
|---|---|---|
| X3 | Less than or equal to 2.0.0 | 192.168.1.10/24 |
| X3 | Greater than or equal to 2.1.0 | 192.168.127.10/24 |
| X5 | 3.0.0 | 192.168.127.10/24 |
| Board Series | Image Version | Flash Connection Port (USB Device) IP Address |
| X5 | 3.0.0 | 192.168.128.10/24 |
Before using remote login, it is necessary to confirm that the computer and development board are connected correctly.
Configure the IP address of the computer to be on the same subnet as the development board. For example, the development board: 192.168.1.10 and the computer: 192.168.1.100. Assigning an IP address depends on the Operating System of the computer. Taking the WIN10 system as an example, the method to modify the static IP of the computer is as follows:

If you want to configure the wired network of the development board to obtain IP dynamically via DHCP mode, please refer to the [Wired Network] chapter for configuration.
To confirm that the connection is working, execute ping 192.168.1.10 from the computer (change the command to the IP address of the development board). If the ping command receives responses, then the connection is working; otherwise, check the network configurations are correct, and that the network firewall of the computer is turned off.
VNC Login
This section is for users using the Ubuntu Desktop system version, and it explains how to use "VNC Viewer" to achieve remote desktop login. "VNC Viewer" is a graphical desktop sharing software that allows you to remotely log in and control the desktop of the device on your computer. With this software, you can preview the system desktop of the development board on your computer screen and use your computer's mouse and keyboard for remote operation. By using VNC Viewer, you can achieve the same effect as local operation on the development board. You can download VNC Viewer from the following link: VNC Viewer.
Connect to the Development Board Currently, VNC supports two connection methods: direct connection and cloud connection. Users can choose according to their own needs. This article recommends using the direct connection method. The connection steps are as follows:- Enter the IP address of the input device, for example: 192.168.127.10

After entering the IP address, press Enter, a prompt for an unencrypted connection will appear, click
Continue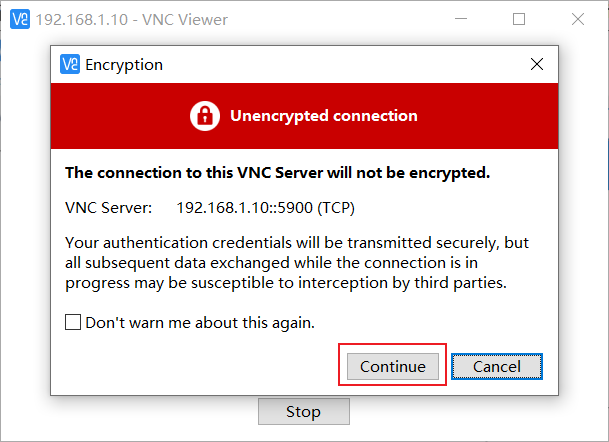
Enter the password
sunrise, checkRemember password, and clickOKto connect
SSH Login
In addition to VNC login for remote desktop, you can also connect to the development board via SSH. The following steps describe how to create SSH connections using terminal software and terminal command line methods.
Terminal Software
Commonly used terminal tools include PuTTy, MobaXterm, etc. Users can choose according to their own preferences. The configuration process for different tools is similar. The following example shows how to create a new SSH connection using MobaXterm:
Open the
MobaXtermtool, click onSession, then selectSSH.Enter the development board IP address, for example:
192.168.1.10.Select
specify username, entersunrise.After clicking OK, enter the username (sunrise) and password (sunrise) to complete the login.
