Welcome to RDK X5 MagicBox repository
2. Multimodal Visual Understanding Application
Multimodal Visual Understanding Application
Multimodal Visual Understanding Application1. Concept Introduction1.1 What is "Visual Understanding"?1.2 Implementation Principle Summary2. Project ArchitectureKey Code1. Tool Layer Entry (largemodel/utils/tools_manager.py)2. Model Interface Layer (largemodel/utils/large_model_interface.py)Code Analysis3. Practical Operations3.1 Configure Online LLM3.2 Start and Test the Feature
1. Concept Introduction
1.1 What is "Visual Understanding"?
In the largemodel project, the Multimodal Visual Understanding feature refers to enabling the robot to not just "see" a pixel matrix, but to truly "understand" the content, objects, scenes, and their relationships in an image. It's like giving the robot eyes that can think.
The core tool for this feature is seewhat. When a user gives an instruction like "see what's here", the system calls this tool, triggering a series of backend operations, and finally returns the AI's analysis of the real-time visual feed in natural language.
1.2 Implementation Principle Summary
The basic principle is to input two different types of information—images (visual information) and text (language information)—into a powerful multimodal large model (e.g., LLaVA).
Image Encoding: The model first converts the input image into a numerical vector that the computer can understand through a Vision Encoder. These vectors capture the image's color, shape, texture, and other features.
Text Encoding: Simultaneously, the user's question (e.g., "What's on the table?") is also converted into a text vector.
Cross-modal Fusion: The most critical step is that the model fuses the image and text vectors in a special "Attention Layer". Here, the model learns to "focus" on parts of the image related to the question. For example, when asked about a "table", the model focuses more on areas of the image that match "table" features.
Generate Answer: Finally, a large language model (LLM) generates a descriptive text answer based on the fused information.
Simply put, it's using text to "illuminate" the corresponding parts of an image, and then describing the "illuminated" parts in language.
2. Project Architecture
Key Code
1. Tool Layer Entry (largemodel/utils/tools_manager.py)
The seewhat function in this file defines the execution flow of this tool.
x# From largemodel/utils/tools_manager.py
class ToolsManager: # ...
def seewhat(self): """ Capture camera frame and analyze environment with AI model. :return: Dictionary with scene description and image path, or None if failed. """ self.node.get_logger().info("Executing seewhat() tool") image_path = self.capture_frame() if image_path: # Use isolated context for image analysis. analysis_text = self._get_actual_scene_description(image_path)
# Return structured data for the tool chain. return { "description": analysis_text, "image_path": image_path } else: # ... (Error handling) return None
def _get_actual_scene_description(self, image_path, message_context=None): """ Get AI-generated scene description for captured image. :param image_path: Path to captured image file. :return: Plain text description of scene. """ try: # ... (Build Prompt) # Force use of a plain text system prompt with a clean, one-time context. simple_context = [{ "role": "system", "content": "You are an image description assistant. ..." }]
result = self.node.model_client.infer_with_image(image_path, scene_prompt, message=simple_context) # ... (Process results) return description except Exception as e: # ...2. Model Interface Layer (largemodel/utils/large_model_interface.py)
The infer_with_image function in this file is the unified entry point for all image understanding tasks. It is responsible for calling the specific model implementation based on the configuration.
xxxxxxxxxx# From largemodel/utils/large_model_interface.py
class model_interface:    # ...    def infer_with_image(self, image_path, text=None, message=None):        """Unified image inference interface."""        # ... (Prepare message)        try:            # Based on the value of self.llm_platform, decide which specific implementation to call            if self.llm_platform == 'ollama':                response_content = self.ollama_infer(self.messages, image_path=image_path)            elif self.llm_platform == 'tongyi':                # ... Call Tongyi model logic                pass            # ... (Other platform logic)        # ...        return {'response': response_content, 'messages': self.messages.copy()}
Code Analysis
The implementation involves two main layers: the tool layer defines the business logic, and the model interface layer is responsible for communication with the large language model. This layered design is the key to achieving platform generality.
Tool Layer (
tools_manager.py):The
seewhatfunction is the business core of the visual understanding feature. It encapsulates the complete process of "seeing": first calling thecapture_framemethod to get an image, then calling_get_actual_scene_descriptionto prepare an instruction (Prompt) for requesting the model to analyze the image.The most critical step is calling the
infer_with_imagemethod of the model interface layer. It doesn't care which model is used underneath; it only passes the two core pieces of data—"image" and "analysis instruction"—forward.Finally, it packages the analysis result (plain text description) received from the model interface layer into a structured dictionary and returns it. This allows the upper-layer application to easily use the analysis results.
Model Interface Layer (
large_model_interface.py):The
infer_with_imagefunction acts as a "dispatch center". Its main responsibility is to check the current platform configuration (self.llm_platform) and dispatch the task to the corresponding specific processing function (e.g.,ollama_inferortongyi_infer) based on the configuration value.This layer is the key to adapting to different AI platforms. All platform-specific operations (such as data encoding, API call formats, etc.) are encapsulated in their respective processing functions.
Through this approach, the business logic code in
tools_manager.pydoesn't need any modifications to support multiple different backend large model services. It only needs to interact withinfer_with_image, which is a unified, stable interface.
To summarize, the seewhat tool's execution flow reflects a clear separation of responsibilities: ToolsManager is responsible for defining "what to do" (capture image and request analysis), while model_interface is responsible for defining "how to do it" (based on current configuration, select the appropriate model platform and interact with it). This makes the tutorial's parsing universal; regardless of whether the user is in online or offline mode, the core code logic remains consistent.
3. Practical Operations
3.1 Configure Online LLM
Update the API key in the configuration file, open the model interface configuration file
large_model_interface.yaml:x
vim ~/yahboomcar_ws/src/largemodel/config/large_model_interface.yamlEnter your API Key: Find the corresponding section and paste your copied API Key here. Here's an example using Tongyi Qianwen configuration:
xxxxxxxxxx# large_model_interface.yaml## Tongyi Qianwenqianwen_api_key"sk-xxxxxxxxxxxxxxxxxxxxxxxxxxxxxxxx" # Paste your Key hereqianwen_model"qwen-vl-max-latest" # Can choose model as needed, such as qwen-turbo, qwen-plusOpen the main configuration file
yahboom.yaml:xxxxxxxxxxvim ~/yahboomcar_ws/src/largemodel/config/yahboom.yamlSelect the online platform to use: Modify the
llm_platformparameter to the platform name you want to use:xxxxxxxxxx# yahboom.yamlmodel_serviceros__parameters# ...llm_platform'tongyi' # Optional platforms: 'tongyi', 'spark', 'qianfan', 'openrouter'After modifying the configuration file, you need to recompile in the workspace and source:
x
cd ~/yahboomcar_wscolcon build && source install/setup.bash
3.2 Start and Test the Feature
Start the
largemodelmain program and enable text interaction mode:x
ros2 launch largemodel largemodel_control.launch.py text_chat_mode:=trueSend text instructions:
📓Due to the official DiGua (RDK) system, Chinese input method can only be used when the system language is set to Chinese. The factory image does not switch languages. You can use Chinese pinyin input via the SSH remote software terminal.
Open another terminal and run the following command:
xxxxxxxxxxros2 run text_chat text_chatThen you can start typing your questions.
Test:
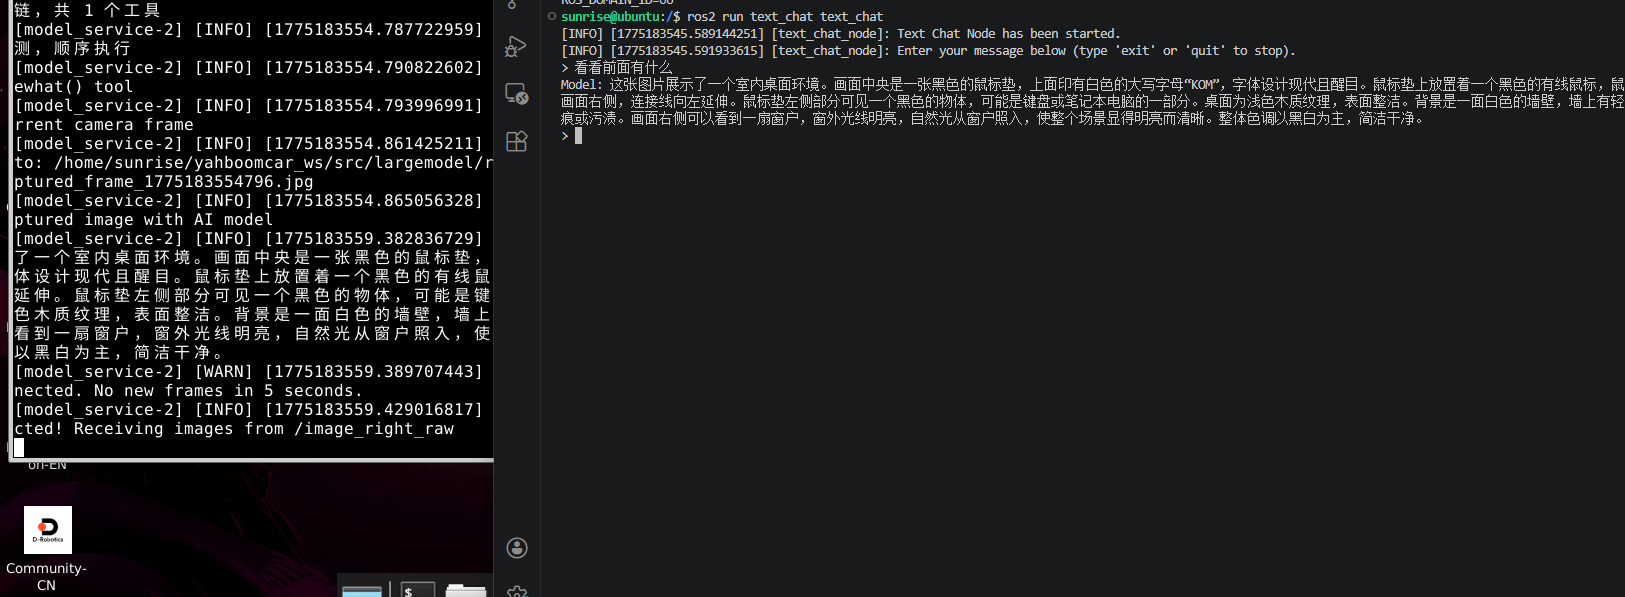
Enter your question in the terminal and press Enter. For example:
看看前面有什么?(What's in front?)Observe the terminal output, and after a while, you should see the detailed answer returned from the cloud large model.