Welcome to RDK X5 MagicBox repository
3. Multimodal Visual Positioning Application
Multimodal Visual Positioning Application
Multimodal Visual Positioning Application1. Concept Introduction1.1 What is "Multimodal Visual Positioning"?1.2 Implementation Principle Summary2. Code AnalysisKey Code1. Tool Layer Entry (largemodel/utils/tools_manager.py)2. Model Interface Layer (largemodel/utils/large_model_interface.py)Code Analysis3. Practical Operations3.1 Configure Online LLM3.2 Start and Test the Feature
1. Concept Introduction
1.1 What is "Multimodal Visual Positioning"?
Multimodal Visual Positioning is a technology that combines multiple sensor inputs (such as cameras, depth sensors, IMU, etc.) and algorithmic processing techniques to achieve precise position and posture recognition and tracking of a device or user in an environment. This technology does not rely on a single type of sensing data but integrates information from different perceptual modes, thereby improving the accuracy and robustness of positioning.
1.2 Implementation Principle Summary
- Cross-modal Representation Learning: To enable LLMs to process visual information, a mechanism needs to be developed to convert visual signals into a form that the model can understand. This may involve using Convolutional Neural Networks (CNNs) or other architectures suitable for image processing to extract features and map them into the same embedding space as text.
- Joint Training: By designing appropriate loss functions, text and visual data can be trained simultaneously within the same framework, causing the model to learn connections between these two modalities. For example, in a question-answering system, answers can be given based on both the provided text questions and the relevant image content.
- Vision-guided Language Generation/Understanding: Once an effective cross-modal representation is established, visual information can be leveraged to enhance the capabilities of language models. For instance, when given a photo, the model can not only describe what's happening in the picture but also answer specific questions about that scene, or even execute instructions based on visual cues (such as navigating to a certain location).
2. Code Analysis
Key Code
1. Tool Layer Entry (largemodel/utils/tools_manager.py)
The visual_positioning function in this file defines the execution flow of this tool, especially how it constructs a Prompt containing the target object name and format requirements.
# From largemodel/utils/tools_manager.pyclass ToolsManager: # ... def visual_positioning(self, args): """ Locate object coordinates in image and save results to MD file. :param args: Arguments containing image path and object name. :return: Dictionary with file path and coordinate data. """ self.node.get_logger().info(f"Executing visual_positioning() tool with args: {args}") try: image_path = args.get("image_path") object_name = args.get("object_name") # ... (Path fallback mechanism and parameter checking) # Construct a prompt asking the large model to identify the coordinates of the specified object. if self.node.language == 'zh': prompt = f"请仔细分析这张图片,用一个个框定位图像每一个{object_name}的位置..." else: prompt = f"Please carefully analyze this image and find the position of all {object_name}..." # ... (Build independent message context) result = self.node.model_client.infer_with_image(image_path, prompt, message=message_to_use) # ... (Process and parse the returned coordinate text) return { "file_path": md_file_path, "coordinates_content": coordinates_content, "explanation_content": explanation_content } # ... (Error handling)2. Model Interface Layer (largemodel/utils/large_model_interface.py)
The infer_with_image function in this file is the unified entry point for all image-related tasks.
x# From largemodel/utils/large_model_interface.pyclass model_interface: # ... def infer_with_image(self, image_path, text=None, message=None): """Unified image inference interface.""" # ... (Prepare message) try: # Based on the value of self.llm_platform, decide which specific implementation to call if self.llm_platform == 'ollama': response_content = self.ollama_infer(self.messages, image_path=image_path) elif self.llm_platform == 'tongyi': # ... Call Tongyi model logic pass # ... (Other platform logic) # ... return {'response': response_content, 'messages': self.messages.copy()}Code Analysis
The core of the visual positioning feature lies in guiding the large model to output structured data through precise instructions. It also follows the layered design of tool layer and model interface layer.
Tool Layer (
tools_manager.py):- The
visual_positioningfunction is the business core of this feature. It receives two key parameters:image_path(image path) andobject_name(name of the object to locate). - The most critical operation of this function is constructing a highly customized Prompt. It's not simply asking the model to describe the image; instead, it embeds the
object_nameinto a carefully designed template, explicitly requesting the model to "locate the position of every {object_name} in the image", and implicitly or explicitly requiring the result to be returned in a specific format (such as a coordinate array). - After constructing the Prompt, it calls the
infer_with_imagemethod of the model interface layer, passing the image and this customized instruction together. - After receiving the text returned from the model interface layer, it needs to perform post-processing: using regular expressions and other methods to parse the precise coordinate data from the model's natural language response.
- Finally, it returns the parsed structured coordinate data to the upper-layer application.
- The
Model Interface Layer (
large_model_interface.py):- The
infer_with_imagefunction continues to serve as the unified "dispatch center". It receives the image and Prompt fromvisual_positioning, and based on the current configuration (self.llm_platform), dispatches the task to the correct backend model implementation. - For visual positioning tasks, the responsibilities of the model interface layer are basically the same as for visual understanding tasks: correctly packaging the image data and text instructions and sending them to the selected model platform, then returning the returned text result intact to the tool layer. All platform-specific implementation details are encapsulated in this layer.
- The
To summarize, the general flow of visual positioning is: ToolsManager receives the target object name and constructs a precise Prompt requiring coordinate output -> ToolsManager calls the model interface -> model_interface packages the image and Prompt together and sends them to the corresponding model platform based on configuration -> The model returns text containing coordinate information -> model_interface returns the text to ToolsManager -> ToolsManager parses the text, extracts structured coordinate data, and returns it. This process demonstrates how Prompt Engineering technology can be used to enable a general-purpose visual large model to complete more specific, structured tasks.
3. Practical Operations
3.1 Configure Online LLM
Update the API key in the configuration file, open the model interface configuration file
large_model_interface.yaml:xxxxxxxxxxvim ~/yahboomcar_ws/src/largemodel/config/large_model_interface.yamlEnter your API Key: Find the corresponding section and paste your copied API Key here. Here's an example using Tongyi Qianwen configuration:
xxxxxxxxxx# large_model_interface.yaml## Tongyi Qianwenqianwen_api_key"sk-xxxxxxxxxxxxxxxxxxxxxxxxxxxxxxxx" # Paste your Key hereqianwen_model"qwen-vl-max-latest" # Can choose model as needed, such as qwen-turbo, qwen-plusOpen the main configuration file
yahboom.yaml:xxxxxxxxxxvim ~/yahboomcar_ws/src/largemodel/config/yahboom.yamlSelect the online platform to use: Modify the
llm_platformparameter to the platform name you want to use:xxxxxxxxxx# yahboom.yamlmodel_serviceros__parameters# ...llm_platform'tongyi' #Optional platforms: 'tongyi', 'spark', 'qianfan', 'openrouter'After modifying the configuration file, you need to recompile in the workspace and source:
xxxxxxxxxxcd ~/yahboomcar_wscolcon build && source install/setup.bash
3.2 Start and Test the Feature
Start the
largemodelmain program:Open a terminal and run the following command:
xxxxxxxxxxros2 launch largemodel largemodel_control.launch.py text_chat_mode:=trueSend text instructions: Open another terminal and run the following command:
📓Due to the official DiGua (RDK) system, Chinese input method can only be used when the system language is set to Chinese. The factory image does not switch languages. You can use Chinese pinyin input via the SSH remote software terminal.
Open another terminal and run the following command:
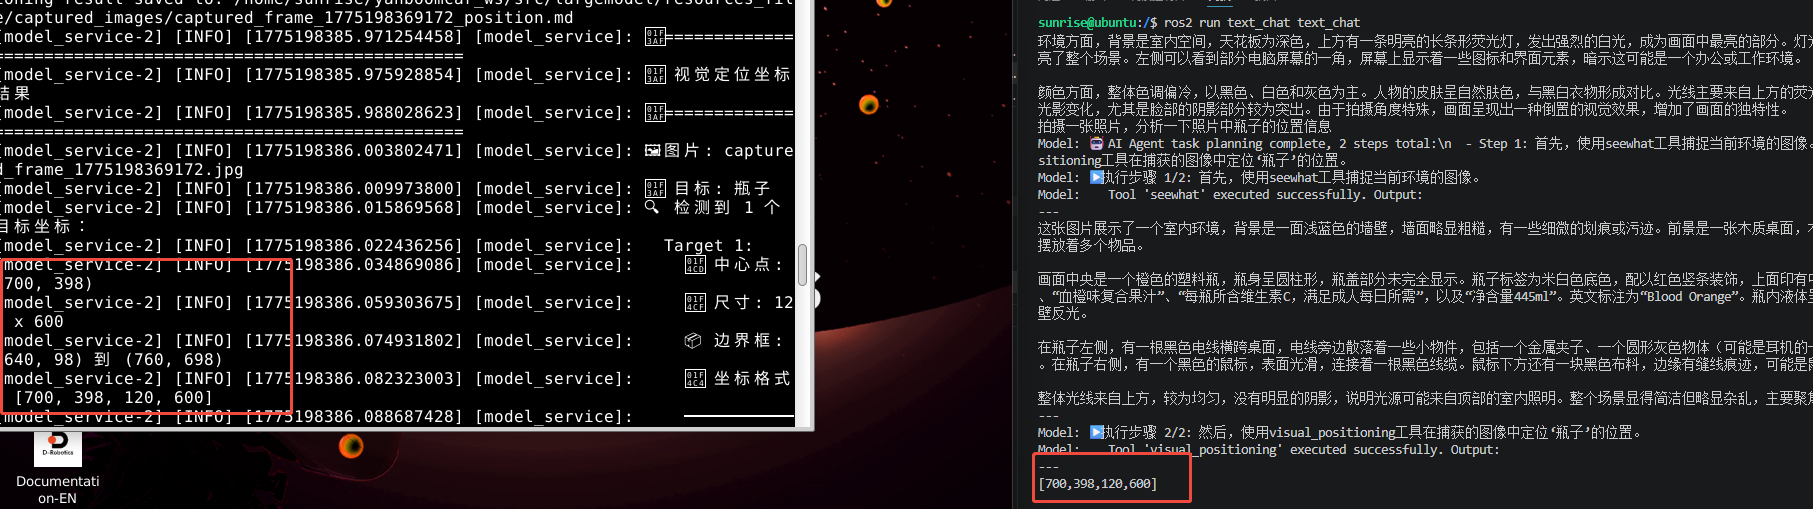
xxxxxxxxxxros2 run text_chat text_chatTake a photo on-site to analyze the position and enter the text: "拍一张照片然后分析图片中瓶子的位置" (Take a photo and analyze the position of bottles in the image)
Observe the results: In the first terminal running the main program, you will see log output showing the system received the instruction, called the
visual_positioningtool, prompted thatvisual_positioningexecution is complete, and the coordinates were saved to a document.You can find this document at
/home/sunrise/yahboomcar_ws/src/largemodel/resources_file/captured_images/captured_frame_1775198369172_position.md.