yahboom
HomeLearn
Solution
Blog
Online Store
About Us
EN/中文
Rider Pi Robot📖
0.Quick Start
  • 0. Notes (Must Read)new
  • 1.APP control experience
  • 2.Web page image transmission controlnew
  • 3.Manual
1.RPi Basic course
  • 1.SSH remote login
  • 2.VNC remote login desktop
  • 3. Remote file transfer
  • 4. JupyterLab environment construction and use
  • 5. Write system image
  • 6. Connect to WiFi
  • 7. Close startup programs(MustRead)
  • 8. Raspberry Pi system expansion
2.Car basic control course
  • 1. Car screen display control
  • 2. Car recording audio
  • 3. Car plays audio
  • 4. Car recording video
  • 5. Car plays video
  • 6. RGB light control
  • 7. Car attitude angle reading
  • 8. Read the battery level of the car
3.Car motion control
  • 1. Car forward and backward
  • 2. Car rotation movement
  • 3. Adjust car height
  • 4. Adjust car posture
  • 5. Car self-stabilization mode
  • 6. Car squats and shakes
4.Open Source CV
A. Getting started with OpenCV
  • 1. Introduction to OpenCV
  • 2. OpenCV image reading and display
  • 3. OpenCV image writing
  • 4. OpenCV Image Quality
  • 5.OpenCV pixel operations
B. OpenCV geometric transformation
  • 1. Image scaling
  • 2. Image cutting
  • 3. Image translation
  • 4. Image mirroring
  • 5. Affine Transformation
  • 6. Image Rotation
  • 7. Perspective Transformation
C. OpenCV image processing and drawing text segments
  • 1. Grayscale processing
  • 2. Image Binarization
  • 3. Edge Detection
  • 4. Line drawing
  • 5. Rectangle and circle drawing
  • 6. Text and picture drawing
D. Image beautification
  • 1. Color Image Histogram
  • 2. Histogram Equalization
  • 3. Image repair
  • 4. Brightness enhancement
  • 5. Skin whitening
  • 6. Gaussian mean filtering
  • 7. Median Filter
5.AI Visual recognition course
  • 1. Camera driver tutorial
  • 2. Color recognition
  • 3. HSV value test
  • 4. Object Recognition
  • 5. QR code recognition
  • 6. Human face mask
  • 7. License Plate Recognition
  • 8. Human Pose Estimation
  • 9. Object Detection
  • 10.Yolo detection
  • 11. Face Detection
  • 12. Face effects
  • 13. 3D Object Recognition
  • 14. Paintbrush
  • 15. Finger recognition
  • 16. Gesture Recognition
  • 17.Facial Recognitionnew
  • 18.Emotion Recognitionnew
  • 19.Motion Detectionnew
6.AI Visual interaction course
  • 1. Color tracking
  • 2. Color follows
  • 3. QR code recognition action
  • 4. Face tracking
  • 5. Finger control
  • 6. Gesture following
  • 7. Gesture control car
  • 8. Human Body Followingnew
7. AI Large Model Interaction
  • 0.Principles of Large AI Models
  • 1.Large model premise use configuration
  • 2.Q&A(For cm5)
  • 3.Q&A and ChatGPT(For cm4)
  • 4.Speech recognition
  • 5.Picture to Text
  • 6.Embodied intelligence
Download
  • APP(iOS/Android)
  • System_File
  • Code
  • Hareware_Info
  • AI_Model_File
  • 3D_Model_File
  • Instruction_Manual
Download ZIP

Welcome to Rider Pi Robot repository

3. Image translation

3. Image translation

3. Image translation3.1. Image translation3.2. Actual effect display

3.1. Image translation

cv2.warpAffine(src, M, dsize[,dst[, flags[, borderMode[, borderValue]]]])

Parameter meaning:

src - input image. M - transformation matrix. dsize - size of output image. flags - combination of interpolation methods (int type!) borderMode - border pixel mode (int type!) borderValue - (important!) border fill value; by default, it is 0.

Among the above parameters: M is an affine transformation matrix, which generally reflects the relationship of translation or rotation and is a 2×3 transformation matrix of InputArray type. In daily affine transformation, only the first three parameters are set, such as cv2.warpAffine(img,M,(rows,cols)) to achieve basic affine transformation effects.

How to get the transformation matrix M? The following example illustrates that:

The original image src is converted to the target image dst through the conversion matrix M:

dst(x, y) = src(M11x + M12y+M13, M21x+M22y+M23)

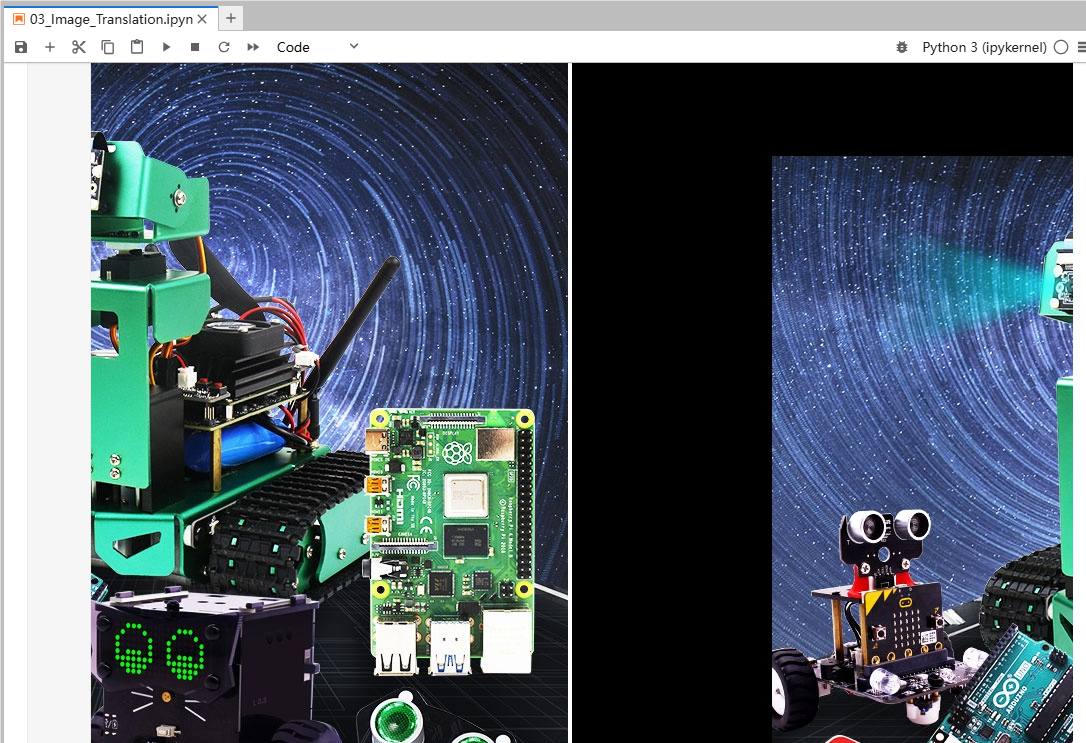
The original image src is moved 200 pixels to the right and 100 pixels downward, and the corresponding relationship is:

dst(x, y) = src(x+200, y+100)

Complete the above expression, that is:

dst(x, y) = src(1·x + 0·y + 200, 0·x + 1·y + 100)

According to the above expression, the values of each element in the corresponding transformation matrix M can be determined as follows:

M11=1

M12=0

M13=200

M21=0

M22=1

M23=100

Substituting the above values into the transformation matrix M, we get:

3.2. Actual effect display

Code path:

/home/pi/Rider-pi_class/4.Open Source CV/B.Geometric_Transformations/03_Image_Translation.ipynb

import cv2
import numpy as np
img = cv2.imread('yahboom.jpg',1)
#cv2.imshow('src',img)
imgInfo = img.shape
height = imgInfo[0]
width = imgInfo[1]
####
matShift = np.float32([[1,0,200],[0,1,100]])# 2*3
dst = cv2.warpAffine(img,matShift,(height,width))#1 data 2 mat 3 info
# 移位 矩阵 Shift Matrix
# cv2.imshow('dst',dst)
# cv2.waitKey(0)
​x
#bgr8转jpeg格式 bgr8 to jpeg format
import enum
import cv2
​
def bgr8_to_jpeg(value, quality=75):
    return bytes(cv2.imencode('.jpg', value)[1])
xxxxxxxxxx
import ipywidgets.widgets as widgets
​
image_widget1 = widgets.Image(format='jpg', )
image_widget2 = widgets.Image(format='jpg', )
# create a horizontal box container to place the image widget next to eachother
image_container = widgets.HBox([image_widget1, image_widget2])
​
# display the container in this cell's output
display(image_container)
#display(image_widget2)
​
img1 = cv2.imread('yahboom.jpg',1)
​
image_widget1.value = bgr8_to_jpeg(img1)
image_widget2.value = bgr8_to_jpeg(dst)

Image cutting
Image mirroring

COMPANY

  • About us
  • Team Style
  • Blog

LEARNING & EXPLORATION

  • Tutorials
  • Edge AI hardware
  • Educational robots
  • Embedded intelligent hardware

WHERE TO BUY

  • Yahboom Online Store
  • Amazon
  • Alibaba
  • AliExpress
  • Mercado

TECHNOLOGY SUPPORT

  • Email: support@yahboom.com

BE A DISTRIBUTOR

  • Email: sales@yahboom.com
QR Code
QR Code

Copyright © 2017-2026 Yahboom. All Rights Reserved.

EN/中文