Welcome to Rider Pi Robot repository
6. Human face mask
Face Mask
1. Experimental Purpose
Drive the car to recognize the face and put a mask on the face, and make corresponding movements according to the position of the face on the screen
2. Experimental Path Source Code
Enter the car system, end the car program, enter "ip (ip is the car's ip): 8888" in the browser, enter the password "yahboom"
 Then log in
Enter the path of Rider-pi_class/5.AI Visual Recognition Course/6. Facial Mask and run face_mask.ipynb.
You can also enter commands in the terminal to directly start the python script
Then log in
Enter the path of Rider-pi_class/5.AI Visual Recognition Course/6. Facial Mask and run face_mask.ipynb.
You can also enter commands in the terminal to directly start the python script
python3 face_mask.py3. Experimental phenomenon
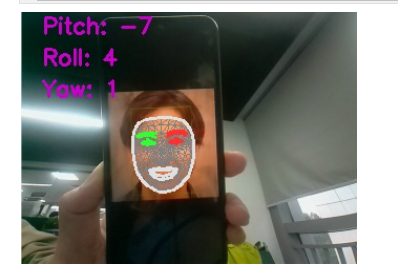
After running the source code, you can see that the car can recognize the face, put a mask on the face, and perform corresponding movements.
4. Main source code analysis
x# For webcam input:drawing_spec = mp_drawing.DrawingSpec(thickness=1, circle_radius=1)cap=cv2.VideoCapture(0)cap.set(3,320)cap.set(4,240)with mp_face_mesh.FaceMesh( max_num_faces=1, refine_landmarks=True, min_detection_confidence=0.5, min_tracking_confidence=0.5) as face_mesh: while cap.isOpened(): face_coordination_in_real_world = np.array([ [285, 528, 200], [285, 371, 152], [197, 574, 128], [173, 425, 108], [360, 574, 128], [391, 425, 108] ], dtype=np.float64) h=240 w=320 face_coordination_in_image = [] text='' success, image = cap.read() if not success: print("Ignoring empty camera frame.") # If loading a video, use 'break' instead of 'continue'. continue # To improve performance, optionally mark the image as not writeable to # pass by reference. image.flags.writeable = False image = cv2.cvtColor(image, cv2.COLOR_BGR2RGB) results = face_mesh.process(image) # Draw the face mesh annotations on the image. image.flags.writeable = True image = cv2.cvtColor(image, cv2.COLOR_RGB2BGR) direction=0 if results.multi_face_landmarks: for face_landmarks in results.multi_face_landmarks: mp_drawing.draw_landmarks( image=image, landmark_list=face_landmarks, connections=mp_face_mesh.FACEMESH_TESSELATION, landmark_drawing_spec=None, connection_drawing_spec=mp_drawing_styles .get_default_face_mesh_tesselation_style()) mp_drawing.draw_landmarks( image=image, landmark_list=face_landmarks, connections=mp_face_mesh.FACEMESH_CONTOURS, landmark_drawing_spec=None, connection_drawing_spec=mp_drawing_styles .get_default_face_mesh_contours_style()) mp_drawing.draw_landmarks( image=image, landmark_list=face_landmarks, connections=mp_face_mesh.FACEMESH_IRISES, landmark_drawing_spec=None, connection_drawing_spec=mp_drawing_styles .get_default_face_mesh_iris_connections_style()) for idx, lm in enumerate(face_landmarks.landmark): if idx in [1, 9, 57, 130, 287, 359]: x, y = int(lm.x * w), int(lm.y * h) face_coordination_in_image.append([x, y]) face_coordination_in_image = np.array(face_coordination_in_image,dtype=np.float64) # The camera matrix focal_length = 1 * w cam_matrix = np.array([[focal_length, 0, w / 2], [0, focal_length, h / 2], [0, 0, 1]]) # The Distance Matrix dist_matrix = np.zeros((4, 1), dtype=np.float64) success, rotation_vec, transition_vec = cv2.solvePnP(face_coordination_in_real_world, face_coordination_in_image,cam_matrix, dist_matrix) # Use Rodrigues function to convert rotation vector to matrix rotation_matrix, jacobian = cv2.Rodrigues(rotation_vec) result = rotation_matrix_to_angles(rotation_matrix) print(result) pitch=round(-result[0]/100*20) yaw=round(result[1]/80*15) roll=round(result[2]/80*15) if abs(yaw)<= 4: if abs(pitch)<3: pitch = round( pitch * 7 ) print("pitch11",pitch) if pitch < -7: print("hello") pitch = -3 print("pitch",pitch) elif pitch > 7: pitch = 3 print("picth",pitch) else: pitch = pitch print("pitch",pitch) yaw = 0 roll = 0 else: pitch = -3 yaw = yaw if abs(roll) >29: roll = round(roll/6) else: roll = roll print("pitch,yaw,roll",pitch,yaw,roll) if car_type!="R": car.attitude(['p','y','r'],[pitch,yaw,roll]) else: print('rider') car.attitude(['p','y','r'],[pitch,yaw,roll]) #car.attitude(['p','y','r'],[int(pitch/4),int(yaw/4),int(roll/4)]) time.sleep(0.1) else: pass # Flip the image horizontally for a selfie-view mydisplay. b,g,r = cv2.split(image) image = cv2.merge((r,g,b)) image = cv2.flip(image, 1) try: for i, info in enumerate(zip(('Pitch', 'Roll', 'Yaw'), result)): k, v = info text = f'{k}: {int(v)}' cv2.putText(image, text, (20, i*30 + 20),cv2.FONT_HERSHEY_SIMPLEX, 0.7, (200, 0, 200), 2) except: pass imgok = Image.fromarray(image) mydisplay.ShowImage(imgok) #把结果显示到屏幕上 r,g,b = cv2.split(image) image1 = cv2.merge((b,g,r)) image_widget.value = bgr8_to_jpeg(image1) # cv2.imshow("image",image1) if cv2.waitKey(5) & 0xFF == 27: break if button.press_b(): breakThe main function turns on the camera and covers the face recognized by the camera with a mask, and performs corresponding movements based on the IMU data and the position of the face on the screen.