Welcome to Rider Pi Robot repository
15. Finger recognition
Finger recognition
1. Experimental purpose
Finger recognition for driving the car
2. Experimental path source code
Enter the car system, end the car program, enter "ip (ip is the car's ip): 8888" in the browser, enter the password "yahboom" Then log in Enter the path Rider-pi_class/5.AI Visual Recognition Course/15. Finger recognition and run FingerCtrl_USB.ipynb.
Or enter the command in the terminal to directly start the python script
cd /home/pi/Rider-pi_class/5.AI Visual Recognition Course/15. Finger recognitionpython3 FingerCtrl_USB.py3. Experimental phenomenon
After running the source code, you can see that the car will detect the finger and display it
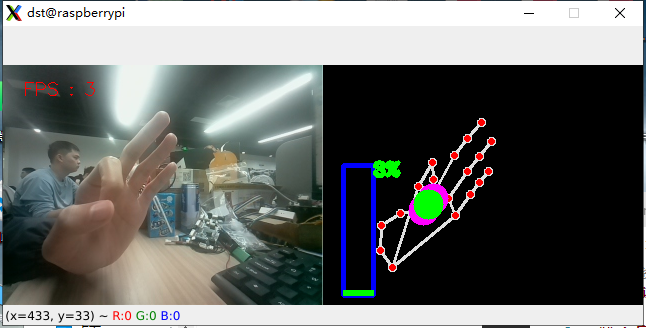 Note: The computer screen displays the original picture and the recognition result, and the car can only display the recognition result because the screen is too small.
4. Main source code analysis
xif __name__ == '__main__': capture = cv.VideoCapture(0) capture.set(6, cv.VideoWriter.fourcc('M', 'J', 'P', 'G')) capture.set(cv.CAP_PROP_FRAME_WIDTH, 320) capture.set(cv.CAP_PROP_FRAME_HEIGHT, 240) print("capture get FPS : ", capture.get(cv.CAP_PROP_FPS)) hand_detector = handDetector() while capture.isOpened(): ret, frame = capture.read() action = cv.waitKey(1) & 0xFF # frame = cv.flip(frame, 1) img = hand_detector.findHands(frame) lmList = hand_detector.findPosition(frame, draw=False) if len(lmList) != 0: angle = hand_detector.calc_angle(4, 0, 8) x1, y1 = lmList[4][1], lmList[4][2] x2, y2 = lmList[8][1], lmList[8][2] cx, cy = (x1 + x2) // 2, (y1 + y2) // 2 cv.circle(img, (x1, y1), 15, (255, 0, 255), cv.FILLED) cv.circle(img, (x2, y2), 15, (255, 0, 255), cv.FILLED) cv.line(img, (x1, y1), (x2, y2), (255, 0, 255), 3) cv.circle(img, (cx, cy), 15, (255, 0, 255), cv.FILLED) if angle <= 10: cv.circle(img, (cx, cy), 15, (0, 255, 0), cv.FILLED) volBar = np.interp(angle, [0, 70], [230, 100]) volPer = np.interp(angle, [0, 70], [0, 100]) value = np.interp(angle, [0, 70], [0, 255]) # print("angle: {},value: {}".format(angle, value)) # 进行阈值二值化操作,大于阈值value的,使用255表示,小于阈值value的,使用0表示 # Perform a threshold binarization operation. Values ••greater than the threshold value are represented by 255, and values ••less than the threshold value are represented by 0. if effect[index]=="thresh": gray = cv.cvtColor(frame, cv.COLOR_BGR2GRAY) frame = cv.threshold(gray, value, 255, cv.THRESH_BINARY)[1] # 进行高斯滤波,(21, 21)表示高斯矩阵的长与宽都是21,标准差取value # Perform Gaussian filtering, (21, 21) means the length and width of the Gaussian matrix are both 21, and the standard deviation is value elif effect[index]=="blur": frame = cv.GaussianBlur(frame, (21, 21), np.interp(value, [0, 255], [0, 11])) # 色彩空间的转化,HSV转换为BGR # Color space conversion, HSV to BGR elif effect[index]=="hue": frame = cv.cvtColor(frame, cv.COLOR_BGR2HSV) frame[:, :, 0] += int(value) frame = cv.cvtColor(frame, cv.COLOR_HSV2BGR) # 调节对比度 # Adjust contrast elif effect[index]=="enhance": enh_val = value / 40 clahe = cv.createCLAHE(clipLimit=enh_val, tileGridSize=(8, 8)) lab = cv.cvtColor(frame, cv.COLOR_BGR2LAB) lab[:, :, 0] = clahe.apply(lab[:, :, 0]) frame = cv.cvtColor(lab, cv.COLOR_LAB2BGR) if action == ord('q'): break if action == ord('f'): index += 1 if index >= len(effect): index = 0 cTime = time.time() fps = 1 / (cTime - pTime) pTime = cTime text = "FPS : " + str(int(fps)) cv.rectangle(img, (20, 100), (50, 230), (255, 0, 0), 3) cv.rectangle(img, (20, int(volBar)), (50, 230), (0, 255, 0), cv.FILLED) cv.putText(img, f'{int(volPer)}%', (50, 110), cv.FONT_HERSHEY_COMPLEX, 0.6, (0, 255, 0), 3) cv.putText(frame, text, (20, 30), cv.FONT_HERSHEY_SIMPLEX, 0.6, (0, 0, 255), 1) dst = hand_detector.frame_combine(frame, img) cv.imshow('dst', dst) #把画面显示在lcd屏上 #Display the image on the LCD screen #b, g, r = cv.split(img) #屏幕显示原生图片The screen displays the original image b, g, r = cv.split(img) #屏幕显示识别结果The screen displays the recognition results image = cv.merge((r, g, b)) imgok = Image.fromarray(image) display.ShowImage(imgok) capture.release() cv.destroyAllWindows()The car calls the detected finger model and displays the recognized finger posture on the car screen and the computer screen.