yahboom
HomeLearn
Solution
Blog
Online Store
About Us
EN/中文
myCobot 320 Arm📖
1.Product Feature
  • 1.Functional Parameters
  • 2.Controller Parameters
  • 3.Structural Parameters
  • 4.Electronic Parameters
  • 5.Coordinate System
  • 6.Introduction of Adaptive Gripper
  • 7.Introduction of force-controlled gripper
2.Common Problem
  • 1.how to ask
  • 2.driver
  • 3.software
  • 4.hardware
3.First Install and Use
  • 1.Product Standard List
  • 2.Product Unboxing Guide
  • 3.Power-on Test Guide
4.Basic Application
1. miniRoboFLow
  • 1. miniRoboFLow
  • 2. Drag & Play
  • 3. Joint Calibration
  • 4. Computer Connect
  • 5. Robot Information
2.1 myblockly
  • 1. What is myBlockly
  • 2. Preparations before using myBlockly
  • 3. myBlockly download and install
  • 4. myBlockly interface display and use of basic functions
  • 5. Control RGB light panel
  • 6. Control the robotic arm to return to the origin
  • 7. Control single joint movement
  • 8. Control multiple joints
  • 9. Use of adaptive grippers
  • 10. Use of force-controlled grippers
  • 11. Q&A
  • 12. API
3. Firmware Description
  • 1.Firmware Description
  • 2.Burn Firmware
2.2 myStudio
  • 1. myStudio
  • 2. myStudio environment setup
  • 3. Install driver
  • 4. Burn and update firmware
5.Mobile APP control
  • Mobile APP control
6.SDK Development
1.Development Environment Construction
  • 1.Development Environment Construction
2.Python
  • 1.What is Python
  • 2.Environment Building
  • 3.Python API usage instaructions
  • 4.TCP IP
  • 5.Drag to teach
  • 6.Use Cases
  • 7.Use of adaptive grippers
  • 8.Use of force-controlled grippers
3.ROS1
  • 1.ROS
  • 2.Environment Building
  • 3.ROS basics
  • 4.Rviz use
  • 5.Basic function case
  • 6.Use of adaptive grippers
  • 7.Use of force-controlled grippers
4.ROS2
  • 1.ROS2 introduction
  • 2.Environment Building
  • 3.ROS2 basics
  • 4.Rviz2 use
  • 5.Basic function case
5.C Sharp(C#)
  • 1.C#
  • 2.Environmental construction
  • 3.Mechanical control
  • 4.myCobot API
  • 5.Use Cases
  • 6.Use of adaptive grippers
6.c plus plus (C++)
  • 1.C++
  • 2.CPlus Download
  • 3.build
  • 4.API
  • 5.example
7.Arduino
  • 1.Arduino
  • 2.Arduino Download
  • 3.API
  • 4.example
  • 5.Use of adaptive grippers
8.Serial communication
  • 1.Serial communication
  • 2.Use of force-controlled grippers
7.Documents Download
  • 1.Product Brochure
  • 2.Software and Source Code
  • 3.System lnformation
Download
  • 3D_Model_File
  • Android Mobile APP
  • Manual
Download ZIP

Welcome to myCobot 320 Arm repository

9. Use of adaptive grippers

Use of adaptive grippers

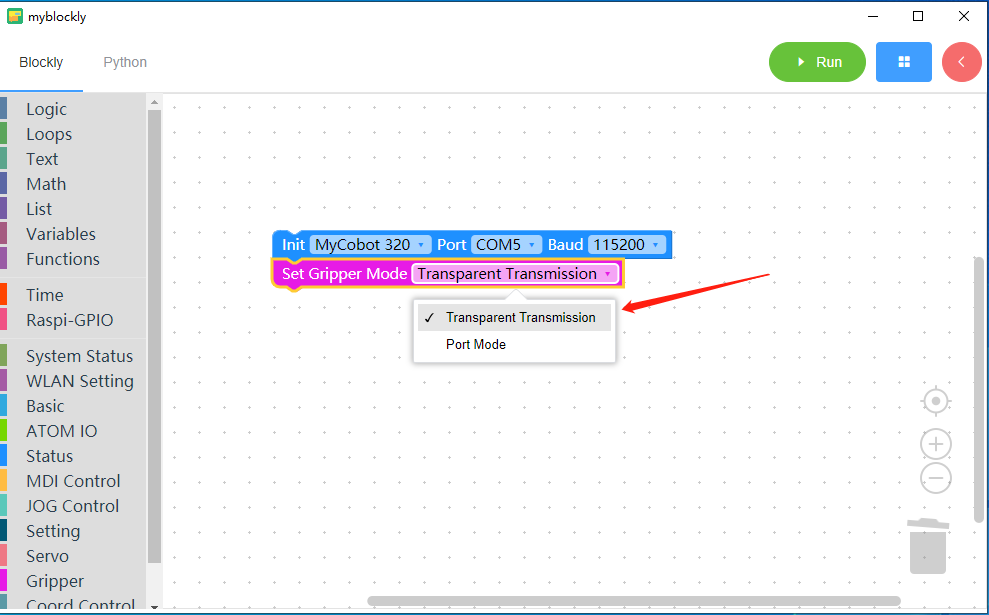
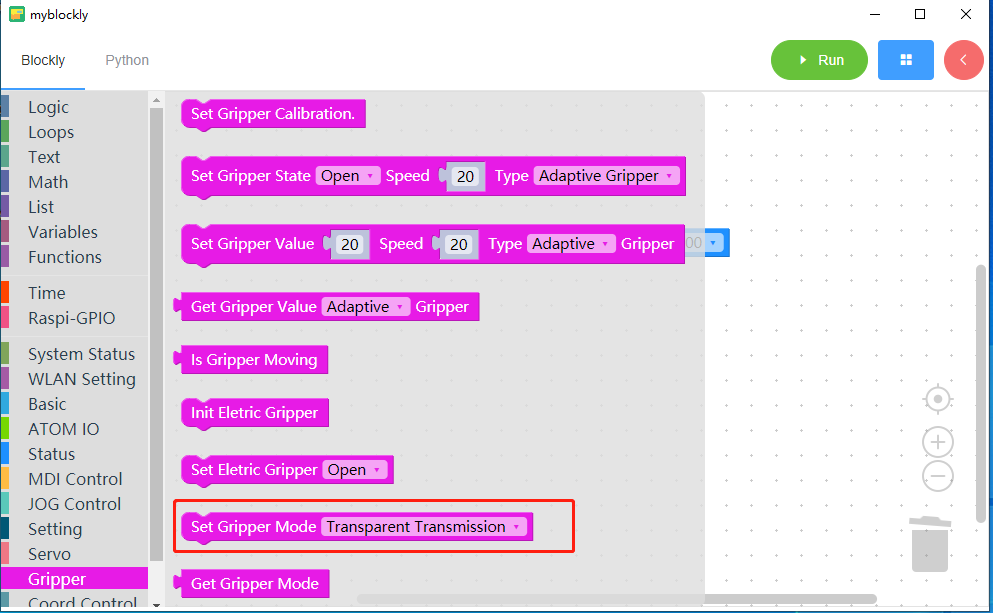
Note that before using myblockly for development, you need to run mc.set_gripper_mode(0) with a python program to set the gripper to 485 mode. Or use the module in myblockly to set the gripper mode to "Transparent Transmission"

Preparation before you begin

  • Make sure the robotic arm is connected to the computer

  • Make sure the machine is normal

  • Make sure the machine is power on

Grippers include adaptive grippers, electric grippers and pneumatic grippers. Here we take the adaptive gripper as an example to explain how to use myBlockly to control the gripper.

Learning content of this chapter

How to use myBlockly to control the adaptive gripper attached to the myCobot 320 M5Stack robotic arm

API display
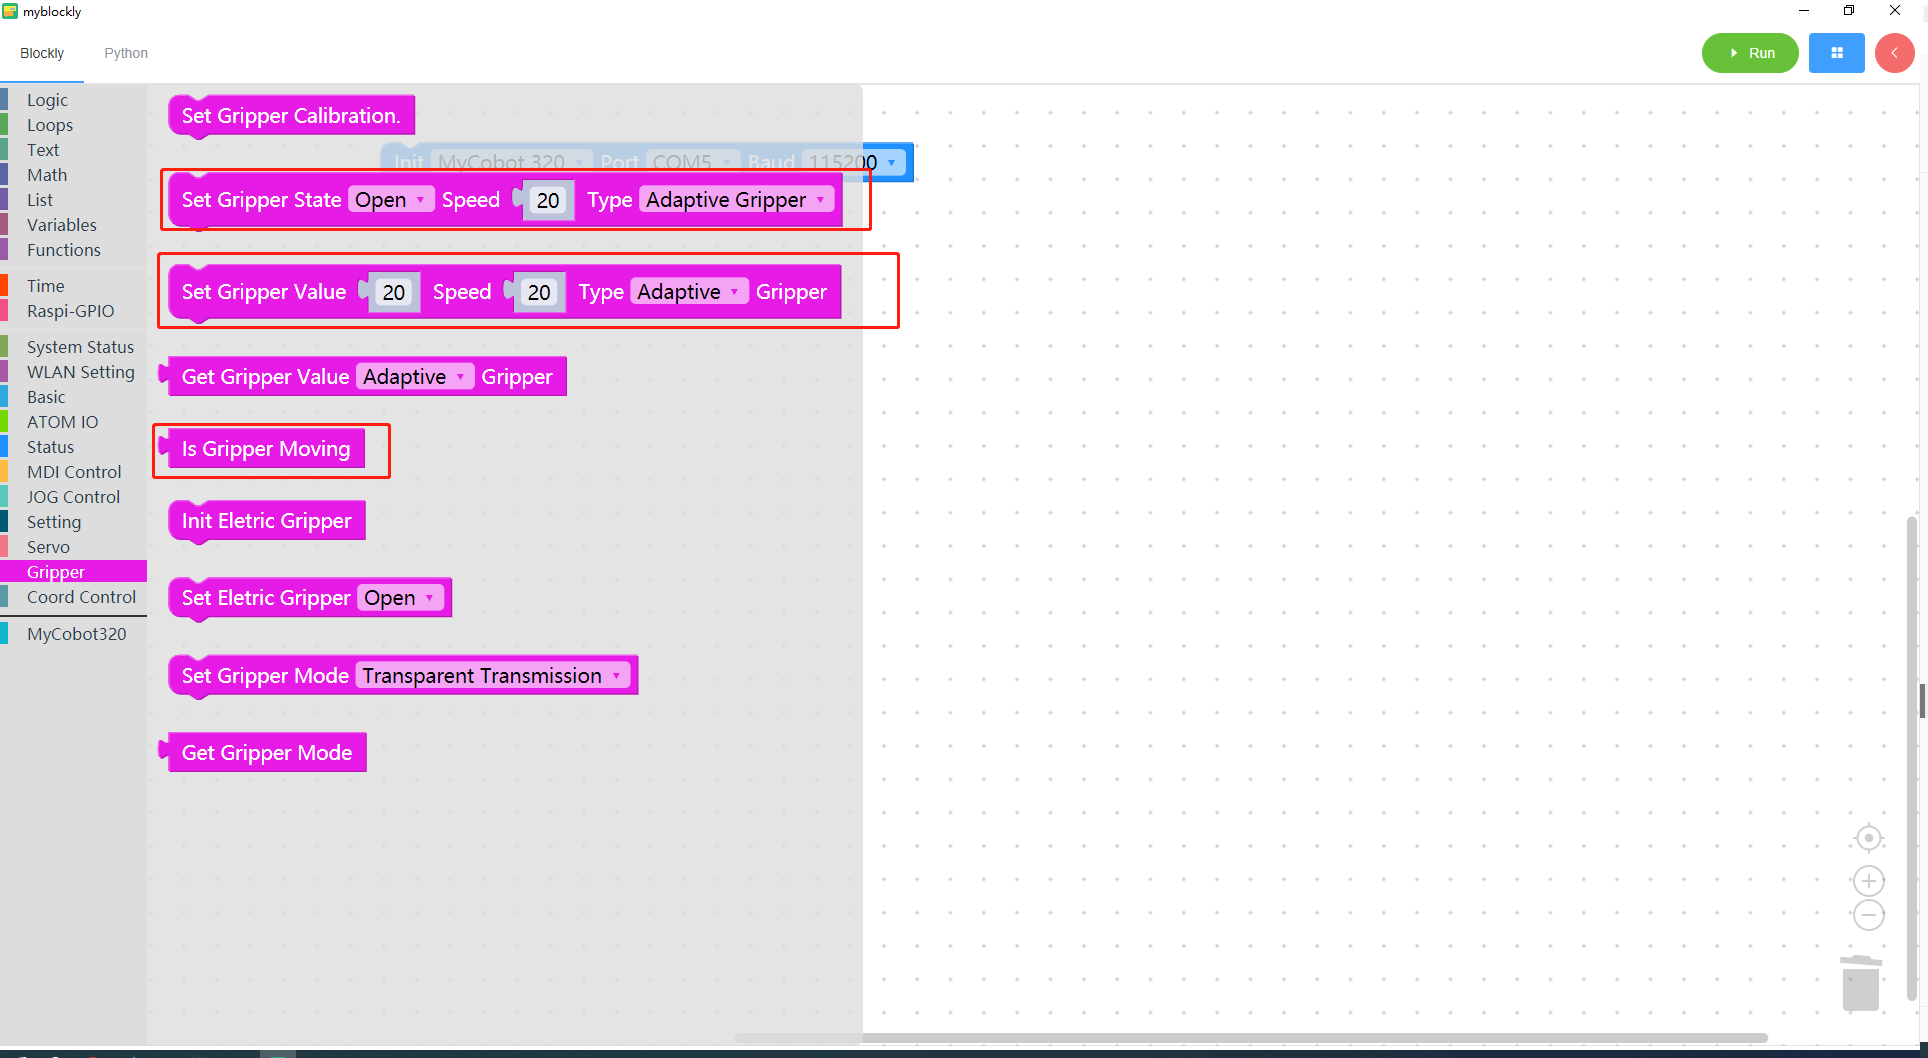
img

  • Method module 1: Set gripper status

    img

    Parameter introduction:

    This module has two parameters that can be adjusted:

    • Clamp status parameter: 1 indicates the clamp claws closed state, 0 indicates the clamp claws open state

    • Speed parameter: indicates the speed at which to rotate, the value range is 0~100

    • Clamp type parameter: select adaptive clamp here

Purpose: Make the gripper enter the specified state (open or closed) at a specified speed

  • Method module 2: Set the value of the gripper

    img

    Parameter introduction:

    This module has two parameters that can be adjusted:

    • The parameter of the gripper value: indicates the position that the gripper wants to reach, and the value range is 0~100.

    • Speed parameter: indicates the speed at which to rotate, the value range is 0~100.

    • Clamp type parameter: select adaptive clamp here

    Purpose: Make the gripper rotate to a specified position at a specified speed.

  • Method module 3: Is the gripper in motion

    img

    Purpose: To determine whether the gripper is running

Simple demonstration

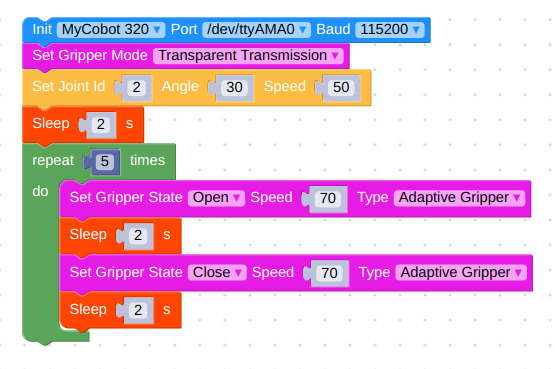
The graphics code is as follows:
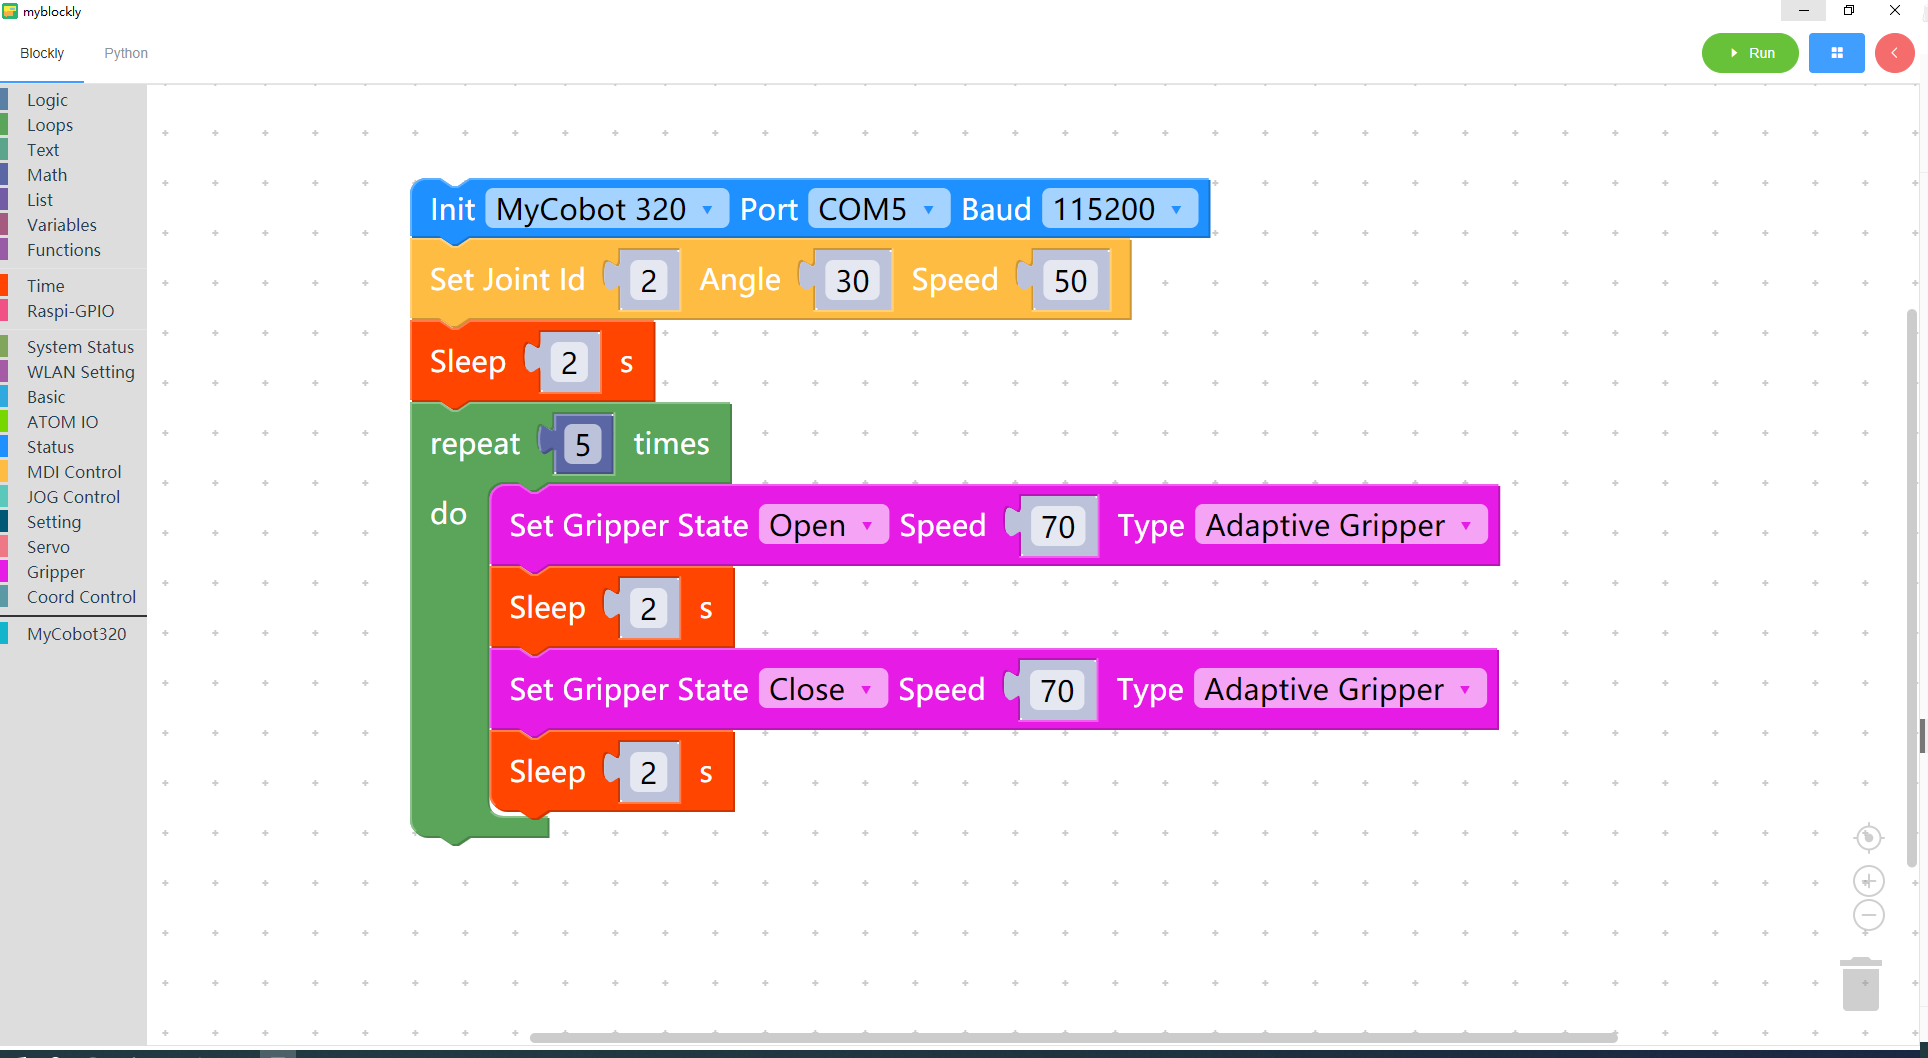
img

  • Implementation content:

    Move joint 2 of the robotic arm to 30 degrees at a speed of 50. After two seconds,

    The gripper opens at a speed of 70. After two seconds,

    The gripper close at speed 70,

    After the process of opening and closing the gripper is cycled 5 times, the program ends.

Note:

If you can't control the girpper from the above example, maybe you need to set the gripper mode
img

img

And run the program

img

Note: If you are using an M5 version of the machine, you need to change the port parameter to COM

Control multiple joints
Use of force-controlled grippers

COMPANY

  • About us
  • Team Style
  • Blog

LEARNING & EXPLORATION

  • Tutorials
  • Edge AI hardware
  • Educational robots
  • Embedded intelligent hardware

WHERE TO BUY

  • Yahboom Online Store
  • Amazon
  • Alibaba
  • AliExpress
  • Mercado

TECHNOLOGY SUPPORT

  • Email: support@yahboom.com

BE A DISTRIBUTOR

  • Email: sales@yahboom.com
QR Code

Copyright © 2017-2026 Yahboom. All Rights Reserved.

EN/中文