Welcome to myCobot 320 Arm repository
2.Environment Building
Install different versions of ubuntu system in Linux
1 Virtual machine installation
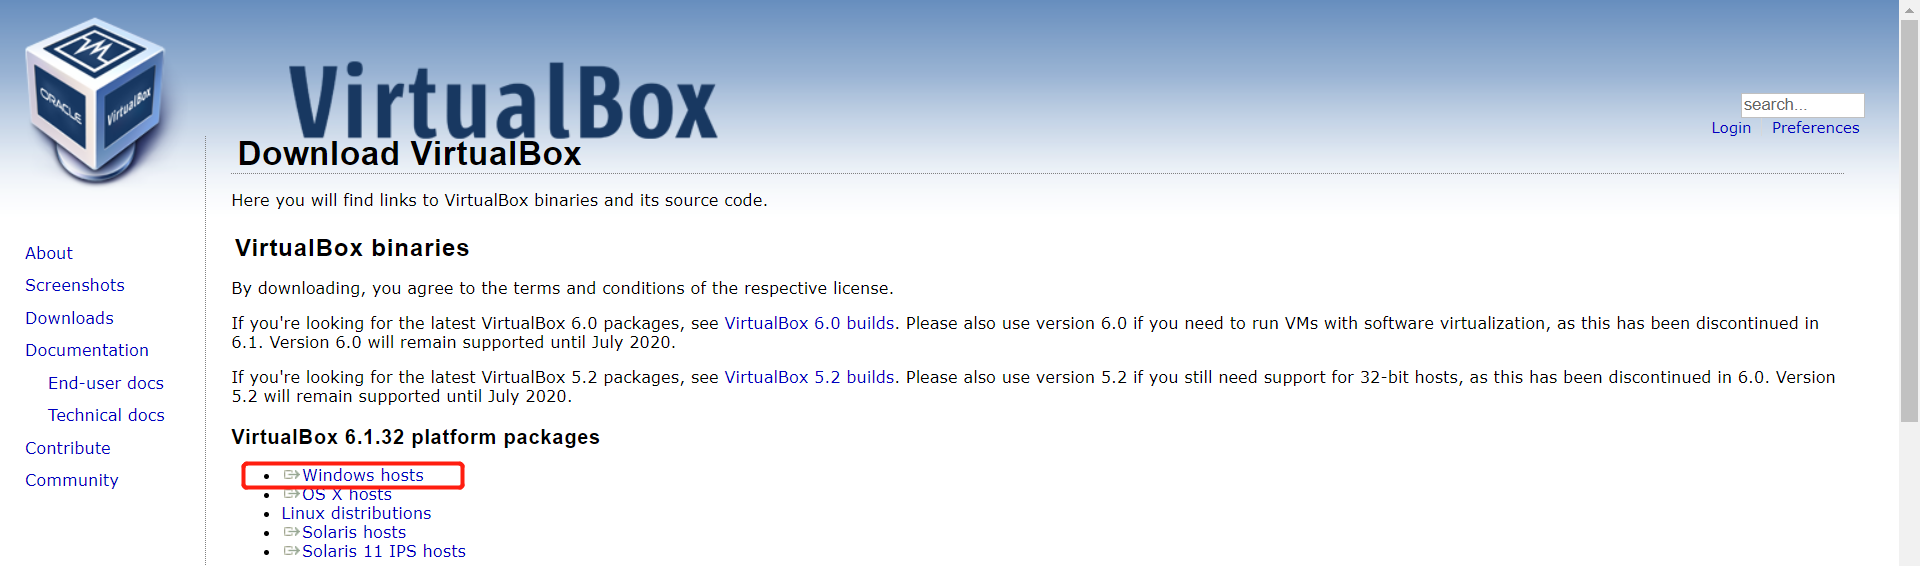
Go to Official website to download the virtual machine Virtual Box or go to Official website to download the virtual machine VMware.
Of course, if you already have your virtual machine, you may skip this step.
We chose to download the Virtual box because it is free.

There are two options for virtual machine creation:
① Using our configured virtual machine ROS1 virtual machine files, imported into the virtual machine software, you can save the time to configure the environment, easy to quickly use the ROS case.
ROS1 VM files: http://download-elephantrobotics.oss-cn-shenzhen.aliyuncs.com/system_images/ubuntu20.04_ROS1_V20230731.ova.zip
Step-by-step video on how to import VM files into VM software: https://drive.google.com/file/d/1KeYk_CUgDE46rVn7zbd0EhraIbgt3qZt/view?usp=sharing
② Follow the steps below to deploy the ROS environment yourself.
2 Creating a virtual machine
2.1 Creating a virtual machine
Select Create in control
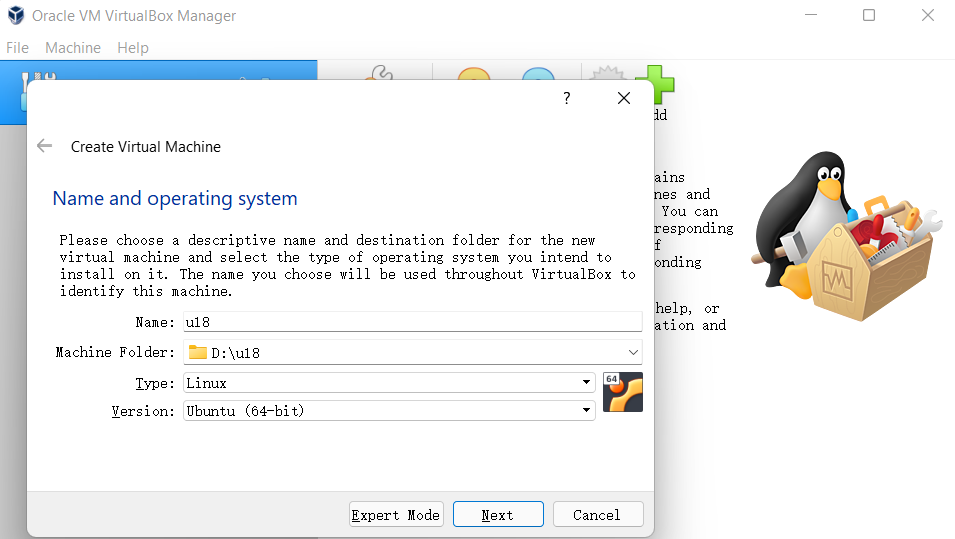
Input the name of the virtual machine and the location where it is stored, select the type of virtual machine as Linux, select the ubuntu64-bit version, and go to the next step.
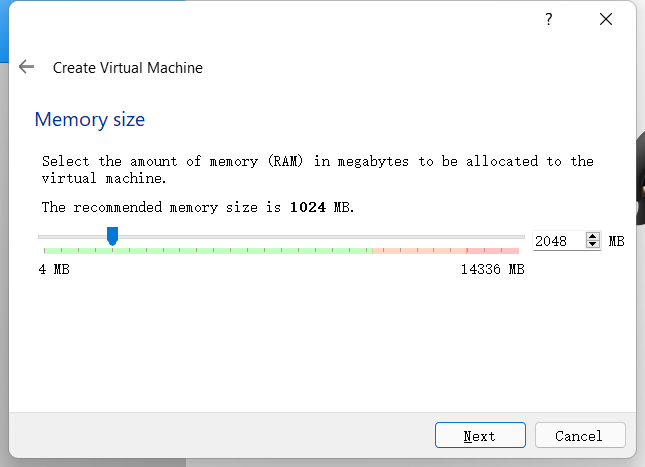
Configure a memory size according to your own needs, and then go to the next step.
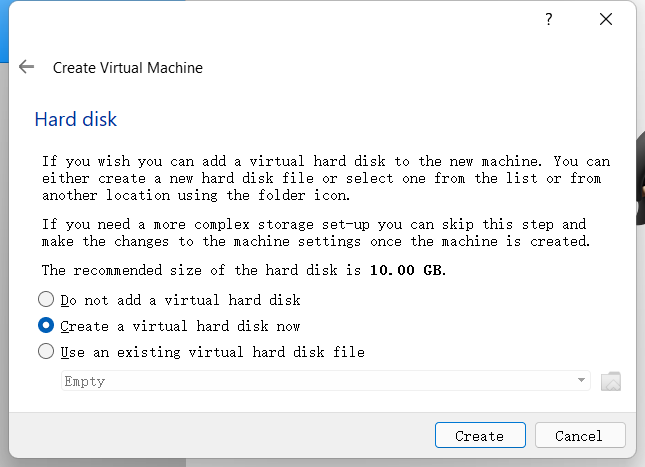
Choose Create a virtual hard disk now to create it.
Select the virtual hard disk type as VDI type, and go to the next step.
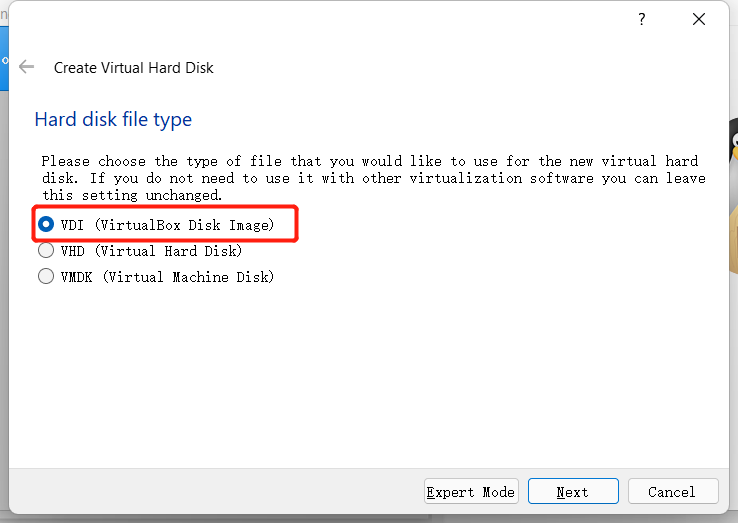
Allocate the size of the virtual hard disk. Since an ubuntu system needs to be installed, and the operation will be performed in the system, it is recommended that the size should not be less than 20G.
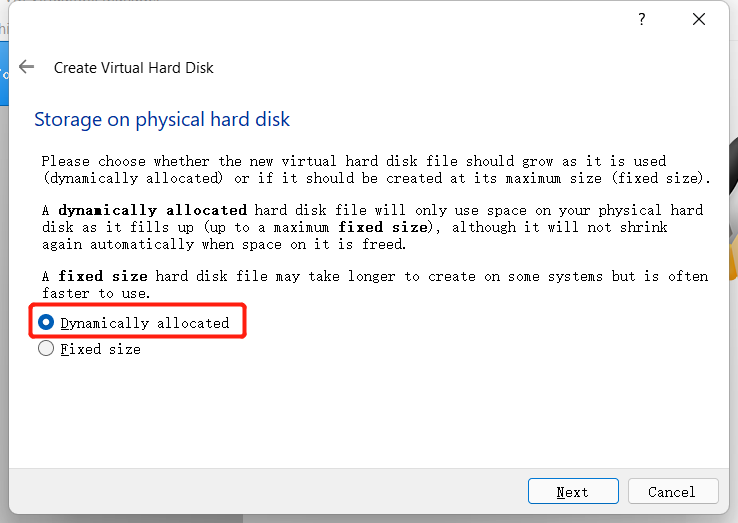

2.2 Import ubuntu system
2.2.1 Downloading the ubuntu system
Select the ubuntu version according to your own needs and install it:
The installation method and process of the three versions are the same. Here, we take the version 18.04 version for an example.
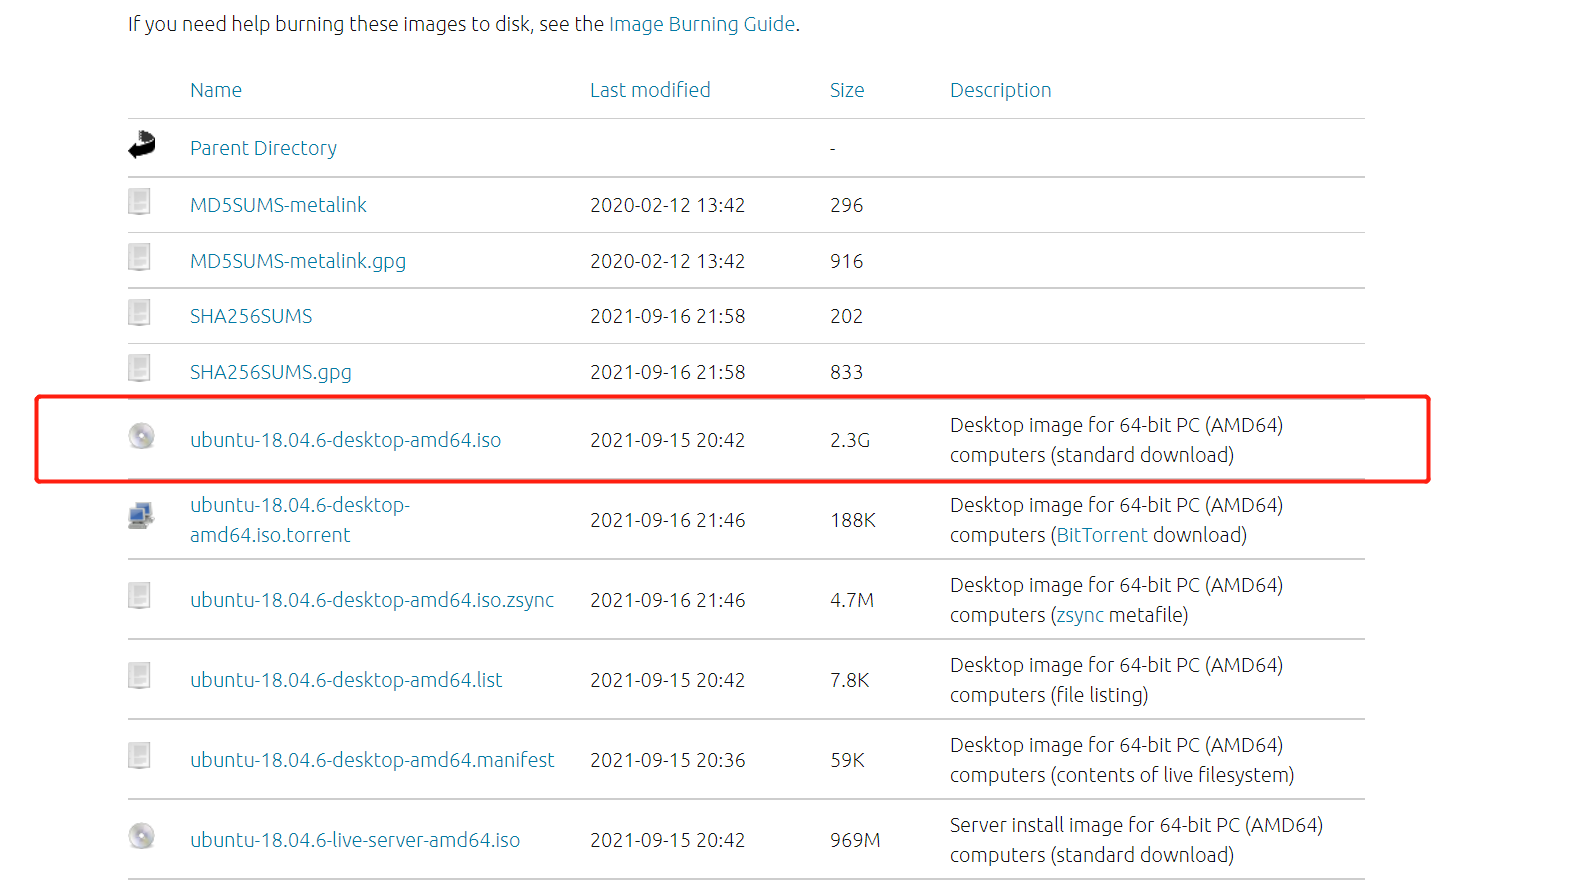
After the downloading is complete, there will be a file shown in the figure:

2.2.2 Importing ubuntu into a visual machine
Find the previously installed virtual machine in the Virtual box, enter Setup, and assign a CD to the controller in Storage:
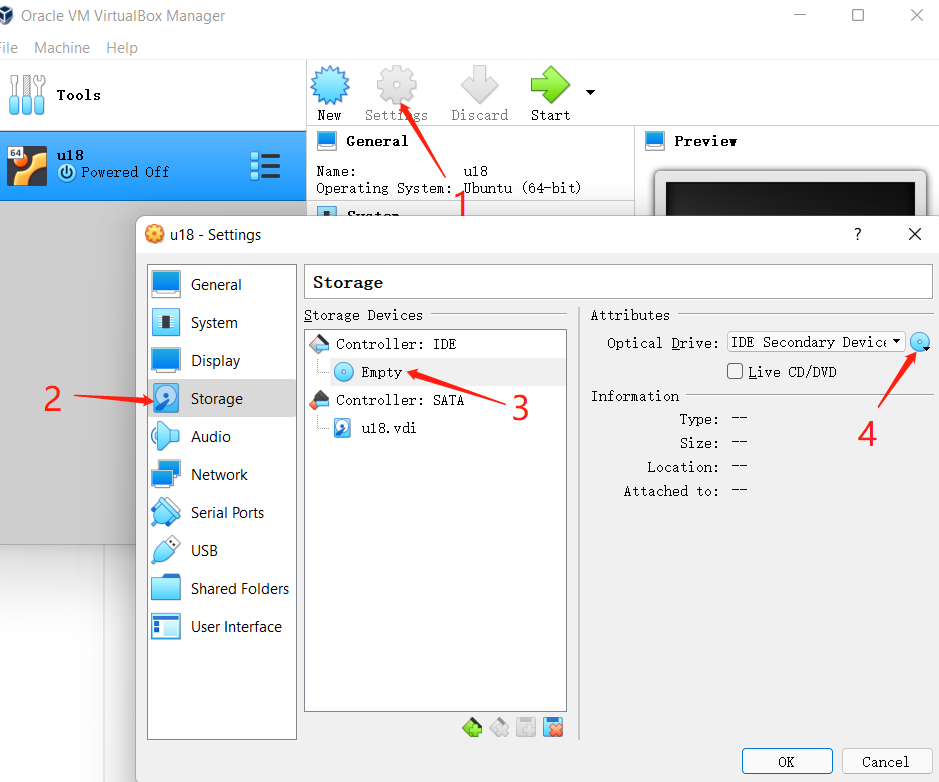
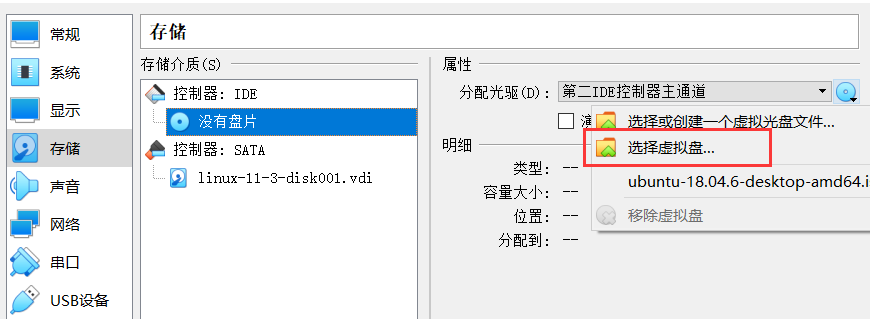
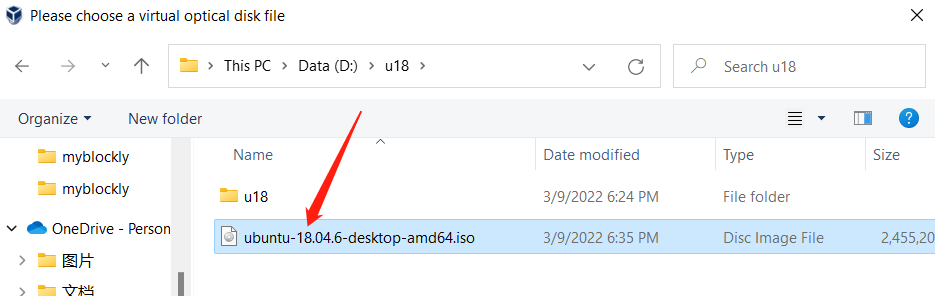
Then open the virtual machine for ubuntu installation, and click start.
2.2.3 Installing ubuntu
Wait for the system to start, enter a welcome interface, select "Chinese (Simplified)", and click the "Install Ubuntu" button;
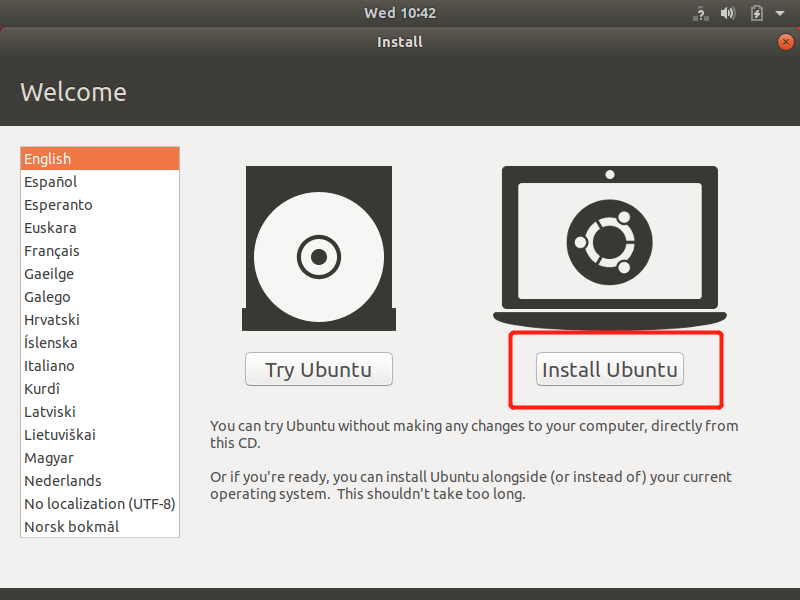
Click “Continue” button;
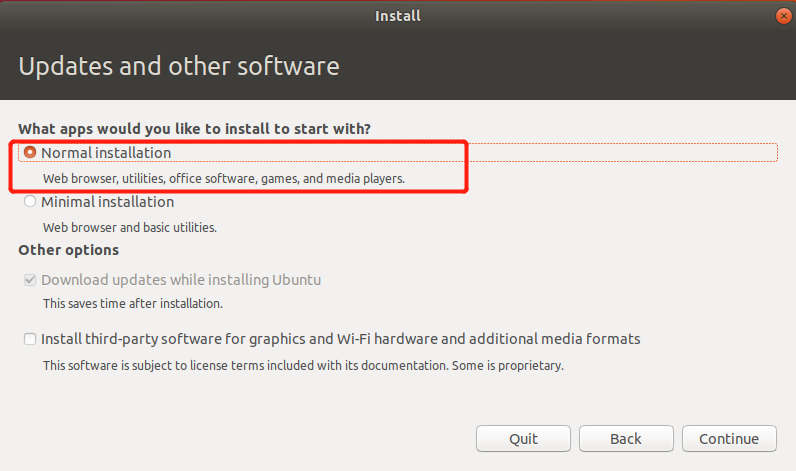
Select the "Clear entire disk and install Ubuntu" option, and click the "Install Now" button;
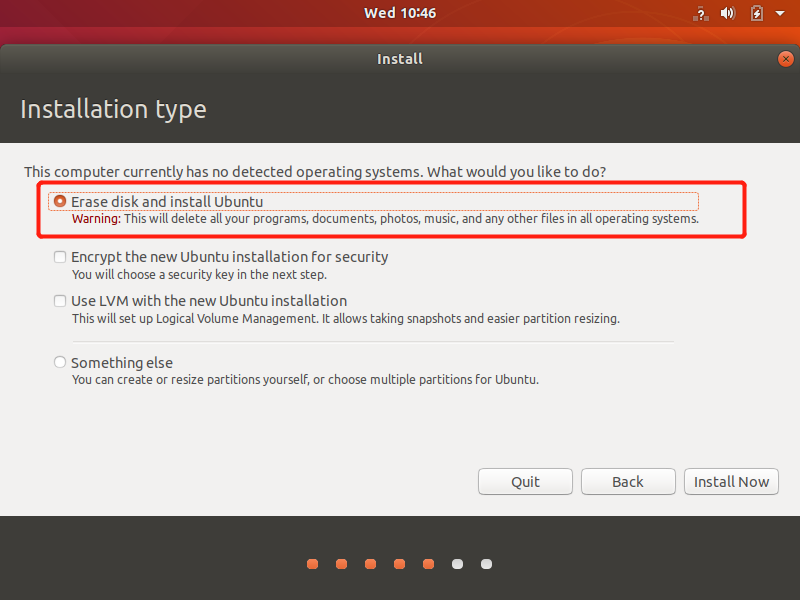
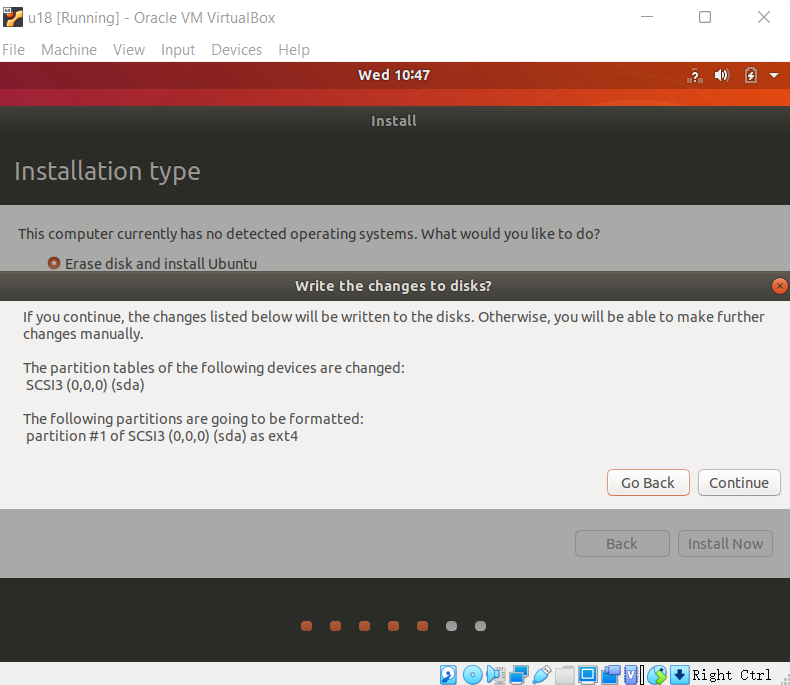
Click the "Continue" button in the pop-up dialog box;
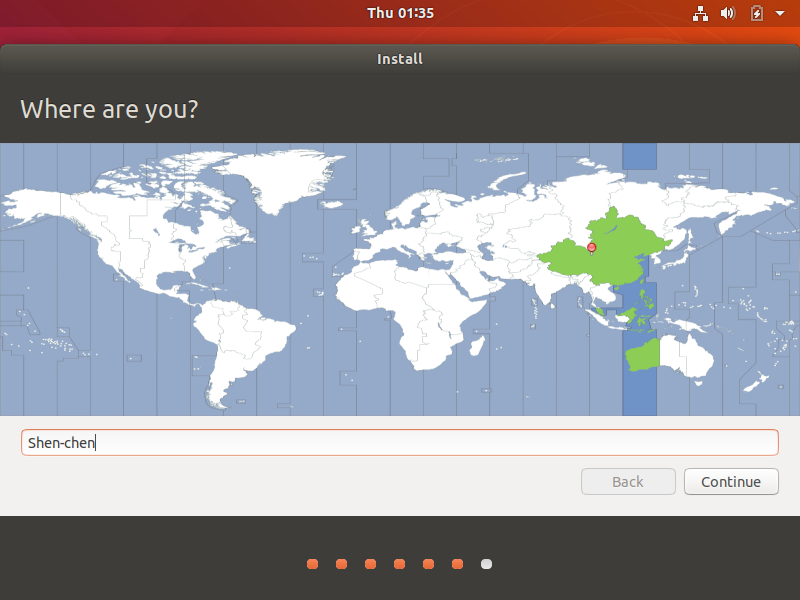
Set a geographic position and click the “Continue” button;
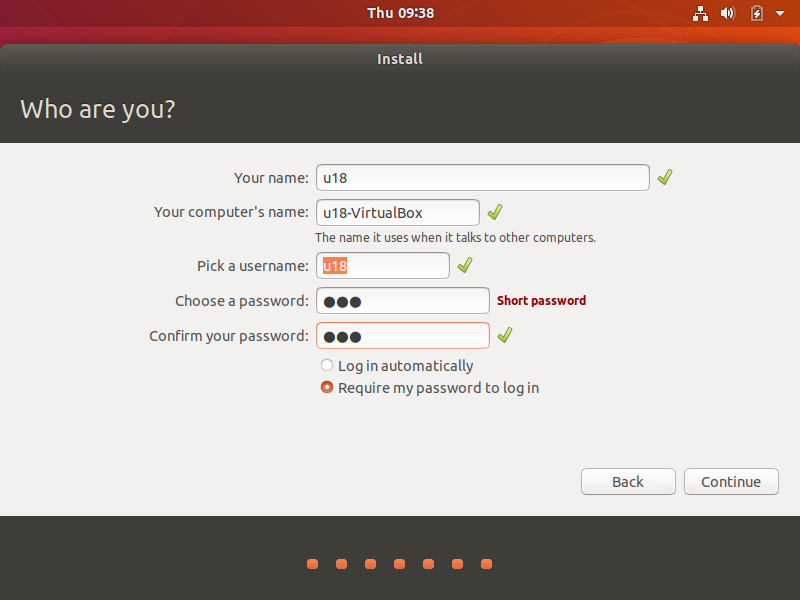
Set a user name and password, and click the “Continue” button;
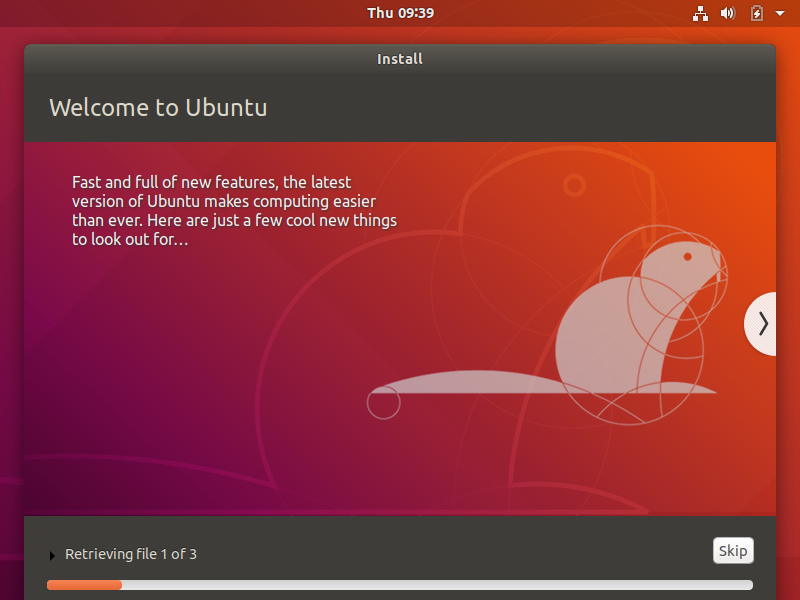
Enter the system installation interface, and wait patiently;
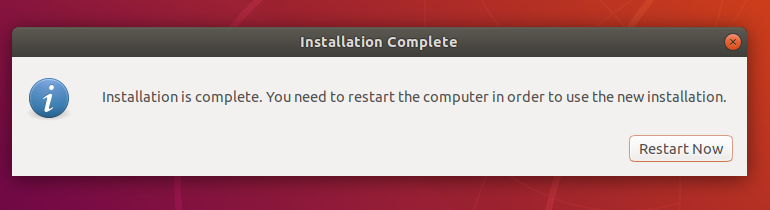
After installation is complete, click the "Restart now" button in the pop-up dialog box to complete the installation.
3 ROS Environment building
3.1 Installing ROS
Building a basic development environment requires the installation of the robot operating system (short for ROS), MoveIt and a git version manager. The installation methods and procedures are described respectively below.
3.1.1 Selecting a version
There is a one-to-one relationship between ROS and ubuntu. Different versions of ubuntu correspond to different versions of ROS. The reference website is as follows: http://wiki.ros.org/Distributions
Here are the ROS versions supported by Ubuntu:
Ubuntu 16.04 / ROS Kinetic
Ubuntu 18.04 / ROS Melodic
Ubuntu 20.04 / ROS Noetic
Install the ROS version corresponding to the Ubuntu version you have installed.
If the versions are different, the downloading will fail. The system we choose here is Ubuntu 18.04, so the corresponding ROS version is ROS Melodic.
NOTE: At present, we do not provide any reference for installing ROS in windows. If necessary, refer to https://www.ros.org/install/
3.1.2 Start installation
1 Adding a software source
There is no ROS software source in the software source list of Ubuntu itself, so you need to Configure the ROS software source into the software list repository first, and then download ROS. Open a console terminal (shortcut key: Ctrl+Alt+T) and input the following command:
official source:
sudo sh -c 'echo "deb http://packages.ros.org/ros/ubuntu $(lsb_release -sc) main" > /etc/apt/sources.list.d/ros-latest.list'If the download speed is slow, it is recommended to select a nearby mirror source to replace the above command. For example, Tsinghua University is:
xxxxxxxxxxsudo sh -c '. /etc/lsb-release && echo "deb http://mirrors.tuna.tsinghua.edu.cn/ros/ubuntu/ `lsb_release -cs` main" > /etc/apt/sources.list.d/ros-latest.list'Here you will be asked to input a user password. Just input the user password set when Ubuntu is installed.
2 Setting a key
Configuring a public key. This step is to let the system confirm that our path is safe, so that there is no problem in downloading the file. Otherwise it will be deleted immediately after downloading:
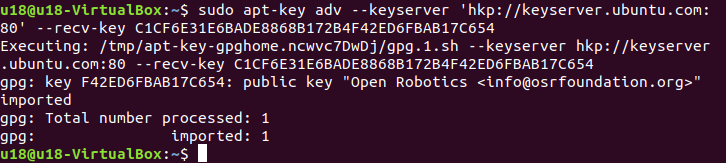
xxxxxxxxxxsudo apt-key adv --keyserver 'hkp://keyserver.ubuntu.com:80' --recv-key C1CF6E31E6BADE8868B172B4F42ED6FBAB17C654The execution result is displayed as follows:
3 Installation
After adding a new software source, you need to update the software source list. Open a console terminal (shortcut key: ++) and input the following command:CtrlAltT
xxxxxxxxxxsudo apt-get updateExecute Installing ROS. Open a console terminal (shortcut key: ++) and input the following command according to your Ubuntu version:CtrlAltT
xxxxxxxxxx# Ubuntu 16.04sudo apt install ros-kinetic-desktop-full# Ubuntu 18.04sudo apt install ros-melodic-desktop-full# Ubuntu 20.04sudo apt install ros-noetic-desktop-fullIt is recommended to install the complete ROS here to prevent the lack of libraries and dependencies.
The installation process takes a long time, so please wait with patience.
If the following error message appears on the console terminal during the installation process, you need to replace the software source list in /etc/apt/sources.list.

Open a console terminal (shortcut key:++),enter the following command:CtrlAltT
xxxxxxxxxxsudo gedit /etc/apt/sources.list将sources.list中的官方软件源全部替换成下面的阿里云软件源:
Ubuntu 16.04 version:
xdeb http://mirrors.aliyun.com/ubuntu/ xenial maindeb-src http://mirrors.aliyun.com/ubuntu/ xenial main
deb http://mirrors.aliyun.com/ubuntu/ xenial-updates maindeb-src http://mirrors.aliyun.com/ubuntu/ xenial-updates main
deb http://mirrors.aliyun.com/ubuntu/ xenial universedeb-src http://mirrors.aliyun.com/ubuntu/ xenial universedeb http://mirrors.aliyun.com/ubuntu/ xenial-updates universedeb-src http://mirrors.aliyun.com/ubuntu/ xenial-updates universe
deb http://mirrors.aliyun.com/ubuntu/ xenial-security maindeb-src http://mirrors.aliyun.com/ubuntu/ xenial-security maindeb http://mirrors.aliyun.com/ubuntu/ xenial-security universedeb-src http://mirrors.aliyun.com/ubuntu/ xenial-security universeUbuntu 18.04 version:
xxxxxxxxxxdeb http://mirrors.aliyun.com/ubuntu/ bionic main restricted universe multiversedeb-src http://mirrors.aliyun.com/ubuntu/ bionic main restricted universe multiverse
deb http://mirrors.aliyun.com/ubuntu/ bionic-security main restricted universe multiversedeb-src http://mirrors.aliyun.com/ubuntu/ bionic-security main restricted universe multiverse
deb http://mirrors.aliyun.com/ubuntu/ bionic-updates main restricted universe multiversedeb-src http://mirrors.aliyun.com/ubuntu/ bionic-updates main restricted universe multiverse
deb http://mirrors.aliyun.com/ubuntu/ bionic-proposed main restricted universe multiversedeb-src http://mirrors.aliyun.com/ubuntu/ bionic-proposed main restricted universe multiverse
deb http://mirrors.aliyun.com/ubuntu/ bionic-backports main restricted universe multiversedeb-src http://mirrors.aliyun.com/ubuntu/ bionic-backports main restricted universe multiverse
Ubuntu 20.04 version:
xxxxxxxxxxdeb http://mirrors.aliyun.com/ubuntu/ focal main restricted universe multiversedeb-src http://mirrors.aliyun.com/ubuntu/ focal main restricted universe multiverse
deb http://mirrors.aliyun.com/ubuntu/ focal-security main restricted universe multiversedeb-src http://mirrors.aliyun.com/ubuntu/ focal-security main restricted universe multiverse
deb http://mirrors.aliyun.com/ubuntu/ focal-updates main restricted universe multiversedeb-src http://mirrors.aliyun.com/ubuntu/ focal-updates main restricted universe multiverse
deb http://mirrors.aliyun.com/ubuntu/ focal-proposed main restricted universe multiversedeb-src http://mirrors.aliyun.com/ubuntu/ focal-proposed main restricted universe multiverse
deb http://mirrors.aliyun.com/ubuntu/ focal-backports main restricted universe multiversedeb-src http://mirrors.aliyun.com/ubuntu/ focal-backports main restricted universe multiverse
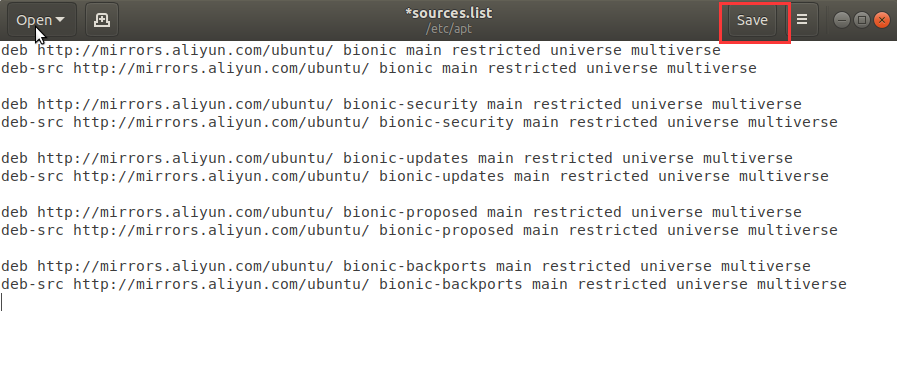
-After the configuration is complete, the contents of the sources.list file are as follows, click Save and Exit.
To update the list of software sources, enter in the console terminal:
xxxxxxxxxxsudo apt-get updateEnter the instructions to install ROS in the console terminal:
xxxxxxxxxx# Ubuntu 16.04sudo apt install ros-kinetic-desktop-full# Ubuntu 18.04sudo apt install ros-melodic-desktop-full# Ubuntu 20.04sudo apt install ros-noetic-desktop-fullThe installation process takes a long time, so please wait with patience.
4 Configuring the ROS environment to the system
rosdep allows you to easily install the source codes you want to compile, or the system dependencies required by some ROS core components. Execute the following commands in sequence in the terminal, and open a console terminal (shortcut key: ++).CtrlAltT
If your system does not have rosdep installed, use the command to install it.sudo apt install python-rosdep
If the system of the Ubuntu installed by you is version 20.04, use the command to it install. After completion, execute the rosdep initialization command.sudo apt install python3-rosdep
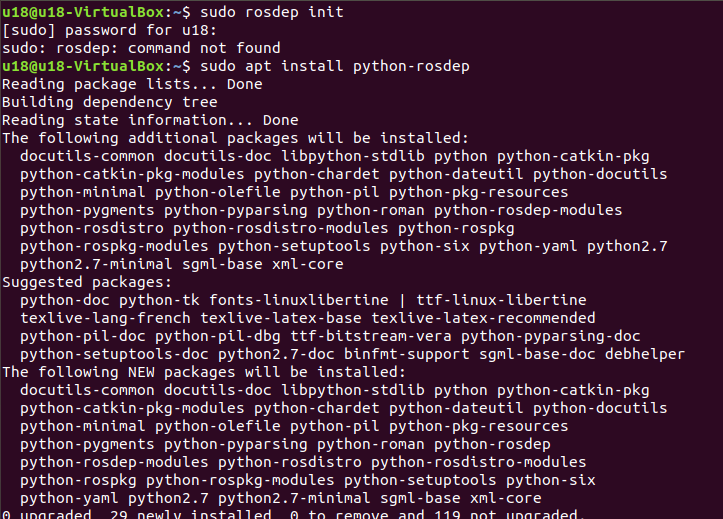
initialize rosdep:
xxxxxxxxxxsudo rosdep initIf the following error message appears:

Solution: Modify the hosts file and enter the following command in the console terminal:
xxxxxxxxxxsudo gedit /etc/hostsAt the end of the file content, add the IP addresses of the following two URLs to access:
xxxxxxxxxx199.232.28.133 raw.githubusercontent.com151.101.228.133 raw.github.com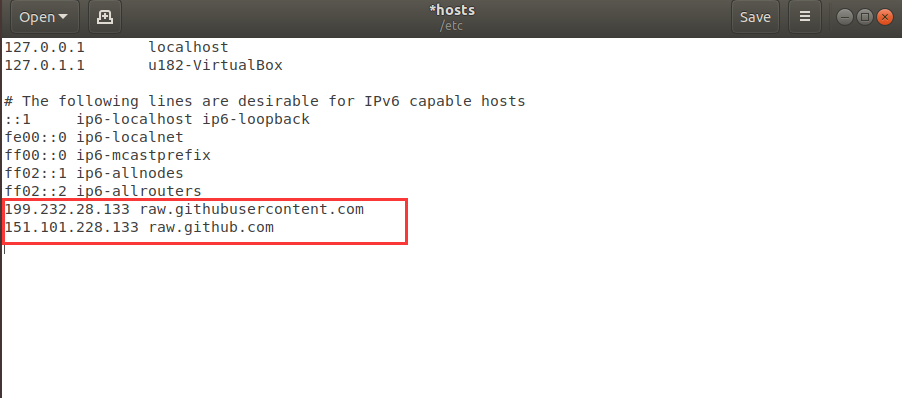
After the modification is complete, execute in the console terminal:
xxxxxxxxxxsudo rosdep initrosdep updateAfter the initialization is completed, in order to avoid re-validating the ROS function path every time the terminal window is closed, we can set the path to an environment variable, so that each time you open a new terminal, the ROS function path will automatically take effect. Execute the following commands in sequence in the terminal, and open a console terminal (shortcut key: ++):CtrlAltT
3.1.3 Set up the ros environment
1 Bash
Execute the following commands:
xxxxxxxxxx# Ubuntu 16.04echo "source /opt/ros/kinetic/setup.bash" >> ~/.bashrc# Ubuntu 18.04echo "source /opt/ros/melodic/setup.bash" >> ~/.bashrc# Ubuntu 20.04echo "source /opt/ros/noetic/setup.bash" >> ~/.bashrcsource ~/.bashrc2 Install dependencies
Input the following command in the terminal to install a ROS extra dependency, and open a console terminal (shortcut key: ++):CtrlAltT
xxxxxxxxxxsudo apt-get install python-rosinstall python-rosinstall-generator python-wstool build-essentialIf your Unbutu system is version 20.04, please execute the following command to install:
xxxxxxxxxxsudo apt install python3-rosdep python3-rosinstall python3-rosinstall-generator python3-wstool build-essential# Ubuntu 16.04sudo apt install ros-kinetic-joint-state-publisher-gui# Ubuntu 18.04 sudo apt install ros-melodic-joint-state-publisher-gui# Ubuntu 20.04 sudo apt install ros-noetic-joint-state-publisher-gui3.1.4 Verify installation
The startup of the ROS system requires a ROS Master, that is, a node manager. We can input the roscore command in the terminal to start the ROS Master.
To verify whether ROS has been installed successfully, open a console terminal (shortcut key: ++) and execute the following command in the terminal:CtrlAltT
xxxxxxxxxxroscoreWhen the following interface is displayed, it means that ROS has been installed successfully.
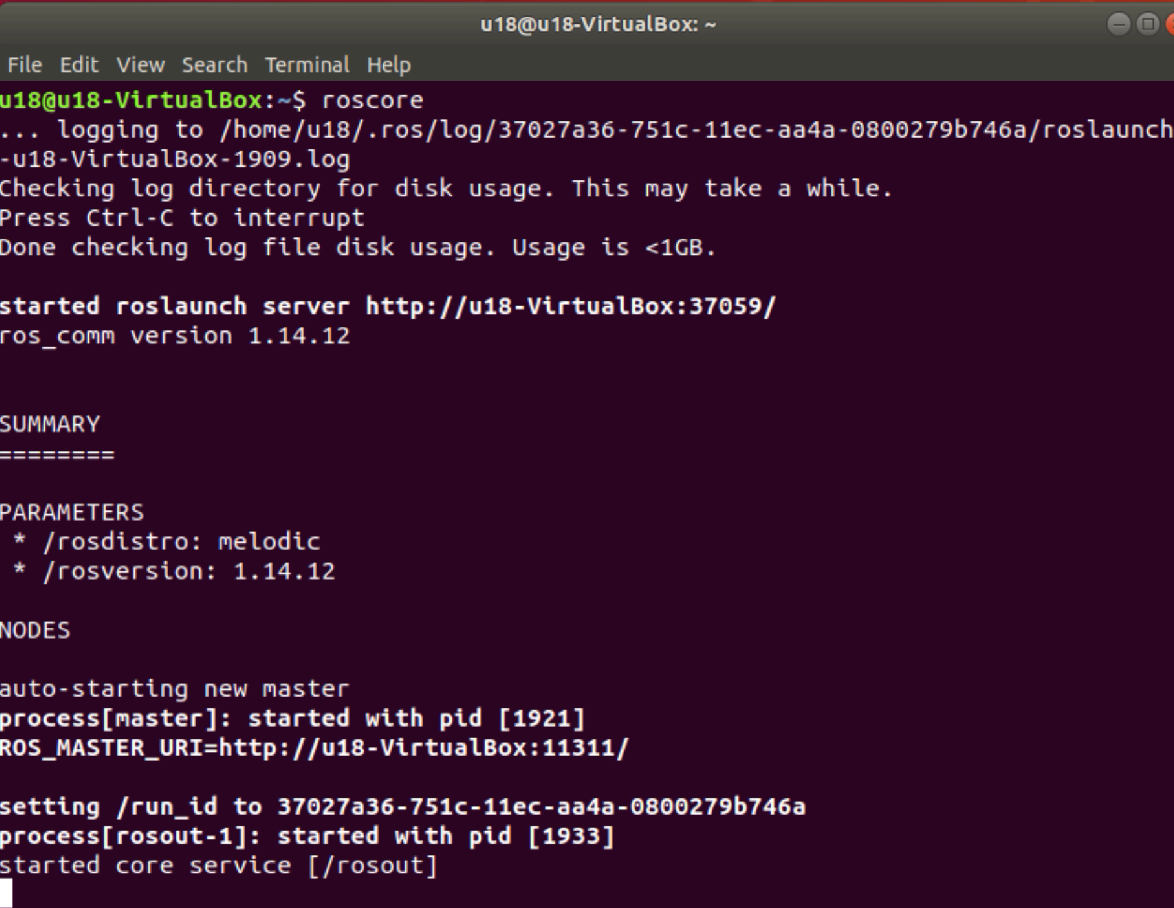
The roscore command starts a node manager, which is used for node management. In a ros system, there is and only one node manager, which is the prerequisite for the operation of the ros node, so before executing the start of the ros node, roscore needs to be executed in the first step.
For more detailed installation instructions, you can refer to the official installation instructions by visiting the website:: http://wiki.ros.org/ROS/Installation
3.2 MoveIt Installation
MoveIt is the composition of a series of function packages for movement operations in ros, mainly including motion planning, collision detection, kinematics, 3D perception, operation control and other functions.
1 Updating the software source list
Open a console terminal (shortcut key: ++) and input the following command on the terminal window to update the software source list:CtrlAltT
xxxxxxxxxxsudo apt-get update2 Installing MoveIt
Open a console terminal (shortcut key: ++) and input the following command on the terminal window to execute the installation of MoveIt:CtrlAltT
xxxxxxxxxx# Ubuntu16.04sudo apt-get install ros-kinetic-moveit# Ubuntu 18.04sudo apt-get install ros-melodic-moveit# Ubuntu20.04sudo apt-get install ros-noetic-moveit3.3 Git Installation
1Adding a software source
Add the software source for installing git to the software source list of ubuntu, open a console terminal (shortcut key: ++) and input the following command on the terminal window:CtrlAltT
xxxxxxxxxxsudo add-apt-repository ppa:git-core/ppa2 Updating the software source list
Open a console terminal (shortcut key: ++) and input the following command on the terminal window to update the software source list:CtrlAltT
xxxxxxxxxxsudo apt-get update3 Installing git
Open a console terminal (shortcut key: ++) and input the following command on the terminal window to execute the installation of git:CtrlAltT
xxxxxxxxxxsudo apt-get install git4 Verify installation
Read the git version, open a console terminal (shortcut key: ++) and input the following command on the terminal window:CtrlAltT
xxxxxxxxxxgit --versionThe git version number can be displayed in the terminal as follows, that is, the installation is successful.
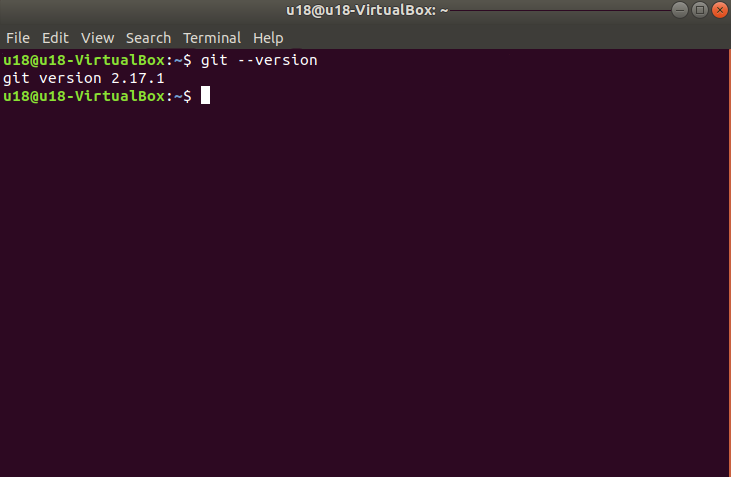
5 Use
During the subsequent downloading of the ros package, you need to use git. For the use of git, refer to the following link:
4.4 mycobot_ros Installation
mycobot_ros is a ROS package launched by Elephant Robotics and applicable to its mycobot series of desktop six-axis robot arms.
Project address: http://github.com/elephantrobotics/mycobot_ros
1 Precondition
Before installing the package, make sure you have a ros workspace.
Here is an example command for creating a workspace. Open a console terminal (shortcut key: ++) and input the following command in the command line:CtrlAltT
xxxxxxxxxxmkdir -p ~/catkin_ws/src # Create a foldercd ~/catkin_ws/src # Enter the foldercatkin_init_workspace # Initialize the current directory into a ROS workspacecd .. # Return to the parent directorycatkin_make # Build the code in the workspaceAdd workspace environment
The official default ROS1 workspace is .catkin_ws
xxxxxxxxxx# Ubuntu 16.04echo "source ~/catkin_ws/devel/setup.bash" >> ~/.bashrc# Ubuntu 18.04echo "source ~/catkin_ws/devel/setup.bash" >> ~/.bashrc# Ubuntu 20.04echo "source ~/catkin_ws/devel/setup.bash" >> ~/.bashrcsource ~/.bashrc2 Installing the package
NOTE:
This package depends on ROS and MoveIT. Before using it, make sure that you have installed ROS and MoveIT successfully.
The interaction of this package with a real robot arm depends on PythonApi - .
pymycobotThe Api project location is: https://github.com/elephantrobotics/pymycobot
Quick installation:
pip install pymycobot --upgradeWhen executing the pip install pymycobot --upgrade command, if the following error message appears:

Enter the following command to install pip at the prompt
xxxxxxxxxxsudo apt install python-pipIf your Ubuntu system is version 20.04, please execute the command to install pip
sudo apt install python3-pipAfter the pip installation is complete, the terminal executes again
xxxxxxxxxxpip install pymycobot --upgradeThe installation method depends on Git, so make sure that Git have been installed in your computer.
The official default ROS1 workspace is .catkin_ws
xxxxxxxxxxcd ~/catkin_ws/src # Enter the src folder of the workspace# Clone the code on githubgit clone https://github.com/elephantrobotics/mycobot_ros.gitcd .. # return to the workspacecatkin_make # Build the code in the workspacesource devel/setup.bash # add environment variablesSo far, the ROS1 environment construction has been completed.You can learn the basics of ROS or ROS use cases