yahboom
HomeLearn
Solution
Blog
Online Store
About Us
EN/中文
myCobot 320 Arm📖
1.Product Feature
  • 1.Functional Parameters
  • 2.Controller Parameters
  • 3.Structural Parameters
  • 4.Electronic Parameters
  • 5.Coordinate System
  • 6.Introduction of Adaptive Gripper
  • 7.Introduction of force-controlled gripper
2.Common Problem
  • 1.how to ask
  • 2.driver
  • 3.software
  • 4.hardware
3.First Install and Use
  • 1.Product Standard List
  • 2.Product Unboxing Guide
  • 3.Power-on Test Guide
4.Basic Application
1. miniRoboFLow
  • 1. miniRoboFLow
  • 2. Drag & Play
  • 3. Joint Calibration
  • 4. Computer Connect
  • 5. Robot Information
2.1 myblockly
  • 1. What is myBlockly
  • 2. Preparations before using myBlockly
  • 3. myBlockly download and install
  • 4. myBlockly interface display and use of basic functions
  • 5. Control RGB light panel
  • 6. Control the robotic arm to return to the origin
  • 7. Control single joint movement
  • 8. Control multiple joints
  • 9. Use of adaptive grippers
  • 10. Use of force-controlled grippers
  • 11. Q&A
  • 12. API
3. Firmware Description
  • 1.Firmware Description
  • 2.Burn Firmware
2.2 myStudio
  • 1. myStudio
  • 2. myStudio environment setup
  • 3. Install driver
  • 4. Burn and update firmware
5.Mobile APP control
  • Mobile APP control
6.SDK Development
1.Development Environment Construction
  • 1.Development Environment Construction
2.Python
  • 1.What is Python
  • 2.Environment Building
  • 3.Python API usage instaructions
  • 4.TCP IP
  • 5.Drag to teach
  • 6.Use Cases
  • 7.Use of adaptive grippers
  • 8.Use of force-controlled grippers
3.ROS1
  • 1.ROS
  • 2.Environment Building
  • 3.ROS basics
  • 4.Rviz use
  • 5.Basic function case
  • 6.Use of adaptive grippers
  • 7.Use of force-controlled grippers
4.ROS2
  • 1.ROS2 introduction
  • 2.Environment Building
  • 3.ROS2 basics
  • 4.Rviz2 use
  • 5.Basic function case
5.C Sharp(C#)
  • 1.C#
  • 2.Environmental construction
  • 3.Mechanical control
  • 4.myCobot API
  • 5.Use Cases
  • 6.Use of adaptive grippers
6.c plus plus (C++)
  • 1.C++
  • 2.CPlus Download
  • 3.build
  • 4.API
  • 5.example
7.Arduino
  • 1.Arduino
  • 2.Arduino Download
  • 3.API
  • 4.example
  • 5.Use of adaptive grippers
8.Serial communication
  • 1.Serial communication
  • 2.Use of force-controlled grippers
7.Documents Download
  • 1.Product Brochure
  • 2.Software and Source Code
  • 3.System lnformation
Download
  • 3D_Model_File
  • Android Mobile APP
  • Manual
Download ZIP

Welcome to myCobot 320 Arm repository

2.Arduino Download

Arduino Environment Building

1 Arduino IDE download
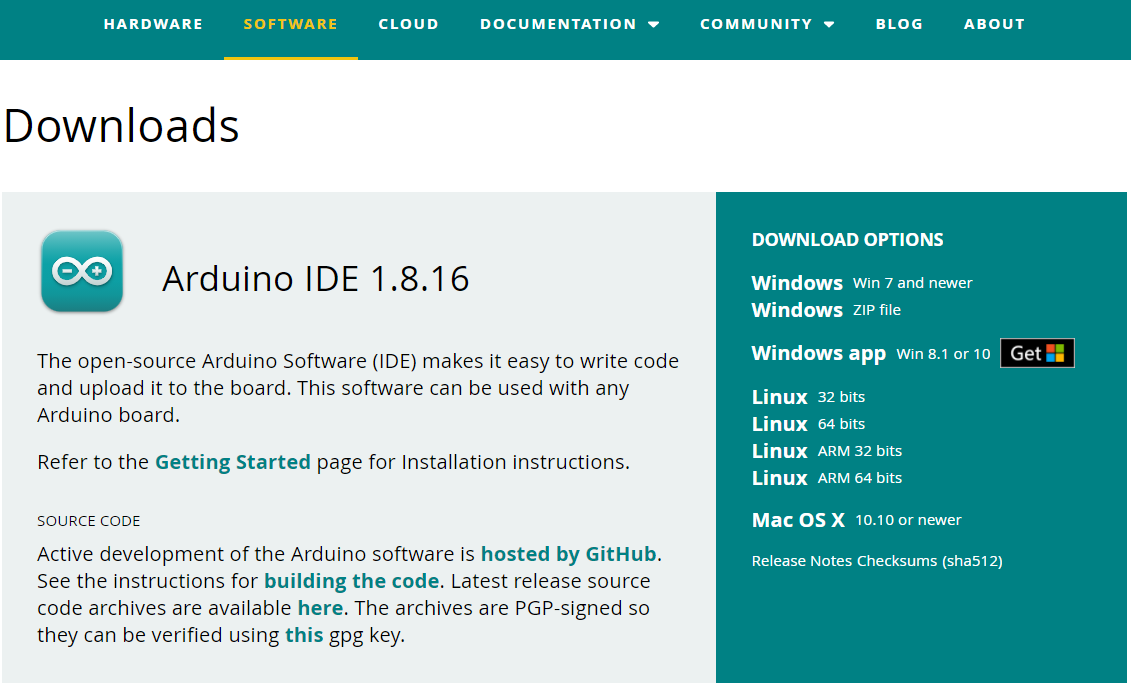
16-1-1-001 Arduino IDE Download Address

  • Arduino Official Website

  • Windows X64

  • Mac OS X

  • Linux ARM 64

2 Installed drivers

Before burning the program, M5Core host (including M5Stack-basic/GRAY/M5GO/FIRE/FACES) / micro control types of equipment users according to the operating system you are using, please download the corresponding driver package. After decompressing the package, select the installation package of the corresponding OPERATING system bit.

For Mac OS, ensure correct settings of the system Preferred settings --> Security and privacy --> General before installation, and allow the user to get it from App Store or an approved developer.

Download the M5Stack-basic serial port driver CP210X or CP34X

CP2104

  • Windows10

  • MacOS

  • Linux

After extracting the zip package, select the corresponding installation package to install according to your computer operating system (win10 and win11 select x64 or x86 for installation).
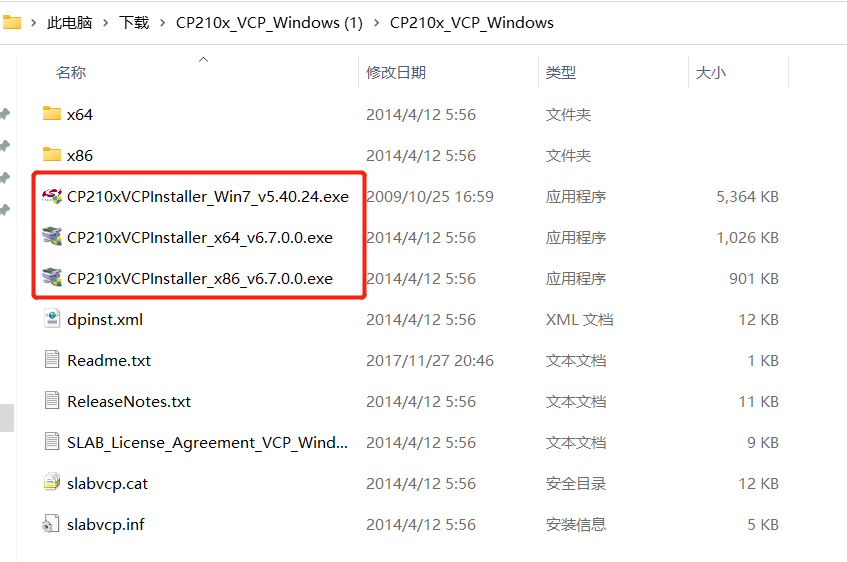
16-1-2-001

CP34X

  • Windows10

  • MacOS

3 Add board

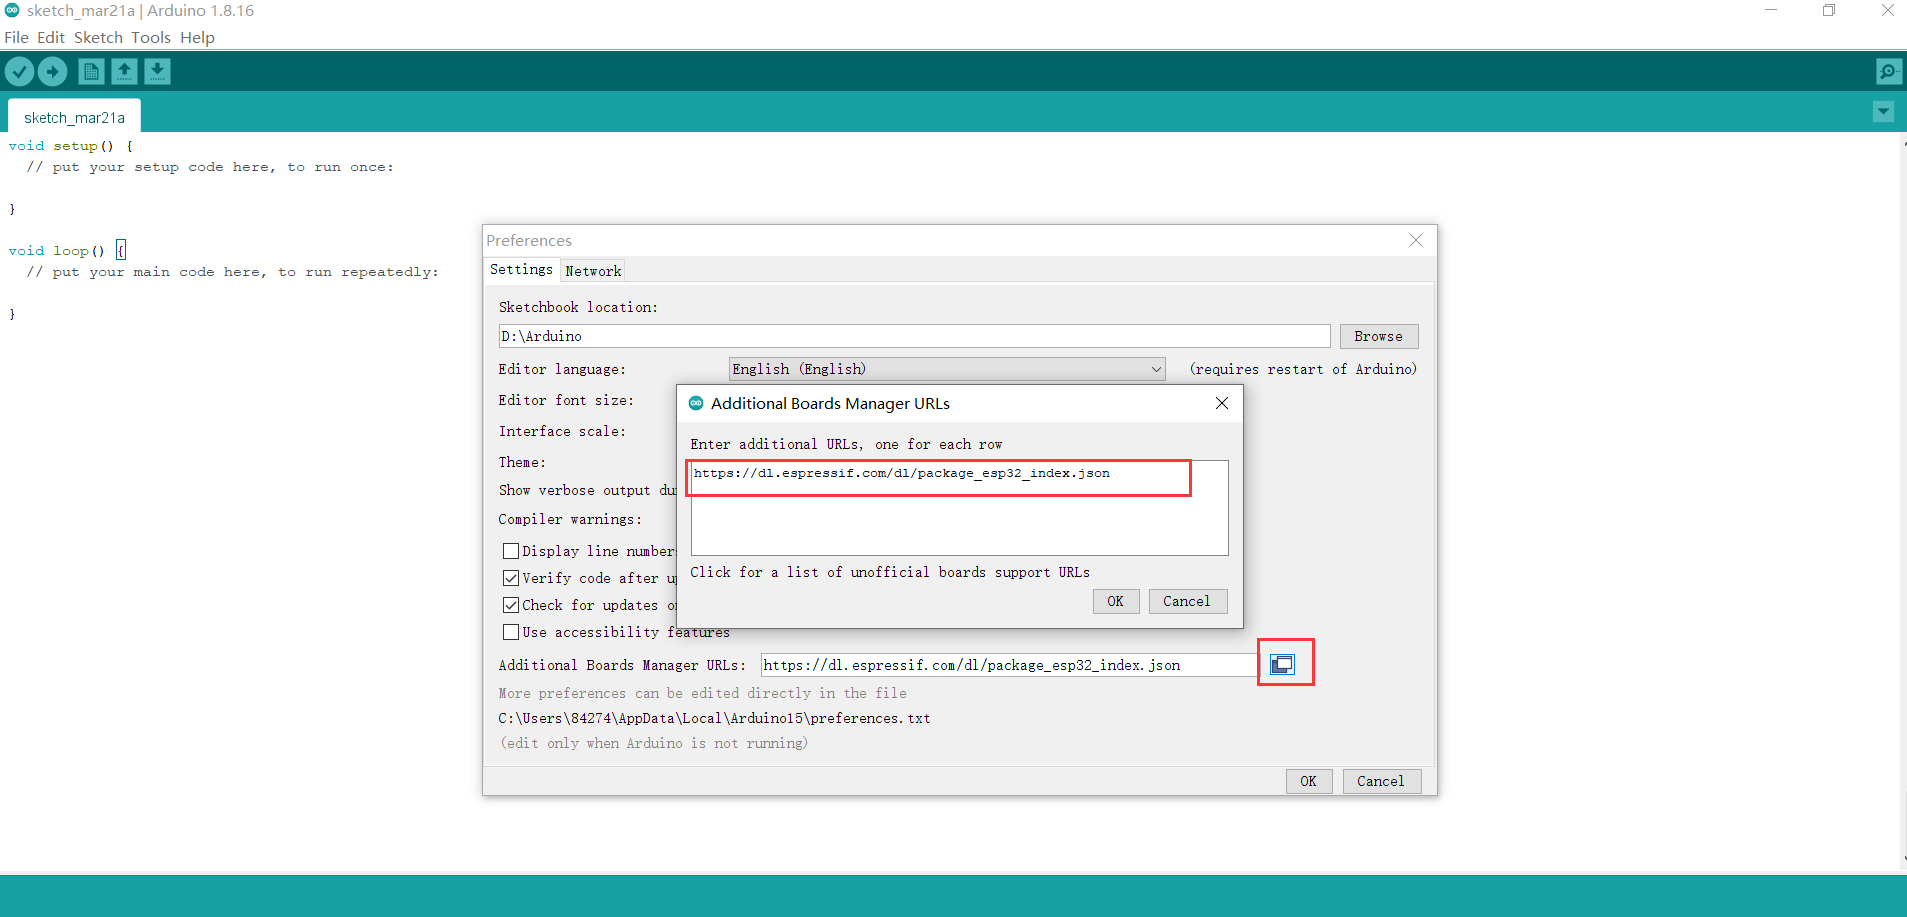
  • Open the Arduino IDE and select File --> Preferences --> Settings to add the url address below to the additional board manager https://m5stack.oss-cn-shenzhen.aliyuncs.com/resource/arduino/package_m5stack_index.json
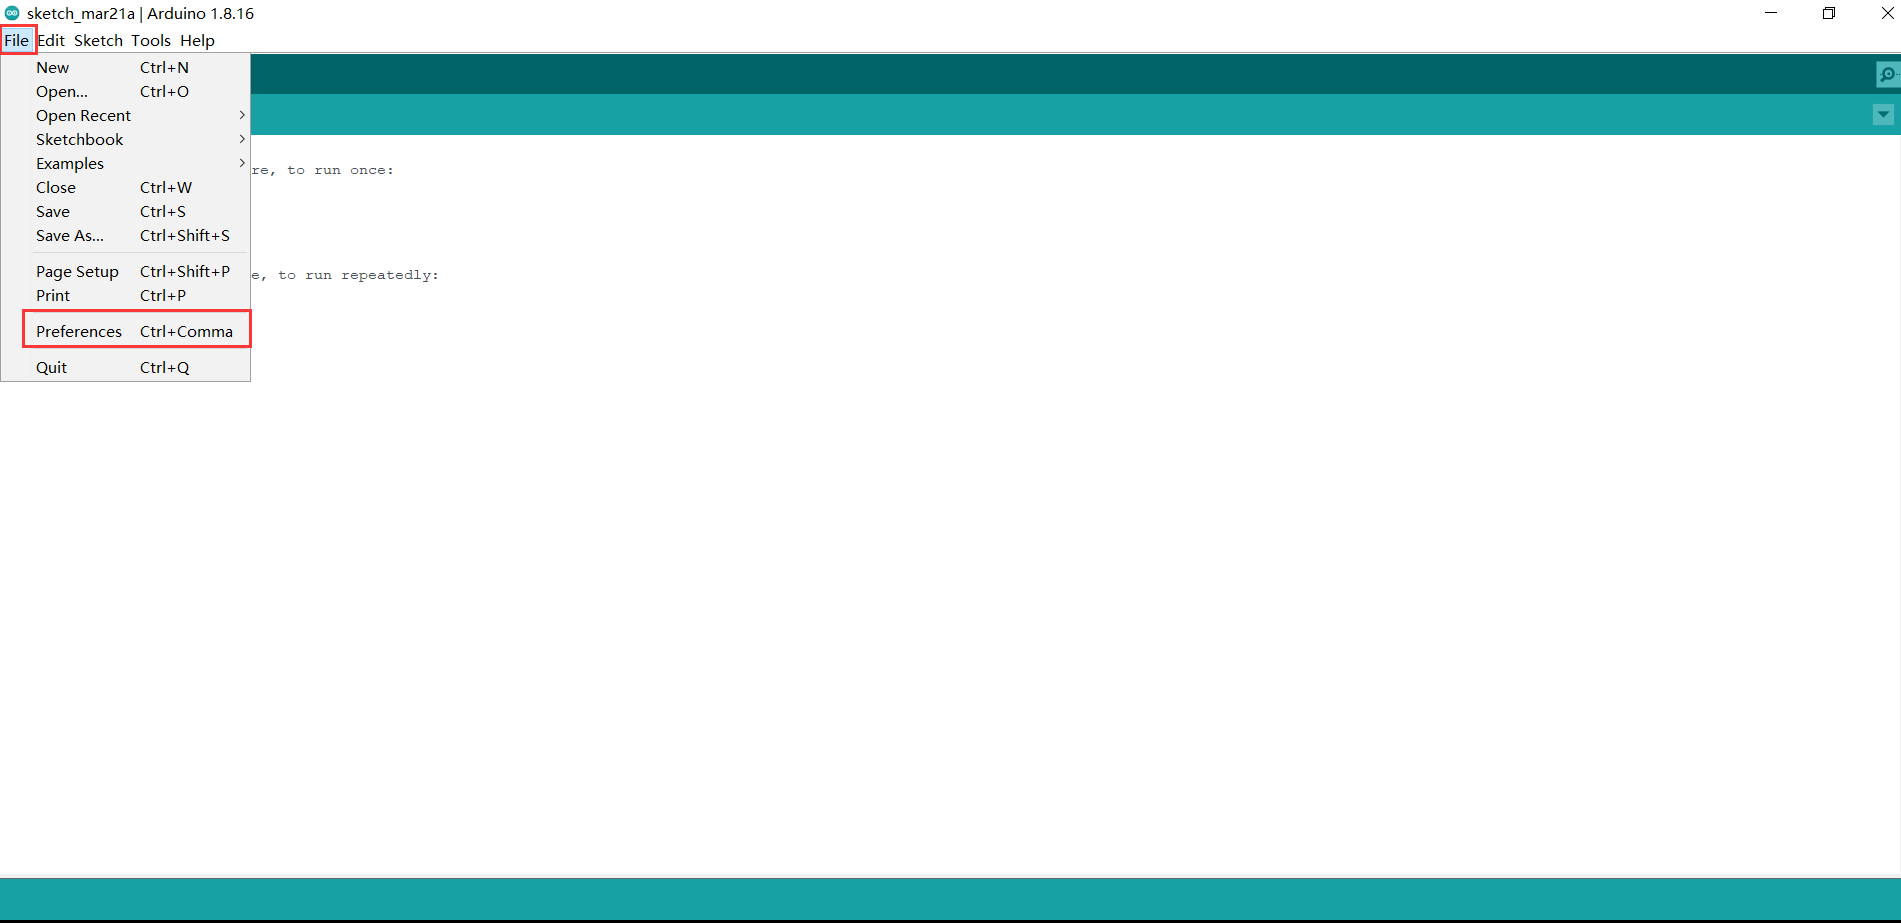
16-1-3-001

16-1-3-002

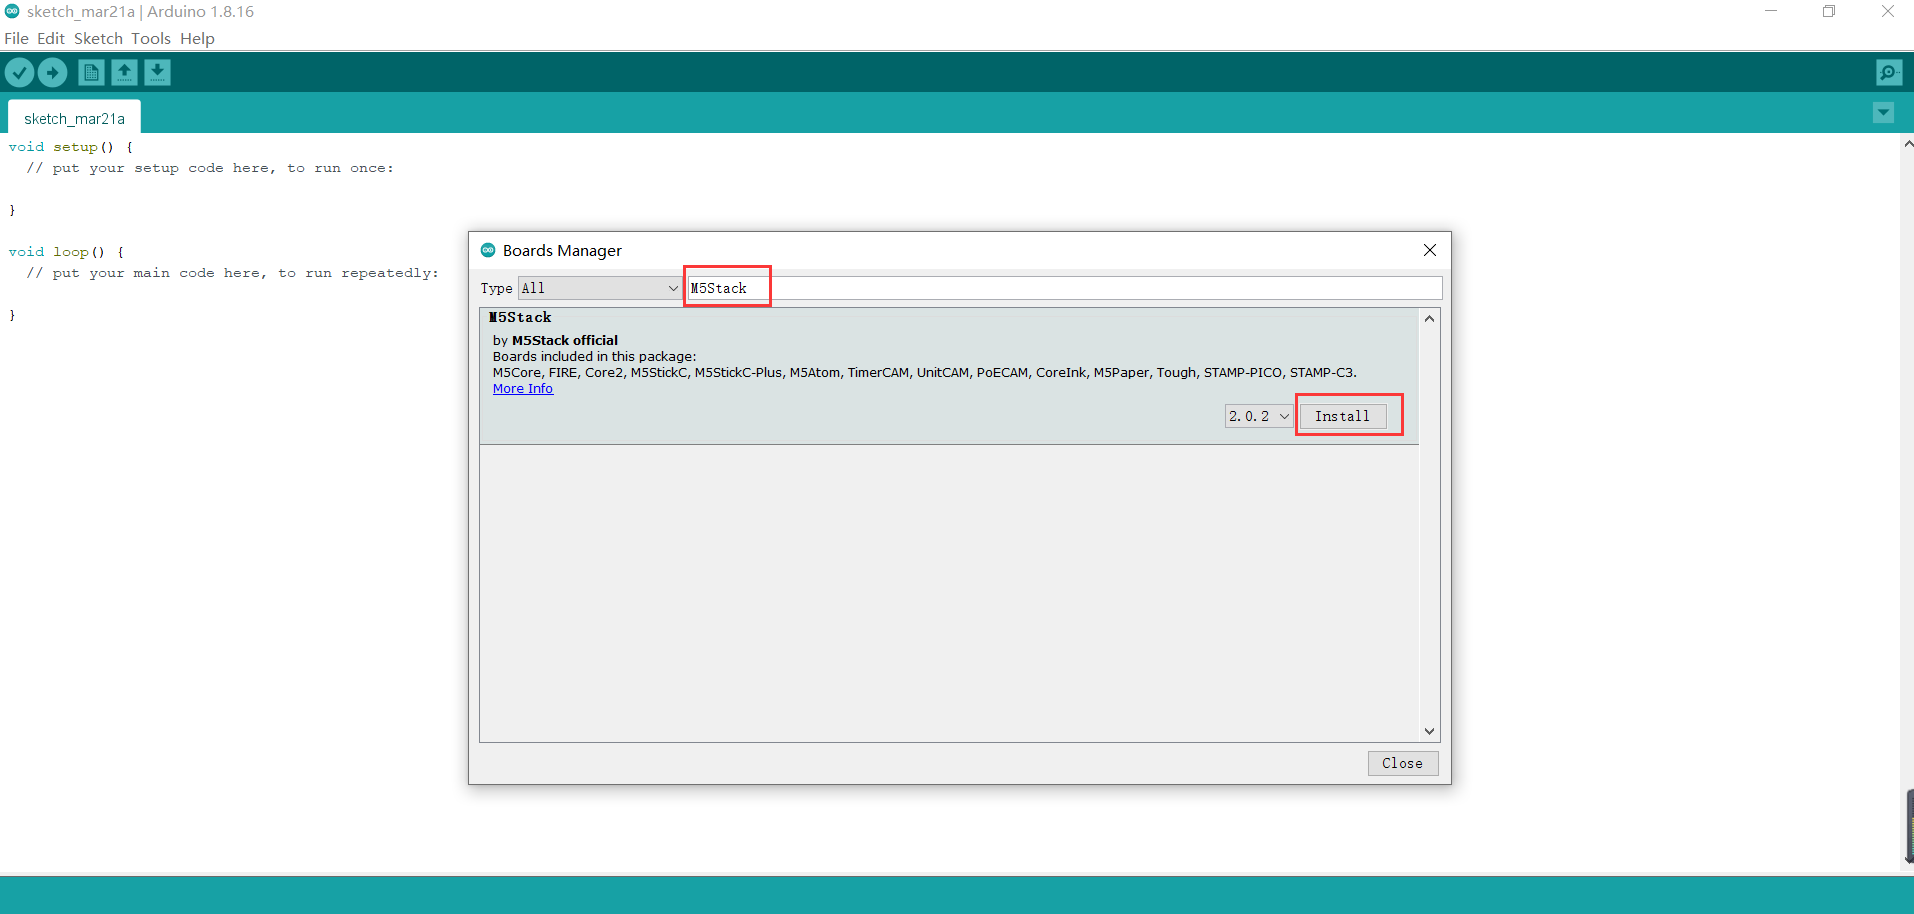
  • After adding, select the Tools --> Board --> Boards Manager, in the new pop-up dialog, input and search M5Stack , click Install (in case of search failure, you can try to restart Arduino program), as shown below:
16-1-3-003

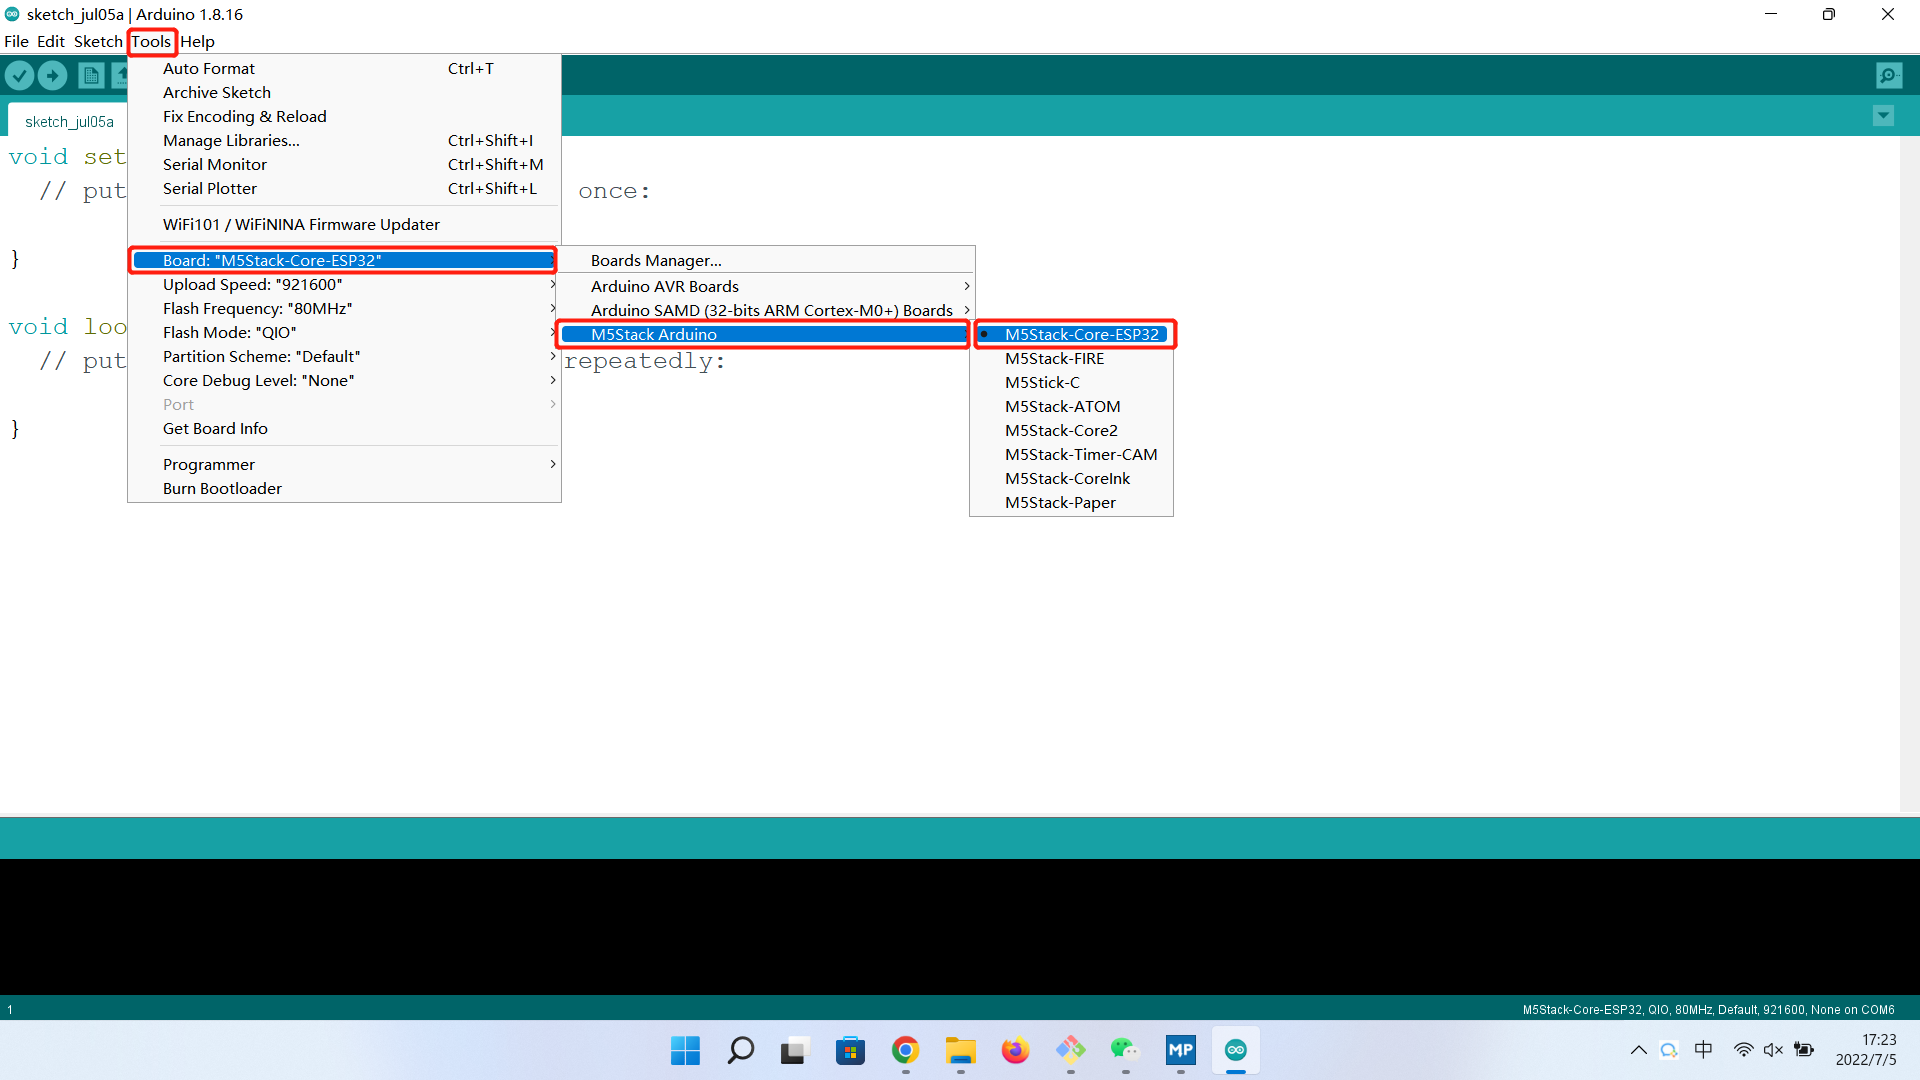
  • After adding, select Tools --> Board, check whether it is successful, as shown below:
16-1-3-004

4 Add related libraries

4.1 Install the M5Stack library

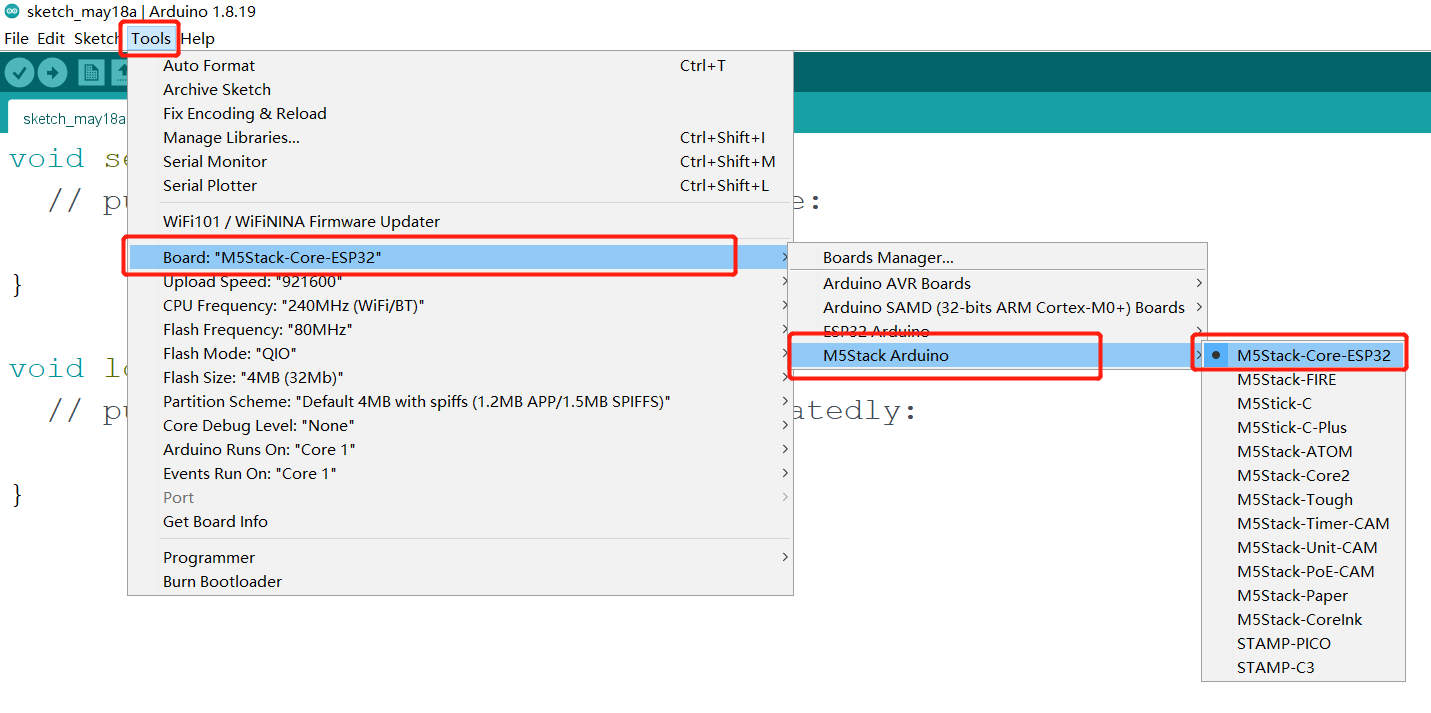
  1. Tools --> Development Board --> M5Stack Arduino select M5Stack-Core-ESP32, as shown in the following figure:
    16-1-4.1-001

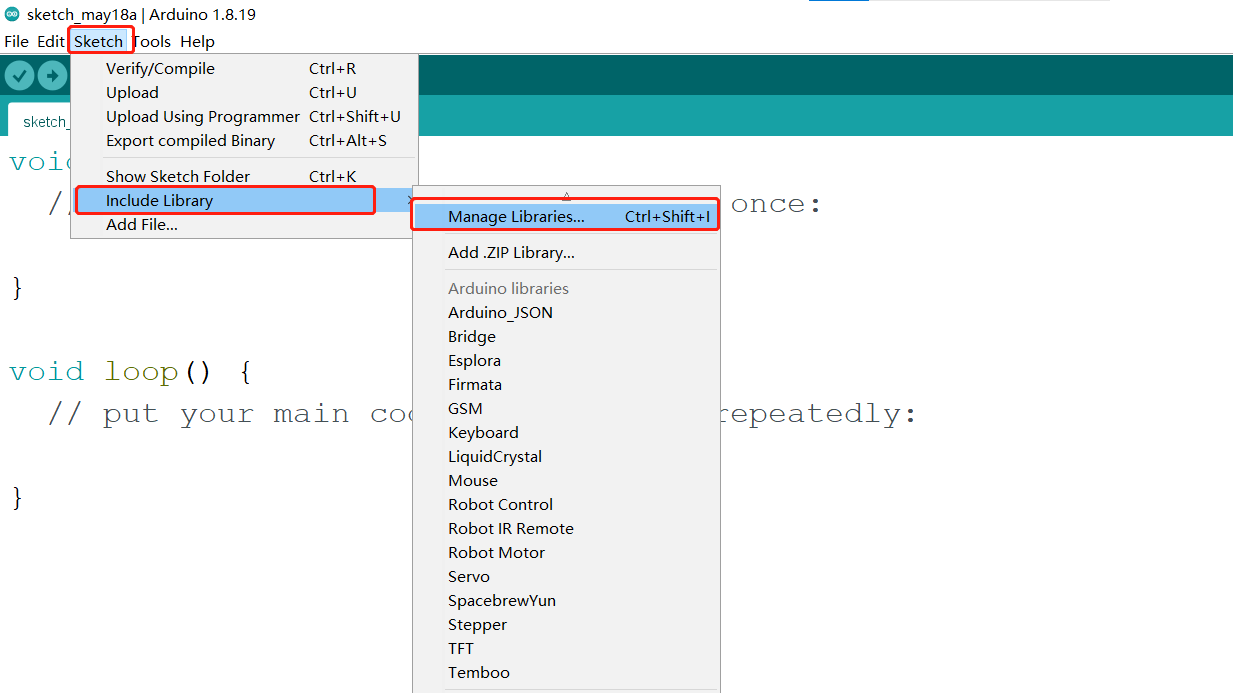
  2. Project --> Load Library --> Manage Library In the search box, enter M5Stack, as shown in the figure below:
    16-1-4.1-002

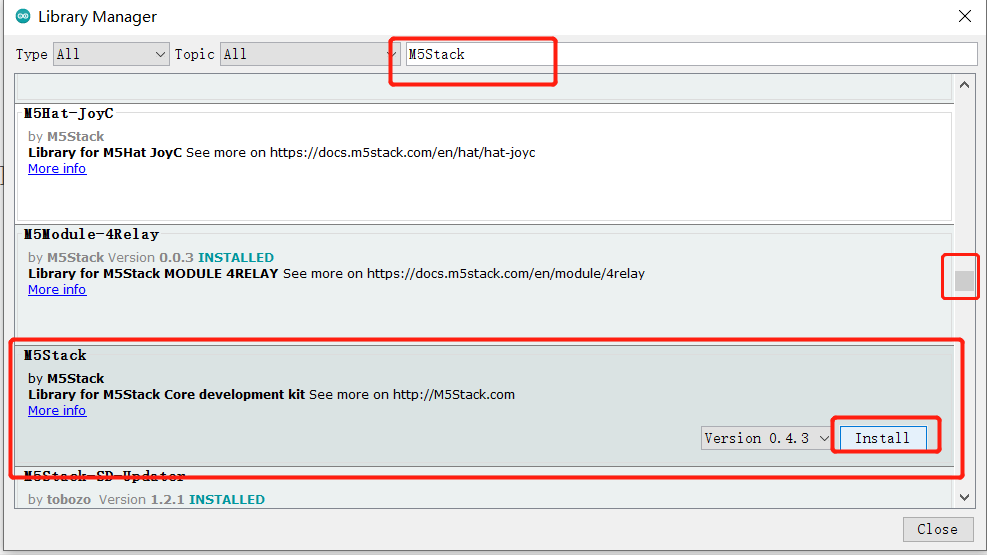
  3. After finding it, click Install, scroll down, M5Stack is at the back, you can see the location of the drop-down slider in the picture for details, as shown in the figure below:
    16-1-4.1-003

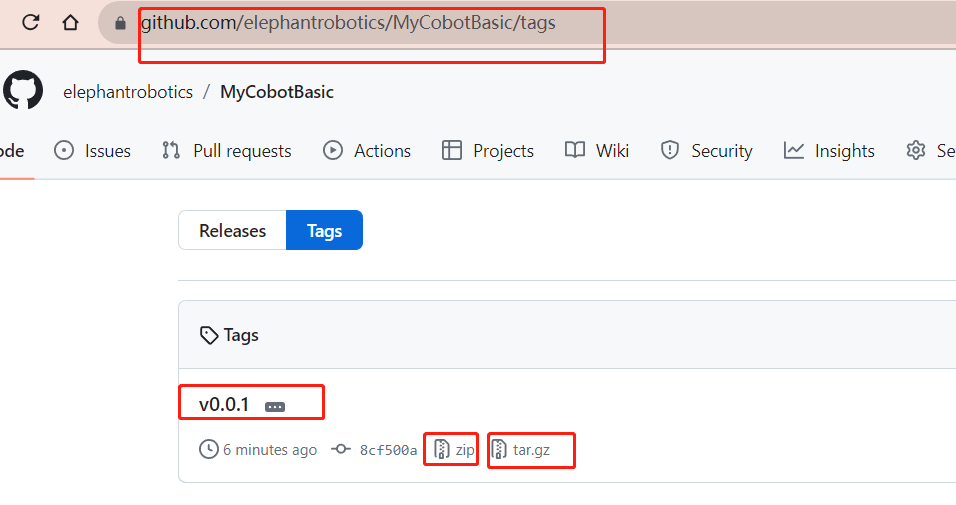
4.2 Install the MyCobotBasic library Note: Please download the latest library, the first version is v0.0.1.

  • MycobotBasic(After the Mycobot280-Arduino model is imported, you can refer to 10.3-arduinolib_use for use). Please see the figure below for details, .zip is suitable for Windows systems, and .tar.gz is suitable for Linux systems: 16-1-4.2-001
  • Library Installation Instructions

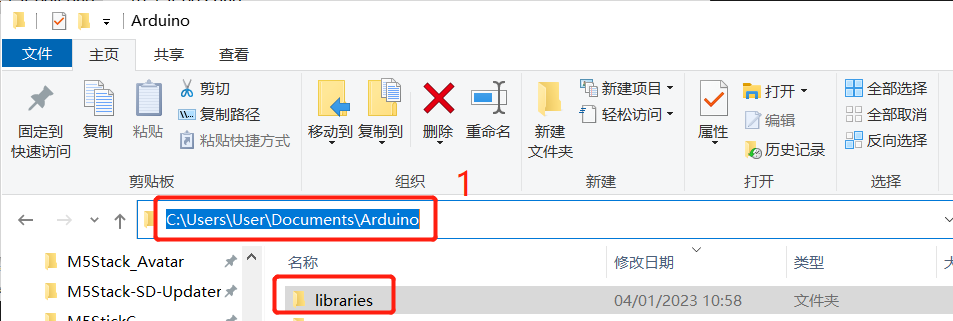
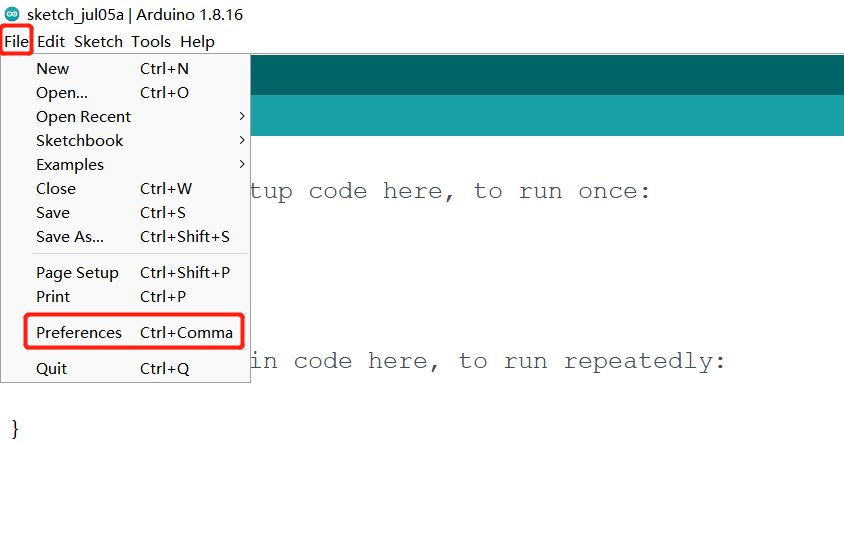
    First check the location of the Arduino project folder by clicking File --> Preferences (you can copy the path to your hard drive to find the libraries folder)
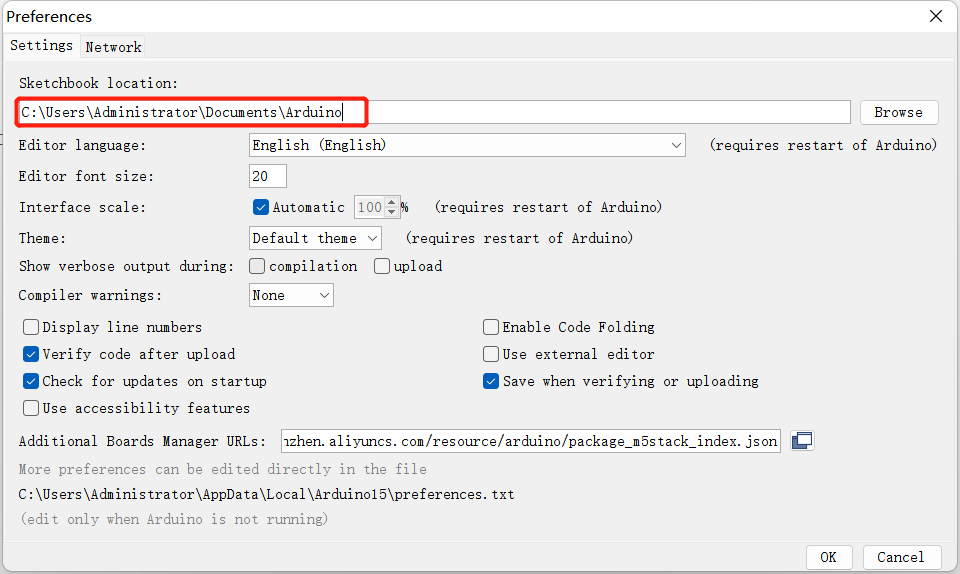
16-1-4.2-002

16-1-4.2-003

16-1-4.2-004 1 Copy the path here and press enter to find the libraries folder

Unzip it into the corresponding folder in the libraries directory. If you are using Arduino, don't overwrite it, just add to the existing Library.
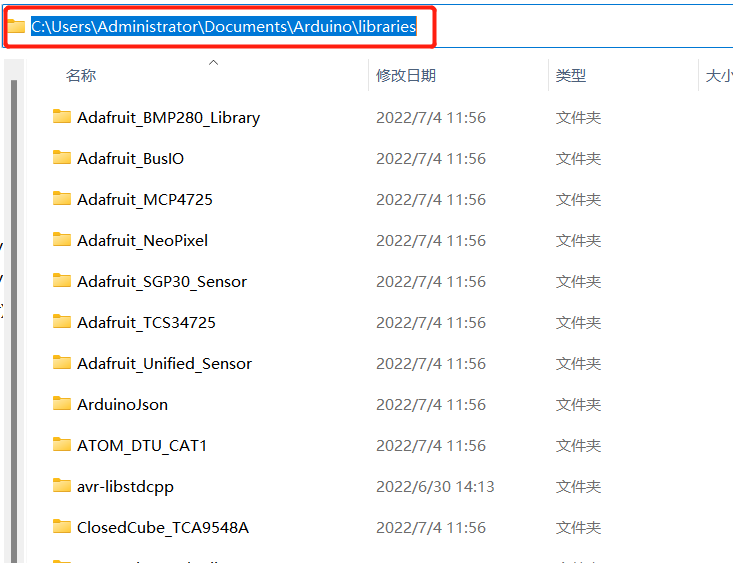
16-1-4.2-005

Congratulations, you have built a Arduino related development environment.

Note: Arduino environment configuration and case compilation can be seen in our beep video ( https://www.bilibili.com/video/BV1Vi4y1c7DQ/ ) .

Arduino
API

COMPANY

  • About us
  • Team Style
  • Blog

LEARNING & EXPLORATION

  • Tutorials
  • Edge AI hardware
  • Educational robots
  • Embedded intelligent hardware

WHERE TO BUY

  • Yahboom Online Store
  • Amazon
  • Alibaba
  • AliExpress
  • Mercado

TECHNOLOGY SUPPORT

  • Email: support@yahboom.com

BE A DISTRIBUTOR

  • Email: sales@yahboom.com
QR Code

Copyright © 2017-2026 Yahboom. All Rights Reserved.

EN/中文