yahboom
HomeLearn
Solution
Blog
Online Store
About Us
EN/中文
myCobot 320 Arm📖
1.Product Feature
  • 1.Functional Parameters
  • 2.Controller Parameters
  • 3.Structural Parameters
  • 4.Electronic Parameters
  • 5.Coordinate System
  • 6.Introduction of Adaptive Gripper
  • 7.Introduction of force-controlled gripper
2.Common Problem
  • 1.how to ask
  • 2.driver
  • 3.software
  • 4.hardware
3.First Install and Use
  • 1.Product Standard List
  • 2.Product Unboxing Guide
  • 3.Power-on Test Guide
4.Basic Application
1. miniRoboFLow
  • 1. miniRoboFLow
  • 2. Drag & Play
  • 3. Joint Calibration
  • 4. Computer Connect
  • 5. Robot Information
2.1 myblockly
  • 1. What is myBlockly
  • 2. Preparations before using myBlockly
  • 3. myBlockly download and install
  • 4. myBlockly interface display and use of basic functions
  • 5. Control RGB light panel
  • 6. Control the robotic arm to return to the origin
  • 7. Control single joint movement
  • 8. Control multiple joints
  • 9. Use of adaptive grippers
  • 10. Use of force-controlled grippers
  • 11. Q&A
  • 12. API
3. Firmware Description
  • 1.Firmware Description
  • 2.Burn Firmware
2.2 myStudio
  • 1. myStudio
  • 2. myStudio environment setup
  • 3. Install driver
  • 4. Burn and update firmware
5.Mobile APP control
  • Mobile APP control
6.SDK Development
1.Development Environment Construction
  • 1.Development Environment Construction
2.Python
  • 1.What is Python
  • 2.Environment Building
  • 3.Python API usage instaructions
  • 4.TCP IP
  • 5.Drag to teach
  • 6.Use Cases
  • 7.Use of adaptive grippers
  • 8.Use of force-controlled grippers
3.ROS1
  • 1.ROS
  • 2.Environment Building
  • 3.ROS basics
  • 4.Rviz use
  • 5.Basic function case
  • 6.Use of adaptive grippers
  • 7.Use of force-controlled grippers
4.ROS2
  • 1.ROS2 introduction
  • 2.Environment Building
  • 3.ROS2 basics
  • 4.Rviz2 use
  • 5.Basic function case
5.C Sharp(C#)
  • 1.C#
  • 2.Environmental construction
  • 3.Mechanical control
  • 4.myCobot API
  • 5.Use Cases
  • 6.Use of adaptive grippers
6.c plus plus (C++)
  • 1.C++
  • 2.CPlus Download
  • 3.build
  • 4.API
  • 5.example
7.Arduino
  • 1.Arduino
  • 2.Arduino Download
  • 3.API
  • 4.example
  • 5.Use of adaptive grippers
8.Serial communication
  • 1.Serial communication
  • 2.Use of force-controlled grippers
7.Documents Download
  • 1.Product Brochure
  • 2.Software and Source Code
  • 3.System lnformation
Download
  • 3D_Model_File
  • Android Mobile APP
  • Manual
Download ZIP

Welcome to myCobot 320 Arm repository

10. Use of force-controlled grippers

Use of force-controlled grippers

What you will learn in this chapter

How to use myBlockly to control the force-controlled gripper attached to the myCobot 320 M5Stack robot arm

Some API displays

  • Module 1:Set Pro Force Control Claw Parameters

    image-20250428114502172

  • Applicable scope: ER myCobot 320 series, ER Mercury series, ER myCobot Pro 600, ERmyCobot Pro 630, other general robots

  • Function: Set the parameters of the Pro force-controlled gripper. You can set a variety of parameter functions. Please see the following table for details.

  • parameter:

    • Gripper ID: gripper_id, the default value is 14, and the value range is 1 ~ 254.

    • The command number of the gripper: address.

    • Parameter value: value.

Functiongripper_idaddressvalue
Set the gripper ID1431 ~ 254
Set the gripper enable state14100 or 1, 0 - disable; 1 - enable
Set the clockwise runnable error of the gripper14210 ~ 16
Set the anti-clockwise runnable error of the gripper14230 ~ 16
Setting the minimum actuation force of the gripper14250 ~ 254
IO output settings14290, 1, 16, 17
Set the IO opening angle14300 ~ 100
Set IO closing angle14310 ~ 100
Set the virtual position value of the servo14410 ~ 100
Setting the holding current14431 ~ 254

  • Module 2:Set Pro Force Control Claw Angle

image-20250428114600880

  • Applicable scope: ER myCobot 320 series, ER Mercury series, ER myCobot Pro 600, ERmyCobot Pro 630, other general robots

  • Function: Set the angle of the force-controlled gripper.

  • parameter:

    • Gripper ID: Default is 14, value range is 1 ~ 254.

    • Gripper angle: value range is 0 ~ 100.

  • Module 3:Set Pro Force Control Claw Torque

image-20250428114648380

  • Applicable scope: ER myCobot 320 series, ER Mercury series, ER myCobot Pro 600, ERmyCobot Pro 630, other general robots

  • Function: Set the torque of the force-controlled gripper.

  • parameter:

    • Gripper ID: Default is 14, value range is 1 ~ 254.

    • Torque value: range is 1 ~ 100.

  • Module 4:Read the torque of the Pro force control gripper

image-20250428114733408

  • Applicable scope: ER myCobot 320 series, ER Mercury series, ER myCobot Pro 600, ERmyCobot Pro 630, other general robots

  • Function: Read the torque of the force-controlled gripper.

  • parameter:

    • Gripper ID: Default is 14, value range is 1 ~ 254.

Simple Demo

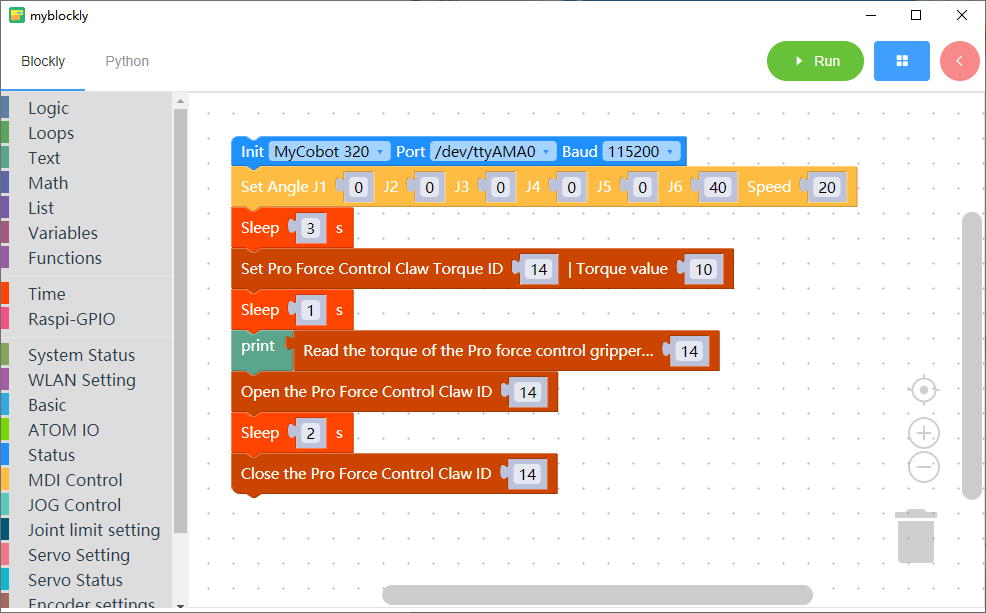
  • The graphics code is as follows:

image-20250428114853092

  • Implementation content:

    The robot arm's joint 6 moves to 40 degrees at a speed of 20, and the rest of the joints move to 0 degrees. After three seconds,

    Set the torque of the force-controlled gripper to 10. After one second,

    The program running window will print out the current torque value of the force-controlled gripper, then open the gripper. After two seconds,

    The gripper closes and the program ends.

Use of adaptive grippers
Q&A

COMPANY

  • About us
  • Team Style
  • Blog

LEARNING & EXPLORATION

  • Tutorials
  • Edge AI hardware
  • Educational robots
  • Embedded intelligent hardware

WHERE TO BUY

  • Yahboom Online Store
  • Amazon
  • Alibaba
  • AliExpress
  • Mercado

TECHNOLOGY SUPPORT

  • Email: support@yahboom.com

BE A DISTRIBUTOR

  • Email: sales@yahboom.com
QR Code

Copyright © 2017-2026 Yahboom. All Rights Reserved.

EN/中文