yahboom
HomeLearn
Solution
Blog
Online Store
About Us
EN/中文
DOFBOT-Ultra📖
1. Get Started Quickly
  • 0.Unboxing Video
  • 1. Get Started Quickly
  • 2. Access the Terminal
  • 3. Calibration offset(Depth Camera)
  • 4. Calibration offset(USB Camera)
2. Assembly Course
  • 1. Installation Steps
  • 2. Calibrate the Robotic Arm
  • 3. Install the Map
3. Remote Control Course
  • 1. Mobile Phone Control
  • 2. USB Handle Control
  • 3. PC Web Page Programming
4. Preparation
  • 1. Manage Web control services
  • 2. Manage JupyterLab services
  • 3. Manage OLED services
5. 2D Visual Tracking Course
  • 1. Color block positioning
  • 2. Color block tracking
  • 3. Face positioning
  • 4. Face tracking
  • 5. Label code positioning
  • 6. Label code tracking
6. 2D Visual Grasping Course
  • 1. Identify grab color block
  • 2. Catch game
  • 3. Color sorting
  • 4. Color stacking
  • 5. Label code sorting
  • 6. Label code stacking
  • 7. Gesture grasping color blocks
  • 8. Gesture stacking color blocks
  • 9. Single garbage sorting
  • 10. Garbage sorting
  • 11. Tracking game
7. 2D Mediapipe Course
  • 1. Hand detection
  • 2. Posture detection
  • 3. Overall detection
  • 4. Facial Detection
  • 5. Face Detection
  • 6. Face effects
  • 7. 3D Object Recognition
  • 8. Paintbrush
  • 9. Finger control
  • 10. Gesture Recognition
  • 11. Gesture control robotic arm action group
  • 12. Arm posture control robotic arm
  • 13. Palm Targeting
  • 14. Robotic arm tracks the palm
  • 15. Fingertip trajectory recognition
  • 16. Fingertip trajectory control robotic arm
  • 17. Gesture Grasp and Release Objects
  • 18. Finger Control Robot Arm
8. AI Large Model Voice Module (Must Read)
  • 1. Introduction to AI Large Model Voice Module
  • 2. Flash the firmware (Must read)
  • 3. Modify the wake-up word and command word
9. 2D Voice Control Course
  • 1. Simple Voice Control
  • 2. Smart Voice Control
  • 3. Voice Action Control
  • 4. Memory Learning Mode
  • 5. Color Recognition with Voice Broadcast
  • 6. Color Recognition and Grasping with Voice Broadcast
  • 7. Color Recognition and Sorting with Voice Broadcast
  • 8. Voice Recognition Target Tracking
  • 9. Voice Control Stacking
  • 10. Voice Control Sorting
  • 11. Garbage Recognition with Voice Broadcast
  • 12. Garbage Sorting with Voice Broadcast
10. 3D Depth Camera Course
  • 1. Dabai_DCW2 camera
  • 2. Deep pseudo-color image
  • 3. Depth camera ranging
  • 4. Color block volume measurement
11. 3D Robotic Arm Control and Inverse Kinematics
  • 1. Robotic arm ROS control
  • 2. Inverse solution
12. 3D Sorting and Grasping Course
  • 1. AprilTag ID sorting
  • 2. AprilTag abnormal height sorting
  • 3. MediaPipe Gesture-AprilTag ID sorting
  • 4. MediaPipe Gesture-AprilTag height sorting
  • 5. MediaPipe Gesture-AprilTag distance sorting
  • 6. Block color sorting
  • 7. Block abnormal height sorting
  • 8. Block different shape sorting
  • 9. Block shape abnormal height sorting
  • 10. Yolov26 garbage sorting
13. 3D Tracking and Grasping Course
  • 1. AprilTag Tracking and Grasping
  • 2. Color Block Tracking and Grasping
  • 3. KCF Object Tracking and Grasping
14. 3D Voice Control for Grasping Course (Sorting & Tracking)
  • 1. Voice Control AprilTag ID Sorting
  • 2. Voice Control Remove Height Abnormal AprilTag
  • 3. Voice Control Tracking and Grasping AprilTag
  • 4. Voice Control Color Block Sorting
  • 5. Voice Control Remove Height Abnormal Color Block
  • 6. Voice Control Tracking and Grasping Color Block
  • 7. Voice Control Yolov26 Garbage Recognition Sorting
  • 8. Voice Control Object Tracking and Grasping
15. AI Model Basics
  • 1. AI Large Model Types and Principles
  • 2. RAG Retrieval Enhancement and Model Training Samples
  • 3. Embodied Intelligent Robot System Architecture
  • 4. Embodied Intelligent Functions Core Source Code
16. AI Model Development
  • 0. DofbotUltra Large Model Development Quick Start Guide
  • 1. Register a Model Service Provider Account
  • 2. Configure API-KEY
  • 3. Introduction to Dify
  • 4. Basic Dify Features
  • 5. AI Large Model Development - chatbot
  • 6. Deploy the RAG knowledge base
  • 7. RAG knowledge base + chatbot
  • 8. AI agent workflow
17. AI Model – Text Version
  • 1. Semantic understand instruction following
  • 2. Multimodal visual understand
  • 3. Text Large Model + robotic arm control
  • 4. Multimodal Large Model + Video Understanding
  • 5. Multimodal Large Model + Robotic Arm Gripping
  • 6. Multimodal Large Model + Robotic Arm Tracking
  • 7. Multimodal Large Model + Robotic Arm Sorting
  • 8. Multimodal Large Model + Robotic Arm Handling
  • 9. Multimodal Large Model + Color Blocks Back In Place
  • 10. Multimodal Large Model + Intent Prediction + Robotic Arm Gripping
  • 11. Text Large Model + YOLOv26 + Intelligent Garbage Classification
18. AI Model – Voice Version
  • 1. Semantic understand instruction following
  • 2. Multimodal visual understand
  • 3. Text Large Model + robotic arm control
  • 4. Multimodal Large Model + Video Understanding
  • 5. Multimodal Large Model + Robotic Arm Gripping
  • 6. Multimodal Large Model + Robotic Arm Tracking
  • 7. Multimodal Large Model + Robotic Arm Sorting
  • 8. Multimodal Large Model + Robotic Arm Handling
  • 9. Multimodal Large Model + Color Blocks Back In Place
  • 10. Multimodal Large Model + Intent Prediction + Robotic Arm Gripping
  • 11. Text Large Model + YOLOv26 + Intelligent Garbage Classification
19. AI Model – Fun Applications
  • 1. AI Butler-Intent Inference
  • 2. AI Encyclopedia-Arithmetic Master
  • 3. AI Encyclopedia-You asked I Pointed
  • 4. AI Encyclopedia-Nutritional Analysis
  • 5. AI Encyclopedia-Problem Solving Expert
  • 6. AI Encyclopedia-English Spelling
  • 7. AI Butler-Garbage Sorting
  • 8. AI Top Chef
20. MoveIt Course
  • 1. MoveIt Configuration
  • 2. MoveIt Usage
  • 3. MoveIt Drive Real Robot
  • 4. MoveIt Random Movement
  • 5. MoveIt Forward Kinematics Design
  • 6. MoveIt Inverse Kinematics Design
  • 7. MoveIt Cartesian Path
  • 8. MoveIt Scene Design
  • 9. MoveIt Trajectory Planning
  • 10. MoveIt Collision Detection
21. YOLOv11 Development Course
PI 5
  • 1. YOLO Environment Setup
  • 2. CLI Usage
  • 3. Object Detection
  • 4. Instance Segmentation
  • 5. Pose Estimation
  • 6. Image Classification
  • 7. Oriented Bounding Boxes Object Detection
  • 8. Model Conversion
  • 9. Dataset Annotation
  • 10. Model Training and Conversion
  • 11. Model Prediction
RDK X5
  • 1. YOLO Environment Setup
  • 2. CLI Usage
  • 3. Object Detection
  • 4. Instance Segmentation
  • 5. Pose Estimation
  • 6. Image Classification
  • 7. Oriented Bounding Boxes Object Detection
  • 8. Model Prediction
  • 9. Model Conversion
22. YOLOv26 Development Course
PI 5
  • 6. Image Classification
  • 1. YOLO Environment Setup
  • 2. CLI Usage
  • 3. Object Detection
  • 4. Instance Segmentation
  • 5. Pose Estimation
  • 6. Image Classification
  • 7. Oriented Bounding Boxes Object Detection
  • 8. Model Conversion
  • 9. Dataset Annotation
  • 10. Model Training and Conversion
  • 11. Model Prediction
RDK X5
  • 1. YOLO Environment Setup
  • 2. CLI Usage
  • 3. Object Detection
  • 4. Instance Segmentation
  • 5. Pose Estimation
  • 7. Oriented Bounding Boxes Object Detection
  • 8. Model Conversion
  • 9. Dataset Annotation
  • 10. Model Training and Conversion
  • 11. Model Prediction
23.Linux Operating System
  • 1.Introduction to Linux system
  • 2.Ubuntu file system
  • 3.Ubuntu common commands
  • 4.Ubuntu common editors
  • 5.Ubuntu software operation commands
  • 6.Virtual machine installation
  • 7.SSH remote control
  • 8.VNC remote control
  • 9.Transfer files remotely
  • 10.Driver library and communication
  • 11.Capacity expansion and resource allocation
  • 12.Bind device ID
  • 13.Capacity expansion and resource allocation
  • 14.Update system software sources
  • 15.Set root user password
  • 16.sudo free password
  • 17.Connect to WiFi network
  • 18.View system version
  • 19.Customized service management
  • 20.Back up system image
24. Basic Control Course
  • 1. Control RGB Light
  • 2. Control Buzzer
  • 3. Control Single Servo
  • 4. Read Servo Angle
  • 5. Control All Servos
  • 6. DOFBOT Up Down Left Right Movement
  • 7. DOFBOT Dancing
  • 8. DOFBOT Memory Actions
  • 9. DOFBOT Grab Blocks
  • 10. Porter
  • 11. Stack Blocks
  • 12. Two DOFBOT Synchronized Actions
25.RDKx5 Board Basic Course
  • 1.Introduction to RDK X5 board
  • 2.Write system file
  • 3.Hardware interface description
  • 4.Install case and other accessories
  • 5.Use 7-inch display
  • 6.SD card expansion
  • 7.Network configuration
  • 8.Remote login
  • 9.Update system
  • 10.srpi-config user guide
  • 11.config. txt configuration file
  • 12.Self-startup setting
  • 13.RDK exclusive command usage
  • 14.Linux command usage
  • 15.GPIO readwrite operation
  • 16.Image classification algorithm
  • 17.Use USB camera
  • 18.Use MIPI camera
  • 19.Binocular camera depth algorithm
26.PI5 Board Basic Course
  • 1.Introduction to Raspberry PI 5
  • 2.Raspberry PI system installation and backup
  • 3.Powering the Raspberry PI 5
  • 4.Startup of Raspberry PI 5
  • 5.Installation and introduction of shell and active radiator
  • 6.GPIO and 40-pin pins
  • 7.Tips for using Raspberry PI 5
  • 8.Raspberry PI PCIe connector
  • 9.MIPI CSI DSI connector
  • 10.UART connector
  • 11.Real-time clock
  • 12.Power over Ethernet (PoE) connector
  • 13.Update and upgrade operating system
  • 14.Introduction to raspi-config tool
  • 15.config.txt file description
  • 16.Network Configuration
  • 17.remote access
  • 18.Transfer files remotely
  • 19.Set display resolution and rotation
  • 20.Set screen to sleep
  • 21.Get real-time temperature of Raspberry Pi
  • 22.Play audio and video
  • 23.Using USB camera
  • 24.Using MIPI camera
27. Visual Basics Course
  • 1. Introduction to Open Source CV
  • 2. Image Reading and Display
  • 3. Image Writing
  • 4. Image Quality
  • 5. Pixel Operation
  • 6. Image Zoom
  • 7. Picture Cut
  • 8. Picture Pan
  • 9. Picture Mirroring
  • 10. Affine Transformation
  • 11. Picture Rotation
  • 12. Perspective Transformation
  • 13. Grayscale Processing
  • 14. Binary Image
  • 15. Edge Detection
  • 16. Line Segment Drawing
  • 17. Rectangular Circle Drawing
  • 18. Text and Picture Drawing
28. ROS2 Basic Course
  • 1.Introduction to ROS2
  • 2.ROS2 install Humble
  • 3.ROS2 development environment
  • 4.ROS2 workspace
  • 5.ROS2 function package
  • 6.ROS2 node
  • 7.ROS2 topic communication
  • 8.ROS2 service communication
  • 9.ROS2 action communication
  • 10.ROS2 custom interface message
  • 11.ROS2 parameter service case
  • 12.ROS2 meta-function package
  • 13.ROS2 distributed communication
  • 14.ROS2 DDS
  • 15.ROS2 time related API
  • 16.ROS2 common command tools
  • 17.ROS2 rviz2 use
  • 18.ROS2 rqt toolbox
  • 19.ROS2 Launch startup file configuration
  • 20.ROS2 recording and playback tool
  • 21.ROS2 URDF model
  • 22.ROS2 Gazebo simulation platform
  • 23.ROS2 TF2 coordinate transformation
29. Jupyter Lab Usage Course
  • 1. Read the document before operation
  • 2. Jupyter lab environment construction tutorial
  • 3. Basic tutorial of Jupyter lab
  • 4. Jupyter widgets configuration tutorial
  • 5. Getting Started Tutorial for JupyterWidgets Controls
Download
  • System_File
  • VM_File
  • Instruction Manual
  • Code
  • Software Tools
  • Communication_Protocols
  • Hardware_Info
Download ZIP

Welcome to DOFBOT-Ultra repository

8.Remote login

Remote Login

Remote Login1.4 Remote LoginSerial Port LoginNetwork Status ConfirmationVNC LoginSSH LoginTerminal Software

1.4 Remote Login

This chapter is intended to introduce users who need to remotely access the development board through their personal computer (PC) on how to remotely login via serial port and network (VNC, SSH) methods.

tip

Before remote login via network, the development board needs to be connected to the network via wired Ethernet or wireless WiFi, and the IP address needs to be configured:

  • Wired Ethernet: The development board defaults to static IP mode. For the IP address, refer to the [Network Status Confirmation] section.
  • Wireless WiFi: The development board's IP address is generally assigned by the router and can be viewed in the device command line using the ifconfig command for the wlan0 network.

Serial Port Login

Before using serial port login, it is necessary to confirm that the serial port cable of the development board is correctly connected to the computer. Refer to the [Serial Port Debugging] chapter to verify the serial connection.

Serial port login requires a PC terminal tool. The commonly used tools are PuTTy, MobaXterm, etc. Users can select their terminal tool according to their own preferences, as the port configuration process is similar for different tools. Below is an example with MobaXterm to explain the process of creating a new serial port connection:

  • When the USB-to-Serial adapter is first plugged into the computer, the serial port driver needs to be installed. After the driver is installed, the Device Manager can recognize the serial port board port normally, as shown in the figure below: image-20220416105939067

  • Open the MobaXterm tool, click Session, and then select Serial.

  • Configure the port number, for example, COM7. The actual serial port number used depends on the serial port number recognized by the PC.

  • Set the serial port configuration parameters as follows:

    Configuration ItemParameter Value
    Baud rate921600
    Data bits8
    ParityNone
    Stop bits1
    Flow ControlNone
  • Click OK, enter the username: root, password: root to log in to the device image-Uart-Login

At this point, you can use the ifconfig command to query the IP address of the development board, where eth0 and wlan0 represent the wired and wireless networks respectively:

xxxxxxxxxx
root@ubuntu:~# ifconfig
eth0: flags=4163<UP,BROADCAST,RUNNING,MULTICAST>  mtu 1500
        inet 192.168.1.10  netmask 255.255.255.0  broadcast 192.168.1.255
        inet6 fe80::211:22ff:feaa:7637  prefixlen 64  scopeid 0x20<link>
        ether 00:11:22:aa:76:37  txqueuelen 1000  (Ethernet)
        RX packets 767  bytes 54006 (54.0 KB)
        RX errors 0  dropped 0  overruns 0  frame 0
        TX packets 5766  bytes 246466 (246.4 KB)
        TX errors 0  dropped 0 overruns 0  carrier 0  collisions 0
        device interrupt 43  base 0xa000  

lo: flags=73<UP,LOOPBACK,RUNNING>  mtu 65536
        inet 127.0.0.1  netmask 255.0.0.0
        inet6 ::1  prefixlen 128  scopeid 0x10<host>
        loop  txqueuelen 1000  (Local Loopback)
        RX packets 3847  bytes 339115 (339.1 KB)
        RX errors 0  dropped 0  overruns 0  frame 0
        TX packets 3847  bytes 339115 (339.1 KB)
        TX errors 0  dropped 0 overruns 0  carrier 0  collisions 0

wlan0: flags=4099<UP,BROADCAST,MULTICAST>  mtu 1500
        ether 08:e9:f6:ae:f8:8a  txqueuelen 1000  (Ethernet)
        RX packets 0  bytes 0 (0.0 B)
        RX errors 0  dropped 0  overruns 0  frame 0
        TX packets 0  bytes 0 (0.0 B)
        TX errors 0  dropped 0 overruns 0  carrier 0  collisions 0


Network Status Confirmation

tip

The IP addresses corresponding to different versions of the images are as follows:

Board SeriesImage VersionEthernet Port IP Address
X3Less than or equal to 2.0.0192.168.1.10/24
X3Greater than or equal to 2.1.0192.168.127.10/24
X53.0.0192.168.127.10/24
Board SeriesImage VersionFlash Connection Port (USB Device) IP Address
X53.0.0192.168.128.10/24

Before using remote login, it is necessary to confirm that the computer and development board are connected correctly.

Configure the IP address of the computer to be on the same subnet as the development board. For example, the development board: 192.168.1.10 and the computer: 192.168.1.100. Assigning an IP address depends on the Operating System of the computer. Taking the WIN10 system as an example, the method to modify the static IP of the computer is as follows:

image-20220416110242445

If you want to configure the wired network of the development board to obtain IP dynamically via DHCP mode, please refer to the [Wired Network] chapter for configuration.

To confirm that the connection is working, execute ping 192.168.1.10 from the computer (change the command to the IP address of the development board). If the ping command receives responses, then the connection is working; otherwise, check the network configurations are correct, and that the network firewall of the computer is turned off.

VNC Login

This section is for users using the Ubuntu Desktop system version, and it explains how to use "VNC Viewer" to achieve remote desktop login. "VNC Viewer" is a graphical desktop sharing software that allows you to remotely log in and control the desktop of the device on your computer. With this software, you can preview the system desktop of the development board on your computer screen and use your computer's mouse and keyboard for remote operation. By using VNC Viewer, you can achieve the same effect as local operation on the development board. You can download VNC Viewer from the following link: VNC Viewer.

Connect to the Development Board Currently, VNC supports two connection methods: direct connection and cloud connection. Users can choose according to their own needs. This article recommends using the direct connection method. The connection steps are as follows:- Enter the IP address of the input device, for example: 192.168.127.10

image-20220610160658103

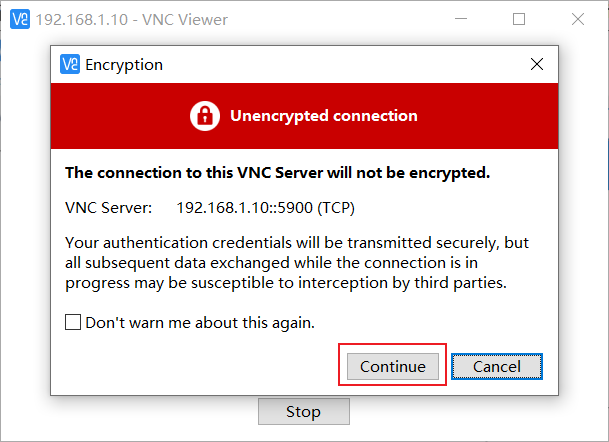
  • After entering the IP address, press Enter, a prompt for an unencrypted connection will appear, click Continue image-20220610160715916
  • Enter the password sunrise, check Remember password, and click OK to connect image-20220610160928136

SSH Login

In addition to VNC login for remote desktop, you can also connect to the development board via SSH. The following steps describe how to create SSH connections using terminal software and terminal command line methods.

Terminal Software

Commonly used terminal tools include PuTTy, MobaXterm, etc. Users can choose according to their own preferences. The configuration process for different tools is similar. The following example shows how to create a new SSH connection using MobaXterm:

  1. Open the MobaXterm tool, click on Session, then select SSH.
  2. Enter the development board IP address, for example: 192.168.1.10.
  3. Select specify username, enter sunrise.
  4. After clicking OK, enter the username (sunrise) and password (sunrise) to complete the login.

image-Network-Login

Network configuration
Update system

COMPANY

  • About us
  • Team Style
  • Blog

LEARNING & EXPLORATION

  • Tutorials
  • Edge AI hardware
  • Educational robots
  • Embedded intelligent hardware

WHERE TO BUY

  • Yahboom Online Store
  • Amazon
  • Alibaba
  • AliExpress
  • Mercado

TECHNOLOGY SUPPORT

  • Email: support@yahboom.com

BE A DISTRIBUTOR

  • Email: sales@yahboom.com
QR Code

Copyright © 2017-2026 Yahboom. All Rights Reserved.

EN/中文