yahboom
HomeLearn
Solution
Blog
Online Store
About Us
EN/中文
NUWA-HP60C Depth Camera📖
1.ROS1-Depth camera usage course
  • 1. Environment Construction
  • 2. Camera recording video
2.ROS1-ROS+OpenCV application
  • 1.ROS+Opencv Basics
  • 2.Face recognition
  • 3.Harris corner detection
  • 4. Target Tracking Algorithm
  • 5. Contour moment
  • 6. Polygonal Outlines
  • 7. Discrete Fourier Transform Algorithm
  • 8. Edge Detection Algorithm
  • 9. Face Detection Algorithm
  • 10. Optical flow detection algorithm
  • 11. Contour Detection
  • 12. General contour detection
  • 13. Feature point tracking
  • 14.HLS Color Filtering
  • 15. Hough circle detection
  • 16. Hough Line Detection
  • 17.HSV color filtering
  • 18.LK optical flow algorithm
  • 19. Human Detection Algorithm
  • 20. Phase-correlated displacement detection
  • 21. Image pyramid sampling algorithm
  • 22.RGB color filtering
  • 23. Clear background detection algorithm
  • 24. Streamlining the optical flow algorithm
  • 25. Simple Filter
  • 26. Threshold Image Processing
  • 27. Watershed segmentation algorithm
3.ROS1-Mediapipe course
  • 1.Hand detection
  • 2.Posture detection
  • 3.Overall detection
  • 4.Face Mesh
  • 5.Face recognition
  • 6.Face effects
  • 7.Face Detection
  • 8.3D Object Recognition
  • 9.Paintbrush
  • 10.Finger control
  • 11.Gesture Recognition
4.ROS1-Depth camera application course
  • 1. Camera calibration
  • 2. QR code
  • 3. Human Pose Estimation
  • 4. Target detection
  • 5. Point cloud data viewing
  • 6. AR Vision
  • 7.AR QR code tracking
  • 8. Color Tracking
  • 9. Object Tracking
5.ROS1-Linux basic course
  • 1.Introduction to Linux system
  • 2.Ubuntu file system
  • 3.Ubuntu common commands
  • 4.Ubuntu common editors
  • 5.Ubuntu software operation commands
  • 6.Virtual machine installation
  • 7.SSH remote control
  • 8.VNC remote control
  • 9.Transfer files remotely
  • 10.Driver library and communication
  • 11.Static IP and hotspot mode
  • 12.Bind device ID
  • 13.Capacity expansion and resource allocation
  • 14.Update system software sources
  • 15.Set root user password
  • 16.sudo free password
  • 17.Connect to WiFi network
  • 18.View system version
  • 19.Customized service management
  • 20.Back up system image
6.ROS1-OpenCV course
  • 1.Opencv Source CV Introduction
  • 2.Image reading and display
  • 3.Picture writing
  • 4.Picture Quality
  • 5.Pixel Operation
  • 6.Picture scaling
  • 7.Picture cutting
  • 8.Picture translation
  • 9.Picture mirroring
  • 10.Affine transformation
  • 11.Picture rotation
  • 12.Perspective transformation
  • 13.Grayscale processing
  • 14.Image binarization
  • 15.Edge detection
  • 16.Line segment drawing
  • 17.Rectangle and circle drawing
  • 18.Text and picture drawing
7.ROS1 basic course
  • 1.ROS introduction
  • 2.ROS installation
  • 3.ROS common command tools
  • 4.ROS workspace
  • 5.ROS function package
  • 6.ROS node
  • 7.ROS topic publisher
  • 8.ROS topic subscribers
  • 9.ROS service client
  • 10.ROS service server
  • 11.ROS action client
  • 12.ROS action server
  • 13.ROS custom message reception
  • 14.ROS-launch file
  • 15.ROS-TF transformation
  • 16.ROS parameter service
  • 17.ROS-rviz use
  • 18.ROS-rqt tool usage
  • 19.Topic message recording and playback
  • 20.urdf model introduction
  • 21.gazebo introduction
  • 22.ROS distributed communication
8.ROS2-Depth Camera Application Course
  • 1. Use of Depth Camera
  • 2. Camera internal parameter calibration
  • 3. Color tracking
  • 4. KCF Object Tracking
  • 5. ORBSLAM2 Basics
  • 6. ORB_SLAM2 PCL Mapping
  • 7. ORB_SLAM2 Octomap Mapping
9.ROS2-OpenCV course
  • 1. ROS+OpenCV application
  • 2. QR code creation and recognition
  • 3. AR Vision
10.ROS2-Mediapipe course
  • 1.Hand detection
  • 2.Posture detection
  • 3.Overall detection
  • 4.Face Mess
  • 5.Face recognition
11.ROS2 basic course
  • 1.Introduction to ROS2
  • 2.ROS2 install Humble
  • 3.ROS2 development environment
  • 4.ROS2 workspace
  • 5.ROS2 function package
  • 6.ROS2 node
  • 7.ROS2 topic communication
  • 8.ROS2 service communication
  • 9.ROS2 action communication
  • 10.ROS2 custom interface message
  • 11.ROS2 parameter service case
  • 12.ROS2 meta-function package
  • 13.ROS2 distributed communication
  • 14.ROS2 DDS
  • 15.ROS2 time related API
  • 16.ROS2 common command tools
  • 17.ROS2 rviz2 use
  • 18.ROS2 rqt toolbox
  • 19.ROS2 Launch startup file configuration
  • 20.ROS2 recording and playback tool
  • 21.ROS2 URDF model
  • 22.ROS2 Gazebo simulation platform
  • 23.ROS2 TF2 coordinate transformation
5.Bracket installation video
  • Bracket installation video
Download
  • ROS1_VM
  • ROS2_VM
  • ROS1_Code
  • ROS2_Code
  • DataSheet
  • 3D_Model_File
  • Windows Software
  • ROS2_Basic_VM
Download ZIP

Welcome to NUWA-HP60C Depth Camera repository

8.Picture translation

Image panning

The original image src is converted into the target image dst through the transformation matrix M:

dst(x, y) = src(M11x + M12y+M13, M21x+M22y+M23)

Move the original image src to the right by 200 and down by 100 pixels, then the corresponding relationship is:

dst(x, y) = src(x+200, y+100)

Complete the above expression, that is:

dst(x, y) = src(1·x + 0·y + 200, 0·x + 1·y + 100)

According to the above expression, it can be determined that the value of each element in the corresponding transformation matrix M is:

M11=1

M12=0

M13=200

M21=0

M22=1

M23=100

Substituting the above values into the transformation matrix M, we get:
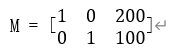
Next, we directly use the transformation matrix M to call the function cv2.warpAffine() to complete the translation of the image.

  • Start Docker

After entering the Raspberry Pi 5 desktop, open a terminal and run the following command to start the container corresponding to Dofbot:

xxxxxxxxxx
./Docker_Ros.sh

Access Jupyter Lab within Docker:

xxxxxxxxxx
IP:9999 // Example: 192.168.1.11:9999

Code path:/root/Dofbot/4.opencv/2.Transform/03_move_pic.ipynb

xxxxxxxxxx
import cv2
import numpy as np
img = cv2.imread('yahboom.jpg',1)
#cv2.imshow('src',img)
imgInfo = img.shape
height = imgInfo[0]
width = imgInfo[1]
####
matShift = np.float32([[1,0,200],[0,1,100]])# 2*3
dst = cv2.warpAffine(img, matShift, (height, width)) #1 data 2 mat 3 info
# shift matrix
# cv2.imshow('dst',dst)
#cv2.waitKey(0)

The following will display the comparison between the original image and the translated image in the jupyterLab control:

xxxxxxxxxx
#bgr8 to jpeg format
import enum
import cv2
def bgr8_to_jpeg(value, quality=75):
     return bytes(cv2.imencode('.jpg', value)[1])
​x
import ipywidgets.widgets as widgets
image_widget1 = widgets.Image(format='jpg', )
image_widget2 = widgets.Image(format='jpg', )
# create a horizontal box container to place the image widget next to each other
image_container = widgets.HBox([image_widget1, image_widget2])
# display the container in this cell's output
display(image_container)
#display(image_widget2)

img1 = cv2.imread('yahboom.jpg',1)

image_widget1.value = bgr8_to_jpeg(img1)

image_widget2.value = bgr8_to_jpeg(dst)
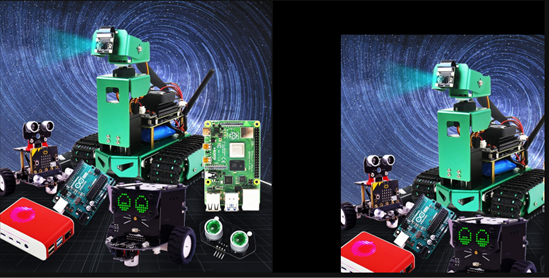
As can be seen from the image, the picture has moved to the lower right corner (200, 100).

Picture cutting
Picture mirroring

COMPANY

  • About us
  • Team Style
  • Blog

LEARNING & EXPLORATION

  • Tutorials
  • Edge AI hardware
  • Educational robots
  • Embedded intelligent hardware

WHERE TO BUY

  • Yahboom Online Store
  • Amazon
  • Alibaba
  • AliExpress
  • Mercado

TECHNOLOGY SUPPORT

  • Email: support@yahboom.com

BE A DISTRIBUTOR

  • Email: sales@yahboom.com
QR Code
QR Code

Copyright © 2017-2026 Yahboom. All Rights Reserved.

EN/中文