Welcome to NUWA-HP60C Depth Camera repository
14.ROS-launch file
14.ROS-launch file
This course will explain the commonly used launch files in the ros system, talk about the concept of launch files and how to write launch files.
14.1 launch file
The launch file is a file provided by ROS for starting multiple nodes. The format is XML format. It can make the process of starting multiple ROS nodes simple. It also simplifies the process of parameter setting by the ROS parameter server.The file name ends with .launch. As mentioned before, generally, we will create a folder named launch under the path of the function package to store the delaunch files belonging to the function package.
14.1.1 roslaunch
Run the launch file. ROS provides the roslaunch tool. Unlike rosrun, roslaunch can start multiple nodes at the same time. You only need to write multiple nodes into the running launch file. The command to start roslaunch is as follows, enter in the terminal,
roslaunch <pkg_name> <launch_file_name>pkg_name: represents the name of the function package. According to the actual situation, change it to the name of the function package where the launch file is located;
launch_file_name: Indicates the file name of the launch file that needs to be launched.
14.2 Write launch file
14.2.1 Launch file of a single node
The format of the launch file is in XML format, and it needs to have a root element. The root element of the launch file is a pair of
xxxxxxxxxx<launch>......</launch>The launch file starts the node program, so the core is one or more nodes. Each node represents the started node program. A node startup must include the following points:
- pkg: the name of the function package where the node is located
- type: the name of the executable program running the node
- name: The name of the node does not have to be the same as the name of the node defined in the program, it can be named arbitrarily
A necessary node element in the launch file has the following format:
xxxxxxxxxx<node pkg="pkg_name" type="excutable_name" name="node_name"/>Note that the last / is essential, of course, you can also write,
xxxxxxxxxx<nodepkg="pkg_name" type="excutable_name" name="node_name"></node>
We use the following command to create a function named learn_launch in the ros_ws/src directory and enter it in the terminal,
xxxxxxxxxxcd ~/ros_ws/src/catkin_create_pkg learn_launch std_msgs rospy roscpp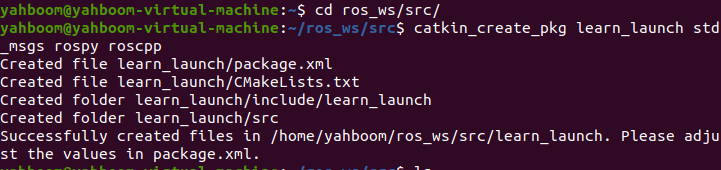
Then in the learn_launch directory, create a new folder named launch and enter in the terminal,
xxxxxxxxxxcd ~/ros_ws/src/learn_launchmkdir launchGo back to the workspace directory to compile,
xxxxxxxxxxcd ~/ros_wscatkin_makeThen create a new file in the launch folder, the file name is turtle_node.launch, and put the following content into it,
xxxxxxxxxx<launch> <node pkg="turtlesim" type="turtlesim_node" name="turtle"/> </launch>Exit after saving, then run the launch file and enter in the terminal,
xxxxxxxxxxroslaunch learn_launch turtle_node.launch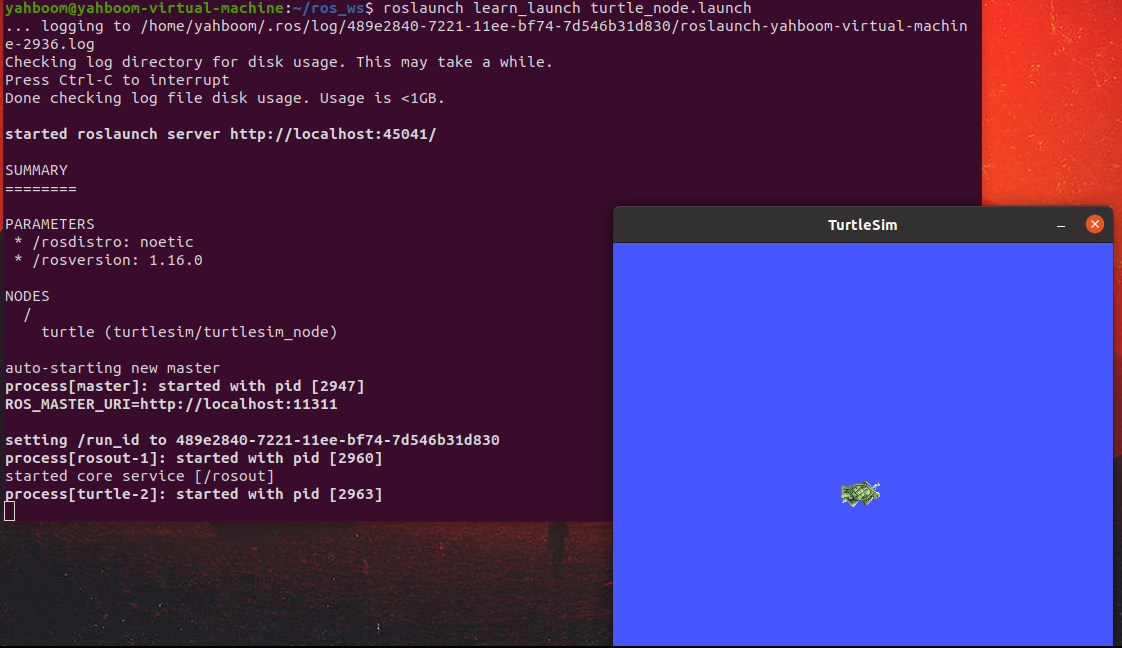
As shown in the picture above, after launch is run, roscore will be automatically turned on, and then the baby turtle program will be run to generate a baby turtle.
14.2.2 Launch files of multiple nodes
We write a launch file. This launch file starts two nodes, one is the node that generates the little turtle, and the other is the node that runs the keyboard to control the little turtle. In the launch folder, create a new file named turtle_ctrl.launch and copy the following content into it,
xxxxxxxxxxroslaunch learn_launch turtle_ctrl.launch
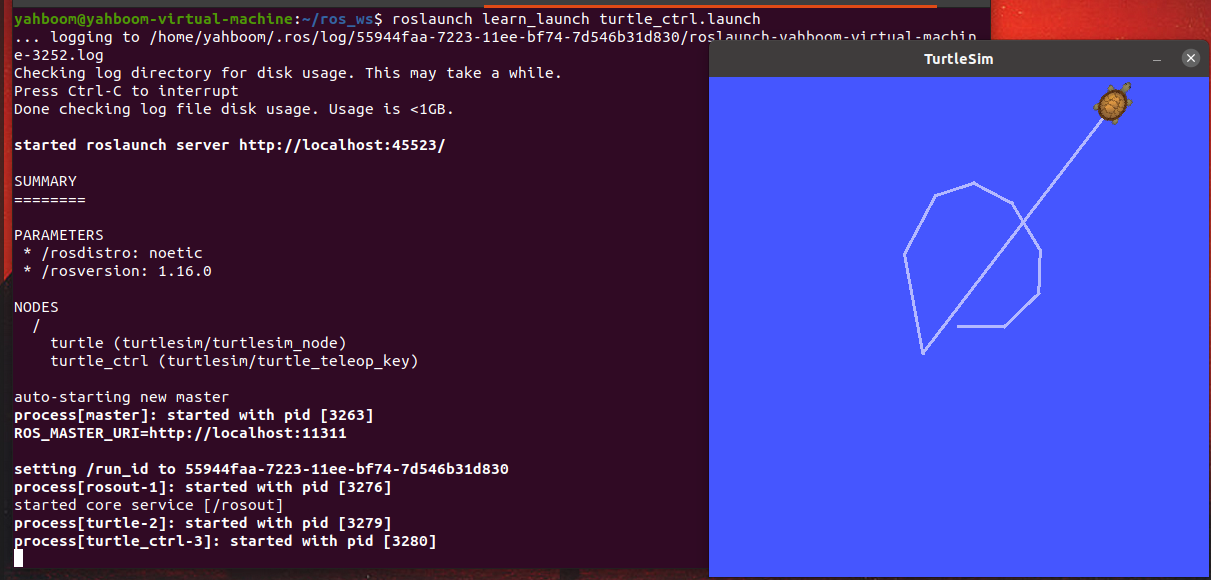
After running, click on the terminal interface and press the up, down, left and right keys on the keyboard to control the movement of the turtle. We can use the rosnode list command to see which nodes are currently running, and enter in the terminal,
xxxxxxxxxxrosnode list

/turtle and /turtle_ctrl are the corresponding turtle nodes and control nodes, and the corresponding names are the value of node's name in the launch file code.
14.2.3 Load and run the launch file in the launch file
In the launch file, you can not only run the node, but also load and run the launch file, that is, nested use. The tag needed here is
xxxxxxxxxx<include file=”$(find package_name)/launch/launch_file_name”/>package_name: Indicates the function package where the launch file is located
launch_file_name: Indicates the file name of the launch file that needs to be run.
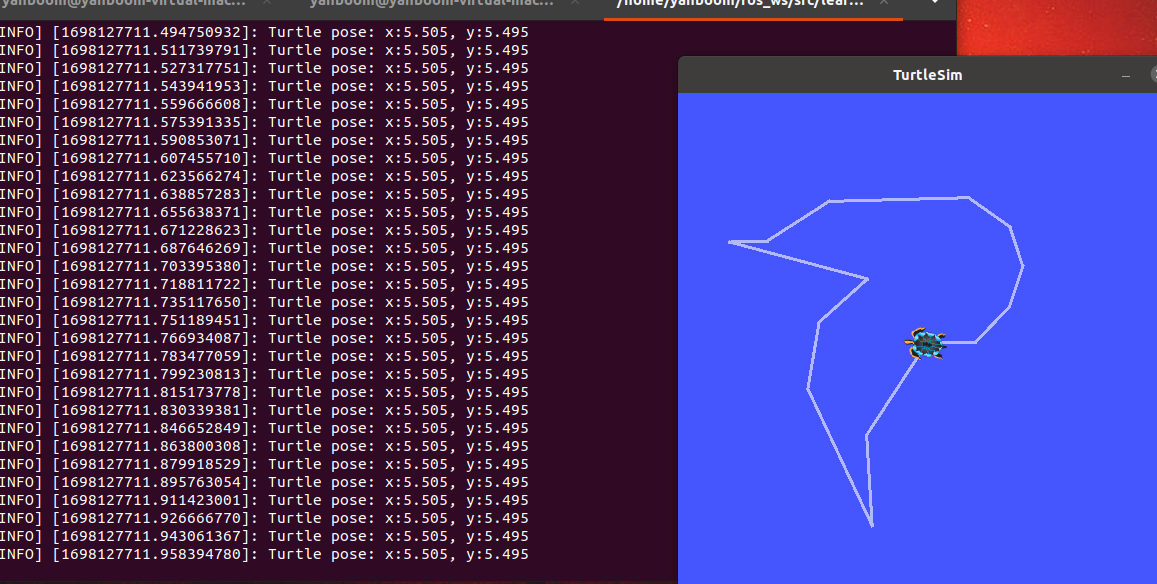
We create a new file and name it listen_turtle_pose.launch. This program implements the following functions: after the program is run, a small turtle will be generated, and the terminal will print out the xy coordinates of the small turtle;Click on the terminal, we control the little turtle through keyboard control, and when the little turtle moves, the terminal will print out the xy coordinates of the little turtle in real time. Copy and paste the following content into the listen_turtle_pose.launch file,
xxxxxxxxxx<launch> <include file="$(find learn_launch)/launch/turtle_ctrl.launch"/> <node pkg="learn_topic" type="turtle_pose_subscriber" name="turtle_pose" output="screen"/> </launch>Here, a parameter output is added when node is started, because we want to print this information on the terminal.So it is output to the screen screen and there are two values: log is output to the log, and none has no output.
14.2.4 launch file loading parameters
In the launch file, there are two variables representing parameters, namely arg and param. Their meanings are as follows:
arg
Used for parameterized parameters, different parameter values can be passed in at startup, including the following two parts:
- name:the name of the parameter
- default:the default value of the parameter
When used, the format is as follows:
xxxxxxxxxx<arg name="arg_name" default="default_value"/>param
Used to set parameters in the parameter server (Parameter Server), including the following two parts:
- name:the name of the parameter
- value:the value of the parameter
When used, the format is as follows:
xxxxxxxxxx<param name="parameter_name" value="parameter_value"/>
Summary: arg is used in the launch file and can be flexibly configured. The value of arg can be used as the value of param; param is used in the parameter server of the node, that is, used in the node program. The parameter server will be mentioned in the following tutorials.
To give an example of how to use these two, create a launch file in the launch folder and name it set_backgroud_color.launch.After this program is started, the color of the background plate that generates the little turtle will be modified according to the parameters we set. Copy the following content to the set_backgroud_color.launch file,
xxxxxxxxxx<launch> <arg name="r_value" default="100"/> <arg name="g_value" default="0"/> <arg name="b_value" default="100"/> <node pkg="turtlesim" type="turtlesim_node" name="turtle"> <param name="/background_r" value="$(arg r_value)"/> <param name="/background_g" value="$(arg g_value)"/> <param name="/background_b" value="$(arg b_value)"/> </node></launch> Save and exit, then enter in the terminal,
xxxxxxxxxxroslaunch learn_launch set_backgroud_color.launch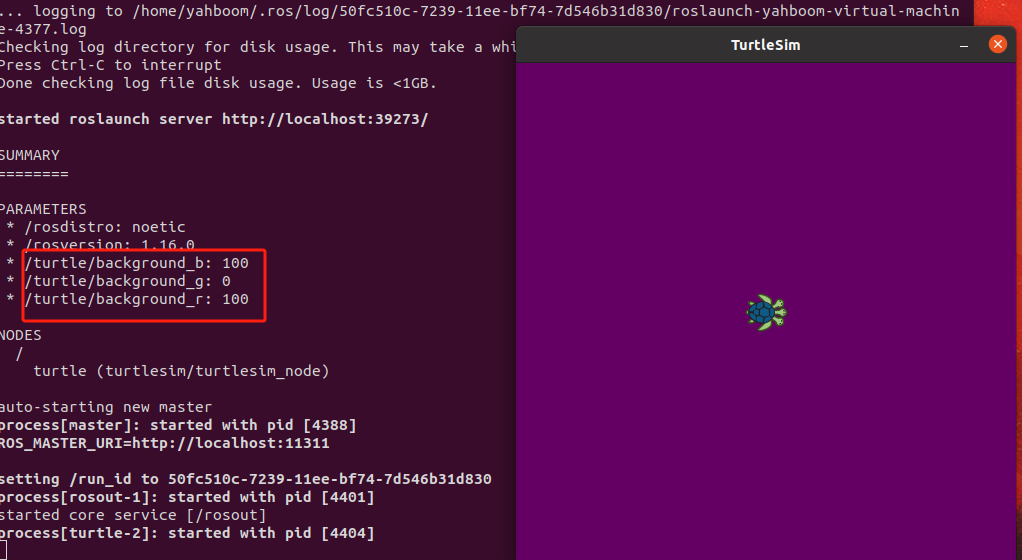
The color of the background plate becomes the color with the rgb value we set as (100, 0, 100). We can also modify the rgb value on the command line during startup, as long as we bring parameters, for example, terminal input,
xxxxxxxxxxroslaunch learn_launch set_backgroud_color.launch b_value:=2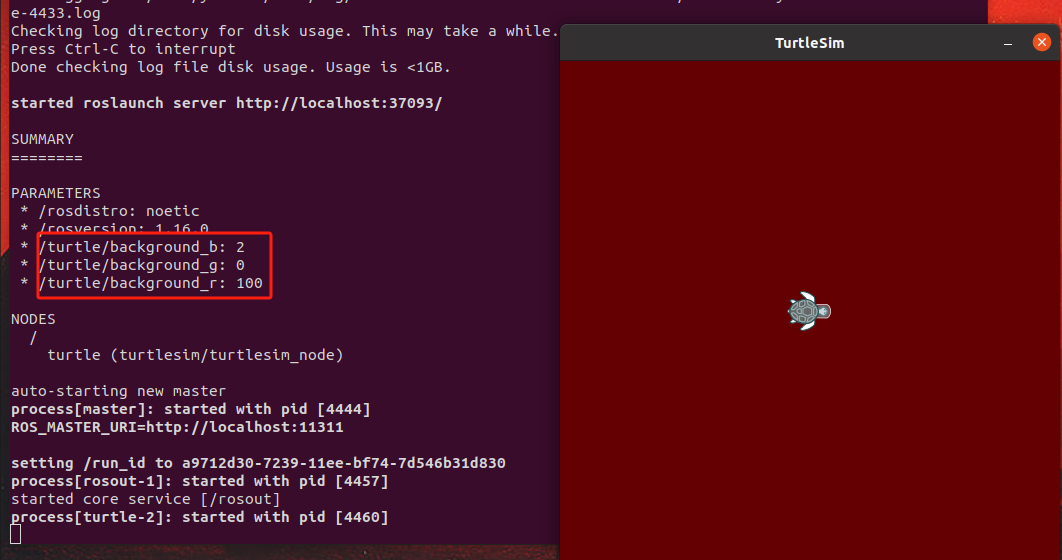
It can be seen that when we start the command, we change the value of b_value to 2 and then pass it in. How are the parameters passed here? In the node tag, we set three parameters, namely /background_r, /background_g and /background_b. Their value values are $(arg r_value), $(arg g_value) and $(arg b_value) respectively;Let’s look at the default values of r_value, g_value and b_value, which are 100, 0 and 100 respectively in the arg tag above. This is very clear: We define the value in arg, and then pass the value defined in arg to the value in param.Just add $(arg g_value) when quoting. Of course, you don’t have to, that is, write In this case, the parameter value of /background_g is fixed at 255.
14.2.5 Launch file remaps topic name
In the actual development process, the original preset topic names often need to be modified based on the topic names of other nodes. Source code modification is troublesome. The C++ version of the code still needs to be compiled after modification, which is more troublesome.But in the launch file, you can use the
xxxxxxxxxx<remap from="original_topic" to="remapped_topic" />original_topic: the topic name set in the original node program
remapped_topic: mapped topic name
Here is an example of how to use the
xxxxxxxxxxroslaunch learn_launch turtle_node.launchAfter running successfully, enter rostopic list to see, enter in the terminal,
xxxxxxxxxxrostopic list
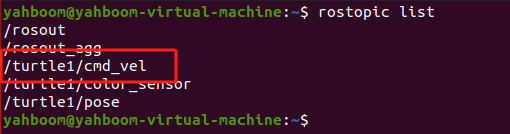
The speed control topic at this time is /turtle1/cmd_vel, paste the following code into remap_topic.launch,
xxxxxxxxxx<launch> <node pkg="turtlesim" type="turtlesim_node" name="turtle"> <remap from="/turtle1/cmd_vel" to="/ctrl_vel"/> </node> </launch>Exit after saving, close the original Little Turtle launch, and enter in the terminal,
xxxxxxxxxxroslaunch learn_launch remap_topic.launchAfter running successfully, enter rostopic list to see, enter in the terminal,
xxxxxxxxxxrostopic list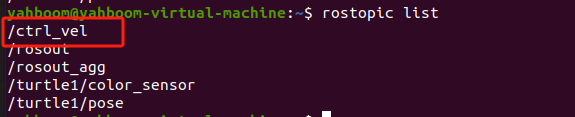
At this time, the original /turtle1/cmd_vel is gone and mapped to /ctrl_vel. This is because we remapped the topic in the launch file.
xxxxxxxxxx<remap from="/turtle1/cmd_vel" to="/ctrl_vel"/>14.2.6. Use conditional statements in launch files
In the launch file, we can add conditional judgment to select the node program to start. The conditional judgment is controlled by if and unless in the launch file. Specific usage examples are as follows:Create a new file in the launch folder and name it condition_ctrl_turtle.launch. After the program is run, based on the actual parameters, determine whether to start the keyboard control node to control the turtle. Copy the following content to condition_ctrl_turtle.launch.
xxxxxxxxxx<launch> <arg name="ctrl_node" default="true"/> <node pkg="turtlesim" type="turtlesim_node" name="turtle"/> <node pkg="turtlesim" type="turtle_teleop_key" name="turtle_ctrl" if="$(eval arg('ctrl_node') == true)"/></launch>After saving, exit and enter the following command to run,
xxxxxxxxxxroslaunch learn_launch condition_ctrl_turtle.launchAfter the program is running, we enter rosnode list to see which nodes are started.
xxxxxxxxxxrosnode list

As you can see, we have started the control node of the little turtle. If we click on the launch terminal, we can use up, down, left, and right to control the movement of the little turtle. Let's try setting the parameter ctrl_node to false, close the launched launch file, and enter in the terminal,
xxxxxxxxxxroslaunch learn_launch condition_ctrl_turtle.launch ctrl_node:=falseAfter the program is running, we enter rosnode list to see which nodes are started.
xxxxxxxxxxrosnode list

The query found that the control node is not running, because the if judgment is that the keyboard control program is started when the parameter ctrl_node is true.
xxxxxxxxxx<node pkg="turtlesim" type="turtle_teleop_key" name="turtle_ctrl" if="$(eval arg('ctrl_node') == true)"/>The judgment inside if is true, and the judgment inside unless is false
14.2.7 Using namespace in launch file
There is a concept of group in the launch file, the label is
In the group, add the namespece parameter, which means that the namespace is added in front of all nodes in the group. The format used is as follows:
xxxxxxxxxx<group ns="namespace"> <node pkg=".." .../> </group>Change the namespace to custom content. For example, create a new launch file under the launch file and name it group_turtle.launch. Copy the following content to group_turtle.launch.
xxxxxxxxxx<launch> <group ns="robot1"> <node pkg="turtlesim" type="turtlesim_node" name="turtle"/> </group> <group ns="robot2"> <node pkg="turtlesim" type="turtlesim_node" name="turtle"/> </group></launch>Save and exit. After the program runs, two windows will open and two turtles will be generated respectively.
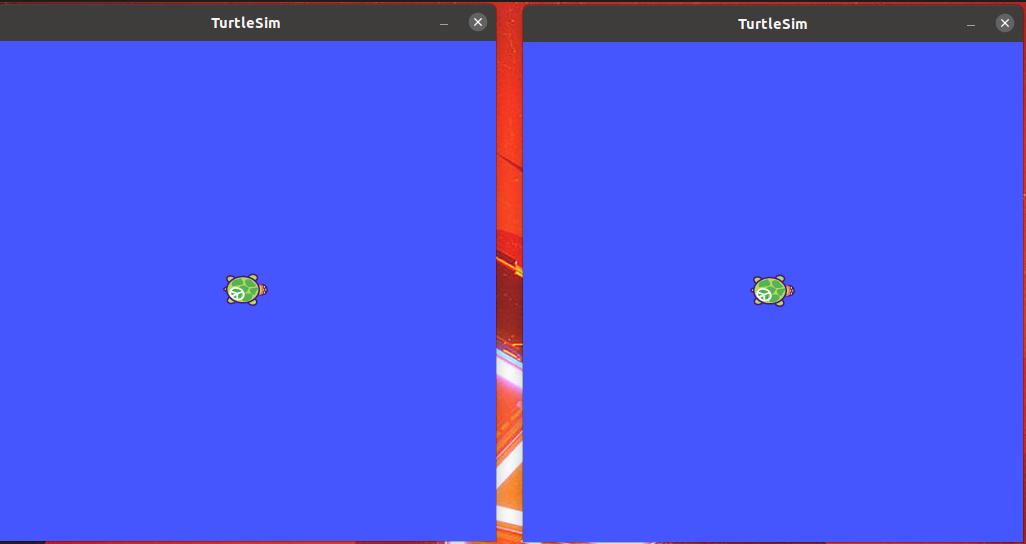
Enter rosnode list to query the currently running node information.
xxxxxxxxxxrosnode list

The query found that the nodes with two little turtles are /robot1/turtle and /robot2/turtle. The names of these two nodes are preceded by /robot1 and /robot2 respectively to distinguish the two nodes.Let's take a look at the topic again and enter rostopic list to query the current topic.
xxxxxxxxxxrostopic list
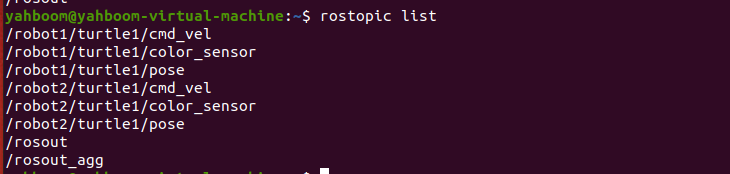
The query revealed that /robot1 and /robot2 were also added as distinctions. We added ns to group to add namespaces before all node names.
xxxxxxxxxx<group ns="robot1"><group ns="robot2">