yahboom
HomeLearn
Solution
Blog
Online Store
About Us
EN/中文
NUWA-HP60C Depth Camera📖
1.ROS1-Depth camera usage course
  • 1. Environment Construction
  • 2. Camera recording video
2.ROS1-ROS+OpenCV application
  • 1.ROS+Opencv Basics
  • 2.Face recognition
  • 3.Harris corner detection
  • 4. Target Tracking Algorithm
  • 5. Contour moment
  • 6. Polygonal Outlines
  • 7. Discrete Fourier Transform Algorithm
  • 8. Edge Detection Algorithm
  • 9. Face Detection Algorithm
  • 10. Optical flow detection algorithm
  • 11. Contour Detection
  • 12. General contour detection
  • 13. Feature point tracking
  • 14.HLS Color Filtering
  • 15. Hough circle detection
  • 16. Hough Line Detection
  • 17.HSV color filtering
  • 18.LK optical flow algorithm
  • 19. Human Detection Algorithm
  • 20. Phase-correlated displacement detection
  • 21. Image pyramid sampling algorithm
  • 22.RGB color filtering
  • 23. Clear background detection algorithm
  • 24. Streamlining the optical flow algorithm
  • 25. Simple Filter
  • 26. Threshold Image Processing
  • 27. Watershed segmentation algorithm
3.ROS1-Mediapipe course
  • 1.Hand detection
  • 2.Posture detection
  • 3.Overall detection
  • 4.Face Mesh
  • 5.Face recognition
  • 6.Face effects
  • 7.Face Detection
  • 8.3D Object Recognition
  • 9.Paintbrush
  • 10.Finger control
  • 11.Gesture Recognition
4.ROS1-Depth camera application course
  • 1. Camera calibration
  • 2. QR code
  • 3. Human Pose Estimation
  • 4. Target detection
  • 5. Point cloud data viewing
  • 6. AR Vision
  • 7.AR QR code tracking
  • 8. Color Tracking
  • 9. Object Tracking
5.ROS1-Linux basic course
  • 1.Introduction to Linux system
  • 2.Ubuntu file system
  • 3.Ubuntu common commands
  • 4.Ubuntu common editors
  • 5.Ubuntu software operation commands
  • 6.Virtual machine installation
  • 7.SSH remote control
  • 8.VNC remote control
  • 9.Transfer files remotely
  • 10.Driver library and communication
  • 11.Static IP and hotspot mode
  • 12.Bind device ID
  • 13.Capacity expansion and resource allocation
  • 14.Update system software sources
  • 15.Set root user password
  • 16.sudo free password
  • 17.Connect to WiFi network
  • 18.View system version
  • 19.Customized service management
  • 20.Back up system image
6.ROS1-OpenCV course
  • 1.Opencv Source CV Introduction
  • 2.Image reading and display
  • 3.Picture writing
  • 4.Picture Quality
  • 5.Pixel Operation
  • 6.Picture scaling
  • 7.Picture cutting
  • 8.Picture translation
  • 9.Picture mirroring
  • 10.Affine transformation
  • 11.Picture rotation
  • 12.Perspective transformation
  • 13.Grayscale processing
  • 14.Image binarization
  • 15.Edge detection
  • 16.Line segment drawing
  • 17.Rectangle and circle drawing
  • 18.Text and picture drawing
7.ROS1 basic course
  • 1.ROS introduction
  • 2.ROS installation
  • 3.ROS common command tools
  • 4.ROS workspace
  • 5.ROS function package
  • 6.ROS node
  • 7.ROS topic publisher
  • 8.ROS topic subscribers
  • 9.ROS service client
  • 10.ROS service server
  • 11.ROS action client
  • 12.ROS action server
  • 13.ROS custom message reception
  • 14.ROS-launch file
  • 15.ROS-TF transformation
  • 16.ROS parameter service
  • 17.ROS-rviz use
  • 18.ROS-rqt tool usage
  • 19.Topic message recording and playback
  • 20.urdf model introduction
  • 21.gazebo introduction
  • 22.ROS distributed communication
8.ROS2-Depth Camera Application Course
  • 1. Use of Depth Camera
  • 2. Camera internal parameter calibration
  • 3. Color tracking
  • 4. KCF Object Tracking
  • 5. ORBSLAM2 Basics
  • 6. ORB_SLAM2 PCL Mapping
  • 7. ORB_SLAM2 Octomap Mapping
9.ROS2-OpenCV course
  • 1. ROS+OpenCV application
  • 2. QR code creation and recognition
  • 3. AR Vision
10.ROS2-Mediapipe course
  • 1.Hand detection
  • 2.Posture detection
  • 3.Overall detection
  • 4.Face Mess
  • 5.Face recognition
11.ROS2 basic course
  • 1.Introduction to ROS2
  • 2.ROS2 install Humble
  • 3.ROS2 development environment
  • 4.ROS2 workspace
  • 5.ROS2 function package
  • 6.ROS2 node
  • 7.ROS2 topic communication
  • 8.ROS2 service communication
  • 9.ROS2 action communication
  • 10.ROS2 custom interface message
  • 11.ROS2 parameter service case
  • 12.ROS2 meta-function package
  • 13.ROS2 distributed communication
  • 14.ROS2 DDS
  • 15.ROS2 time related API
  • 16.ROS2 common command tools
  • 17.ROS2 rviz2 use
  • 18.ROS2 rqt toolbox
  • 19.ROS2 Launch startup file configuration
  • 20.ROS2 recording and playback tool
  • 21.ROS2 URDF model
  • 22.ROS2 Gazebo simulation platform
  • 23.ROS2 TF2 coordinate transformation
5.Bracket installation video
  • Bracket installation video
Download
  • ROS1_VM
  • ROS2_VM
  • ROS1_Code
  • ROS2_Code
  • DataSheet
  • 3D_Model_File
  • Windows Software
  • ROS2_Basic_VM
Download ZIP

Welcome to NUWA-HP60C Depth Camera repository

19.Topic message recording and playback

19.Topic message recording and playback

ros provides the rosbag tool for recording and playing data. It records the data in the specified rostopic into a data package with a .bag suffix, which facilitates offline analysis and processing of the data.

19.1. rosbag command

The commands of rosbag are as follows:
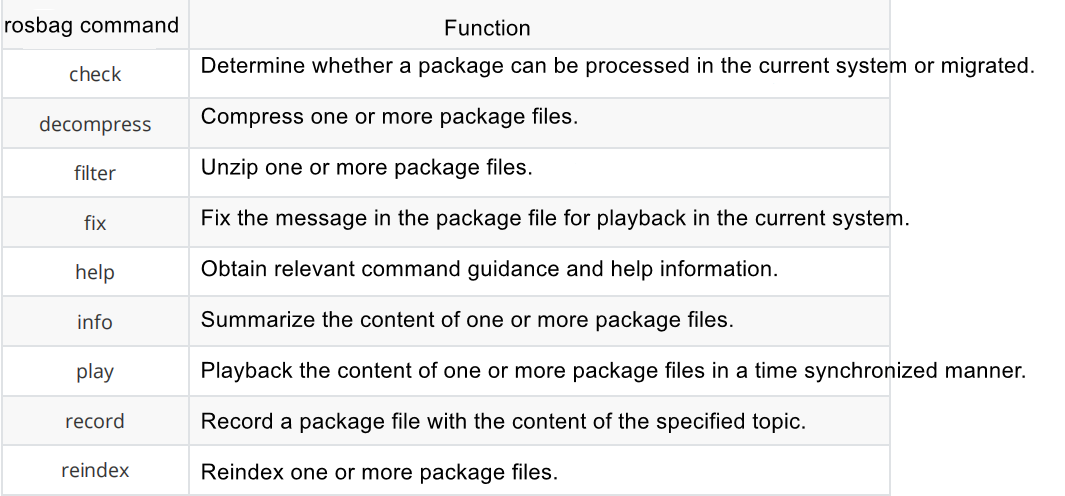
image-20231024192036060

Commonly used ones are record and play, which are recording messages and playing messages respectively.

19.1.2 record recording message

The command format of rosbag record recording message is,

rosbag record /topic_name

Among them, /topic_name is the name of the topic where the message needs to be recorded. If the parameter -a is provided, for example,

xxxxxxxxxx
rosbag record -a

With the parameter -a, it means recording all current topic data without specifying a certain topic. Of course, you can also record multiple topics that you are interested in, for example,

xxxxxxxxxx
rosbag record /topic_name1  /topic_name2 

When you want to stop recording, press ctrl c to stop. The data packet will be named after the current time, with the suffix .bag, and saved in the terminal directory where the recording command is run. If you want to specify the name of the generated data packet, add the parameter -O on the command line, for example,

xxxxxxxxxx
rosbag record -O save_topic.bag /topic_name

19.1.3 View packet information

The command format of rosbag info to view packet information is,

xxxxxxxxxx
rosbag info file_name.bag

Open the terminal in the folder where the data package is located, and then enter the above command to see the information of the data package, including topic name, size, data type, etc., for example,
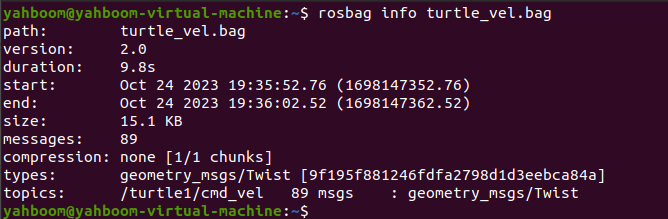
image-20231024193711156

You can also use the parameter -y to convert it into YAML format for viewing.

xxxxxxxxxx
rosbag info -y file_name.bag

for example,
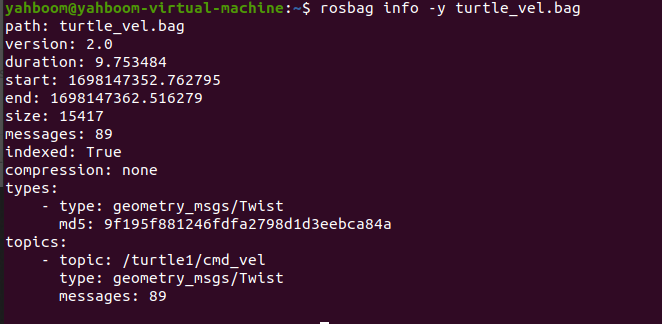
image-20231024193908356

19.1.4. Play data packets

The command format of rosbag play to play data packets is,

xxxxxxxxxx
rosbag play file_name.bag

Open the terminal in the folder where the data package is located, and then enter the above command to play the topic information recorded in the data package. It can be understood as a publisher publishing information according to the default frequency.If you want to change the rate of message publishing, you need to add -r, followed by a number corresponding to the playback rate.

xxxxxxxxxx
rosbag play -r 2 file_name.bag

If you want to loop playback, add the -l parameter.

xxxxxxxxxx
rosbag play -l  file_name.bag  

If the recorded data packet contains multiple data and you only want to play the topic of interest, you need to add the --topic command.

xxxxxxxxxx
rosbag play file_name.bag --topic /topic_name

During the playback command, if you want to pause playback midway, you can press the space bar to pause or continue playback.

19.2 rosbag instance operation

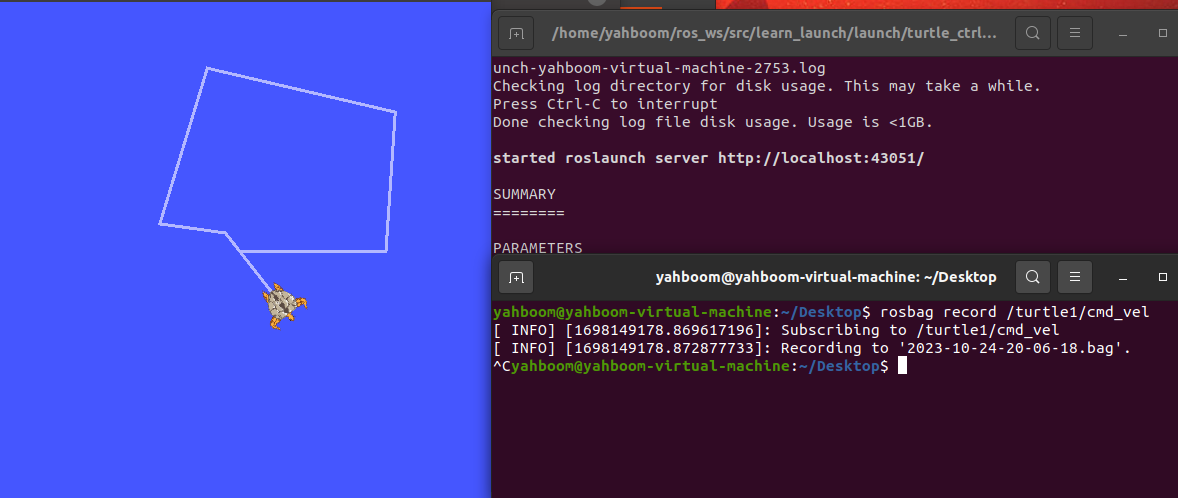
We first run the program to control the little turtle, and record the speed topic of the little turtle at this time, and then play it again and enter in the terminal,

xxxxxxxxxx
roslaunch learn_launch turtle_ctrl.launch

Then enter the following command to record the speed topic data of the little turtle,

xxxxxxxxxx
rosbag record /turtle1/cmd_vel

image-20231024200656639

Click on the terminal that starts the launch file, and press up, down, left, and right to control the movement of the little turtle. After the exercise is completed, click on the terminal to start the command to record the topic, ctrl c to close the recording, and a data packet (.bag suffix) with time as the unit will be generated in the terminal directory. Here I am in the ~/Desktop directory. The generated package name is 2023-10-24-20-06-18.bag.

Also use ctrl c to close turtle_ctrl.launch, then run only the small turtle node and enter in the terminal,

xxxxxxxxxx
roslaunch learn_launch turtle_node.launch

Open another terminal, use the cd command to switch to the directory of the data packet just recorded, and enter,

xxxxxxxxxx
rosbag play 2023-10-24-20-06-18.bag #Replace the bag here with the name you just recorded
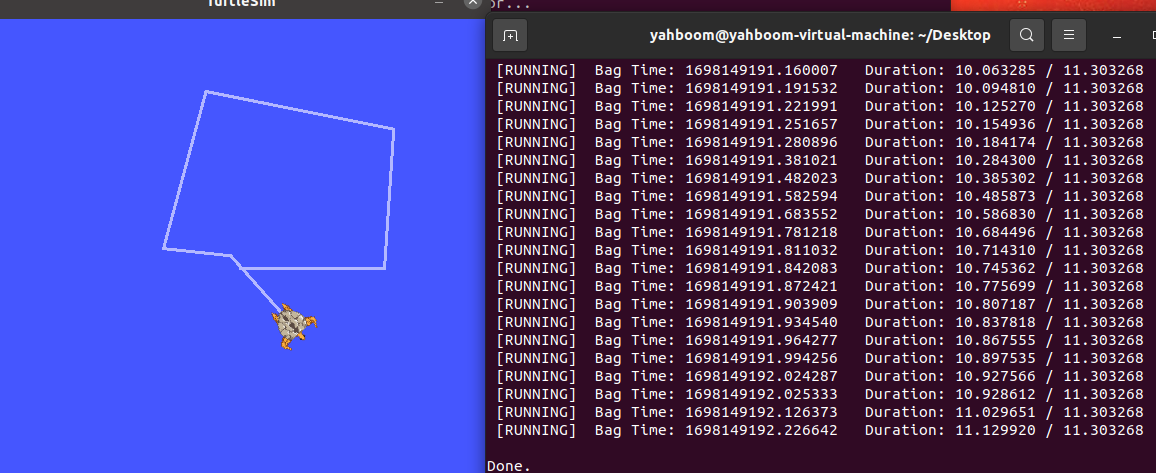
image-20231024202050356

As shown in the figure above, the terminal that plays the data packet will continue to play (publish) the data. After receiving the speed control instruction, the little turtle starts moving according to the speed value.

You can use rosbag info to check the relevant information of this data packet and enter it in the terminal.

xxxxxxxxxx
rosbag info 2023-10-24-20-06-18.bag #Replace the bag here with the name you just recorded
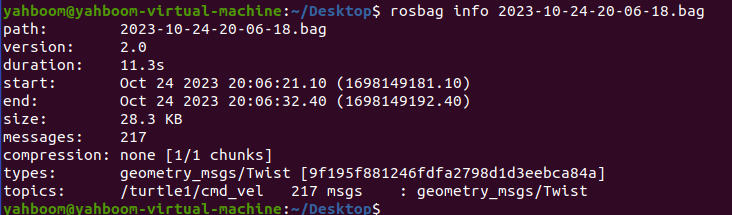
image-20231024202653591

ROS-rqt tool usage
urdf model introduction

COMPANY

  • About us
  • Team Style
  • Blog

LEARNING & EXPLORATION

  • Tutorials
  • Edge AI hardware
  • Educational robots
  • Embedded intelligent hardware

WHERE TO BUY

  • Yahboom Online Store
  • Amazon
  • Alibaba
  • AliExpress
  • Mercado

TECHNOLOGY SUPPORT

  • Email: support@yahboom.com

BE A DISTRIBUTOR

  • Email: sales@yahboom.com
QR Code

Copyright © 2017-2026 Yahboom. All Rights Reserved.

EN/中文