yahboom
HomeLearn
Solution
Blog
Online Store
About Us
EN/中文
NUWA-HP60C Depth Camera📖
1.ROS1-Depth camera usage course
  • 1. Environment Construction
  • 2. Camera recording video
2.ROS1-ROS+OpenCV application
  • 1.ROS+Opencv Basics
  • 2.Face recognition
  • 3.Harris corner detection
  • 4. Target Tracking Algorithm
  • 5. Contour moment
  • 6. Polygonal Outlines
  • 7. Discrete Fourier Transform Algorithm
  • 8. Edge Detection Algorithm
  • 9. Face Detection Algorithm
  • 10. Optical flow detection algorithm
  • 11. Contour Detection
  • 12. General contour detection
  • 13. Feature point tracking
  • 14.HLS Color Filtering
  • 15. Hough circle detection
  • 16. Hough Line Detection
  • 17.HSV color filtering
  • 18.LK optical flow algorithm
  • 19. Human Detection Algorithm
  • 20. Phase-correlated displacement detection
  • 21. Image pyramid sampling algorithm
  • 22.RGB color filtering
  • 23. Clear background detection algorithm
  • 24. Streamlining the optical flow algorithm
  • 25. Simple Filter
  • 26. Threshold Image Processing
  • 27. Watershed segmentation algorithm
3.ROS1-Mediapipe course
  • 1.Hand detection
  • 2.Posture detection
  • 3.Overall detection
  • 4.Face Mesh
  • 5.Face recognition
  • 6.Face effects
  • 7.Face Detection
  • 8.3D Object Recognition
  • 9.Paintbrush
  • 10.Finger control
  • 11.Gesture Recognition
4.ROS1-Depth camera application course
  • 1. Camera calibration
  • 2. QR code
  • 3. Human Pose Estimation
  • 4. Target detection
  • 5. Point cloud data viewing
  • 6. AR Vision
  • 7.AR QR code tracking
  • 8. Color Tracking
  • 9. Object Tracking
5.ROS1-Linux basic course
  • 1.Introduction to Linux system
  • 2.Ubuntu file system
  • 3.Ubuntu common commands
  • 4.Ubuntu common editors
  • 5.Ubuntu software operation commands
  • 6.Virtual machine installation
  • 7.SSH remote control
  • 8.VNC remote control
  • 9.Transfer files remotely
  • 10.Driver library and communication
  • 11.Static IP and hotspot mode
  • 12.Bind device ID
  • 13.Capacity expansion and resource allocation
  • 14.Update system software sources
  • 15.Set root user password
  • 16.sudo free password
  • 17.Connect to WiFi network
  • 18.View system version
  • 19.Customized service management
  • 20.Back up system image
6.ROS1-OpenCV course
  • 1.Opencv Source CV Introduction
  • 2.Image reading and display
  • 3.Picture writing
  • 4.Picture Quality
  • 5.Pixel Operation
  • 6.Picture scaling
  • 7.Picture cutting
  • 8.Picture translation
  • 9.Picture mirroring
  • 10.Affine transformation
  • 11.Picture rotation
  • 12.Perspective transformation
  • 13.Grayscale processing
  • 14.Image binarization
  • 15.Edge detection
  • 16.Line segment drawing
  • 17.Rectangle and circle drawing
  • 18.Text and picture drawing
7.ROS1 basic course
  • 1.ROS introduction
  • 2.ROS installation
  • 3.ROS common command tools
  • 4.ROS workspace
  • 5.ROS function package
  • 6.ROS node
  • 7.ROS topic publisher
  • 8.ROS topic subscribers
  • 9.ROS service client
  • 10.ROS service server
  • 11.ROS action client
  • 12.ROS action server
  • 13.ROS custom message reception
  • 14.ROS-launch file
  • 15.ROS-TF transformation
  • 16.ROS parameter service
  • 17.ROS-rviz use
  • 18.ROS-rqt tool usage
  • 19.Topic message recording and playback
  • 20.urdf model introduction
  • 21.gazebo introduction
  • 22.ROS distributed communication
8.ROS2-Depth Camera Application Course
  • 1. Use of Depth Camera
  • 2. Camera internal parameter calibration
  • 3. Color tracking
  • 4. KCF Object Tracking
  • 5. ORBSLAM2 Basics
  • 6. ORB_SLAM2 PCL Mapping
  • 7. ORB_SLAM2 Octomap Mapping
9.ROS2-OpenCV course
  • 1. ROS+OpenCV application
  • 2. QR code creation and recognition
  • 3. AR Vision
10.ROS2-Mediapipe course
  • 1.Hand detection
  • 2.Posture detection
  • 3.Overall detection
  • 4.Face Mess
  • 5.Face recognition
11.ROS2 basic course
  • 1.Introduction to ROS2
  • 2.ROS2 install Humble
  • 3.ROS2 development environment
  • 4.ROS2 workspace
  • 5.ROS2 function package
  • 6.ROS2 node
  • 7.ROS2 topic communication
  • 8.ROS2 service communication
  • 9.ROS2 action communication
  • 10.ROS2 custom interface message
  • 11.ROS2 parameter service case
  • 12.ROS2 meta-function package
  • 13.ROS2 distributed communication
  • 14.ROS2 DDS
  • 15.ROS2 time related API
  • 16.ROS2 common command tools
  • 17.ROS2 rviz2 use
  • 18.ROS2 rqt toolbox
  • 19.ROS2 Launch startup file configuration
  • 20.ROS2 recording and playback tool
  • 21.ROS2 URDF model
  • 22.ROS2 Gazebo simulation platform
  • 23.ROS2 TF2 coordinate transformation
5.Bracket installation video
  • Bracket installation video
Download
  • ROS1_VM
  • ROS2_VM
  • ROS1_Code
  • ROS2_Code
  • DataSheet
  • 3D_Model_File
  • Windows Software
  • ROS2_Basic_VM
Download ZIP

Welcome to NUWA-HP60C Depth Camera repository

3.ROS2 development environment

3. ROS2 development environment

In theory, you can write basic ROS2 programs in Notepad, but to improve development efficiency, you can install the integrated development environment (VSCode).

1. Using the VSCode development environment

  • Search for "VSCode" in your browser, select the installation package for your platform, download and install it.

image-20250814155106188

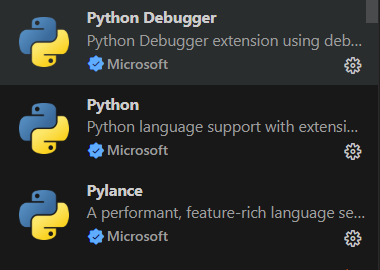
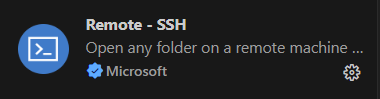
  • Install commonly used plug-ins to improve work efficiency.
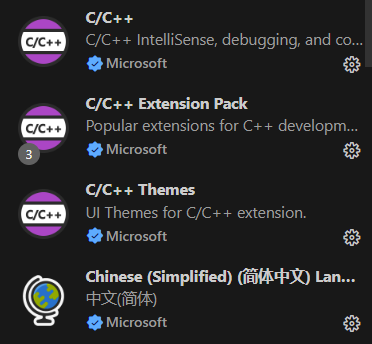
image-20250814155201019

image-20250814155255572

image-20250814155341084

2. Using the Terminal

In ROS2, you'll frequently use the terminal. We recommend a relatively easy-to-use terminal: Terminator. The results are as follows:
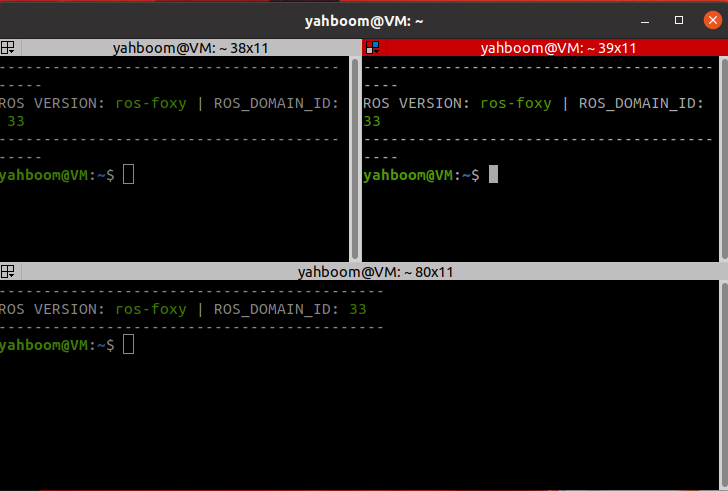
image-20231023123012987

2.1. Installation

xxxxxxxxxx
sudo apt install terminator

2.2. Launching

xxxxxxxxxx
Shortcut `Ctrl+Alt+T` to launch

2.3. Common Terminator Shortcuts

About operations within the same tab:

Alt+Up                          // Move to the upper terminal
Alt+Down                        // Move to the lower terminal
Alt+Left                        // Move to the left terminal
Alt+Right                       // Move to the right terminal
Ctrl+Shift+O                    // Split terminal horizontally
Ctrl+Shift+E                    // Split terminal vertically
Ctrl+Shift+Right                // Move the splitter bar to the right in a vertically split terminal
Ctrl+Shift+Left                 // Move the splitter bar to the left in a vertically split terminal
Ctrl+Shift+Up                   // Move the splitter bar up in a horizontally split terminal
Ctrl+Shift+Down                 // Move the splitter bar down in a horizontally split terminal
Ctrl+Shift+S                    // Hide/Show scroll bars
Ctrl+Shift+F                    //Search
Ctrl+Shift+C                    //Copy the selected content to the clipboard
Ctrl+Shift+V                    //Paste the clipboard content here
Ctrl+Shift+W                    //Close the current terminal
Ctrl+Shift+Q                    //Exit the current window, all terminals in the current window will be closed
Ctrl+Shift+X                    //Maximize the current terminal
Ctrl+Shift+Z                    //Maximize the current terminal and enlarge the font
Ctrl+Shift+N or Ctrl+Tab        //Move to the next terminal
Ctrl+Shift+P or Ctrl+Shift+Tab  //Crtl+Shift+Tab moves to the previous terminal

About operations between tabs:

F11                             //Full screen switch
Ctrl+Shift+T                    //Open a new tab
Ctrl+PageDown                   //Move to the next tab
Ctrl+PageUp                     //Move to the previous tab
Ctrl+Shift+PageDown             //Exchange the current tab with the tab after it
Ctrl+Shift+PageUp               //Exchange the current tab with the tab before it
Ctrl+Plus (+)                   //Increase the font
Ctrl+Minus (-)                  //Decrease the font
Ctrl+Zero (0)                   // Restore the font to its original size
Ctrl+Shift+R                    // Reset the terminal state
Ctrl+Shift+G                    // Reset the terminal state and clear the screen
Super+g                         // Bind all terminals so that input into one terminal is automatically input into all terminals
Super+Shift+G                   // Unbind
Super+t                         // Bind all terminals in the current tab so that input into one terminal is automatically input into the other terminals
Super+Shift+T                   // Unbind
Ctrl+Shift+I                    // Open a new window; the new window will use the same process as the original window
Super+i                         // Open a new window; the new window will use a different process than the original window

3. Using Git

3.1. Installation

Since daily work involves teamwork and version management, Git is an essential skill. Git is a free and open source distributed version control system. To install Git in Ubuntu:

xxxxxxxxxx
sudo apt install git

3.2. Basic Git Operations

Git's job is to create and save snapshots of your project and compare them with subsequent snapshots.

This chapter introduces commands for creating and committing your project snapshots.

Git uses the following six commands: git clone, git push, git add, git commit, git checkout, and git pull. We'll explain them in detail later.
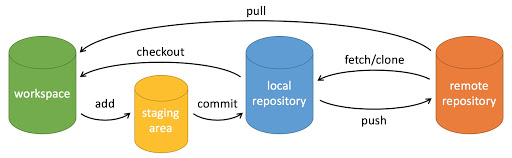
img

Description:

  • workspace: Workspace
  • staging area: Staging area
  • local repository: Repository or local repository
  • remote repository: Remote repository

A simple step-by-step guide:

xxxxxxxxxx
$ git init
$ git add .
$ git commit
  • git init - Initializes the repository.
  • git add . - Adds files to the staging area.
  • git commit - Adds the contents of the staging area to the repository.

3.2.1. Repository Creation Commands

The following table lists the Git commands for creating repositories:

CommandDescription
git initInitializes a repository
git cloneMakes a copy of a remote repository, essentially downloading a project.

3.2.2. Committing and Modifying

Git's job is to create and save snapshots of your project and compare them with subsequent snapshots.

The following table lists the commands for creating and committing snapshots of your project:

CommandDescription
git addAdds files to the staging area
git statusViews the current status of the repository, showing modified files.
git diffCompares file differences, that is, the differences between the staging area and the working directory.
git commitCommits the staging area to the local repository.
git resetRoll back a revision.
git rmRemove a file from the staging area and the working directory.
git mvMove or rename a file in the working directory.
git checkoutSwitch branches.
git switch (introduced in Git 2.23)Switch branches more cleanly.
git restore (introduced in Git 2.23)Revert or undo changes to a file.

3.2.3. Commit Log

CommandDescription
git logView historical commits
git blame <file>View the modification history of a specified file in list form

3.2.4. Remote Operations

CommandDescription
git remoteRemote repository operations
git fetchRetrieve code from a remote repository
git pullDownload and merge remote code
git pushUpload and merge remote code

For more information on using the Git tool, enter git --help in the terminal to view the help documentation.

ROS2 install Humble
ROS2 workspace

COMPANY

  • About us
  • Team Style
  • Blog

LEARNING & EXPLORATION

  • Tutorials
  • Edge AI hardware
  • Educational robots
  • Embedded intelligent hardware

WHERE TO BUY

  • Yahboom Online Store
  • Amazon
  • Alibaba
  • AliExpress
  • Mercado

TECHNOLOGY SUPPORT

  • Email: support@yahboom.com

BE A DISTRIBUTOR

  • Email: sales@yahboom.com
QR Code

Copyright © 2017-2026 Yahboom. All Rights Reserved.

EN/中文